ISE SY-9826 User manual

PRODUCT MAY VARY SLIGHTLY FROM THE ITEM PICTURED DUE TO MODEL UPGRADES.
PLEASE READ THIS INSTRUCTION VERY CAREFULLY BEFORE USING THIS
ITEM. YOU WILL FIND IMPORTANT INFORMATION REGARDING SAFETY OF
YOUR MAGNETIC BIKE.
INSTRUCTION MANUAL
EXERCISE BIKE
SY-9826 (517E)
(ENGLISH)
1.
ENGLISH
100 KG
MAX USER
WEIGHT [email protected]
+33 344 762 166
WWW.ISEFIT.COM

CONTENTS
This device concerned has been manufactured under an EU
Declaration of Conformity and compliance with all relevant EU
Directives, including CE(EN55014-1,EN55014-2);
EN957( EN ISO 20957-1, EN ISO 20957-5)
Please be assured that the box of this product is recycling, the rest of the packaging can be trashed.
In case the product contains batteries, do not trash directly.
DISTRIBUTED BY:
ISE GMBH
THEODOR-HEUSS-STRASSE 7
66130 SAARBRÜCKEN GÜDINGEN.
DEU - DEUTSCHLAND
TEL: +490681 98845400
WWW.ISEFIT.DE
IMPORTER:
SAS ISE
1 CHEMIN D’ARMANCOURT
60200 COMPIÈGNE. FRANCE
TEL: +33 344 762 1 66
PORT.: +33 6 32 91 85 26
CONTACT@ISEFIT.COM
WWW.ISEFIT.COM
WARNING:
A CORRECT LUBRICATION OF THE PRODUCT WITH SILICON OIL OR TEFLON IS REALLY IMPORTANT. THIS LUBRICATION
MUST BE PERFORMED REGULARLY DEPENDING ON EACH PERSON, EVEN BEFORE ITS FIRST USE.
YOU MUST PRESERVE THE ORIGINAL PACKAGING WITH ITS PROTECTIONS, PURCHASE RECEIPT, MANUAL AND
COMPONENTS DURING THE GUARANTEE PERIOD.
CHECK IN THE MANUAL THE MAXIMUM WEIGHT YOUR EQUIPMENT CAN SUPPORT. AN EXCESSIVE WEIGHT COULD
LEAD TO A MALFUNCTION IN THE OPERATING SYSTEM, WHICH WON’T BE COVERED BY THE GUARANTEE.
IMPORTANT SAFETY INSTRUCTIONS
PARTS LIST AND EXPLODED DIAGRAM
INSTALLATION GUIDE
EXERCISE INSTRUCTIONS
RESISTANCE LEVELS
HEART RATE
LEVELLING
CLEANING AND MAINTENANCE
MOVING THE BIKE
CUSTOMER CARE
DISPLAY INSTRUCTIONS
1.
2.
3.
4.
5.
6.
7.
8.
9.
10.
11.
3.
4.
6.
12.
13.
13.
13.
14.
14.
14.
15.
2.
ENGLISH
PRODUCT PARAMETERS
MODEL: SY-9826 (517E)
PRODUCT SIZE: 1200*650*1600MM
RESISTANCE SYSTEM: MAGNETIC
ADJUSTABLE RESISTANCE: 8 LEVELS
MATERIAL: Q235 STEEL, PLASTIC SIDES
MAX. USER WEIGHT: 100 KG
G.W / N.W: 29 KG/26 KG
MANUAL IN FR / EN / DE / ES / IT
TEST STANDARD(S):EN ISO 20957-1, EN ISO 20957-5
CLASS: HC (HOME USE)
Importer:
SAS ISE
1 Chemin d’Armancourt
60200 Compiègne France
TEL : +33 3 44 76 21 66
PORT : +33 6 32 91 85 26
www.isefit.com

1. IMPORTANT SAFETY INSTRUCTIONS
NOTETHE FOLLOWING PRECAUTION BEFORE ASSEMBLING OR OPERATINGTHE MACHINE
1. Assemble the machine exactly as the descriptions in the instruction manual.
2. Check all the screws, nuts and other connections before using the machine for the first time and ensure that
the trainer is in the safe condition.
3. Set up the machine in a dry level place and leave it away from moisture and water.
4. Place a suitable base (e.g. rubber mat, wooden board etc.) beneath the machine in the area of assembly to
avoid dirt and etc..
5. Before beginning training, remove all objects within a radius of 2 meters from the machine.
6. Do not use aggressive cleaning articles to clean the machine, Only use the supplied tools or suitable tools of
your own to assemble the machine or repair any parts of machine. Remove drops of sweat from the machine
immediately after finishing training.
7. Your health can be affected by incorrect or excessive training. Consult a doctor before beginning a training
program. He can define the maximum setting (Pulse. Watts. Duration of training etc) to which you may train
yourself and can get precise information during training. This machine is not suitable for therapeutic purpose.
8. Only do training on the machine when it is in correct working way. Use only original spare parts for any
necessary repairs.
9. This machine can be used for only one person’s training at a time.
10. Wear training clothes and shoes, which are suitable for fitness training with the machine. Your training shoes
should be appropriate for the trainer.
11. If you have a feeling of dizziness, sickness or other abnormal symptoms, please stop training and consult a
doctor asap.
12. People such as children and handicapped persons should only use the machine in the presence of another
person who can give aid and advice.
13. The power of the machine increases with increasing the speed, and the reverse. The machine is equipped
with adjustable knob, which can adjust the resistance. Reduce the resistance by turning the adjusting knob
for the resistance setting towards stage 1. Increase the resistance by turning the adjusting knob for the
resistance setting towards stage 8.
14. The maximum user’s weight is 100kgs/220Lbs.
3.
ENGLISH
CARE MUST BE TAKEN WHEN LIFTING OR MOVING THE EQUIPMENT SO AS NOT TO INJURE YOUR BACK. ALWAYS
USE PROPER LIFTINGTECHNIQUES AND/OR USE ASSISTANCE.

2. PARTS LIST AND EXPLODED DIAGRAM
4.
ENGLISH
4
3
5
6
6
7
8914
11L
12
13
14
11R
13
12
15
53
9
9
18
17 1920
21
8523
24
2420
25L
25R
21
8523
19 18
17
22
26
28 29 30 313228
32 3029 28
31
22 23
34
33
35
33
22
23
36
37
37
38 39
40
30
41 42L
32
43
44
32
31 41
30
45
28
46L4748 49L 5051L
51R50
49R484746R
41 42R
43
32
28
45
30
32
31
10
16
5455
1
1b 1a
2
26
58
52
80 81 82 83

5.
ENGLISH
64 63 65
66
67 77 68
606162
63 64
56
56
64
90
91
75
92 78
75
79
76
69
72
74
69 73
73
70
70
71
93
86
27
91 94 95
88
89
87
40
58 59L
57
57
59R
84

6.
ENGLISH
Nº NAME QTY. Nº NAME QTY.
1 COMPUTER 1 49 U BRACKET 2
2 SCREW M5 4 50 SPRING WASHER 1/2’’ 2
3 PULSE 2 51 NYLON NUT(L/R) 1/2’’ 2
4 MIDDLE HANDLEBAR 1 52 ARC WASHER D19 2
5 SCREW ST4.2X19 2 53 TENSION CONTROL 1
6 END CAP 25 2 54 SCREW M5 1
7 SMALL COVER 1 55 ARC WASHER D6 1
8 BOLT M8X30 2 56 CROSS WRENCH S13-14-15 1
9 ARC WASHER D8 4 57 ALLEN WRENCH S6 1
10 FOAM GRIP 2 58 ALLEN WRENCH S8 1
11 HANDLEBAR (L/R) 2 59 OPEN-END WRENCH S17-19 1
12 FOAM GRIP 2 60 NUT 1
13 END CAP 28 2 61 WASHER 1
14 STOPPLE 12.6X 6 2 62 LEFT COLLAR HOUSING 1
15 UPRIGHT POST 1 63 COLLAR BALL 2
16 WIRE 1 64 COLLAR HOUSING 2
17 END CAP S13 2 65 RIGHT COLLAR HOUSING 1
18 BOLT M8X16 2 66 WASHER 1
19 WASHER D8X 32X2 2 67 CHAIN WHEEL 1
20 BUSHING 32X 19X28 4 68 BELT 1
21 BOLT M8X40 4 69 U BRACKET 2
22 ARC WASHER D8X 20X1.5XR30 8 70 BEARING 2
23 DOMED NUT M8 8 71 AXLE 1
24 PLASTIC INSERT 2 72 NUT M10 2
25 LOWER HANDLEBAR(L/R) 2 73 NUT M10 2
26 SCREW M8X16XS6 4 74 FLYWHEEL 1
27 AXLE 1 75 NYLON NUT M8 2
28 END CAP S17 6 76 TENSION SPRING I 1
29 BOLT M10X60 2 77 CRANK 1
30 BUSHING 14X12.5X 10.1 8 78 BOLT 1
31 WASHER D10X 20X2 4 79 BRACKET 1
32 NYLON NUT M10 8 80 OPEN-END WRENCH S13 14 15 1
33 CARRIAGE BOLT M8X60 4 81 HEX WRENCH S6 1
34 END CAP 50 2 82 HEX WRENCH S8 1
35 FRONT STABILIZER 1 83 OPEN-END WRENCH S17 18 19 1
36 REAR STABILIZER 1 84 SNAP SPRING D12 2
37 END CAP 50 1 85 ARC WASHER D8X 16X1.5XR30 4
38 SENSOR 1 86 MAGNETIC BOARD 1
39 TENSION WIRE 1 87 TENSION SPRING 2 2
40 MAIN FRAME 1 88 PLASTIC LATTICE 1
41 END CAP J40X25 4 89 MAGNET 4
42 PEDAL TUBE (L/R) 2 90 NUT M6 2
43 BOLT M10X45 4 91 BOLT M6*20 3
44 PEDAL 2 92 IDLE WHEEL 1
45 BOLT M10X50 2 93 HEXAGON THIN NUT M10*1.0*2 1
46 BOLT (L/R) 1/2’’ 2 94 SPRING WASHER D6 2
47 ARC WASHER D17 2 95 WASHER D6 2
48 BUSHING 24X20X 16.1 4
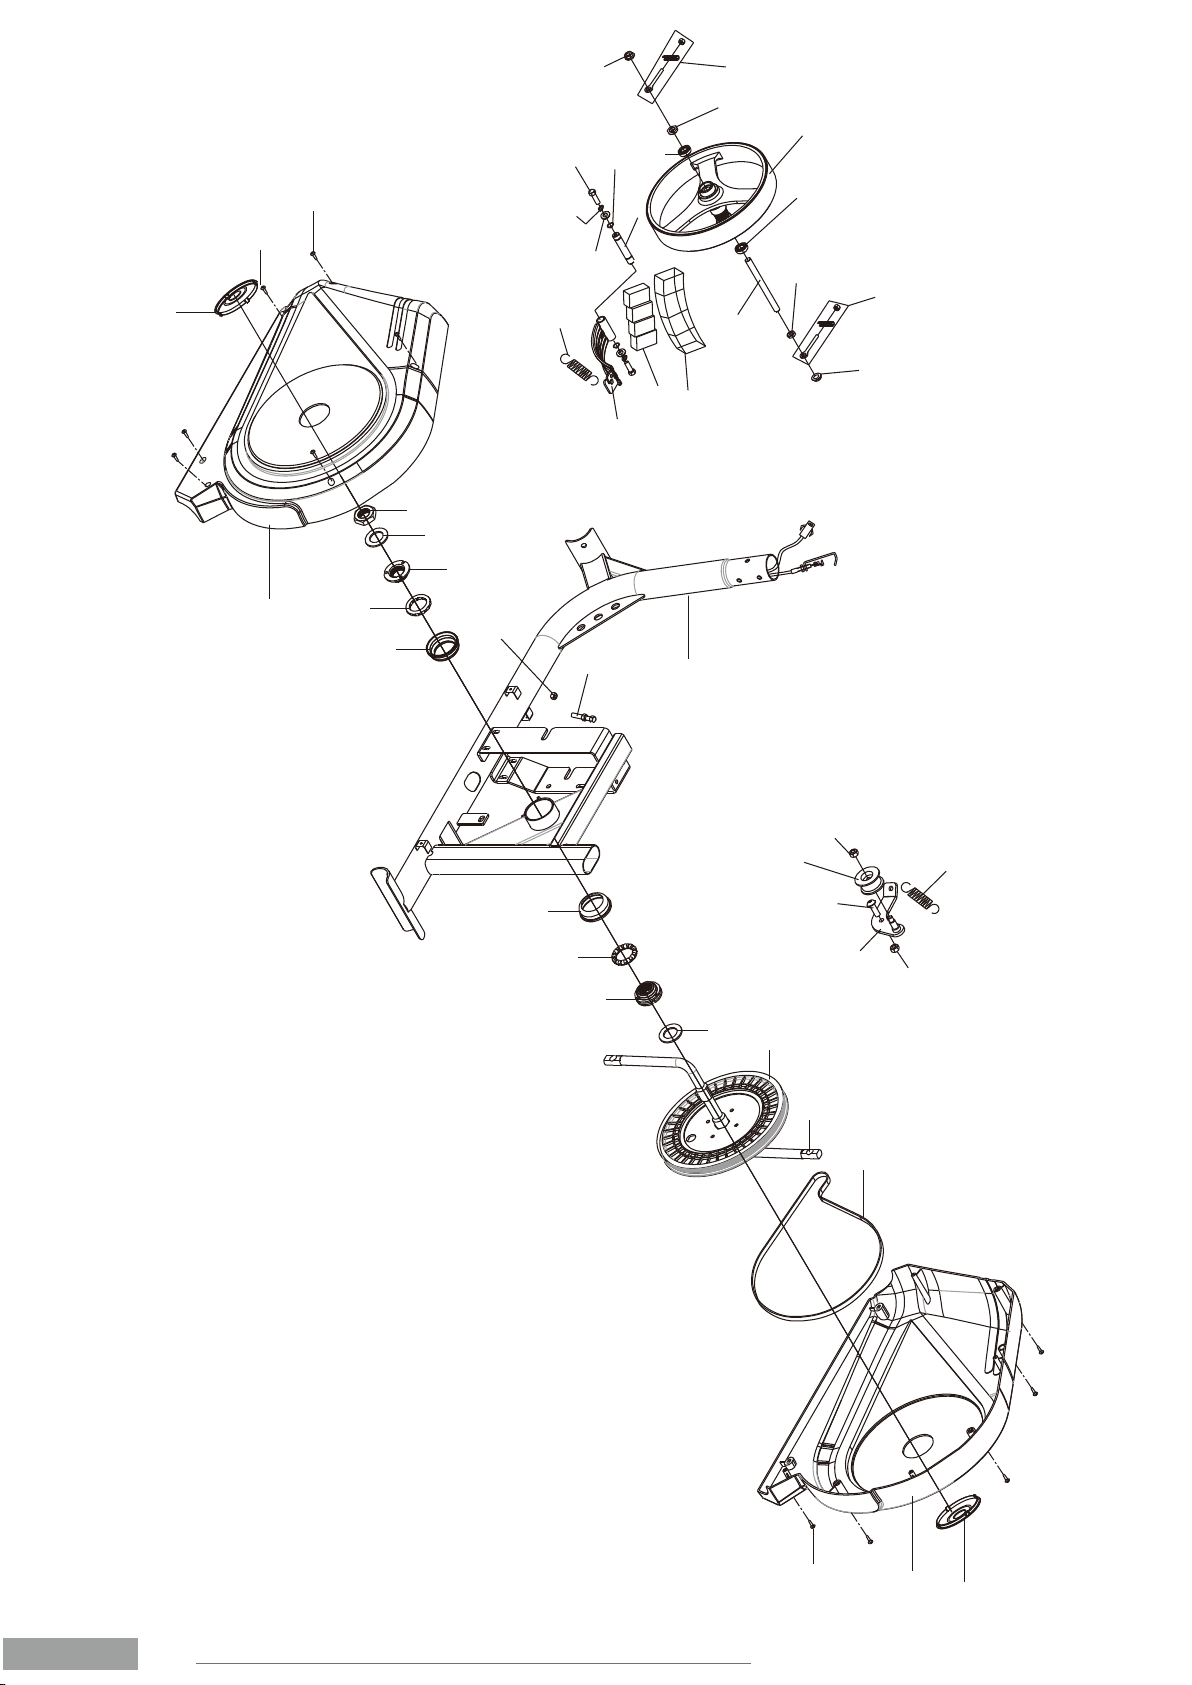
3.2 ASSEMBLY INSTRUCTION:
Attach the front stabilizer (35) and the Rear
Stabilizer (36) to the Main Frame (40) with Carriage
Bolt (33), Domed Nut (23) and Arc Washer (22).
FIGURE 1.
3. INSTALLATION GUIDE
3.1 PREPARATION:
A. Before assembling make sure that you will have enough space
around the item.
B. Use the present tooling for assembling.
C. Before assembling please check whether all needed parts are
available (at the above of this instruction sheet you will find an
explosion drawing with all single parts (marked with numbers)
which this item consists of. ASSEMBLY REQUIRES
TWO PERSONS.
x2.
7.
ENGLISH
#33 M8*60 4PCS
#22 d8* 20*1.5*R30 4PCS
#23 M8 4PCS
S13
33
33
22 23
35 40
36
22
23

FIGURE 2.
Connect the Sensor 16 and 38,and Tension Control wire 53
and 39 as shown in FIG.2, fix the Upright Post (15) with the
Main Frame (40) with Bolt (26), Arc Washer (22).
8.
ENGLISH
5339
16
38
#26 M8*16*S6 4PCS
#22 d8* 20*1.5*R30 4PCS
40
15
16 53
22
26
39
38
22

FIGURE 3.
9.
ENGLISH
LEFT PEDAL RIGHT PEDAL
LEFT PEDAL: The left pedal is marked on its
axis with the letter L (left).
Screw the shaft in the counterclockwise
direction.
RIGHT PEDAL: The right pedal is marked on
its axis with the letter R (right).
Screw the shaft in a clockwise direction.
ATTENTION:
#43 M10*45 4PCS #32 M10 4PCS
#18 M8*16 2PCS #9 d8 2PCS
#19 d8* 32*2 2PCS
#46L/R 1/2" 2PCS
#47 d17 2PCS
#50 1/2" 2PCS #51L/R 1/2" 2PCS
S19
S13
S8
40
15
9
18 19 25L
32
44
43
42L
46L47 49L 5051L
9
19 18
43
32
25R
42R 46R
47
51R50
49R
Fix the Lower Handle Bar (25L/R) to the
Upright Post (15) with Bolt (18) ,Washer (9),
D Washer (19). Fix the Pedal Tubes (42L/R)
with the Pedal Crank by Pedal Hinge Bolt
(46L/R) Curved Washer (50), and Nylon Nut
(51L/R). Install the Pedal (44) on the Pedal.

FIGURE 4.
10.
ENGLISH
#21 M8*40 4PCS
#85 d8* 16*1.5*R30 4PCS
#23 M8 4PCS
#9 d8 2PCS
#8 M8*30 2PCS
11R
8523
14
21
85
11L
7
89
4
4a
25L 25R
15
Connect the Sensor shown in FIG.4,Install
the Middle handlebar (4) on the Upright Post
(15) with bolt (8) Arc Washer (9).
Fix the Handlebar (11L/R) to the Lower
Handle Bar (25L/R) with Bolt (21), Arc
Washer (85) and Domed Nut (23).
S13
S6

CAUTION: MAKE SURE YOU HAVE TIGHTENED ALL THE BOLTS
AND NUTS WELL BEFORE BEGINNING YOUR WORKOUT.
NOTE: THE END CAP ON THE FRONT STABILIZER TUBE IS MOVABLE,
WHICH IT IS EASY FOR YOU TO MOVE YOUR TRAINING BIKE.
11.
ENGLISH
FIGURE 5.
1b
16
1a
4a
#17 S13 2PCS
#28 S17 6PCS
16
4a
17
17
28 28
28
28
28
15
4
25L 25R
1b 1a
2
1
Connect Handle Pulse Wire (1a) and (1b), then connect Sensor
wire (16) to the Computer (1). Fix the Computer (1) onto the
Upright Post (15) with Screw (2).

4. EXERCISE INSTRUCTIONS
This stage is to let your Cardio-vascular System and muscles wind down. This is a repeat of the warm up exercise
e.g. reduce your tempo, continue for approximately 5 minutes. The stretching exercises should now be repeated,
again remembering not to force or jerk your muscles into the stretch.
As you get fitter you may need to train longer and harder. It is advisable to train at least three times a week, and
if possible space your workouts evenly throughout the week.
4.3 THE COOL DOWN PHASE
To tone muscle while on your Upright BIKE you will need to have the resistance set quite high. This will put more
strain on our leg muscles and may mean you cannot train for as long as you would like. If you are also trying to
improve your fitness you need to alter your training program. You should train as normal during the warm up and
cool down phases, but towards the end of the exercise phase you should increase resistance, making your legs
work harden than normal. You may have to reduce your speed to keep your heart rate in the target zone.
4.4 MUSCLE TONING
The important factor here is the amount of effort you put in. The harder and longer you work the more calories you
will burn. Effectively this is the same as if you were training to improve your fitness, the difference is the goal.
4.5 WEIGHT LOSS
The tension control knob allows you to alter the resistance of the pedals. A high resistance makes it more difficult
to pedal, a low resistance makes it easier. For the best results set the tension while the bike is in use.
4.6 USE
12.
ENGLISH
SIDE BENDS
CALF/ACHILES
STRETCHES FORWARD
BENDS
OUTER
THIGH
STRETCHES
INNER
THIGH
STRETCHES
Using your RECUMBENT BIKE provides you with several benefits, it will improve your physical fitness, tone muscle
and in conjunction with calorie controlled diet help you lose weight.
This stage helps get the blood flowing
around the body and the muscles working
properly. It will also reduce the risk of
cramp and muscle injury. It is advisable to
do a few stretching exercises as shown
below. Each stretch should be held for
approximately 30 seconds, do not force or
jerk your muscles into a stretch - if it
hurts, STOP.
4.1 THE WARM UP PHASE:
This is the stage where you put the effort in. After regular
use, the muscles in your legs will become Stronger. Work to
your but it is very important to maintain a steady tempo
throughout. The rate of work should be sufficient to raise your
heart beat into the target zone shown on the graph below.
4.2 THE EXERCISE PHASE:
This stage should last for a minimum of 12 minutes though
most people start at about 15-20 minutes.

ADJUSTING THE RESISTANCE: To increase or decrease resistance, turn the
adjustment knob at front of the rowing frame cover clockwise (+ direction) to
increase resistance and Counterclockwise (- direction) to decrease resistance.
The scale above the knob (1-8) helps you find and reset a suitable resistance.
5. RESISTANCE LEVELS
6. HEART RATE
7. LEVELLING
The pulse rate is measured by sensors in the
handlebars when the user is touching both sensors
at the same time. Accurate pulse measurement
requires that the skin is slightly moist and constantly
touching the hand pulse sensors. If the skin is too
dry or too moist, the pulse rate measurement will
become less accurate.
WARNING. Make sure that you do not exceed your maximum heart rate
during your workout.
If you belong to a risk group, consult a physician.
The levelers ensure that the machine is level and stable during use.
These levelers are used to correct any imbalance in the floor, which
can affect the safety and effectiveness of training.
When a fitness machine is level, it allows the user to have a more
comfortable and safer training experience. If a fitness machine is not
level, it can wobble or wobble during use, which can make the user
feel unstable and increase the risk of injury.
Therefore, it is important to ensure that the leg levelers are adjusted
correctly before using any fitness machine. This can be done by using
a small adjustment tool supplied with the machine or simply turning
the levelers by hand to ensure they are firm and level on the ground.
13.
ENGLISH

8. CLEANING AND MAINTENANCE
STORAGE. Keep your equipment in a enclosed place, away from dust or humidity. Don’t store it neither in a garage
or in a indoor backyard, or near the water.
HUMIDITY. Dust and water could damage it and have an effect on its functioning.
BATTERY. Ensure that the battery is loaded.
SCREWS AND CONNECTING CABLES. Supervise and tighten the screws on a regular basis, because due to the
vibration the screws and nuts tend to loosen.
CLEANING. Don't use abrasive products. A damp cloth is enough.
LEVELLING. Please use the leveling wheels in case your unit has ones in order to avoid vibrations and therefore a
malfuction.
LUBRICATION. THE MOBILE PARTS OF THE MACHINE SOME SCREWS, TRANSMISSION...) MUST BE PROPERLY.
10. CUSTOMER CARE
9. MOVING THE BIKE
Should you need technical assistance or advise with the installation of pieces, visit our website www.isefit.com,
where you will find the section CUSTOMER CARE.
TO HELP US ASSIST YOU, PLEASE BE PREPARED TO PROVIDE THE FOLLOWING INFORMATION WHEN
CONTACTING US. Look for the identification label that will be attached to your machine. Take photos/videos.
MODEL NUMBER (REFERENCE) + SERIAL NUMBER
YOU MUST KEEP THE PURCHASE RECEIPT IN
ORDER TO HAVE ACCESS TO THIS SERVICE
1
3
2THE KEY NUMBER AND DESCRIPTION OF THE
REPLACEMENT PART(S)
(SEE THE PART LIST AND THE EXPLODED
DRAWING)
MODEL NO.: XXXXX
SERIAL Nº.: 206532020101750001
Move the equipment and carefully put the equipment down. Place the equipment on a protective base to prevent
damage to the floor surface.
Move the equipment carefully over uneven surfaces. Do not move the equipment upstairs using the wheels, but carry
the equipment by the handlebars.
Store the equipment in a dry place with as little temperature variation as possible.
14.
ENGLISH

15.
ENGLISH
11. DISPLAY INSTRUCTIONS
FUNCTIONAL BUTTONS:
FUNCTION AND OPERATIONS:
Press “MODE” button until “SCAN” appears. Monitor will rotate through all the 5 functions: Time, speed,distance,
calorie, ODOand pulse. Each display will be hold 5 seconds.
Press MODE button until “PULSE” appears. Before measuring your pulse rate, please place your palms of your
hands on Both of your contact pads and the monitor will show your current heart beat rate in beats per minte
(BPM) on the LCD after 6〜7 seconds.
Remark: During the process of pulse measurement, because of the contact jamming, the measurement value
may be higher than the virtual pulse rate during the first 2〜3 seconds. Then will return to normal level. The
measurement value can not be regarded as the basis of medical treatment.
The computer will “Beep” when press “MODE”,“SET” and “RESET” buttons.
Display current speed.
The total distance which this function is refers to from battery capacity period runs.
1.Count the total time from exercise start to end.
2.Press “MODE” button until “TIME” appears. Press “SET” button to set exercise time. When the “SET” is zero,
the computer will alarm 10 seconds.
1.Count the distance from exercise start to end.
2.Press “MODE” button until “DIST” appears. Press “SET” button to set exercise distance. When the “SET” is zero,
the computer will alarm 10 seconds.
1.Count the total calories from exercise start to end.
2.Press “MODE” button until “CAL” appears. Press “SET” button to set exercise calories. When the “SET” is zero,
the computer will alarm 10 seconds.
MODE. Push down for
selecting functions.If the
long time holds down
MODE button will turn
completely 0.
SET. To set the values
of time,distance pulse
and calories when not
in scan mode.
RESET. Push down for resetting time,
distance and calories. The current data
change is 0. If the long time holds down
RESET, besides the ODO position, the
material will turn completely 0.
SCAN:
TIME:
SPEED:
DIST (DISTANCE):
CAL (CALORIE):
ODO (ODOMETER):
HEART RATE:
ALARM:
Without any signal for 4 minutes, the power will turn off automatically. As long as the
wheel is in motion or press any button, the monitor is in action.
AUTO ON/OFF &AUTO START/STOP:
MODEL: SY-9826 (517E)
RATED VOLTAGE: 3V DC
BATTERY TYPE: 1.5V AA*2
(DOES NOT CONTAIN THE BATTERY)
TEST STANDARD(S): EN55014-1, EN55014-2
DISPLAY PARAMETERS SPECIFICATIONS:
AUTO SCAN
RUNNING TIME
CURRENT SPEED
TRIP DISTANCE
CALORIES
PULSE RATE
EVERY 5 SECONDS
00:00’ ~ 99:59’
0.0 ~ 999.9 (ML) KM
0.00 ~ 9999 (ML) KM
0.0 ~ 9999 KCAL
40 ~ 240 BPM
BATTERY TYPE
OPERATING TEMPERATURE 2PCS OF SIZE – AAA OR UM – 4
0°C ~ +40°C
STORAGE TEMPERATURE
TOTAL DISTANCE (ODO) 0.0 ~ 9999 (ML) KM

VÉLO D'EXERCICE
INSTRUCTION MANUAL
SY-9826 (517E)
1.
FRANÇAIS
(FRANÇAIS)
LE PRODUIT PEUT VARIER LÉGÈREMENT DE L'ARTICLE PHOTO EN
RAISON DES MISES À NIVEAU DU MODÈLE.
VEUILLEZ LIRE CETTE INSTRUCTION TRÈS ATTENTIVEMENT AVANT D'UTILISER
CET ARTICLE. VOUS TROUVEREZ DES INFORMATIONS IMPORTANTES
CONCERNANT LA SÉCURITÉ DE VOTRE VÉLO MAGNETIQUE.
100 KG
POIDS MAXIMAL
+33 344 762 166
WWW.ISEFIT.COM

2.
FRANÇAIS
PARAMÈTRES DU PRODUIT
CONTENU
Cet appareil concerné a été fabriqué conformément à une
déclaration de conformité UE et à toutes les directives
européennes pertinentes, y compris CE(EN55014-1,EN55014-2);
EN957( EN ISO 20957-1, EN ISO 20957-5)
Soyez assuré que la boîte de ce produit est recyclable, le reste de l'emballage peut être jeté.
Si le produit contient des piles, ne le jetez pas directement.
DISTRIBUÉ PAR:
ISE GMBH
THEODOR-HEUSS-STRASSE 7
66130 SAARBRÜCKEN GÜDINGEN.
DEU - DEUTSCHLAND
TEL: +490681 98845400
WWW.ISEFIT.DE
IMPORTATEUR :
SAS ISE
1 CHEMIN D’ARMANCOURT
60200 COMPIÈGNE. FRANCE
TEL: +33 344 762 1 66
PORT.: +33 6 32 91 85 26
WWW.ISEFIT.COM
AVERTISSEMENT:
UNE LUBRIFICATION CORRECTE DU PRODUIT AVEC DE L'HUILE DE SILICIUM OU DU TEFLON EST VRAIMENT
IMPORTANTE. CETTE LUBRIFICATION DOIT ÊTRE EFFECTUÉE RÉGULIÈREMENT EN FONCTION DE CHAQUE PERSONNE,
MÊME AVANT SA PREMIÈRE UTILISATION.
VOUS DEVEZ CONSERVER L'EMBALLAGE D'ORIGINE AVEC SES PROTECTIONS, LE TICKET D'ACHAT, LE MANUEL ET LES
COMPOSANTS PENDANT LA PERIODE DE GARANTIE.
VÉRIFIEZ DANS LE MANUEL LE POIDS MAXIMAL QUE VOTRE ÉQUIPEMENT PEUT SUPPORTER. UN POIDS EXCESSIF
POURRAIT ENTRAÎNER UN DYSFONCTIONNEMENT DU SYSTÈME D'EXPLOITATION, QUI NE SERA PAS COUVERT PAR LA
GARANTIE.
CONSIGNES DE SÉCURITÉ IMPORTANTES
LISTE DES PIÈCES ET SCHÉMA ÉCLATÉ
GUIDE D'INSTALLATION
INSTRUCTIONS D'EXERCICE
NIVEAUX DE RÉSISTANCE
RYTHME CARDIAQUE
MISE À NIVEAU
NETTOYAGE ET ENTRETIEN
DÉPLACER LE VÉLO
SERVICE CLIENT
INSTRUCTIONS D'AFFICHAGE
1.
2.
3.
4.
5.
6.
7.
8.
9.
10.
11.
3.
4.
6.
12.
13.
13.
13.
14.
14.
14.
15.
MODÈLE : SY-9826 (517E)
TAILLE DU PRODUIT : 1200*650*1600MM
SYSTÈME DE RÉSISTANCE : MAGNÉTIQUE
RÉSISTANCE RÉGLABLE : 8 NIVEAUX
MATÉRIEL : ACIER Q235, PLASTIQUE DES HANCHES
POIDS MAXIMAL DE L'UTILISATEUR : 100 KG
G.W / N.W : 29 KG/26 KG
MANUEL EN FR / EN / DE / ES / IT
NORME(S) D'ESSAI : EN ISO 20957-1, EN ISO 20957-5
CLASSE : HC (UTILISATION DOMESTIQUE)
Importateur:
SAS ISE
1 Chemin d’Armancourt
60200 Compiègne France
TEL : +33 3 44 76 21 66
PORT : +33 6 32 91 85 26
www.isefit.com

3.
FRANÇAIS
1. CONSIGNES DE SÉCURITÉ IMPORTANTES
NOTEZ LES PRÉCAUTIONS SUIVANTES AVANT D'ASSEMBLER OU D'UTILISER LA MACHINE
1. Assemblez la machine exactement comme décrit dans le manuel d'instructions.
2. Vérifiez toutes les vis, écrous et autres connexions avant d'utiliser la machine pour la première fois et
assurez-vous que l'entraîneur est en bon état de sécurité.
3. Installez la machine dans un endroit sec et plat et éloignez-la de l'humidité et de l'eau.
4. Placez une base appropriée (par exemple un tapis en caoutchouc, une planche en bois, etc.) sous la machine
dans la zone de montage pour éviter la saleté, etc.
5. Avant de commencer l'entraînement, retirez tous les objets dans un rayon de 2 mètres de la machine.
6. N'utilisez pas d'articles de nettoyage agressifs pour nettoyer la machine. Utilisez uniquement les outils fournis
ou vos propres outils appropriés pour assembler la machine ou réparer des pièces de la machine. Retirez les
gouttes de sueur de la machine immédiatement après avoir terminé l'entraînement.
7. Votre santé peut être affectée par un entraînement incorrect ou excessif. Consultez un médecin avant de
commencer un programme d'entraînement. Il peut définir le réglage maximum (Pulse. Watts. Durée de
l'entraînement, etc.) auquel vous pouvez vous entraîner et peut obtenir des informations précises pendant
l'entraînement. Cette machine ne convient pas à des fins thérapeutiques.
8. Ne vous entraînez sur la machine que lorsqu'elle fonctionne correctement. N'utilisez que des pièces de
rechange d'origine pour les réparations nécessaires.
9. Cette machine ne peut être utilisée que pour l'entraînement d'une seule personne à la fois.
10. Portez des vêtements et des chaussures d'entraînement adaptés à l'entraînement physique avec la machine.
Vos chaussures d'entraînement doivent être adaptées à l'entraîneur.
11. Si vous ressentez des étourdissements, des nausées ou d'autres symptômes anormaux, veuillez arrêter
l'entraînement et consulter un médecin dès que possible.
12. Les personnes telles que les enfants et les personnes handicapées ne doivent utiliser la machine qu'en
présence d'une autre personne qui peut les aider et les conseiller.
13. La puissance de la machine augmente avec l'augmentation de la vitesse, et inversement. La machine est
équipée d'un bouton réglable, qui peut régler la résistance. Diminuez la résistance en tournant le bouton de
réglage du réglage de la résistance vers le niveau 1. Augmentez la résistance en tournant le bouton de
réglage du réglage de la résistance vers le niveau 8.
14. Le poids maximum de l'utilisateur est de 100kgs/220Lbs.
LORSQUEVOUSLEVEZOU DÉPLACEZ L'ÉQUIPEMENT,IL FAUT FAIREATTENTION AFINDE NEPASVOUS BLESSERLE
DOS. UTILISEZTOUJOURS LESTECHNIQUES DE LEVAGE APPROPRIÉES ET/OU UTILISEZ L'ASSISTANCE.

4.
FRANÇAIS
2. LISTE DES PIÈCES ET SCHÉMA ÉCLATÉ
4
3
5
6
6
7
8914
11L
12
13
14
11R
13
12
15
53
9
9
18
17 1920
21
8523
24
2420
25L
25R
21
8523
19 18
17
22
26
28 29 30 313228
32 3029 28
31
22 23
34
33
35
33
22
23
36
37
37
38 39
40
30
41 42L
32
43
44
32
31 41
30
45
28
46L4748 49L 5051L
51R50
49R484746R
41 42R
43
32
28
45
30
32
31
10
16
5455
1
1b 1a
2
26
58
52
80 81 82 83

5.
FRANÇAIS
64 63 65
66
67 77 68
606162
63 64
56
56
64
90
91
75
92 78
75
79
76
69
72
74
69 73
73
70
70
71
93
86
27
91 94 95
88
89
87
40
58 59L
57
57
59R
84
This manual suits for next models
1
Table of contents
Languages:
Other ISE Exercise Bike manuals