Itotec SC Series User manual

SC Series Paper Cutter
Ver.SCZ2001 (EN)
『Applied operation ・Maintenance 』
Operation manual
Carefully read this operation manual and be familiar with the description before
satrting operation, inspection or maintenance of the product.
The
operator or administrator of this product may not have the product operated
by
a person who is not familiar with the description about the product.
CAUTION

5
3Need customer protection ” Redidual 37 How to remove the knife 1-4
risk map and list " 41 How to remove the knife (Lifter) 1-3
44 How to install the knife 1-4
4How to divide the course 48 How to install the knife (Lifter) 1-3
5How to use course jump function 51 How to adjust the knife height 1-2
6How to copy a course 53 How to make fine adjustment of the knife height
7How to paste the course 54 How to change the cutting stick
8How to display the course list 55 How to use two-stage knife installation holes
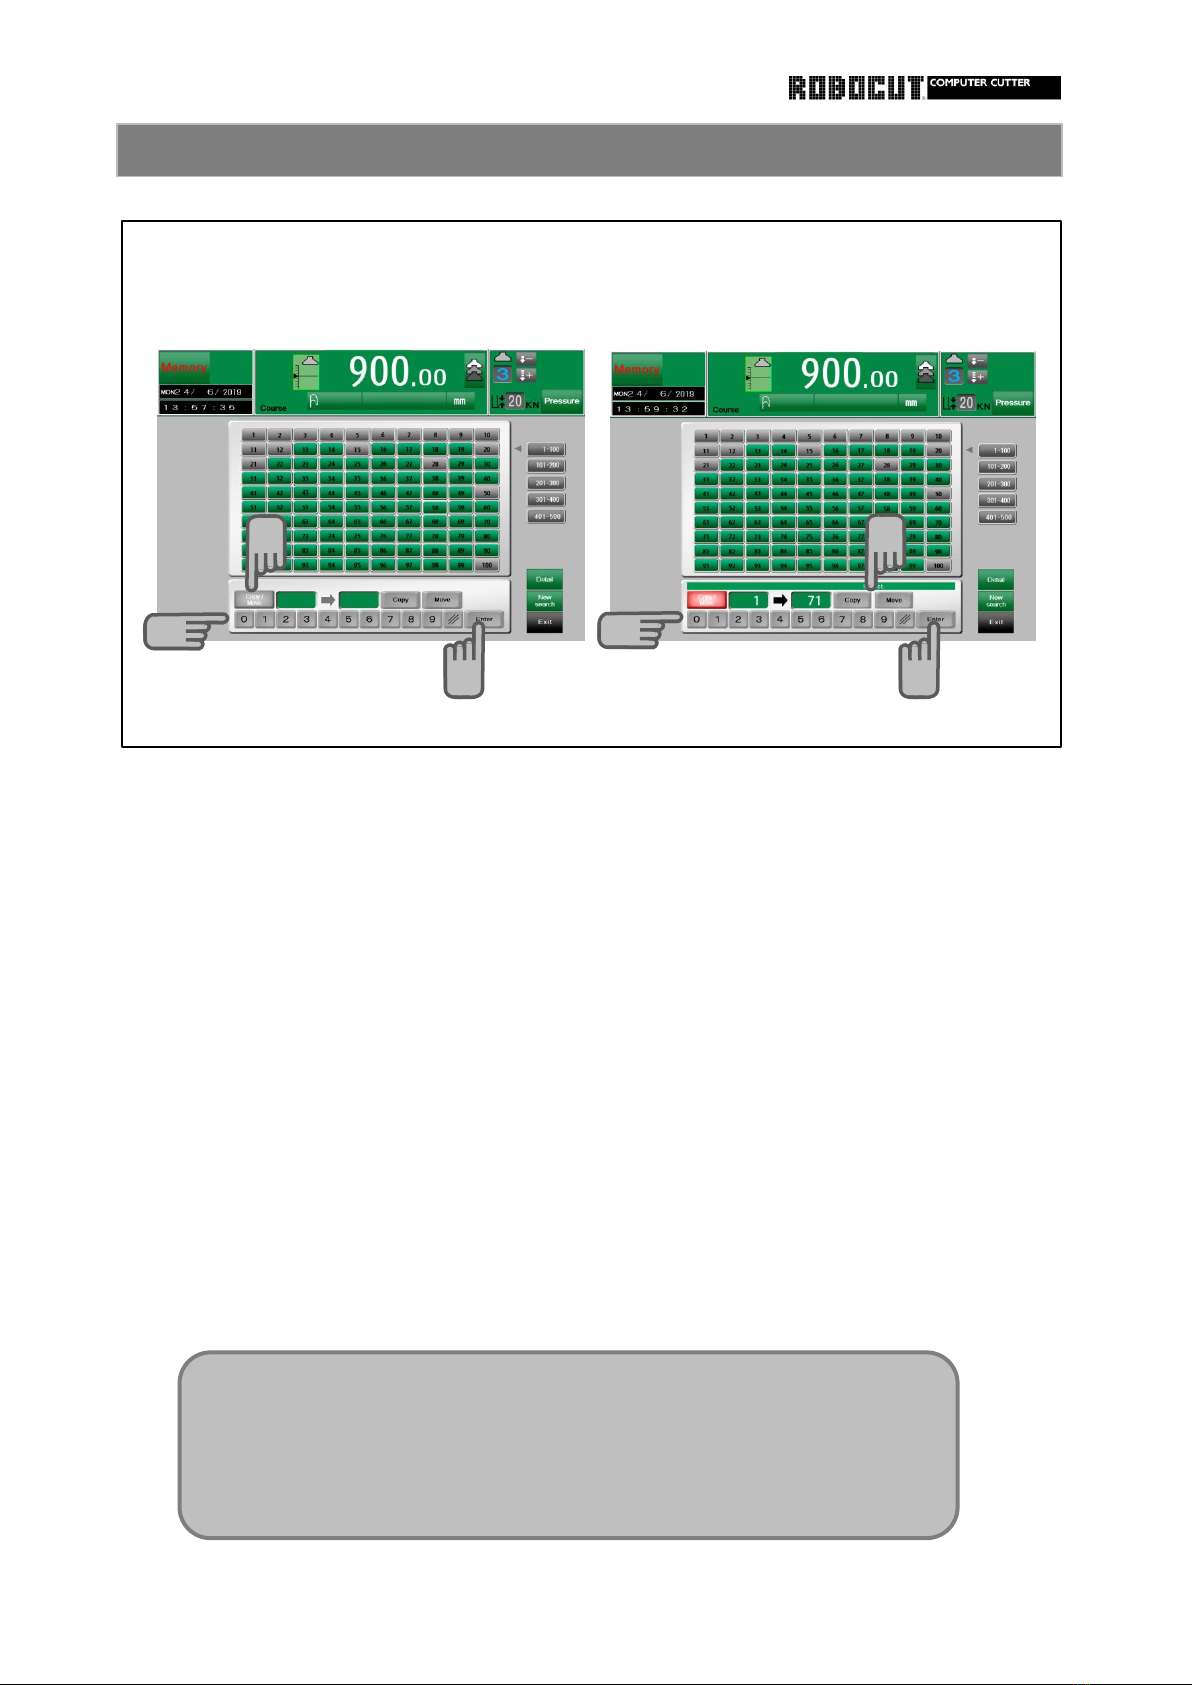
9How to copy or move the course
10 How to store automatic equal division 56 How to remove the false clamp
memory 1-2 57 How to install the false clamp
12 Cancel during the excution 58 How to remove the false clamp (from front)
13 How to use the break function of repeat size 59 How to install the false clamp (from front)
14 How to use repetition of designated range
15 How to use the simulation function 60 Alarm and remedy 1-2
16 How to use clamping function to expelair 62 Trouble during operation
17 How to use clamping repeat size function 63 How to reset the thermal relay or
to expelair pressure alarm
18 How to check the data monitor 64 How to replace the fuse
19 How to check the pedal pressure 65 How to use the clutch-key
20 Display switching cutting/ knife change 66 How to turn manually
counter 67 Safety bolts
21 Correction of error between actual size 68 How to replace the safety bolts 1-2
and displayed size 1-3 70 How to replace the cut-line bulb
24 Function of size agreement detection 71 How to replace the battery for data storage
setting 1-2 72 Check the clutch
26 How to adjust the backgauge accelaration 73 How to adjust the clutch 1-2
27 How to set the backgauge speed in the 75 How to check and replace the V-belt
automatic mode 76 Left/ribht adjustment of the backgauge
28 How to set the softwaew limit (advance 77 Vertical adjustment of the backgauge 1-2
and retraction limit) 79 How to set periodic inspesction timing
29 How to use the pulse handle 80 How to set oil change timing
30 How to set the input range of the 81 Replacement of hydraulic oil
memory size 82 Replacement of gear oil
31 How to use the edit history 83 Oil table
32 How to look at the function selection list 84 Lubrication and grease up
33 How to set the cutting function 85 Cleaning 1-2
34 How to set the option function 87 Discarding
35 How to look at the alarm history
36 How to protect the data
How to change the knife
Install/remove the false clamp
Maintenance
Table of Contents
Important Safety Information
Operation
Index
2

5
Need customer protection " Redidual risk map "
Need customer protection " Redidual risk list "
Important safety infomation
Please refer to the separate volume 「 Risk assessment 」 about the following items.
Need customer protection 「Redidual risk map and list」
3

5
○
○
○
Select the memory mode. To memorize the different task content,
divides when memorize, or memorize it
Press 【 Others 】 of sub mode menu. in advance continuously and later divides
す。 at the required place.
Press 【 Course divide 】 . In the course being divided, under course
number, display division number and
Move the cursor to the page to be current cusor position.
divided.
To run, press 【 Yes 】 .
A vivided line is displayed at the cursor
position.
The cursor moves to the next page
automatically.
Operation
You can divide the course into up to 9.
Even when divided, you can delete or insert a page.
You can memorize multiple different tasks in one course.
How to divide the course
1.
2.
6.
3.
4.
5.
7.
1
3
2
4
5
7
4

5
Select the memory mode. ◆While there is no need to continue the de-
stination of jump, it is understandable and
Store data as usual helpful to edit that the jump destination is
the following course.
Move cursor after last page momorized. ◆There is no limit in the number of jumps as
far as the destination of each jumpdiffers
Enter destination curse number. from the others.
( 100 → 101 → 102 → 103 → 100 )
Press sub mode menu 【 Others 】 and ◆To enter 60 pages, avoid entering full 50
Press 【 Course jump 】 . pages in the first course; place a jump at
Displayed distination course number. an understandable point such as page 30
Displayed in 3 digit including 0. It will be for easier use.
displayed as 005 for 5 course. ◆The jump is caused in paper cutting in the
automatic mode. No jump is caused in the
Call the next destination course and memory mode.
enter data. ◆Becauuse each course is independent of
the others, the course at the destination
On the last page, set the previous course of jump is not deleted evn if one course
numver to be returned in the same way. is deleted.
◆To move the course, the jump destination
course number must be corrected after
moving each.
◆If course jump is caused during fully aut-
omatic operation, the fully automatioc
mode is canceled even in the advance
direction.
Operation
If the work is not enough on page 50, jump to another course and page connect.
How to use course jump function
1.
2.
3.
4.
5.
7.
6.
The destination page of jump may
be designated.
1
3
4
5
5
7
5

5
Select the merory mode. Copy confirmation
Press 【 Data confirmation 】 .
Press sub mode menu 【 Others 】 . Displayed job name, memo, course number
and data up to 7 pages.
Press 【 Course copy 】 .
Press 【 Yes 】 .
The contents of the currently displayed
course are now stored in the temporary
strage location.
Operation
Copy a course.
You can move or copy to another course by paste.
How to copy a course
1.
2.
3.
5.
Only one can be stored in the strage
location. Copy another course and it
will be replaces by that data.
1
2
3
5
4.
4
5
6

5
Select the memory mode. ◆Paeting can be made even if the result
of pasting overflows 50 pages while the
Call up the destination course of pating. data after page 50 is cut.
Press sub mode menu 【 Others 】 . ◆Pating at other units is impassible.
Press 【 Course past 】 . ◆If the number of divisions exceeds 9 as
a result of pasting, pasting is impossible.
Press 【 Deta check 】 to display the job
name, memo and course number, and data
◆If the destination course of pasting is
in up to seven pages. blank, the job name and memo of the
course of copying are also pasted. If the
Press 【 Yes 】 to execute pasting. destination course is not balnk, neither
the job name nor the memo field is
written even if they are blank.
◆Use the copy-and-past function to past
course data at the last of another cour-
se; thus multiple job can be stored in a
single course divisively.
Operation
Copied data can be moved to another course through course pasting or it can be duplicated.
How to paste the course
1.
2.
3.
4.
5.
6.
◆If the destination course of
pastingis blank (an unused course
without data), the data is pasted
from the first page. If the called
course already contains data, the
data is pasted after a division line
added next to the last stored page.
◆If the data of the called course is
unnecessary, use [Delete course]
to delete the course and past the
data from the first page.
1
2
2
3
6
5
7

5
Press 【 Course details 】 .
Press 【 Course list/copy 】 .
The course list is displayed.
Operation
In the memory mode, press sub mode menu 【 Edit 】 ,
Touch the course line, the data of the course is displayed.
Select the memory or the automatic mode.
In the automatic mode, press sub mode menu 【 Main 】 .
Displayed the job name and memo of each course.
How to display the course list
1.
2.
3.
4.
5.
1
1
2
3
4
5
4
8

5
Select the memory or the automatic mode. Enter the destination course of copying,
using number keys.
Press sub mode menu 【 Edit 】 in the
memory mode, press sub mode menu Press 【 Enter 】 .
【 Main 】 in the auto mode.
Select either 【 Copy 】 or. 【 Move 】 .
Press 【 Course details 】 .
Press 【 Course list/copy 】 .
The above is the same as 【 Course list display 】.
Press 【 Copy/Move 】 .
Enter the source course of copying,
using number keys.
Press 【 Enter 】 .
Operation
How to copy or move the course
1.
2.
3.
4.
5.
7.
6.
◆If data is entered to the destination course of copying or moving, an
overwrite confirmation message is displayed.
◆If the destination course of copying or moving is locked, copying or
moving is rejected. Unlock the course first.
8.
10.
9.
5
6
7
8
9
10
9

5
automatically calculated and stored.
Select the memory mode.
division ) = ".
Press 【 Equal division 】 .
Press the Store key.
3 pages are automatically used and stored from the current coursor position.
The data having been written, if there is any, is overwrutten.
Press 【 Close 】 or 【 Cancel 】 to close the automatic equal division window.
Operation
Using calculation keys and ten-key pad, enter "( Overall length of item) / (number of
An Automatic equal division window is displayed and the stored data is displayed.
Enter the ocrall length and the number of divisions of the item. Repeat size data is
The 【 Equal division 】 button is displayed at the right end to the calculation window.
Configure the automatic equal division function.
How to store automatic equal division memory 1
1.
2.
3.
4.
5.
If the Store key has not been pressed, use 【Page ↑】【Page ↓】to change the
first page of storage area.
◆The 【Equal division 】button is not displayedin other than the memory mode
even if division is made.
◆This function can be used at all units.
1
2
2
3
3
4
5
10

5
Reducing the number of repeat size ( N ) by 1
Press 【 Set function 】 in the automatic
equal division window.
window is displayed.
Press 【 Set function 】 in automatic equal
Place a check mark at "Reduce the division window.
number of repeat size ( N ) by 1 . The automatic equal division function
The number of repeat size decreases by 1 setting window is displayed.
and is stored in memory.
Place a check mark at " Attach push-
out ".
Use 【 ▲ 】 and 【 ▼ 】 to enter the
push-out dimension.
Press 【 Exit 】 .
Operation
Attaching push-out
Configure the modification / addition function for automatic eauql division .
The automatic equal division function setting
How to store automatic equal division memory 2
1.
2.
4.
3.
Selection can be made only if a check
mark is placed at " Reduce the num-
ber of repeat size by one ".
5.
6.
After the number of repeat size is finished,
the backgauge moves to the next data
while the last one remains. To push -out
at the timing, place a check mark in adva-
nce. Push-out stored on the last page
when the Store-key is pressed.
1
3
2
1
3
4
5
6
11

5
Canceling is the following case.
① Change the course.
② Correct the momory data.
remaining times window.
Operation
Cancel remaining times during the excution.
③ Move the cursor to outside the page of repeat size and press 【 Start 】 key.
To cancel remaining times during the excution, take the above way or press 【 × 】 of the
(If press air, set direction or clamp hold key, cannot cancel. )
How to cancel during the excution
1.
2.
1
1
2
Canceled because pressed the start-key.
The remaining times remaind displayed even if
moves the cursor to outside the pge of repeat
size.
12

5
◆A break can be inserted in continuous ◆How to enter data including blank
repeat size data. line.
If the frequency is attributed to continu- The cursor does not move beyond the
ous repeat size data, a blank line can be line. To enter new data, temporarily enter
inserted in the repeat size data to repeat without a blank line. Next, move the
the part og repeat size data after the cursor and press 【 Insert page 】 to
blank line by the number of repeat size. insert a blank line.
Move the cusor to the break point.
Press 【 Insert page 】 .
Blank lines can be made.
In the above example
and 5mm.
If there is no blank line
Repeat 3 times 80mm, 210mm, 5mm
Operation
After advance 80mm from 780mm,
repeat 3 times the cut off of 210mm
How to use the break function of repeat size
1.
2.
1
2
2
13

5
Select the memory mode. When paper cutting is executed in the
automatic mode, a line is displayed in the
Enter the first page nuimber of the repetition range at the timing of start of
repeated range, followed by the decimal number of repeat cyles view. (The line is
point key. not displayed in the first cycle when the
remainingnumber of repeat cycles is not
Next, enter the number of repeat cycles displayed.)
and press the number of repeat cycles This line is displayed, too, at the number
key. The first page number of repetition of repeat cycles where no regular range
is separated from the number of repeat
cycles with the decimal point key.
The stored data is displayed as follows :
To modify the first page number or
number of repeat cycles, enter again.
A page number larger than the current
one does not cause an error even if it is
entered as first page of repetition , a
page number smaller than current one is
automatically stored in memory.
designtion is provided.
Operation
A range is repeated by the enterednumber of repeat size.
" First page > number of repeat cycles "
How to use repetition of designated range
1.
2.
3.
6.
4.
There is no limit in the range or number
of repeat cycles.
A duplicate range setting result in an
error.
As well, an error is also caused if the
page is repeat size.
If page copying, deletion or insertion is
executed, range modification imay be
necessary,
5.
1
2
2
3
3
3
6
7
14

5
Select the automatic mode.
Press sub mode menu 【 Others 】 .
Press 【 Simulation 】 .
Press 【 End 】 , the simulation ends.
Operation
To execute continuously, turn to "Continue " and press "Start"-key.
It warks one step each time you press "Start"-key.
You can check the movement of the backgauge before cutting .
How to use the simulation function
1.
2.
3.
4.
5.
IN case of returnimg to page 1 ( or, in the course division case, first page of division
or course jump, continuous simulation is finished and the step motion starts.
Paper cutting is impossible during excution of continuous simulation.
6.
Robo-trim will not work if it is equipped.
(Do not open and close the front table .)
1
2
3
4
5
5
6
15

5
Select the memory mode.
Press 【 Clamp 】 .
An error message is displayed in case of erroneopus entry.
Operation
To expel air out of stacked paper, lower merely the clamp.
The clamp mark is displayed in the air field.
Press sub mode menu 【 Set 】 .
Enter the clamping size, using the ten-key pad.
How to use clamping function to expel air
1.
2.
3.
4.
5.
In the memory mode, even if the displayed page data is clamped, the press of the cutting
button caused to move the clamp and knife.
Repeat size may not be entered on the page next to clampin,
If clamping followrs repeat size as result of deletion of page, a " ?"mark is
displayed.
1
2
3
4
4
5
4
CAUTION
16

5
Select the memory mode.
Press sub mode memu 【 Set 】 .
Press 【 Repeat size clamp 】 .
Press 【 Number of repeat size 】 .
The number of repeat size mark is displayed in the function field.
Operation
Position the backgauge with the repeat size function and lower clamp only to clamp.
Enter the repeat size for clamping, using the ten-key pad.
The clamp repeat size mark is displayed in the function field.
Use the ten-key pad, enter the frequency.
How to use clamping repeat size function to expel air
1.
2.
3.
4.
5.
6.
In case of the memory mode, even if the displayed page data is clamped, the press of
thecutting buton cause to move the clamp and knife.
Be careful about knife operation buton, there is a risk of injury.
The repeat size frequency may not be entered on page 1.
Enter from 1 to 999.
Entry is unnecessary incase of 1.
Enter " 0" to designate frequency.
1
2
3
4
4
5
6
6
CAUTION
17

5
Press sub mode menu 【 Meinte 】 . Press sub mode menu 【 Others 】 .
Press 【 Data monitor 】 . Press 【 Data monitor 】 .
There states from monitors 1 to 5 can be There states from monitors 1 to 5 can
checked. be checked.
Press 【 Exit 】 . Press 【 Exit 】 .
Operation
In the automatic mode
In the manual mode
How to check the data monitor
1.
2.
3.
4.
1
5
2
3
4
5.
6.
6
18

5
Select the manual mode.
Displated current state.
Press 【 Exit 】 .
Operation
Press 【 Adjust pedal pressure 】 .
Press sub mode menu 【 maintenance 】 .
How to check the pedal pressure
1.
2.
3.
4.
1
2
3
3
4
19

5
◆ In all mode.
Press the counter on the lower left of Press the counter on the lower left of
the screen. the screen.
Displayed the knife change counter reset. Displayed the cuting counter reset.
Press 【 Yes 】 and reset the counter. Press 【 Yes 】 and reset the counter.
Press display switching, displayed the Press display switching, displayed the
cutting counter reset and the counter on knife change counter reset and the
the lower left of screen is changed to counter on the lower left of screen is
the cutting counter. changed to the knife change counter.
Press 【 Exit 】 . Press 【 Exit 】 .
Operation
When displaying the knife counter
When displaying the cutting counter
Display switching cutting / knife change counter
1.
2.
3.
4.
6.
5.
7.
8.
2
3
1
5
6
8
4
7
5
1
20
This manual suits for next models
5
Table of contents
Other Itotec Paper Cutter manuals
Popular Paper Cutter manuals by other brands

Krug & Priester
Krug & Priester IDEAL 3915-95 operating instructions

Challenge
Challenge TITAN 265 XG Operator's manual

Martin Yale
Martin Yale intimus 170 Series operating instructions

Duplo
Duplo DocuCutter CC-228 Operational manual

Challenge
Challenge Titan 265 Operator's manual

ABC Office
ABC Office Dahle 212 instruction manual