ITS Telecom EKSELANS KB TG-2 User manual

1
KB TG-2
Wireless RFID Keypad
User manual

2
Features
Thank you for purchasing this wireless keypad. It is recommended to install
closed to the entry door inside, so users can achieve operations such as arm,
disarm, home arm after inputting passcode or by scanning the RFID tags.
This keypad is recommended to use with the Entry Delay feature of the
smart alarm system, to avoid triggering alarm before disarming from
keypad after entering the house. The operations are quite easy, just input
the passcode then press [Arm]/[Disarm]/[Home Arm] key, or put RFID tag
close to the surface of the keypad to disarm the system.
Parts List
Keypad X 1
Rechargeable
Lithium-ion Battery
X 1
Wall Mount Bracket
X 1
AC/DC Power
Adapter X 1
3
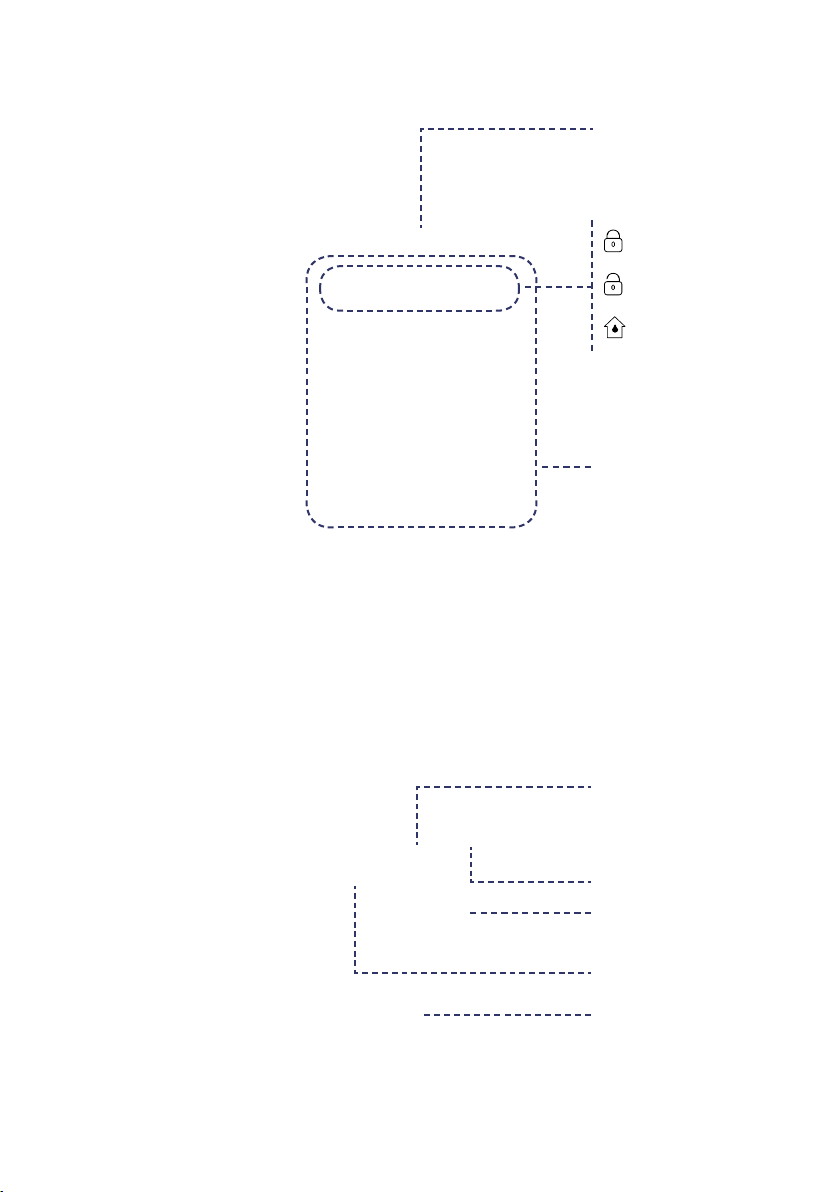
Appearance Status Bar
(LED Indicator)
RFID Area
Battery Cover
Power Switch
Tamper Switch
Reset hole
Battery
DC-IN
Arm
Disarm
Home arm

4
Preparation before Use
1. Make sure the battery has been installed correctly.
2. If you are using it for the first time, please connect the keypad to the power adapter.
3. Turn on the power switch under the battery cover.

5
Pairing the Keypad with the Main Box
Scan QR Code Learn Mode
1. Reset the keypad until the status bar is flashing in 3 colors.
Please keep the keypad powered on and lighted up during the whole pairing process.
2. Launch the App, In the accessory mana-
gement section, tap [Add Accessory]
2. Launch the App (For networking alarm
system) or PC client (For GSM alarm sys-
tem only) to enter the Learn Mode
3. Scan the QR Code on the back of the
keypad.
3. Press 1234 + Arm to send signal to the
system.
4. Follow the guideline in App and save the
settings.
4. Follow the guideline in App and save the
settings.
The keypad will beep once when the pairing process is finished.
Pairing the RFID Tag with the Main Box
Scan QR Code Learn Mode
1. Make sure the keypad has been paired with the system.
2. Launch the App, In the accessory mana-
gement section, tap [Add Accessory]
2. Launch the App (For networking alarm
system) or PC client (For GSM alarm sys-
tem only) to enter the Learn Mode
3. Scan the QR Code on the back of the tag. 3. Read the RFID tag by waving it closing to
the button area until hearing a beep sound.
4. Follow the guideline in App and save the
settings.
4. Follow the guideline in App and save the
settings.
You can try disarming the system by reading the RFID tag via keypad after pairing, to check
if the tag has been correctly paired.

6
Usage
Activate Panel
1. When the keypad is in sleep mode, touching any button of the keypad could activate
the keypad.
2. After being activated, the keypad would synchronize the real-time status with the
alarm system immediately, the result would be represented by the status bar.
3. When there is no operation on the keypad, it will sleep within 10 seconds.
4. When the keypad is sleeping, it will not react to any signal sent from the system until
the next activation.
Why sleep?
Since this keypad is designed to be able to work with battery only, sleeping is the solution
for long-time use.
When the power adapter is connected, it starts providing power and charging the battery.
With the help with over-charging protective circuit, we recommend users to keep the
adapter connected while using.
Arm/Disarm/Home Arm
Input the operation code, and press [Arm] [Disarm] or [Home Arm] key. The status bar
would flash once and then change the color as following pattern after command is
executed correctly.
[ Arm] : Red
[ Disarm] : Green
[Home Arm] : Blue
Note: The operation code is saved in the main panel, which can be modified by App/PC
client. For GSM model, the keypad operation code is the same as Administrator Password
(1234 by default). For networking model, the keypad operation code is the same as Device
Password (1234 by default).
Read the RFID tag on the keypad panel, the system would Disarm immediately if the tag
is paired before.
Once the system is in SOS status and the keypad is activated, the status bar would be
red-flashing and the keypad would generate beep alarm sounds for 1 minute.

7
Change of password
To change device password proceed as follows:
Care & Maintenance
Usage Notices
• The keypad should be connected to control panel before use.
• The power supply of keypad will probably impact on the transmitting distance of
wireless signal.
• The keypad is compatible for most of our alarm system, contact the distributer for
more detail.
• Please make sure the battery has been inserted into the keypad before use.
• The keypad is neither waterproof nor moisture-proof, please install it in a shady, cool
and dry place.
• Install the keypad away from objects such as heater, air conditioner, microwave oven
etc. that produces heat or electric-magnetic.
• Take the keypad for disposal of recycling according to the local regulation.
• Do not take apart the product if you are not a professional technician.
Maintenance
• You can get most dust or fingerprint o with a dry, soft cloth or tissue.
• If there is dirt on the keypad, please wipe the surface by a soft cloth with a little
dilute alkaline detergent and then wipe again with a dry cloth.

8
FAQ
Problem Cause Solution
No response
from keypad
Low Battery
Please connect the power adapter
Low Battery to charge the battery.If the
problem is no solved, please contact
the distributer for more help.
Wearing Gloves Take o the glove and try pressing
the keypad again.
Keypad can’t
be paired with
the system
No response from
the alarm system.
Make sure the alarm system is power
ON and the App or PC client has
already connected to the system.
If you were using the scanning QR
code to pair with, try using Learn
No response from the alarm system.
Mode to see if there’s any error in the
QR code.
Always make sure the location the
keypad installed can be covered by
the RF signal sent from the alarm
system. You can use a paired remote
controller to do some tests.
Can’t disarm by
the RFID tag.
The RFID tag hasn’t
been paired with the
alarm system.
Using the App/PC client to pair the
RFID tag with the system.
Keypad is in power
saving mode.
Touch any button of the keypad to
wake it up.
[Arm]
[Disarm]
[HomeArm]
error
Wrong operation
password
Please input the right code. Users
can modify the operation code in App or
PC client.

9
Technical Specifications
System Preference
Working Humidity <=96 %
Working Temperature (0- 60) ºC
Power IN DC Jack. 5V2A
Battery Lithium-ion Battery, 890mAH
Wireless Frequency 433,92 MHz
Wireless Range Without obstacle 200m
Standby Time 6 months for daily use(8 times a day, Every times 30 seconds)
Weight 162.3g with backup battery
Dimension Alt: 145 mm, Anch: 92,1 mm
Status Bar 1 bar, 3 color(RED/GREEN/BLUE), upon the button area.
Power Switch X1, in battery cover.
Reset Button X1, pin hole, in battery cover.
Buttons 13
RFID Area All area around the buttons in front.
Materials
FRONT : PC
BACK : Non glassy surface to avoid scratches
WALL BRACKET : Non glassy surface to avoid scratches
Wall Mounting Using Mounting Bracket
Features
Power Saving Supported, in battery only mode, the realtime status would be
updated only when keypad is activated.
Pairing Supports scanning QRCode or Learn Mode for pairing new one.
Low Battery Warning Supported. Color indicated, send signal to main box.
Tamper Alarm Supported
RFID Disarm Supported, up to 99 RFID tags.
Reset Supported

10
EKSELANS by ITS
ITS Partner O.B.S. S.L
Av. Cerdanyola 79-81 Local C
08172 Sant Cugat del Vallès
Barcelona (Spain)
Tel: +34 935839543
www.ek.plus
Table of contents


