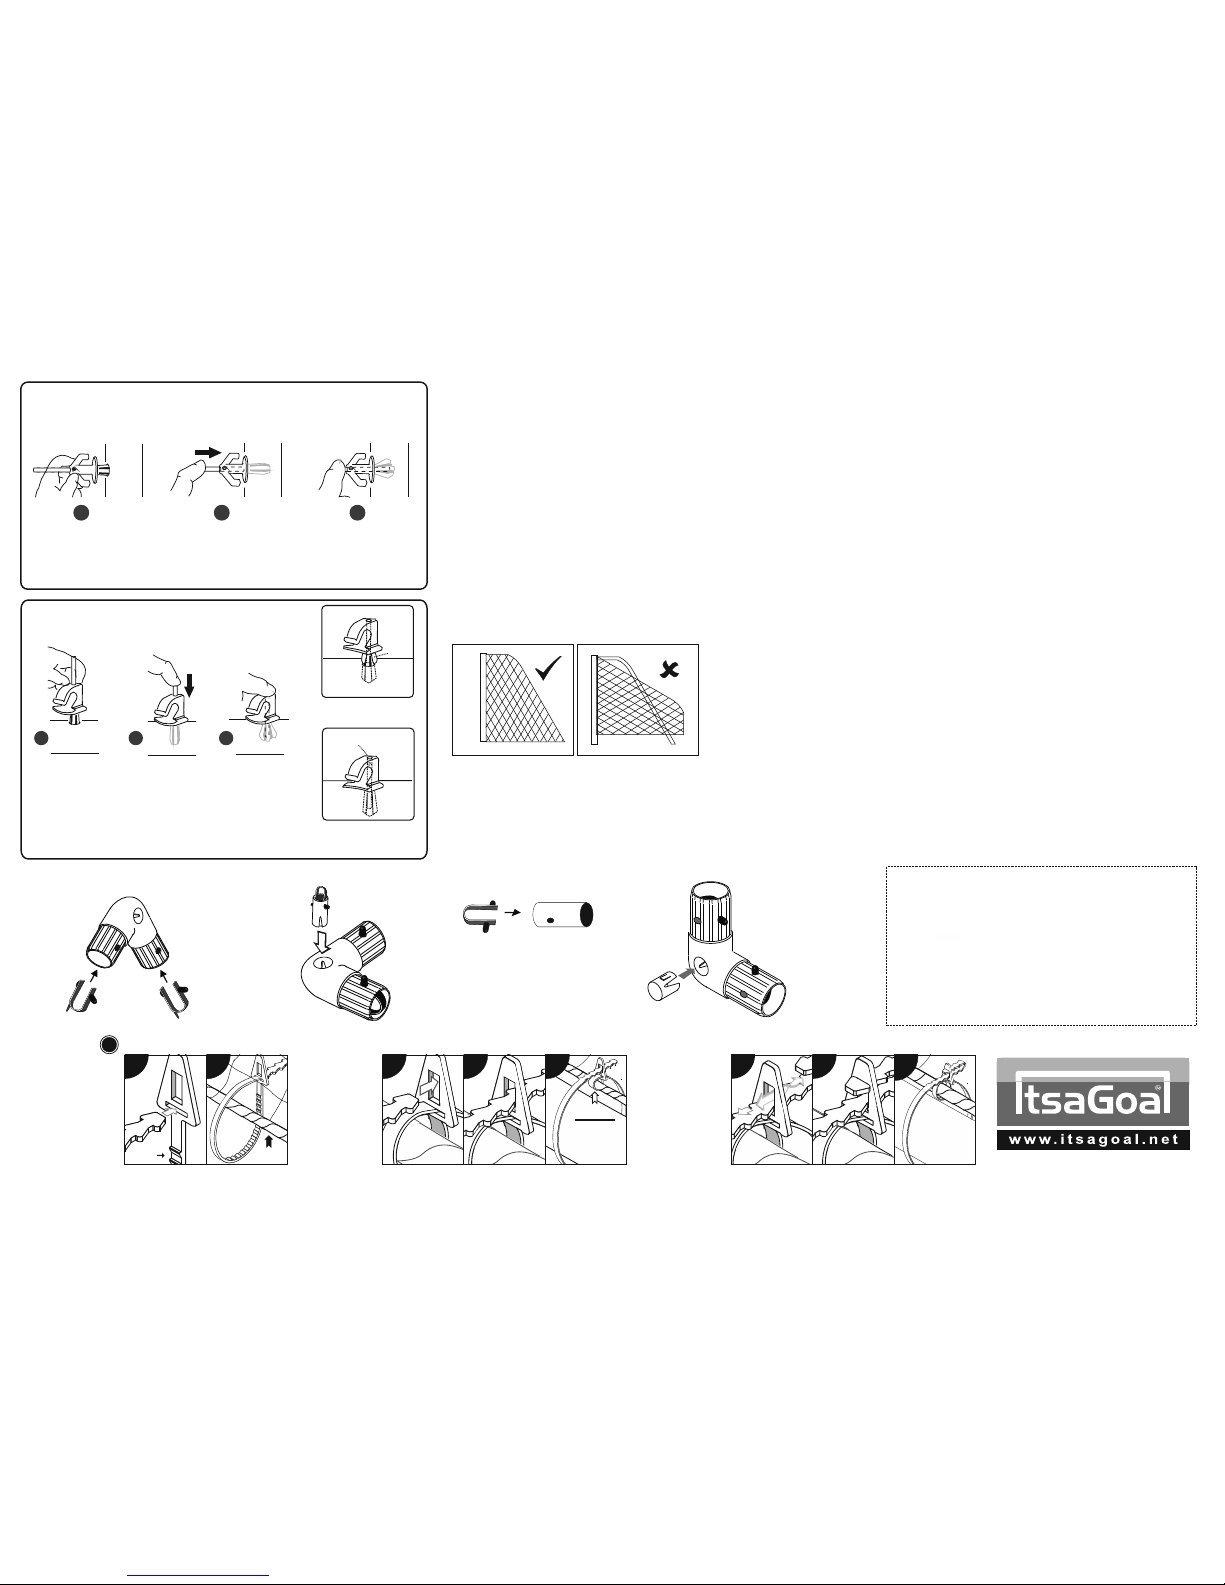
CORNER BRACKETS
At the end of the season nets can be tied into a bundle and placed into a pillow case (not to damage
washing machine) and washed at 40 C0 with normal washing powder. The ground frame can be
washed with hot soapy water. Any scuff marks on posts can be rubbed off with a light abrasive
scouring pad.
WARNING: Check the position of any underground services before using the ground anchors and pegs.
We take no responsibility for any damage or injury caused in this manner.
NEVER use the goals without the ground anchor system. In severe weather or windy conditions it is
advisable to take your goal down as damage is not covered by the guarantee in such circumstances. If
you find the nets are worn along the floor it may be rodents, by spreading pepper along the base frame
rodents will be deterred.
It is advisable in any contact sport to take out the relevant insurance's to cover against injury both from
taking part, equipment and other unforeseeable circumstances.
Crossbars will not be replaced within the guarantee period if broken by swinging or climbing or any other
misuse.
DO NOT try to glue any damaged fixings. Plastic materials in this product vary and this may cause the
plastic to break. Always replace any damaged components.
SQUARE MESH Net is cut to shape. Simply throw over the frame and fit each end onto top stanchion by
securing on each corner of crossbar.
NOTE: If your net does not fit the first time, you may be fitting it to the goal frame upside down i.e. that is to
say the net from the crossbar to the floor (a) is longer than the length of the net to the bottom of the upright.(b)
a
b
a
b
We advise adult supervision during assembly and use. Observe and follow
warning labels attached to goal. Do not use any components, nets or parts
if they are damaged or broken. Spare parts and replacement nets are
readily available. If others are to install your goal you should show them
how to erect and dismantle the goal and hand them a copy of the fitting
instruction. If you lose your instructions copies can be attained from our
company website. To avoid damage when dismantling the goal follow
these guidelines: it is advisable in extreme windy conditions to dismantle
the goal and store away. Do not drop any heavy objects on ends of tubes.
When dismantling the goal ensure that all fittings are packed away and
that non are left on the playing surface. Warning goals must never be left
up or used unless they are properly fitted with ground anchors with net
attached and securely pegged down.
Hard surfaces: to prevent damage to goal or it's components, loosen soil
with a steel pole and moisten with some water before inserting the ground
anchors. Do not use the goal in sub zero temperatures. warning labels
should be replaced when worn and we recommend replacing them every
two years -spare labels available. damaged components requested under
guarantee must be returned for inspection. Failure to follow the warnings,
fitting instructions contained in this document, may invalidate your
guarantee. The company , its agents and representatives do not accept any
product liability if used outside the EU. Use of the product in other
countries outside the EU including the USA is not covered and appropriate
insurance should be taken out by the user to cover for any eventuality. We
reserve the rights to amend the specifications of our soccer products in
the interest of continued development. Your product therefore may differ
slightly to those illustrated. Not suitable for children under 36 months until
assembled due to small parts.
TEL: 0114 24 34 200
SPARE PARTS
NET TIES
!
POST SECTION
PULL
TIGHT
WORLDWIDE © COPYRIGHT 2001 ITSA GOAL, ALL RIGHTS RESERVED A REGISTERED DESIGN
WE RESERVE THE RIGHTS TO AMEND THE SPECIFICATIONS OF OUR SOCCER PRODUCTS IN THE INTEREST OF CONTINUED DEVELOPMENT. YOUR PRODUCT THEREFORE MAY DIFFER LIGHTLY TO THOSE ILLUSTRATED. E&OE
2013 Fitting Instructions \ UPVC \ 68mm --- 10' x 6.6' --- Round FUTSAL MS 1 PC XBAR --- FI.cdr
Ensure locking pin
Is inserted Fully in
the posts
DO NOT THROW THE PINS AWAY
3
Push locking pin
Down centre of
Arrow Head
2
Insert Arrow Head
into Holes on
posts
1
GROUND FRAME
NET FIXING
Ensure locking
pin is inserted
fully
DO NOT THROW THE
LOCKING PINS AWAY
3
Push locking
pin down
centre
2
Insert ground frame
net fixings into holes
on ground frame
On back frame fix all the same way with opening facing
inwards. On side frames along the ground fit alternate
1
Push and Lock the spig-
ots to two of the four
Corner Brackets.
Push and Lock the Blanking
Caps to the two remaining
Corner Brackets. (already
inserted)
Push and Lock the
Large Quick Release
Buttons into the ends of
the Corner Brackets. Push and Lock the Small
Quick Release Buttons
into the ends of the
Spigots.
Lugs
If lugs prevent the rod being
inserted fully, nip the plastic
lugs off so the fixing sits flush
Insert rod
slightly lower
than level
Push the rod slightly inside.
Make sure the rod does not go fully
through and fall out or the fixing
will not lock
To register for your guarantee please visit our web page
www.itsagoal.net
and scroll to the bottom of the page and click on the link ‘Guarantee’
and follow the instructions. Thank you.
HOW TO REGISTER
Guarantee
NOTE : All plastic extrusions vary and therefore some tubes may be looser
or tighter to connector fittings. If you want to increase the diameter of the
fitting just wrap masking tape around the part that fits into the tube, twist
as you insert the fitting and it will grab to the tube tight ...you can make
tighter fits by adding more tape.