Ivation IVAEAC75 User manual

Extra-Large Evaporative Cooler
SKU: IVAEAC75
User Guide

2
INTRODUCTION
Thank you for purchasing the Ivation® Extra-Large
Evaporative Cooler. This User Guide is intended to provide
you with guidelines to ensure that operation of this product
is safe and does not pose risk to the user. Any use that
does not conform to the guidelines described in this User
Guide may void the limited warranty.
Please read all directions before using the product and
retain this guide for reference. This product is intended for
household use only.
This product is covered by a limited one-year warranty.
Coverage is subject to limits and exclusions. See warranty
for details.
INTRODUCTION
SAFETY PRECAUTIONS
PRODUCT OVERVIEW
USAGE
CARE
TROUBLESHOOTING
SPECS
WARRANTY
GET IN TOUCH!
3
4
6
8
11
12
13
14
TABLE OF CONTENTS

3
• Make sure to familiarize yourself with the appliance itself
before using it.
• Before using this appliance, check all the parts to
make sure they function properly, and make sure no
components have been damaged.
• Never immerse the cord, plugs, or any other electrical
elements of this appliance in water, as this can create a
risk of electric shock.
• Do not use this cooler if the power cord or plug have
been damaged, if the cooler has recently malfunctioned
(and the issue has not yet been resolved/repaired), or if
the cooler has been damaged in any manner.
• Keep any and all power cords away from hot surfaces.
• Avoid using this cooler in an enclosed space; it should
always be used in a well-ventilated area.
• DO NOT use the Cool function while the water tank is
empty. Make sure the water tank has been filled with
water before turning on the cooler to ensure ecient
operation.
• Do not overfill the water tank, as this could create an
electrical shock hazard or damage the unit.
• Make sure to drain and clean the water tank frequently to
avoid mold or other bacterial growth.
• Only ever fill the water tank with clean water. Do not fill it
with anything else. No, not even that.
• Make sure to unplug this unit when it’s not being used.
• When moving this unit, some water may spill. Make sure
to dry any spilled water before plugging the unit back in.
Make sure not to let the power cord dangle into spilled
water. It’s best to position the unit first, then fill it with
water, to avoid this.
• Never put anything on top of the cooler or obstruct the
air inlets/outlets.
• Don’t insert any objects or appendages into the vents
while the cooler is running.
• Make sure the unit is unplugged before cleaning or
performing any maintenance on it.
• If the unit functions abnormally, stop using it immediately
and contact Ivation® customer care.
• Make sure the unit is only connected to a power outlet
that can support its rated input of 110 V, 60 Hz, 0.65 A.
SAFETY PRECAUTIONS
SAFETY PRECAUTIONS

4
PACKAGE CONTENTS
• Extra-large evaporative air cooler
• Remote control
• User guide
PARTS
PRODUCT OVERVIEW
PRODUCT OVERVIEW
Rear grille
panel
Top water
tray
Rear cooling
pad
Water level
indicator
Side filter
Power cable
Side cooling pad
Control
panel
Side cooling
pad
Side grille
panel
Side filter
Front
vent
Front vent
angle lever
Rear
filter
Side
grille
panel
Water tank

5
Status light Control button
PRODUCT OVERVIEW
The status light will remain illuminated for 30 seconds
after any buttons on the control panel or remote
control are pressed, then dim.
CONTROL PANEL OVERVIEW
PRODUCT OVERVIEW
Remote Control
On / O Cool function
Swing function
Humidity
control
Natural Breeze
function
Fan speed
Timer
Sleep mode

6
Open the top water tray or pull the
water tray out from the back of the unit.
Fill the water tank.
Power the unit on.
Select a function/fan speed.
Connect the power cable to an outlet.
The water tank can be filled from
the top tray or directly by opening
the water tray at the rear of the
unit. Use a water bottle or similar
container to pour water into the top
tray or the rear water tray until the
water level indicator reaches the fill
line. Do not exceed the fill line, or
else water may spill when you move
the unit.
Press the ON/OFF button on the top of the unit or
on the remote to turn it on. The status indicator light
will turn on.
Press the ON/OFF button on the top of the unit or
on the remote to turn it o. The status indicator light
will turn o.
Push the water tray back into the
unit or close the top tray.
USING THE COOLER
You will find more detailed instructions on each of
these steps in the sections that follow.
Filling the Water Tank
Powering the Cooler On/O
Turning Swing Mode On/O
1
1
2
3
1
2
2
3
3
USAGE
Press the SWING button on the top of the unit or
on the remote.
Press the SWING button on the top of the unit or
on the remote to deactivate it.
The SWING icon will light up when activated.
When turned on, Swing Mode allows the vertical front
vent to oscillate automatically
1
3
2
Top water
tray
Rear
water tray

7
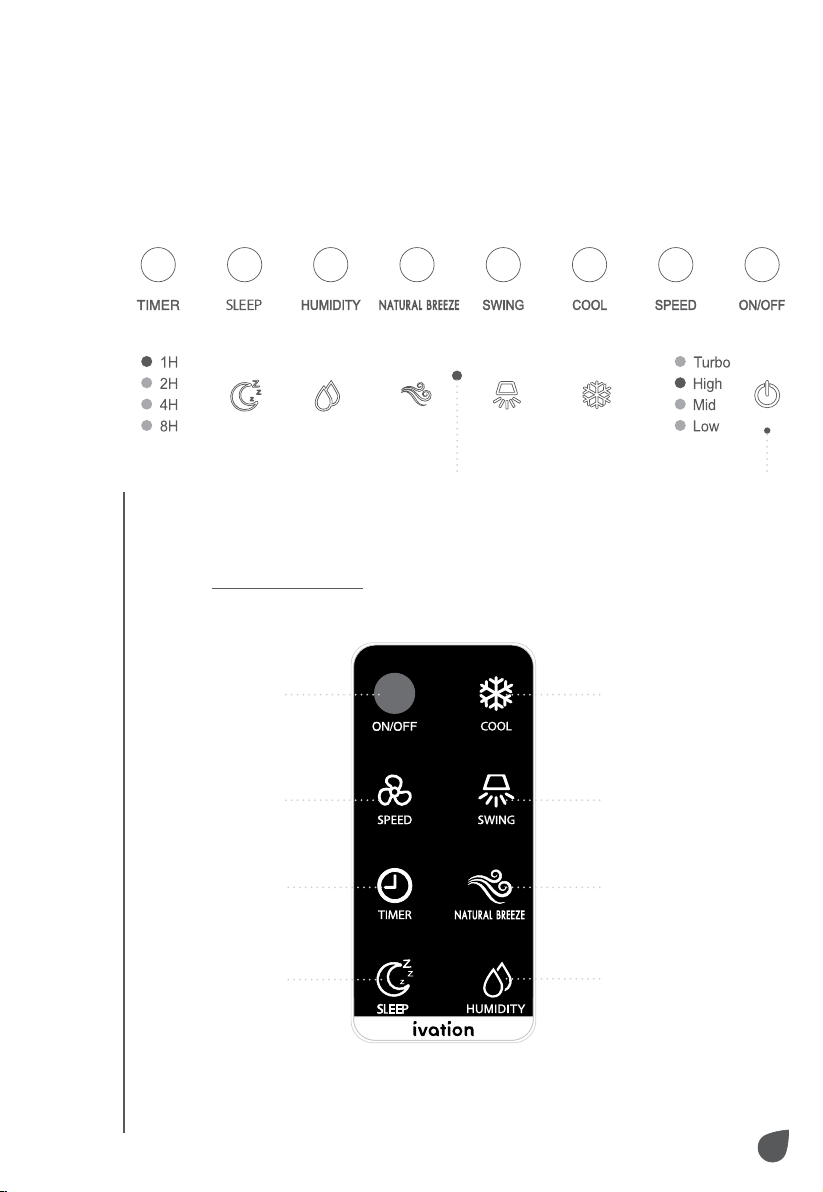
Selecting a Function/Fan Speed
Press the SPEED button on the control panel or the
remote control to cycle through the four fan speed
options: low (1), medium (2), high (3), and turbo
(4). The four speed lights indicate which speed is
operating (e.g., two lights illuminated = medium).
Press the COOL button on top of the unit or on
the remote to activate Cool Mode. The pump inside
the water tank will saturate the cooling pads inside
the unit. Heat flowing through the cooling pads will
exchange with the water and cause the surrounding air
to decrease in temperature as it passes through them.
If you activate Cool Mode while the fan is on a speed
higher than low, it will drop to the lowest speed for the
first 30 seconds, then resume the set speed.
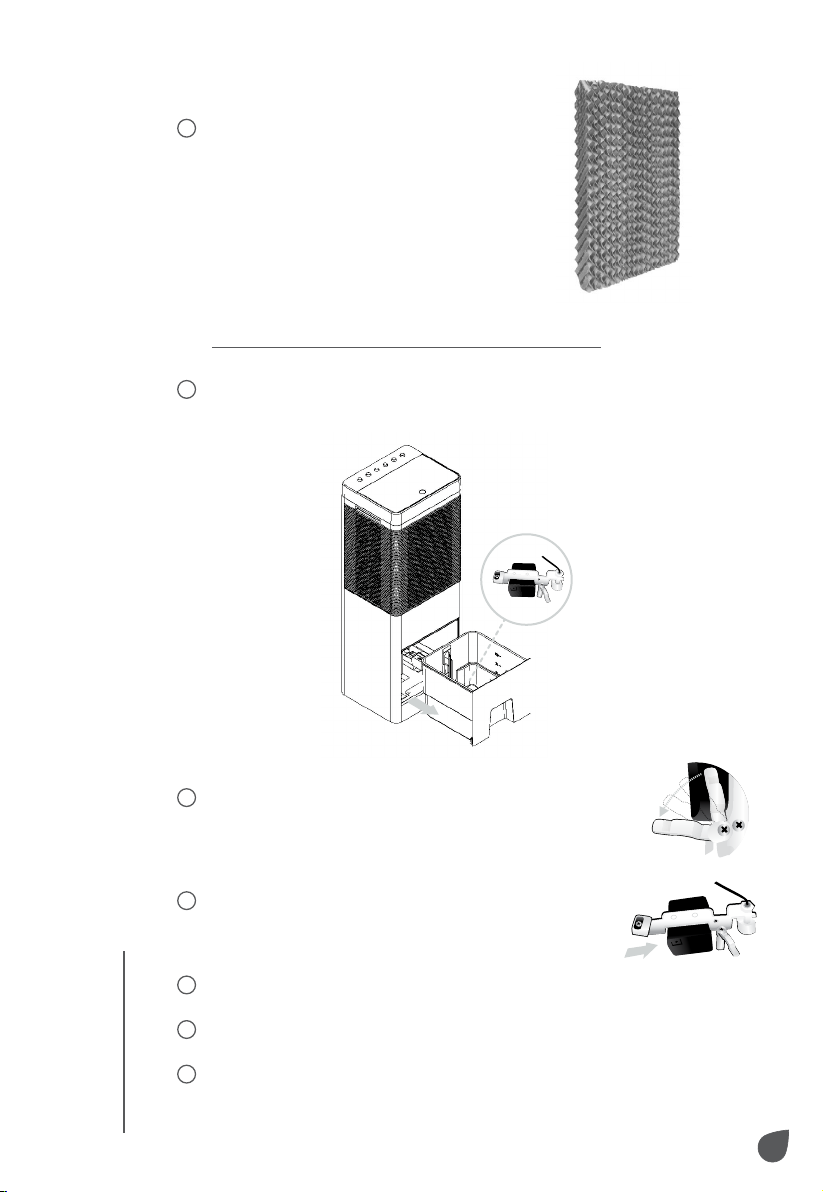
If the water tank is running low, the COOL status
indicator light will blink, and the water pump will
automatically stop. Refill the water tank and press the
COOL button to re-enter COOL Mode.
Press the NATURAL BREEZE icon on the unit or the
remote control to activate Natural Breeze mode, during
which the unit will randomly change fan speeds to
emulate the way natural wind moves.
Press the TIMER icon on the control panel or the
remote control to cycle through the four timer options:
1H, 2 H, 4H, and 8H. Each option designates a time
period for which the unit will run before automatically
shutting o.
Press the SLEEP icon on the control panel or remote
control to activate Sleep Mode. In Sleep Mode, the
cooler will run at the minimum fan speed to save energy
and make as little noise as possible, in order to avoid
disrupting your sleep at night. To deactivate Sleep Mode,
press the icon on the control panel or remote control,
and the cooler will return to normal functionality.
Press the HUMIDITY CONTROL icon on the control
panel or remote control to activate Humidity Control.
This function allows the cooling function to operate
until the ambient relative humidity reaches 85%. The
status light will be illuminated when this function is
activated. When humidity reaches 85%, the status light
will blink, the cooling function will be disabled, and the
fan will continue running. Once the humidity falls below
70%, the status light will become solid, and the cooling
function will reactivate.
1
2
3
4
6
5
USAGE

8
To clean the cooling pads and dust filters:
Unplug the unit.
Unscrew and remove
the side grilles, to
which the dust filters
are attached, and then
pull the cooling pad
toward you away from
the unit.
Unscrew and remove
the back grille, then
remove the cooling
pad by pulling it
toward you as shown.
CARE & MAINTENANCE
To disassemble and clean your evaporative cooler,
follow these steps:
1
2
3
CARE
CARE

9
To clean the water tank and water pump:
Pull out the water tank from the rear of the unit.
Locate the water pump inside the tank.
Unlock the water pump by pulling the lever
counter-clockwise as shown.
Pull water pump out of the tank (pump will
not disconnect completely).
Remove water tank.
Clean the water pump using a soft brush.
Clean and sanitize the water tank and return it to
the rear of the unit.
Water
pump
Water tank
1
2
3
4
5
6
Clean the cooling pads by running
them under water and removing
the dirt with a soft brush.
3
CARE
CARE

10
To drain the water:
Pull out the water tank from the rear of the unit.
Replace the drain valve and the water tank.
Make sure the water tank is above a drain or
receptacle for catching water. Remove the drain
valve from the water tank and let the water flow out
until the tank is empty.
1
3
2
Replace the water pump as shown.
Push water tank back in to close.
Return the lever by turning it clockwise,
locking the water pump in place.
7
9
8
CARE
CARE

11
TROUBLESHOOTING
TROUBLESHOOTING
Problem
The evaporative
air cooler isn’t
functioning, and
doesn’t respond
when you press
the buttons.
Unit turns on, but
no air is coming
out.
The pump
functions, but air is
not cool enough.
Cause
Blackout or faulty
power connection.
The AC fuse is
damaged or the
circuit has stopped
functioning to
prevent a power
overload.
The remote control
batteries are dead or
missing.
The remote control
or the control panel
is damaged.
Motor is damaged.
The dust filter is
clogged or dirty.
A motor connection
is loose or faulty.
The cooling pads are
clogged or dirty.
The cooling pads
are dry or receiving
insucient moisture
while the air cooler
is working.
The ambient
relative humidity is
excessively high.
The thermal
protection has
kicked in because
the motor is too hot.
Corrective Action to Take
Make sure the unit is connected to
a power adapter that is receiving
power and providing the correct
voltage.
Try restarting the unit or replacing
the fuse. Contact Ivation® customer
care if the unit still does not power
on.
Replace batteries in the remote
control.
If the remote control isn’t working,
test the function from the control
panel. If the control panel isn’t
working, test the function from
the remote control. If the function
works on one but not the other, the
part is damaged. Contact customer
care about a replacement remote
control/control panel.
Repair or replace the motor with
another of the same model –
contact Ivation® customer care for
a replacement part.
Clean or replace the dust filter.
Check whether or not the motor
connections are secure.
Clean or replace the cooling pads.
Check to make sure there is not a
clog leading from the water tray at
the bottom of the unit. Make sure
the pump is functioning correctly.
Contact customer care.
If the air cooler has been running
for an extended period of time,
it can raise the humidity level of
the room, which makes it harder
to reduce the temperature as
significantly as when the humidity
level is lower. Turn o the cooler
for a while and allow the humidity
level to return to normal, and then
try again.
Leave the cooler o until the motor
has had sucient time to cool
down.

12
TROUBLESHOOTING / SPECS
The pump fails to
function and the
cooling function
does not work.
The pump
functions, but does
not circulate water,
or the cooling pad
contains too little
water.
Water is spitting
from the cooler.
The unit is
producing an
unpleasant odor.
White sediment
is present in the
water tank.
Pump is damaged.
A motor connection
on the pump is
loose.
Clogged water tray.
The cooling pads
are not positioned
correctly.
Either the unit is
placed in an area
where unpleasant
odors are present,
or there is algae/
bacteria in the water
tank.
The water tank has a
high salt content.
The water
distribution tray is
clogged.
The water supply
hose or pump
strainer is clogged.
Contact customer care to replace
the pump.
Tighten the connection.
Clean the water tray and check for
clogs, remove if necessary.
Adjust the position of the cooling
pad.
Move the unit, dump and replace
the water in the water tank, and
fully clean and sanitize the water
tank.
Drain and clean the water tank and
make sure to frequently clean the
cooling pads.
Remove clog and clean the water
tray.
Clean the water hose or remove
any clogged particles at the pump
strainer.
SPECIFICATIONS
Dimensions: 16.5"x 14.6"x 41.3"(42 x 37 x 105 cm)
Weight (with water tank empty): 31.3 lbs. (14.2 kg.)
Weight (with water tank full): 88.6 lbs. (40.2 kg)
Fan Speeds: 4 (Low/Med/High/Turbo)
Rated Input: 220 V, 0.65 A
Rated Power: 150 W
Water Tank Capacity: 6.9 gal. (26 L)
Continuous Run Time: 7-11 hrs.
Evaporation Rate: 81.2 - 135.3 oz./hr. (2.4 - 4.0 L/hr.)
Area of Coverage: 269.1 ft (25 m)

13
LIMITED WARRANTY ON IVATION® EXTRA-LARGE
EVAPORATIVE COOLER
THIS LIMITED WARRANTY GIVES YOU SPECIFIC LEGAL
RIGHTS AND YOU MAY ALSO HAVE OTHER RIGHTS, WHICH
VARY FROM STATE TO STATE.
WE WARRANT THAT DURING THE WARRANTY PERIOD, THE
PRODUCT WILL BE FREE FROM DEFECTS IN MATERIALS AND
WORKMANSHIP.
LIMITATION OF LIABILITY
TO THE EXTENT NOT PROHIBITED BY LAW, THIS WARRANTY
IS EXCLUSIVE AND IN LIEU OF ALL OTHER WARRANTIES,
ORAL, WRITTEN, STATUTORY, EXPRESS OR IMPLIED. EXCEPT
FOR THE EXPRESS WARRANTIES CONTAINED IN THIS
LIMITED WARRANTY STATEMENT AND TO THE EXTENT NOT
PROHIBITED BY LAW, WE DISCLAIM ALL OTHER WARRANTIES,
EXPRESSED OR IMPLIED, STATUTORY OR OTHERWISE,
INCLUDING WITHOUT LIMITATION, THE WARRANTIES OF
MERCHANTABILITY AND FITNESS FOR A PARTICULAR
PURPOSE. SOME STATES DO NOT ALLOW DISCLAIMERS OF
IMPLIED WARRANTIES, SO THIS DISCLAIMER MAY NOT APPLY
TO YOU. TO THE EXTENT SUCH WARRANTIES CANNOT BE
DISCLAIMED UNDER THE LAWS OF YOUR JURISDICTION, WE
LIMIT THE DURATION AND REMEDIES OF SUCH WARRANTIES
TO THE DURATION OF THIS EXPRESS LIMITED WARRANTY.
OUR RESPONSIBILITY FOR DEFECTIVE GOODS IS LIMITED TO
REPAIR, REPLACEMENT OR REFUND AS DESCRIBED BELOW
IN THIS WARRANTY STATEMENT.
WHO MAY USE THIS WARRANTY? C&A Marketing, Inc. located
at 114 Tived Lane East, Edison, NJ (“we”) extend this limited
warranty only to the consumer who originally purchased the
product (“you”). It does not extend to any subsequent owner or
other transferee of the product.
WHAT DOES THIS WARRANTY COVER? ? This limited warranty
covers defects in materials and workmanship of the Ivation extra-
large evaporative cooler (the “product”) for the Warranty Period
as defined below.
WHAT DOES THIS WARRANTY NOT COVER? This limited
warranty does not cover any damage due to: (a) transportation;
(b) storage; (c) improper use; (d) failure to follow the product
instructions or to perform any preventive maintenance; (e)
WARRANTY INFORMATION

14
GET IN TOUCH!
modifications; (f) unauthorized repair; (g) normal wear and tear;
or (h) external causes such as accidents, abuse, or other actions
or events beyond our reasonable control.
WHAT IS THE PERIOD OF COVERAGE? This limited warranty
starts on the date of your purchase and lasts for one year (the
“Warranty Period”). The Warranty Period is not extended if we
repair or replace the product. We may change the availability of
this limited warranty at our discretion, but any changes will not
be retroactive.
WHAT ARE YOUR REMEDIES UNDER THIS WARRANTY? With
respect to any defective product during the Warranty Period,
we will, at our sole discretion, either: (a) repair or replace such
product (or the defective part) free of charge or (b) refund the
purchase price of such product if an exchange unit cannot be
provided.
HOW DO YOU OBTAIN WARRANTY SERVICE? To obtain
warranty service, you must contact us at 1-866-849-3049 or
by email at info@myivation.com during the Warranty Period to
obtain a Defective Merchandise Authorization (“DMA”) number.
No warranty service will be provided without a DMA number and
return shipping costs to our facilities shall be assumed by you, the
purchaser. Shipping costs of the replacement unit to you shall be
assumed by us.
GET IN TOUCH!
GET IN TOUCH!
info@myivation.com
1-866-849-3049
IVATION is a trademark of C&A IP Holdings, LLC, in the U.S, Canada, and the E.U.
All other products, brand names, company names, and logos are trademarks of
their respective owners, used merely to identify their respective products, and are
not meant to connote any sponsorship, endorsement or approval.
Distributed by C&A Marketing, Inc., 114 Tived Lane East, Edison, NJ 08837.
MADE IN CHINA
© 2020. C&A IP Holdings, LLC. All Rights Reserved.
Other Ivation Accessories manuals