Ivation IVEMG180S User manual

Meat Grinder and
Sausage Maker
USER GUIDE
IVEMG180S
Thank you for purchasing the Ivation® Meat Grinder and Sausage Maker. This User Guide is intended to
provide you with guidelines to ensure that operation of this product is safe and does not pose risk to the
user. Any use that does not conform to the guidelines described in this User Guide may void the limited
warranty.
Please read all directions before using the product and retain this guide for reference. This product is
intended for household use only.
This product is covered by a limited one-year warranty. Coverage is subject to limits and exclusions.
See warranty for details.
Table of contents
Box contents
Parts
Safety precautions
Features
Before first use
Assembly
Mincing meat
Setup for making kibbeh
Setup for making sausage
Care and maintenance
Specifications
Customer service

Box contents
Meat grinder
2 kibbeh attachments
4 sausage attachments
3 cutting plates
Food pusher
User guide
Parts
1
11. Large sausage attachment
12. Food pusher
13. Head
14. Auger
15. Fine cutting plate
16. Medium cutting plate
17. Fixing ring
18. Large cutting plate
19. Blade
1. Food dish
2. Hopper plate
3. Main body
4. Tightening knob
5. Power switch
6. Kibbeh attachments
7. Head inlet
8. Block sausage attachment
9. Fine sausage attachment
10. Medium sausage attachment

2
Safety Precautions
• This unit is for household use only. Do not use outdoors.
• Unplug the unit when not in use, before attaching and removing parts, and before cleaning.
• Keep out of reach of children.
• Always hold the bottom of the unit with both hands. Do not carry by the hopper plate or head.
• Do not attach the blade or cutting plate when using the kibbeh attachment.
• Never push food in by hand. Always use the food pusher.
• Do not grind hard foods such as bones or nuts.
• Do not grind ginger or other ingredients with hard fiber.
• Do not grind meat continuously for more than 10 minutes at a time.
• Do not use force when operating the unit. Risk of jamming.
• Do not attempt to replace parts or repair the unit.
• Do not immerse the cord or main body into water. Risk of electric shock.
• Do not touch the moving parts.
• Only use parts and attachments recommended by the manufacturer.
• This appliance is not intended for use by children or persons with reduced physical, sensory, or
mental capabilities, or lack of experience and knowledge unless they have been given supervision or
instruction concerning the use of the appliance by a person responsible for their safety.
• Do not operate the appliance if the cord or plug is damaged.
Features
Powerful copper motor: this appliance is equipped with a powerful motor for quick and efficient
grinding.
Dual safety switches: designed with maximum safety in mind, the two switches must always be in
the same position in order for the unit to operate, preventing accidental operation.
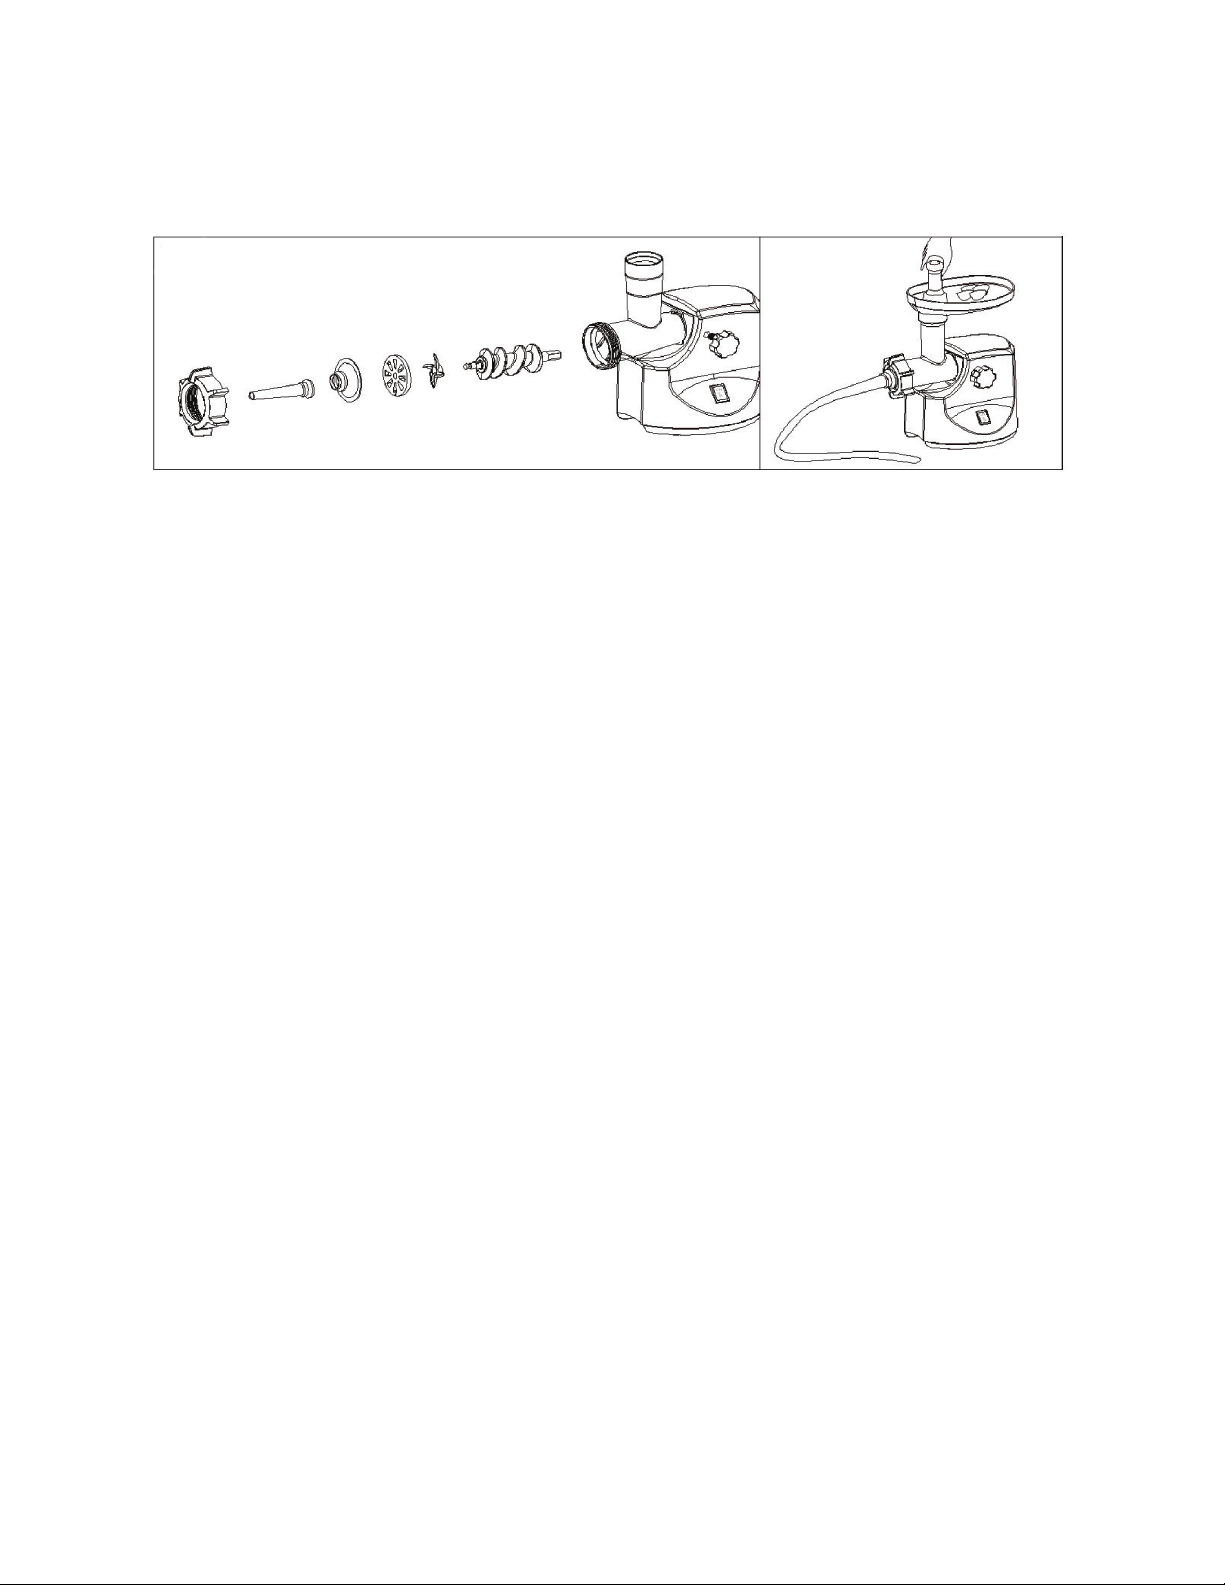
Cutting plates: the three included cutting plates allow you to customize the coarseness of the meat,
according to preference.
FDA approved, ETL certified: All parts used in this meat grinder are FDA approved and ETL certified,
so you can have peace of mind knowing that anything processed through the meat grinder is safe for
consumption.
Reversal function: as clogging can be an issue with any meat grinder, this model has been equipped
with a reversal function specifically designed to remove blockages in the unit.
1. Set both switches to the R position. This will reverse the rotation of the auger and blade to help
to remove the blockage.
2. Unplug the unit and clean the meat out of the head of the unit.
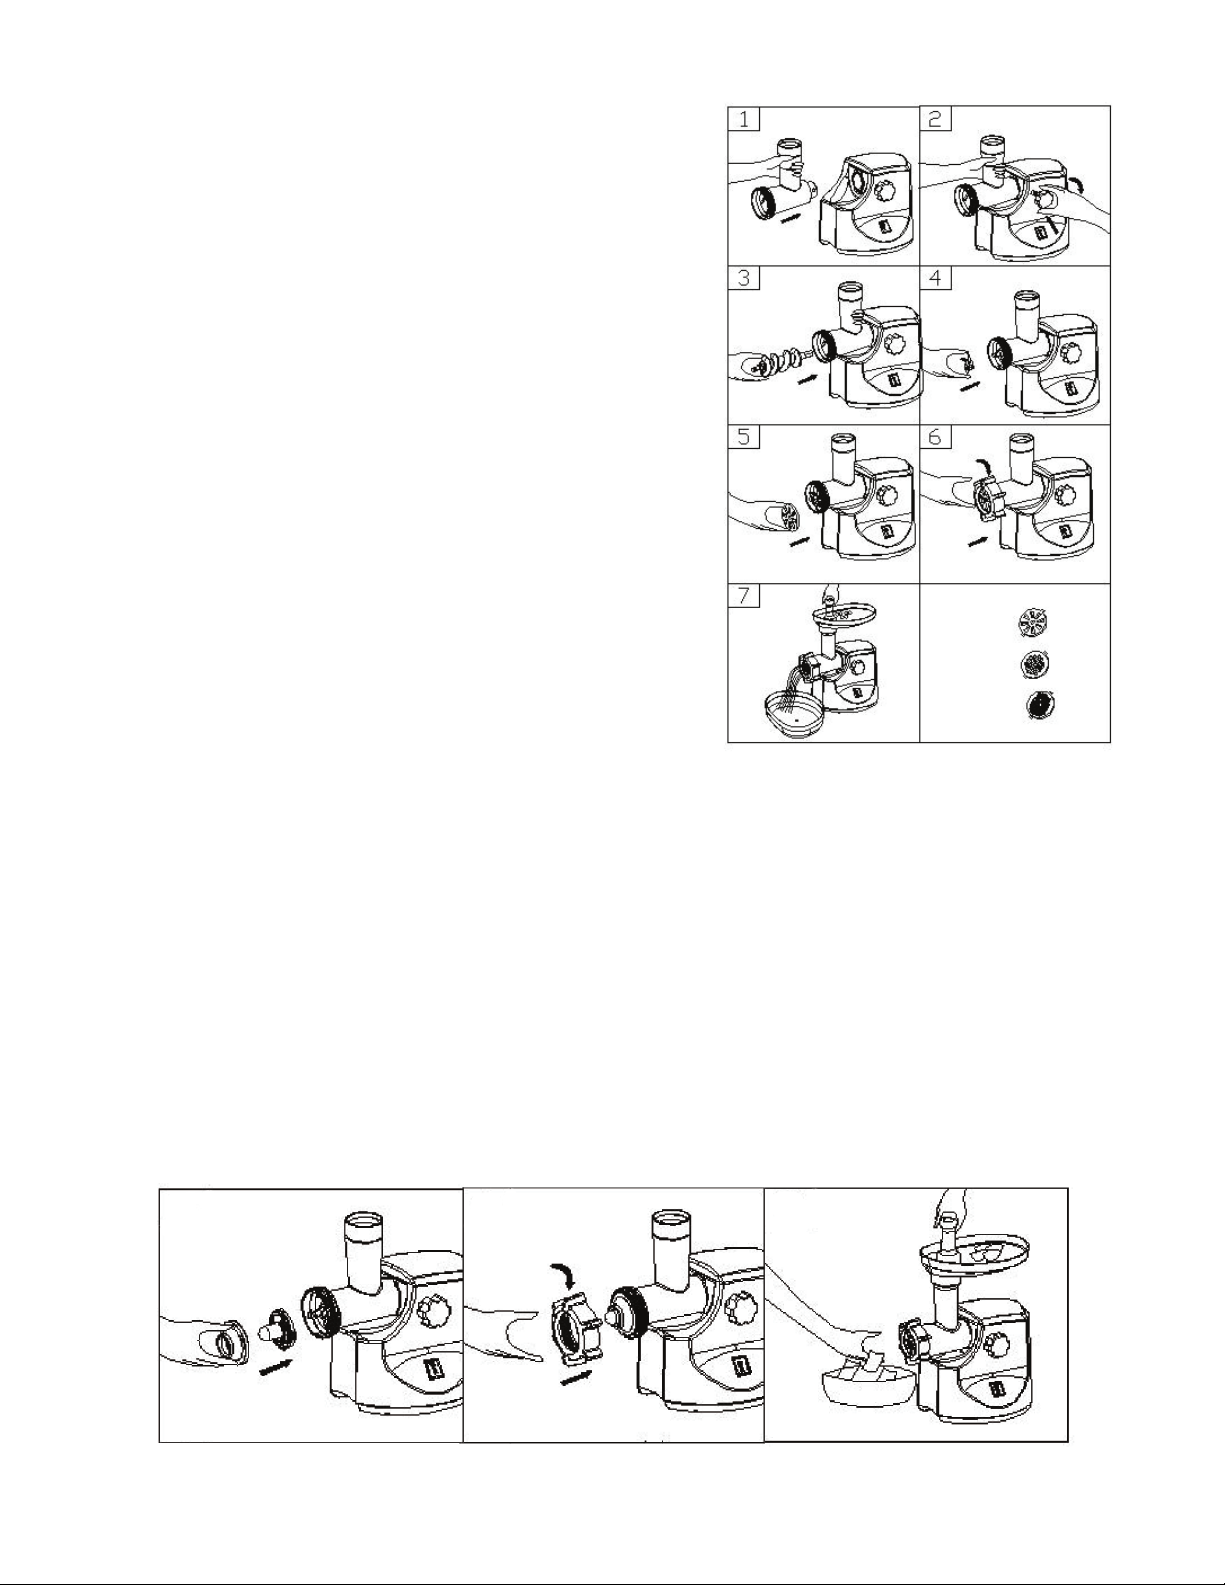
Before First Use
1. Ensure the voltage on the rating label corresponds with the voltage you use at home.
2. Wash each part of the unit and all accessories in warm soapy water. Do not submerge the main
body in water; wipe with a damp cloth.
3. Before plugging in the unit, check that both switches are in the OFF position.

3
Assembly
1. Place the unit on a flat and solid surface.
2. Insert the head into the head inlet (figure 1). Turn the
tightening knob clockwise until the head is securely in
place (figure 2).
3. Place the auger into the head, long end first. Turn it
slightly until it sets into the motor housing (figure 3).
4. Place the blade onto the end of the auger with the sharp
flat edge facing outward (figure 4).
5. Place the desired cutting plate over the blade, fitting the
protrusions into the slots (figure 5).
6. While holding down the cutting plate, screw the fixing
ring tightly onto the head. Be careful not to overtighten
(figure 6).
7. Place the hopper plate on top of the head and fix it into
position (figure 7).
NOTE: always keep the air vents located on the front and
back of the body unobstructed.
Mincing meat
1. Cut the meat into pieces about 1–2 inches in thickness.
For best results, use meat without sinew, bone, or fat.
2. Set the small switch on back of the unit to the ON position. Then set the large switch to the ON
position. This will cause the auger and blade to rotate in a clockwise direction.
3. Place the meat into the hopper plate, feeding it through with the food pusher.
4. When finished, set the large switch to the O position.
5. Unplug the unit.
NOTE: Only push the meat through with the food pusher. Never use bare hands.
Setup for making kibbeh
Place kibbeh attachments as seen in the illustrations below.

4
Setup for making sausage
Place sausage attachments as seen in the illustration below.
Care and maintenance
• Remove any excess meat left in the unit, then wash each part in warm soapy water.
• Do not clean with bleach or solutions that contain chlorine. This will discolor the finish.
• Do not immerse the main body in water or risk damage. Wipe it with a damp cloth.
• Do not clean with thinners or harsh detergents or risk cracking or discoloring the unit.
• Parts and accessories are not dishwasher safe
Specifications
Power: 120V
Wattage: 700W
Max locked power: 1800W
Rated frequency: 60Hz
Dimensions: 10.8" x 7.4" x 17" (275 x 188 x 430mm)
Weight: 13 lbs. (5.9kg)
Customer service
866-849-3049
Table of contents