Ivation IVAWLTHERM User manual

wireless barbecue
thermometer
manual
hello!
Welcome to the Ivation™ family. This manual offers you a
walkthrough of your new Wireless BBQ Thermometer. For
additional information and technical support, please contact
our helpful team at info@myivation.com.
receiver features
• LCD – Displays all icons, temperature and time.
• CLIP – Removable clip allowing you to have the
receiver hang.
• BATTERY COMPARTMENT –
Holds 2 AAA batteries.
• STAND (Removable Clip) – Swings out and
allow you to stand the receiver on tabletop.
Buttons
1 HI/HR – In THERMOMETER MODE, press
and hold until the digits flash; press to
increase the maximum BARBECUE
temperature. Press and hold for 2 seconds
to increase 10 degrees per second. In TIMER
MODE, when the TIMER is stopped, press to
set the hour. Press and hold for 2 seconds to
increase 10 hours per second.
2 LO/MIN – In THERMOMETER MODE, press and hold until the digits flash, press to increase the minimum BARBECUE temperature.
Press and hold for 2 seconds to increase 10 degrees per second. In TIMER MODE, when the TIMER is stopped, press to set the
minute. Press and hold for 2 seconds to increase 10 minutes per second.
3 LIGHT/MODE – Press to turn on the LCD back light for 5 seconds. Press and hold for 2 seconds to select THERMOMETER MODE or
TIMER MODE.
4 HI/CLEAR – In THERMOMETER MODE, press and hold until the digits flash, press to increase the maximum FOOD temperature.
Press and hold for 2 seconds to increase 10 degrees per second. In TIMER MODE, when the timer is stopped, press to clear the timer
setting back to 0:00.
5 ALERT, ˚C /˚F, START/STOP –Press and hold for 2 seconds to switch between ˚C and ˚F display. In THERMOMETER MODE, press to
turn ON/OFF the alarm. In TIMER MODE, press to start or stop the timer countdown or count up.
6 Power – Press to turn ON/OFF the receiver.
what’s in the box?
1x Receiver unit
1x Transmitter unit
1x Detachable stainless steel FOOD probe
1x Detachable stainless steel BARBECUE probe with clip
4x AAA batteries.
ITEM # IVAWLTHERM

transmitter features
• LCD – displays temperature of both FOOD and
BARBECUE. It will automatically switch between
FOOD and BARBECUE displays.
(Note: Press the re-sync button to switch the
display between ˚C and ˚F.)
• WIRE STAND – Allows you to stand the receiver
on tabletop or it can be reversed and used as a hanger.
• BATTERY COMPARTMENT – holds 2 AAA batteries.
• FOOD – Plug-in for stainless steel FOOD probe.
• BARBECUE –Plug-in for stainless steel
BARBECUE probe.
Buttons
1 RE-SYNC – Transmit manually, terminates the auto registration process. Press and hold for 2 seconds to register the radio
frequency with the receiver. Press to select the temperature unit between ˚C and ˚F.
2 POWER – Press and hold for 2 seconds to turns ON/OFF the transmitter.
installing batteries
Open the battery compartment of the receiver and insert two “AAA” batteries with correct polarity. Open the battery compartment of
the by removing the two small screws and insert two “AAA” batteries with correct polarity.
registering receiver & transmitter
The Barbecue Thermometer needs the receiver to register and lock in the radio frequency signal from the transmitter, every time the
device is turned on. Proceed as follows to register.
1 Plug the stainless steel probe sensors into the corresponding plug in of the transmitter. Note: The FOOD probe is 6 inches long with
pointed end while the BARBECUE probe is 3 inches long with a grill rack clip.
2 Turn on the receiver by pressing the POWER button for 2 seconds.
3 Turn on the transmitter by pressing the power button 2 seconds, found on the back of the transmitter. This needs to be done within
120 seconds of turning on the receiver in order for the receiver to receive the Registration Code from the transmitter. If it doesn’t
beep within 5-10 seconds and the “---” shown on LCD was flashing or is solid, press the POWER button for 2 seconds to turn OFF the
Transmitter and then turn back ON. Pressing and holding the RESYNC button for 2 seconds will get the same result as turning the
transmitter OFF and then ON.
4 Registration is completed when the unit beeps and the probe temperatures will appear on LCD.
loss link alert
If the receiver is taken out of range or there is abnormal external interference or after shutting OFF the transmitter, the receiver may not
be able to receive the transmission from the transmitter. If this happens over 4 minutes, the unit will alert you by beeping once for every
4 seconds to tell you to re-sync the signal. Pressing any button on Receiver will stop the Loss Link beep.
To regain transmission signal, move the receiver close to the transmitter, turn OFF the Receiver and then turn back ON. Press and hold the
RESYNC button of the transmitter 2 seconds within 120 seconds and the temperatures should appear on the receiver display.
Remarks: According to FCC Part 15.231(e) rule, the RESYNC button can be activated once every 12 seconds manually. If the re-
synchronization doesn’t succeed 1st time, wait for 12 seconds before pressing & hold the RESYNC button again. Or you can press and hold
the power button 2 seconds to turn OFF the Transmitter and then turn back ON again.It will produce the same result.
thermometer mode
In thermometer mode, the LCD will show a FOOD icon in the upper part of the display and a BARBECUE icon in the lower part of the
display. You can follow processes below to gain your desired settings.
Setting HI (Maximum) FOOD Temperature
1 Press the HI/ CLEAR button to display the maximum FOOD temperature, which will only be displayed for 5 seconds. The FOOD
temperature range is 32˚ F - 572˚ F and the default setting is 176˚ F.
2 Press and hold the HI/ CLEAR button until the digits flash.
3 Press the HI/ CLEAR button to set your desired temperature. It will increase one with each press. Press and hold the HI/ CLEAR
button to fast increase.
4 Press the LIGHT/MODE button to confirm the setting. Note: Press HI/CLEAR to read your set maximum FOOD temperature. To
destroy harmful bacteria like Salmonella and E Coli the USDA recommends the following minimum internal temperatures:
(Beef, Veal, Lamb Steaks & Roasts and Fish) to be 145˚ F
(Egg Dishes, Pork and Ground Beef Veal & Lamb) to be 160˚ F
(Turkey, Chicken & Duck Whole, Pieces & Ground) to be 165˚ F

Setting HI (Maximum) BARBECUE Temperature
1 Press the HI/HR button to display the maximum BARBECUE temperature, which will only be displayed for 5 seconds. The maximum
BARBECUE temperature range is 140˚ F – 572˚ F and the default setting is 176˚ F. Note: The unit will not allow you to set the maximum
BARBECUE temperature below the minimum BARBECUE temperature.
2 Press and hold the HI/HR button until the digits flash.
3 Press the HI/HR button to set your desired temperature. It will increase one with each press. Press and hold the HI/ CLEAR button
to fast increase.
4 Press the LIGHT/ MODE button to confirm the setting. Note: Press the HI/HR button to read your set maximum BARBECUE
temperature.
Setting LO (Minimum) BARBECUE Temperature
1 Press the LO/MIN button to display the minimum BARBECUE temperature, which will only be displayed for 5 seconds. The minimum
BARBECUE temperature range is 32˚ F – 554˚ F and the default setting is 50˚ F. Note: The unit will not allow you to set the minimum
BARBECUE temperature above the maximum BARBECUE temperature.
2 Press and hold the LO/MIN button until the digits flash.
3 Press the LO/MIN button to set your desired temperature. It will increase one with each press. Press and hold the LO/MIN button to
fast increase.
4 Press the LIGHT/MODE button to confirm the setting.Note: Press the LO/MIN button to read your set minimum BARBECUE
temperature.
Activating the Temperature Alarm
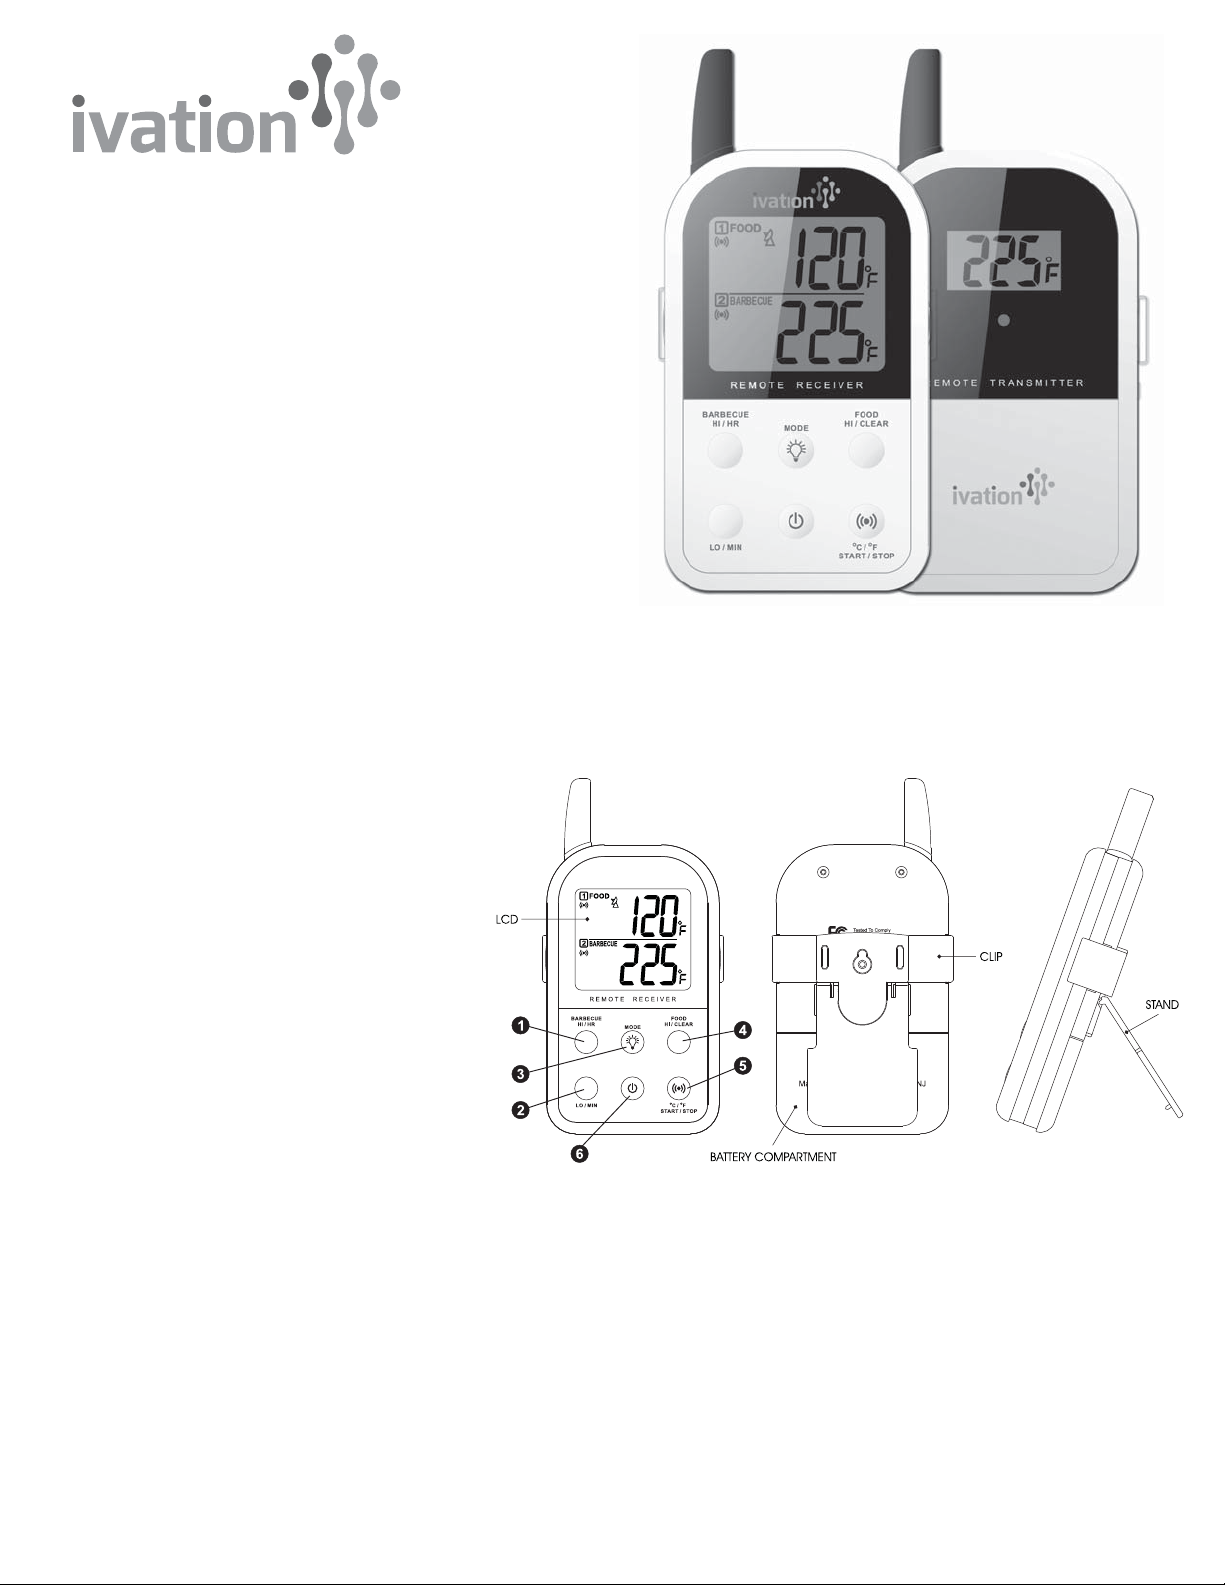
You can press the ALERT, ˚ C /˚ F, START/STOP button to activate the temperature alarm for BARBECUE & FOOD. The alarm icons will
appear beneath the FOOD & BARBECUE icons.
The receiver will beep with the alarm icon and probe temperature flashing if:
a) The actual FOOD temperature has exceeded your set maximum FOOD temperature. (Beep twice in every second)
b) The actual BARBECUE temperature has exceeded your set maximum BARBECUE temperature. (Beep once in every second)
c) The actual BARBECUE temperature has fallen below your set minimum BARBECUE temperature. (Beep once in every second)
Note: The minimum BARBECUE temperature alarm will not be activated until the actual BARBECUE temperature goes above the set
minimum temperature.
For example: You set the minimum BARBECUE temperature as 220˚ F and press the ALERT, ˚C / ˚F, STOP/START to activate the alarm.
The unit will NOT beep or flash even if the actual BARBECUE temperature is below 220˚ F. It assumes that your BARBECUE is not up to
temperature. Only when the actual BARBECUE temperature goes over 220 ºF, then falls below 220 ºF, can the alarm be activated, the
unit will beep and flash.
Note: The unit will retain your Barbecue & Food alert temperature settings even after the unit is turned off.
timer mode
Count Down
1 Press and hold the LIGHT/MODE button to switch the unit from THERMOMETER MODE to TIMER MODE. The timer 0:00, with a small
icon TIMER will be shown on the lower part of the display.
2 Press the HI/HR button to set the hour and LO/MIN button to set the minute.
3 Press the ALERT, ºC /ºF, START/STOP button to start countdown. The icon “ ” will blink.
4 Press the ALERT, ºC /ºF, START/STOP button to stop the countdown. The “ ” will be solid.
5 Press the HI/CLEAR button to clear the setting back to 0:00.
Note: The minimum setting for the timer is 1 minute and the maximum setting is 24 hours. It will be displayed as hours & minutes
when the timer does not exceed 10 hours. Once it exceeds10 hours, only the hour can be displayed. When the countdown reaches
“0:00” the timer starts counting up and it will beep for 30 seconds. The “0:00” and “ ” will blink. Press the ALERT/˚C / ˚F /START/STOP
button to stop the beep.
Count Up
1 Press and hold the LIGHT/MODE button to switch the unit from THERMOMETER MODE to TIMER MODE. The timer 0:00, with a small
icon TIMER will be shown on the lower part of the display.
2 Press the ALERT, ˚C /˚F, START/STOP button to start count up. The icon “ ” will blink.
3 Press the ALERT, ˚C /˚F, START/STOP button to stop the count up. The “ ” will be solid.
4 Press the HI/CLEAR button to clear the setting back to 0:00.
Note: When the count up timer reaches 9:59, it will keep displaying as 9:59, meanwhile, the unit beeps with the “ ” icon blinking for
30 seconds.
Note: The unit will retain your timer settings even after the unit is turned off.
Temperature Display Formats
Press and hold the ALERT, ˚C /˚F, START/STOP button for 2 seconds to switch between ˚C and ˚F.

using timer mode & temperature mode simultaneously
The TIMER MODE and TEMPERATURE MODE can be used simultaneously. This allows you to monitor the temperature for both FOOD
and BABECUE in the TEMPERATURE MODE when using the TIMER MODE to keep track of another cooking task. You can tell different
task by the alarm sound as well as the icons.
1 In the THERMOMETER MODE, when the temperature is reached, the receiver will alarm you by beeping once in every second for the
BARBECUE temperature and beeping twice in every second for the FOOD temperature. The alarm icons and probe temperature will
blink along with the alarm sound.
2 In the TIMER MODE, when the timer is reached, the receiver will alarm you by beeping 3 times in every second. Either the upward
arrow (for count-up) or downward arrow (for countdown) will blink.
procedure for typical use in an outdoor barbecue
The following typical examples will go through the steps to have the WIRELESS BARBECUE THERMOMETER alarm you if a piece of
meat (Boston Butt) is cooked to 160 ˚F if your barbecue temperature falls below 225 ˚F or goes above 250 ˚F, and remind you to check
the smoker in 2 hours.
Set up BARBECUE
Follow the registration procedure.
Place meat on the BARBECUE grill rack.
Insert FOOD probe sensor into the center of thickest portion of the meat. Avoid touching bone or heavy fat areas.
Clip the special BARBECUE probe to grill rack of barbecue chamber.
Position the probe sensor wires so they will not come into contact with flames and exit the barbecue without being pinched/ crushed
by the cover.
Stand/ hang the transmitter away from heat source of barbecue. DO NOT put transmitter on closed cover or under the cover. The
transmitter is water proof for use in rain.
In THERMOMETER MODE
Press HI/CLEAR to display the maximum FOOD temperature.
Press and hold HI/CLEAR until the maximum FOOD temperature flashes.
Press HI/CLEAR repeatedly until 160˚ F appears (press and hold HI/CLEAR button will increase the temperature 10 degrees per second)
Quickly press LIGHT/MODE to confirm the 160˚ F setting.
Press HI/HR to display the maximum BARBECUE temperature.
Press and hold HI/HR until the maximum BARBECUE temperature flashes.
Press HI/HR repeatedly until 250˚ F appears (press and hold HI/HR button will increase the temperature 10 degrees per second)
Quickly press LIGHT/MODE to confirm the 250˚ F setting.
Press LO/MIN to display the minimum BARBECUE temperature.
Press and hold LO/MIN until the minimum BARBECUE temperature flashes.
Press LO/MIN repeatedly until 225˚ F appears (press and hold LO/MIN button will increase the temperature 10 degrees per second)
Quickly press LIGHT/MODE to confirm the 225˚ F setting.
Press ALERT, ˚C /˚F, START/STOP to activate the temperature alarm for the BARBECUE and FOOD.
In TIMER MODE
Press HI/HR twice to set for 2 hours so that 2:00 will be displayed.
Press ALARM/START/STOP to start the countdown.
Press and hold LIGHT/MODE to go back to THERMOMETER MODE.
Clip the receiver to your belt or pocket and move up to 300 ft away from the barbecue. Go indoors if desired. You are now remotely
monitoring your food and barbecue. The receiver will beep and flash if your meat temperature goes above 160˚ F or the barbecue
temperature falls below 225˚ F or exceeds 250˚ F.
helpful hints
If the receiver and / or the transmitter display LLL or HHH instead of the probe temperature, wait for probe to reach room temperature.
If LLL or HHH is still displayed or you get a false temperature, squeeze the probe jacks harder into the transmitter and twist them back
and forth so they make good contact. If the problem still persists it is likely the internal probe wire has shorted out either through
moisture or heat damage.
Do not immerse the probe in water while cleaning.
Do not allow the probe or probe wire to come into contact with flames.
Within the warranty period, return defective probe to address below along with return address and we will send you a replacement
probe at no charge.
If the temperature displayed seems to read too high or the temperature seems to increase too quickly, check to make sure the probe tip
is not poking through the food to outside. Reposition the probe tip in the center of the thickest part of food. Avoid touching bone or heavy
fat areas.

cautions:
1) Always wear a heat resistant glove to touch the stainless steel probe sensors or wires during or just after cooking. Do not touch with
bare hands.
2) Keep the stainless steel probe sensors and wires away from children.
3) Clean the stainless steel probes and dry thoroughly after each and every use.
4) Do not use the receiver in the rain. It is NOT rain proof. The transmitter is rain proof but not water tight. Do not immerse in water.
5) Do not expose the plugs of the stainless steel probes or the plug in holes of the transmitter to water or any liquid. This will result in a
bad connecting and faulty readings.
6) Do not expose the receiver or transmitter to direct heat or surface.
7) Do not use stainless steel probes in microwave oven.
8) The Barbecue Thermometer registers temperatures as low as 32˚ F (0˚ C) and as high as 572˚ F (300˚ C). LLL will be displayed below
32˚ F and HHH will be displayed above 572˚ F. Do not use the stainless probe sensor above 572˚ F. Doing so will deteriorate the wire.
9) Not Intended for Use by Persons ages 12 and Under.
cleaning
1) Always wear a heat resistant glove to touch the stainless steel probe sensors or wires during or just after cooking. Do not touch with
bare hands.
2) Keep the stainless steel probe sensors and wires away from children.
3) Wash the metal probe tips with hot soapy water and dry thoroughly. Do not immerse the probe in water while cleaning.
4) Wipe the transmitter and receiver with damp cloth. Do not immerse either in water.
information to user
Warning: Changes or modifications to this unit not expressly approved by the party responsible for compliance could void the users’
authority to operate the equipment.
Note: This equipment has been tested and found to comply with the limits for a Class B digital device, pursuant to part 15 of the
FCC Rules. These limits are designed to provide reasonable protection against harmful interference in a residential installation. This
equipment generates, uses and can radiate radio frequency energy and, if not installed and used in accordance with the instructions,
may cause harmful interference to radio communications.
However, there is no guarantee that interference will not occur in a particular installation. If this equipment does cause harmful
interference to radio or television reception, which can be determined by turning the equipment off and on, the user is encouraged to try
to correct the interference by one or more of the following measures:
- Reorient or relocate the receiving antenna.
- Increase the separation between the equipment and receiver.
- Connect the equipment into an outlet on a circuit different from that to which the receiver is connected.
- Consult the dealer or an experienced radio/TV technician for help.
This device complies with part 15 of the FCC Rules. Operation is subject to the following two conditions: (1) this device may not cause
harmful interference, and (2) this device must accept any interference received, including interference that may cause undesired operation.
LIMITED ONE YEAR WARRANTY
C&A Marketing, Inc. warrants the Ivation Wireless BBQ Thermometer to be free of defects in parts, materials and workmanship for a
period of one year from date of purchase. Should any repairs or servicing under this warranty be required, Contact C&A Marketing Inc.
and ship the Ivation Wireless BBQ Thermometer to the C&A Marketing Inc. service center located as follows:
C&A Marketing Returns Department
2 Bergen Turnpike
Reidgfiled Park, NJ 07660
Tel: 201-881-1900
Email Info@myivation.com
www.myivation.com
Do not send any parts or product to C&A Marketing, Inc. without obtaining a Return Authorization Number and instructions. This warranty
is VOID if instructions for use are not followed; for accidental damage; for commercial use; for damage incurred while in transit; or if the
Ivation Wireless BBQ Thermometer has been tampered with. This warranty gives you specific legal rights and you may also have other
rights which vary from state to state.
Distributed by C & A Marketing
2 Bergen Turnpike, Ridgefield Park, NJ 07660
Made in China
ivation is a trademark of C&A IP Holdings, LLC
©2014 All right reserved
Table of contents
Other Ivation Thermometer manuals