IVOL PW01A-08U User manual

User’s Manual
8/16 Port Wall Charging Cabinet
8 Port 16 Port
IVOL
Habraken 2327
5507TK, Veldhoven
The Netherlands
Tel: +31 (0)40-2542823

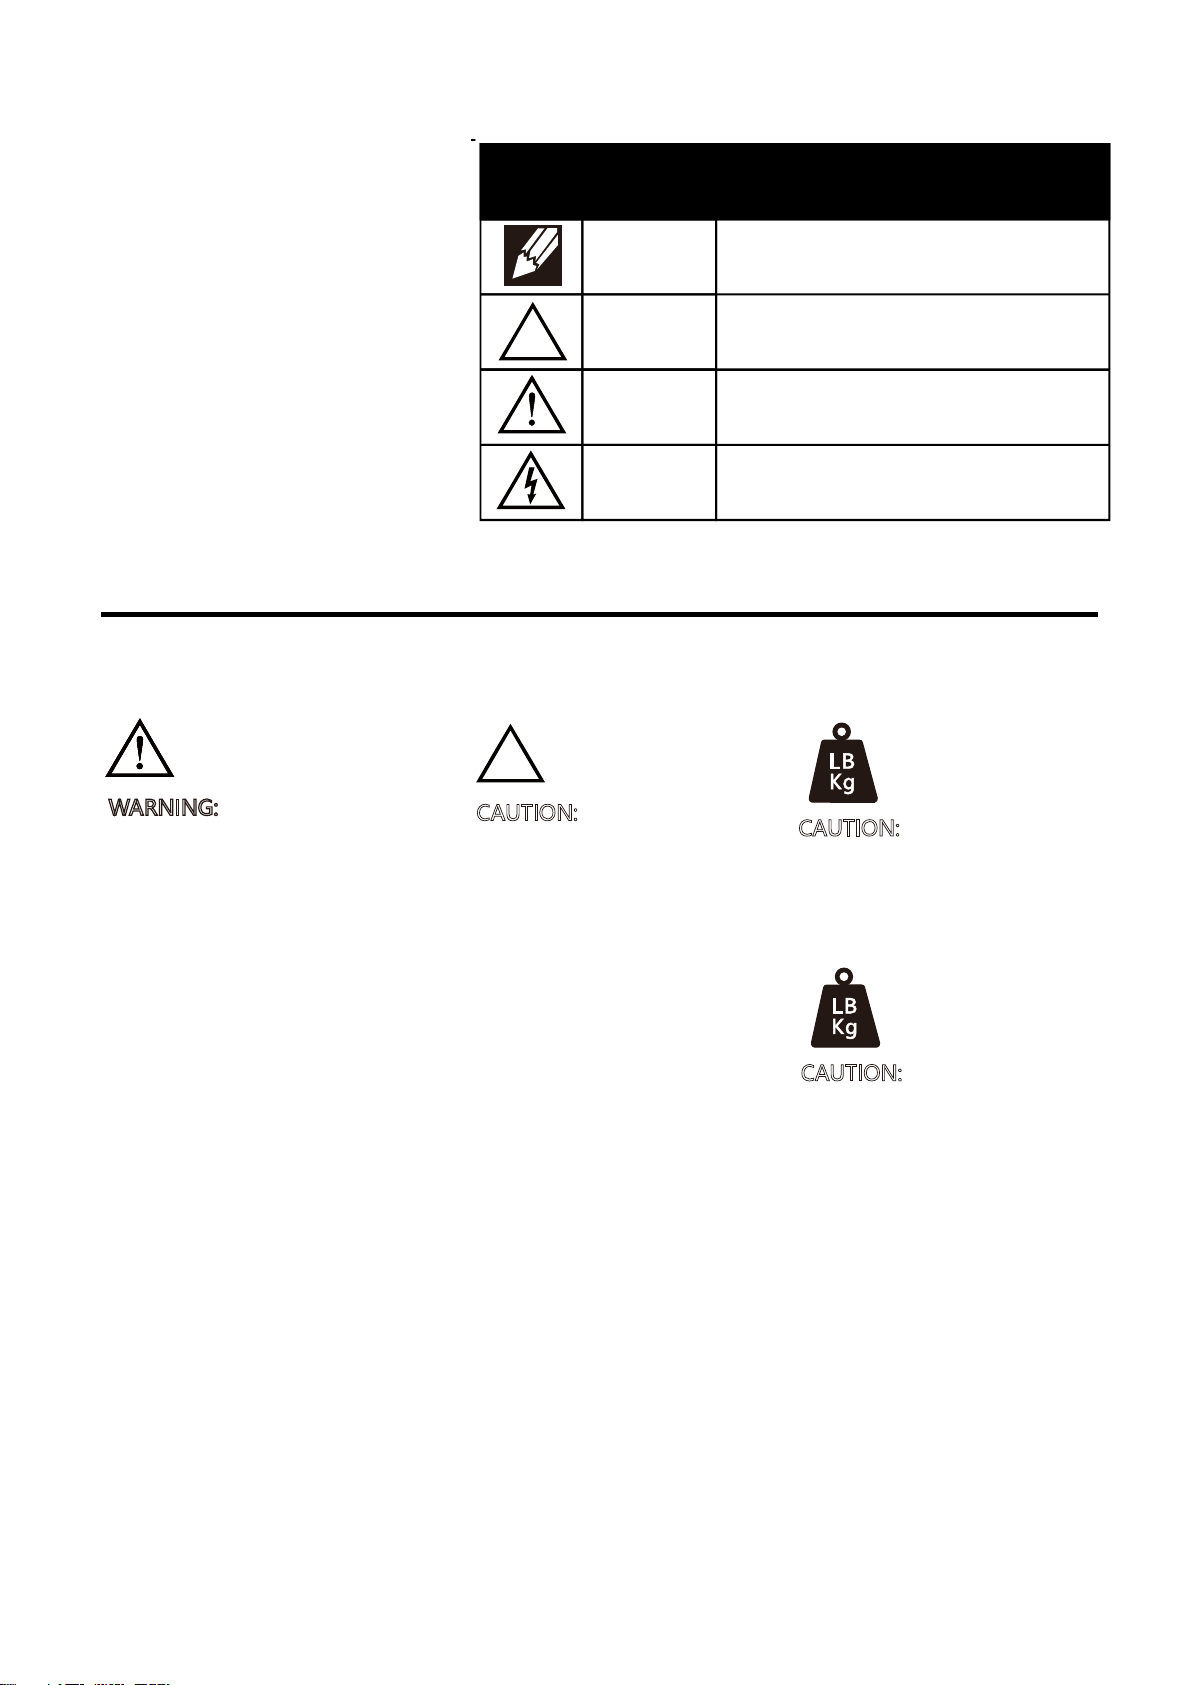
Symbol Signal Word Level of Hazard
NOTE
CAUTION
WARNING
ELECTRICAL
Hazard Symbols
Review
Safety
WARNING: Please consult with
appropriate engineering,
architectural or construction
professional to ensure that the
mounting solution is mounted
properly to handle applied
loads.
CAUTION: Make sure the
cabinet is level to the wall
surface. Do not over-tighten
the bolts.
CAUTION: Do not exceed
maximum listed weight
capacity. Serious injury or
property damage may occur.
≤ 29.54 lbs.(13.4kg)
These symbols alert users of a safety
condition that demands attention. All
users should be able to recognize and
understand the significance of the foll
-owing Safety Hazards if encountered
on the product or within the documen
-tation. Children who are not able to
recognize and respond appropriately
to safety alert should not use this pro
-duct without adult supervision!
A Note indicates important information that
helps you make better use of this product.
A CAUTION indicates either potential damage
to hardware or loss of data and tells you how
to avoid the problem.
A WARNING indicates either potential for
property damage, personal injury, or death.
An electrical indicates an impending electrical
hazard which, if not avoided, may result in
personal injury, fire and /or death.
CAUTION: Do not exceed
maximum listed weight
capacity. Serious injury or
property damage may occur.
≤ 59.08 lbs.(26.8kg)
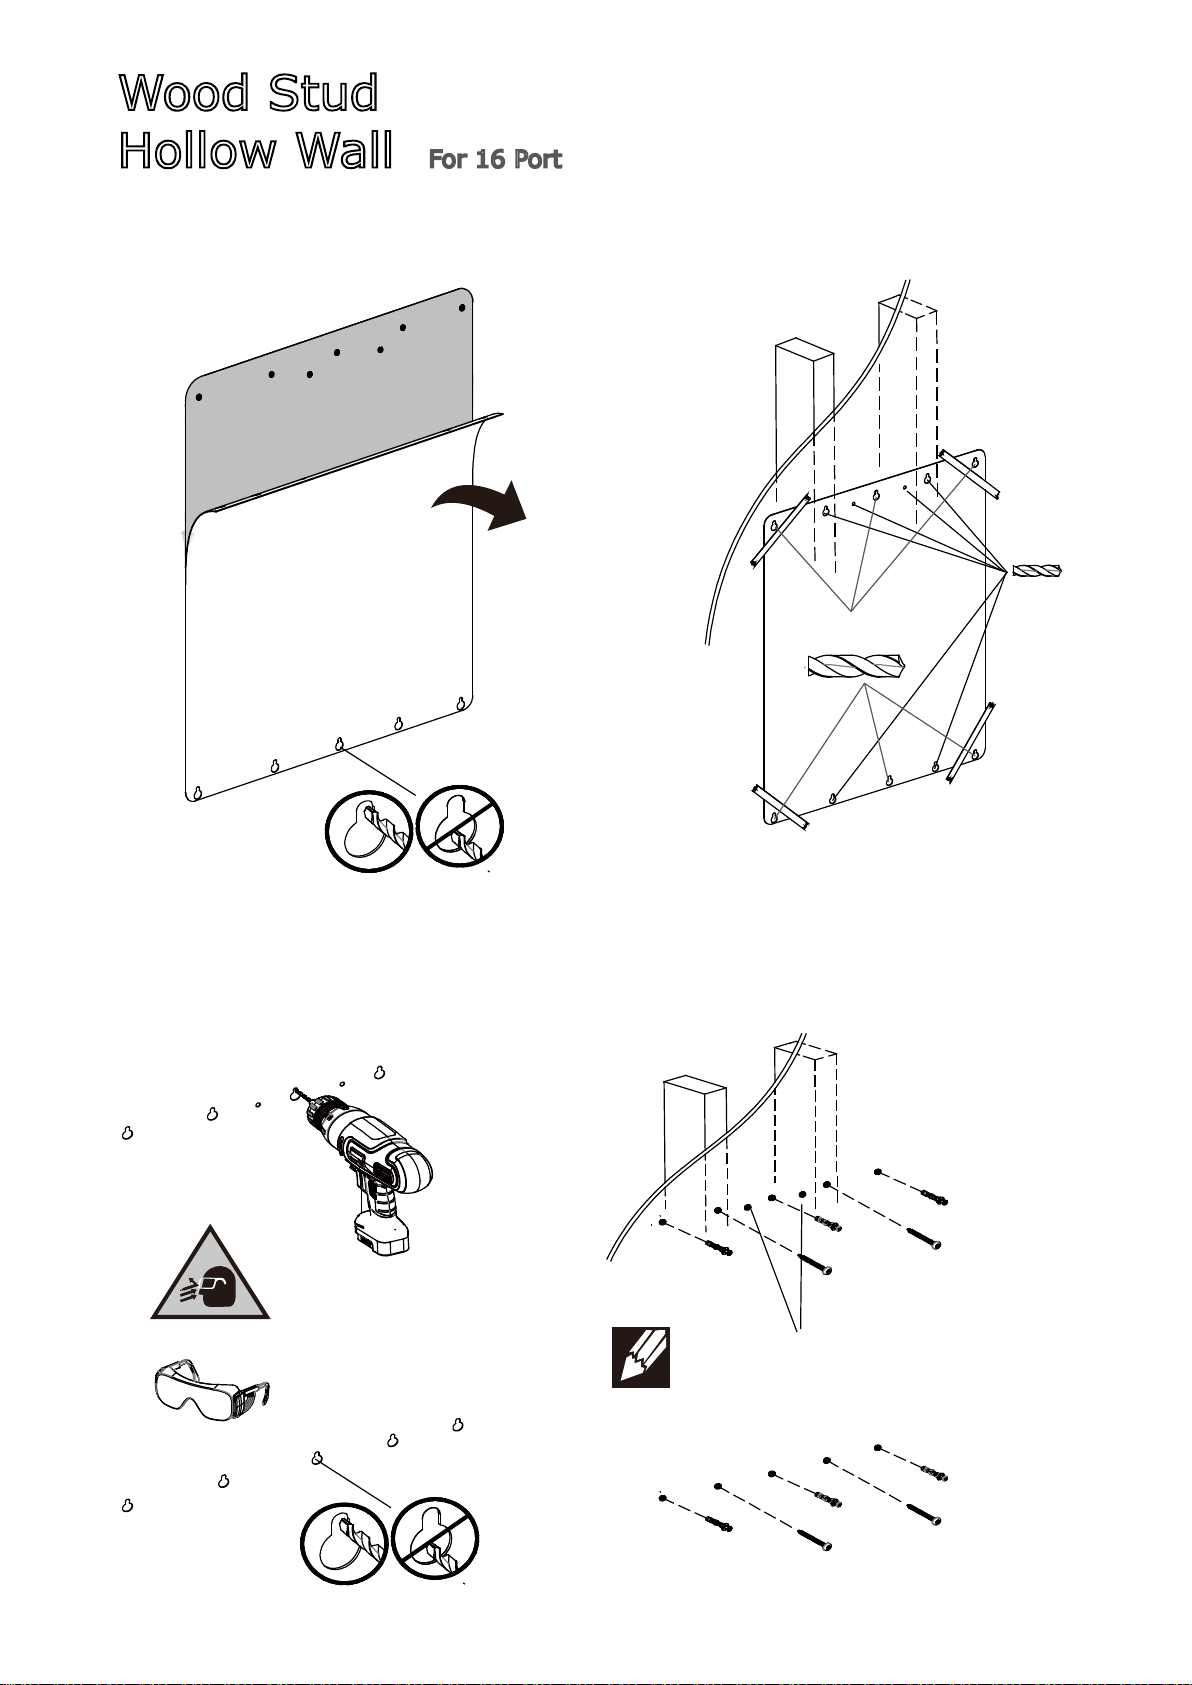
8 Port
16 Port

Components
Tools Needed
Remove Internal Packaging
TEAM
LIFT
For Your Safety!
1X (Only For
8 Port) 1X (Only For 16 Port) 1X
Switzerland
1X
UK
1X
EU
2X
2X
9X For 8 Port
12X For 16 Port
9X For 8 Port
12X For 16 Port
6X
WOOD STUD
HOLLOW WALL
Φ3/16”(5mm)
Φ3/8”(10mm) Φ3/8”(10mm)
CONCRETE
1X

≤8.6"
(220mm)
≤12"(305mm
≤1"
(25.4mm)
≤ 3 lbs.
(1.36kg)
Individual tablet weight:
Individual dimensions (including cover):
8 Port
16 Port
62”-68
62”-68
Mounting Considerations

Wood Stud
Hollow Wall For 8 Port
WOOD STUD
HOLLOW WALL CONCRETE
2“
(51mm)
4“
(102mm)
5/8“-1.2“
(16-30mm)
≥4“
(≥102mm)
≤3/8“
(≤10mm)
62-68”
(158-173mm)
a. Find stud and draw a mark,
62”-68”(158-173cm) from floor b. Place template on wall lining up the
chosen hole
Hole Opon 1

Wood Stud
Hollow Wall For 8 Port
c. Level and secure template to wall
Φ3/8”(10mm)
Φ3/16”(5mm)
Hole Opon 2
tape
d. Draw marks through holes of template,
Then take off template.
e. Use suitable drill bit when drilling
holes, refer to below picture

Wood Stud
Hollow Wall For 8 Port
≥60mm
2X
6X
Φ3/16”(5mm)
Φ3/8”(10mm)
Note: Use the Φ3/16”(5mm) drill bit when drilling directly into the wood stud.
Use the Φ3/8”(10mm)drill bit when drilling into the hollow wall for the anchors.
Use hollow wall anchors where ever a screw does not get inserted directly into the wood stud.
g.Insert anchors to wall then tighten screws.
This hole is reserved
for tightening screw from
inside the cabinet.
f.Drill 5 holes at the top.
Drill 4 holes at the bottom.
1.2mm
Wood Stud
Hollow Wall
1.2mm

62-68”
(158-173mm)
Wood Stud
Hollow Wall For 16 Port
a. Find stud and draw a mark,
62”-68”(158-173cm) from floor. b. Put template on wall lining up
the chosen holes
Hole Opon 1
Hole Opon 2
c. Level and secure template to wall
tape

Wood Stud
Hollow Wall For 16 Port
f. Drill 7 holes at the top.
Drill 5 holes at the bottom
This two holes are reserved for tightening
screws from inside cabinet.
g.Insert anchors to wall then tighten screws.
d. Draw marks through holes of template,
then take off template.
Φ3/8”(10mm)
Φ3/16”(5mm)
e. Use suitable drill bit when drilling
holes, refer to below picture.

≥60mm
4X
6X
Φ3/16”(5mm)
Φ3/8”(10mm)
Wood Stud
Hollow Wall For 16 Port
spacer
Note: Use the Φ3/16”(5mm) drill bit when drilling directly into the wood stud.
Use the Φ3/8”(10mm)drill bit when drilling into the hollow wall for the anchors.
Use hollow wall anchors where ever a screw does not get inserted directly into the wood stud.
1.2mm
Wood Stud
Hollow Wall
1.2mm
spacer

CONCRETE For 8 Port
a.Draw a mark on wall
62”-68”(158-173cm) from floor. b.Level and secure template to wall.
Φ3/8”(10mm)
d. 1 drill 5 holes at top.
2 drill 4 holes at bottom.
tape
62-68”
(158-173mm)
c.Draw marks through template,
then take off template.
Mounting holes must be at least 2-3/8”(60mm)
deep and must be located within solid concrete, not mortar
or covering material. If you drill into an area of concrete
that is not solid, reposition mounting holes until both anchors
can be fully inserted into solid concrete!
≥60mm

CONCRETE For 8 Port
9X
8X
e.
Anchors that are not fully set in solid
concrete will not support the applied load
resulting in an unstable, unsafe condition
which could lead to personal injury and /or
property damage. Consult a construction
professional if you have any doubt about
what this means in regard to your particular
situation.
Insert a spacer between wall
and screw, tighten screw
Insert anchors into holes.
Remove spacer
1.2mm
spacer

CONCRETE For 16 Port
Φ3/8”(10mm)
a.Draw a mark on the wall
62”-68”(158-173cm) from floor. b.Level and secure template to wall.
d. 1 Drill 7 holes at top.
2 Drill 5 holes at bottom.
tape
62-68”
(158-173mm)
c.Draw marks through template,
then take off template.
Mounting holes must be at least 2-3/8”(60mm)
deep and must be located within solid concrete, not mortar
or covering material. If you drill into an area of concrete
that is not solid, reposition mounting holes until both anchors
can be fully inserted into solid concrete!
≥60mm

CONCRETE For 16 Port
12X
10X
spacer
e.
Anchors that are not fully set in solid
concrete will not support the applied load
resulting in an unstable, unsafe condition
which could lead to personal injury and /or
property damage. Consult a construction
professional if you have any doubt about
what this means in regard to your particular
situation.
Insert a spacer between wall
and screw, tighten screw
Insert anchors into holes.
Remove spacer
1.2mm

Plug power cable into power inlet


X1
Warning: 2 people are
required to lift this
product.
Hang wall cabinet onto screws.
Unlock door by turning key,
Push door to the left to open.
Secure cabinet to wall by tightening
screw through reserved hole.

Unlock doors by turning the key, push the doors in arrow pointed directions to open.
Warning: 2 people are
required to lift this
product.

Connecting USB cables
Insert USB cables into USB ports,
route cables through access holes.
X2
Sesure cabinet to wall by tightening 2 screws through the reserved 2 holes.
Use the key to open the side-door

POWER SWITCH
Plug cables into tablets Turn on power switch
Use key to open the door in the center.
16 ports cabinet
8 ports cabinet
This manual suits for next models
1
Table of contents
Popular Batteries Charger manuals by other brands

Phocos
Phocos Any-Grid Series User and installation manual

HONGKONG BWAY INDUSTRIAL
HONGKONG BWAY INDUSTRIAL BW-WC02 user manual

Malmbergs
Malmbergs Evon manual

Black & Decker
Black & Decker LCS12 instruction manual

Deca
Deca SM1208 instruction manual

LocknCharge
LocknCharge PC Locs iQ 16 Cart User instructions