IXL fresco Aurora User manual

transform your outdoors year-round
USER GUIDE
Model No. 23101
Model No. 22001
2 YEAR IN HOME WARRANTY
12 MONTH COMMERCIAL ON
PREMISE WARRANTY

Contents
1 Range……………………………………………………....……………………..3
2 Safety……………………………………………………….…………………….4
3 How It Works……………………………………………….……………………5
3.1 Heating………………………………………….……………………...5
3.2 Areacovered…………………………………...………………………5
3.3 Table Layouts………………………………….……………………….5
4 Electrical Connections…..………………………………….……………..6 - 7
5 Installation Instructions……………………………………………………….8
5.1 Clearances……………………………………..……………………....8
5.2 Step 1…..………………………………………..…………………..…9
5.3 Step 2…..…….………………………………..……………………….9
5.4 Step 3..…………………………………………..……………………10
5.5 Step 4…………………………………………..……………………..10
5.6 Step 5…………………………………………..….……………….....11
5.7 Step 6…………………………………………..……………………..11
5.8 Step 7…………………………………………..……………………..11
5.9 Step 8…………………………………………..……………………..12
5.9 Step 9…………………………………………..……………………..12
6 Operating Instructions……………………………………………………….13
6.1 Fresco Nova(Model No. 22001) .…………………………………..13
6.2 Fresco Aurora (Model No. 23101) …………………………..…….13
6.3 Connecting the Fresco Aurora to your wireless network………...14
6.3.1 Step 1………………………………………………………………….14
6.3.2 Step 2………………………………………………………………….14
6.3.3 Step 3………………………………………………………………….14
6.3.4 Step 4………………………………………………………………….14
6.3.5 App Set Process.…………………………………………………….15
6.3.6 Fresco App Troubleshooting................……………………….16 - 17
7 Resetting the Fresco Aurora………………………………………………..18
8 Replacement Parts……………………………………………………………19
8.1 Remotes………………………………………………………………19
8.2 Fresco………………………………………………………………....19
8.3 Replacing the battery………………………………………………..19
8.4 Fresco Aurora……………………………………….......…………..19
9 Cleaning/Maintenance………………………………………………………..20
10 Troubleshooting….………………………………………………………21 - 22
11 WiringDiagram………………………………………………………………...23
12 Warranty...........…………………………………………………………...24 - 26

Fresco Nova Fresco Aurora
Model 22001 23101
Heat Output (Watts) 2000 1000/2000
Total Wattage 2021 2060
LED Light Output (Lumens) 1800 2920
LED Light Output (Watts) 21 32
Coloured RGB Lights N/A Yes
LED Output DC24V
Remote Control Supplied Yes Optional Accessory
Phone/Tablet App Control No Yes
Power Connection 230 - 240 V
Connection 3 Pin Plug 10 Amp
Lead Length (mm) 2500
IP Rating IPX4
Dimensions (mm) 1218 x 249 x 165
Unit Weight (kg) 12 kg
Minimum Mounting Height (mm) 2100
Recommend Maximum Mounting 2700
Height (mm)
NOTE: Mounting the Fresco unit at higher positions will reduce the heaters
effectiveness. The Mounting Wire Assembly supplied is 2.0m long and is suitable for
ceiling heights of up to 4.0m.
1. Range
FRESCO OUTDOOR ENTERTAINING APPLIANCE
3

HALO HEAT TECHNOLOGY™
TASK LIGHT
MOOD LIGHT
NOTE
• Read through these instructions completely before commencing installation.
• Incorrect installation, operation or maintenance can result in death, severe
injury or property damage.
• The unit must be installed horizontally.
• Fresco products are not tanning lamps.
• Make sure the elements have cooled and power is off to the Fresco before
removing elements for replacement.
• Do not operate this appliance without the end or glass panels in position.
• This appliance is not intended for use by persons (including children) with
reduced physical, sensory or mental capabilities, or lack of experience and
knowledge, unless they have been given supervision or instruction concerning
use of the appliances by a person responsible for their safety.
• Children should be supervised to ensure they do not play with the appliance.
• This heater must be mounted at least 2.1 metres from the oor.
• The heater must not be located immediately below a socket outlet.
• Do not install or use the appliance if the power cord is damaged.
• If the supply cord is damaged, it should be replaced by IXL Appliances or its
service agent or a similarly qualied person in order to avoid a hazard.
• If the Fresco unit is located within wet areas, the switches or controls must not
be able to be touched by people in a bath, shower or other water-holding
device. In these circumstances the Fresco unit must be located in accordance
with the requirements of the current Australian/New Zealand Wiring Rules
AS/NZS 3000 relating to damp situations.
WARNING: Curtains or combustible material may ignite if in contact with the heater.
WARNING: The heater must not be used if the glass panel is damaged.
WARNING: In order to avoid overheating, do not cover the heater.
WARNING: The heater must be installed horizontally. Failure to do so will cause
hot spots within the heat elements leading to early failure.
WARNING: Do not feed in any excess cable into the unit as this can interfere with
the wireless control.
2. Safety
FRESCO OUTDOOR ENTERTAINING APPLIANCE
4

3. How It Works
3.1 Heating
The heat source used in the Fresco is carbon bre heat lamps. The 22001 model
use one 2000W heat lamp, while 23101 uses two 1000W lamps. The 23101 model
also allows for the selection 1 or 2 heat lamps to be in operation.
3.2 Area covered
3.3 Table Layouts
1x Fresco
2x Fresco
IXL Fresco 2000W Heat Spread Adjusted
(X - Axis)
IXL Fresco 2000W Heat Spread Adjusted
(Y- Axis)
FRESCO OUTDOOR ENTERTAINING APPLIANCE
5

4. Electrical Connections
Installation of any electrical wiring, power outlet or switch is to be carried out by
registered/licensed electrician. This installation must comply with the requirements
of the current Australian/New Zealand Wiring Rules AS/NZS 3000.
Electrical connections or socket outlets should not be located directly above the
heater. These are to be located outside the physical footprint of the Fresco unit to
ensure that it minimises the effect caused by heat build-up above the heater.
Only a licensed electrician can shorten the supply cord if it is too long. When
shortening the supply cord the internal wiring of the Fresco unit must not be
disrupted in any way.
If the Fresco unit is installed on an angled ceiling, the electrical connections or
wall socket are to be located at the lowest point of the Fresco unit.
The heater must not be located in front of a socket-outlet.
Refer to the images below for the correct and incorrect positioning the wall socket.
Correct Installation (Horizontal).
Correct Installation (Angled).
CEILING
CEILING
FRESCO OUTDOOR ENTERTAINING APPLIANCE
6

4. Electrical Connections
Incorrect Installation (Angled)
Incorrect Installation (Horizontal)
Incorrect Installation
CEILING
CEILING
CEILING
CEILING
FRESCO OUTDOOR ENTERTAINING APPLIANCE
7

5. Installation
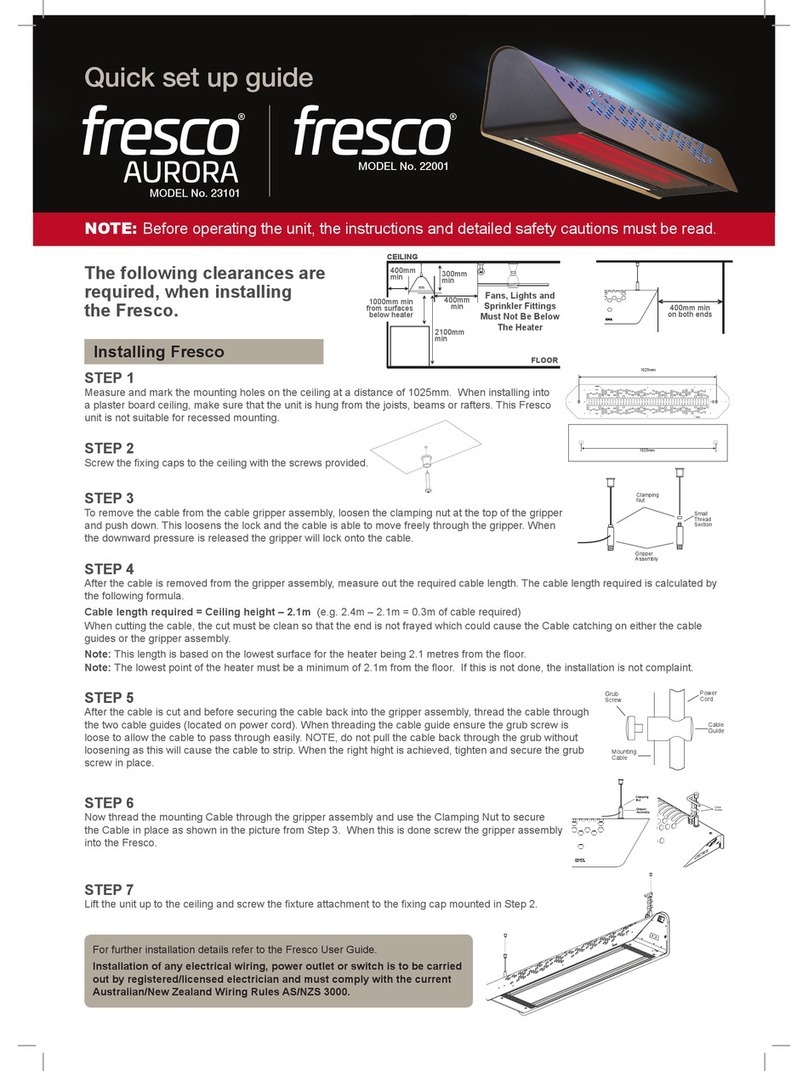
The following dimensions shows the clearances required for the Fresco unit. The 2
wire mounting assemblies supplied with the heater are 2.0m in length. Do not install
heater close to curtains or other combustible materials.
The minimum installation height is 2.1m from the oor to the glass panel
Refer to images of clearances below.
5.1 Clearances
Fans, Lights and Sprinkler Fittings
Must Not Be Below The Heater
Ceiling
1000mm min
from surfaces
below heater
Floor
2100mm
min from
floor
300mm min
400mm
min
400mm min
400mm min.
Same for both ends
<
FRESCO OUTDOOR ENTERTAINING APPLIANCE
8

5. Installation
Step 1
Measure and mark the mounting holes on the ceiling at a distance of 1025mm.
When installing into a plaster board ceiling, make sure that the unit is hung from the
joists, beams or rafters. This Fresco unit is not suitable for recessed mounting.
Step 2
Screw the xing caps to the ceiling with the screws provided.
1025mm
1025mm
FRESCO OUTDOOR ENTERTAINING APPLIANCE
9

5. Installation
Step 3
To remove the cable from the cable gripper assembly, loosen the clamping nut at
the top of the gripper and push down. This loosens the lock and the cable is able
to move freely through the gripper. When the downward pressure is released the
gripper will lock onto the cable.
Step 4
After the cable is removed from the gripper assembly, measure out the required
cable length. The cable length required is calculated by the following formula.
Cable length required = Ceiling height – 2.1m
(e.g. 2.4m – 2.1m = 0.3m of cable required)
When cutting the cable, the cut must be clean so that the end is not frayed which
could cause the Cable catching on either the cable guides or the gripper assembly.
Note: This length is based on the lowest surface for the heater being
2.1 metres from the oor.
Note: The lowest point of the heater must be a minimum of 2.1m from the oor.
If this is not done, the installation is not complaint.
FRESCO OUTDOOR ENTERTAINING APPLIANCE
10
Clamping
Nut
Gripper
Assembly
Small
Thread
Section

5. Installation
Step 5
After the cable is cut and before securing the cable back into the gripper assembly,
thread the cable through the two cable guides (located on power cord). When
threading the cable guide ensure the grub screw is loose to allow the cable to pass
through easily. NOTE, do not pull the cable back through the grub without loosening
as this will cause the cable to strip. When the right hight is achieved, tighten and
secure the grub screw in place.
Step 6
Now thread the mounting Cable through the gripper assembly and use the
Clamping Nut to secure the Cable in place as shown in the picture from Step 3.
When this is done screw the gripper assembly into the Fresco.
Step 7
Lift the unit up to the ceiling and screw the xture attachment
to the xing cap mounted in Step 2.
FRESCO OUTDOOR ENTERTAINING APPLIANCE
11
Grub
Screw
Mounting
Cable
Power
Cord
Cable
Guide
Clamping
Nut
Gripper
Assembly
Cable
Guides

5. Installation
FRESCO OUTDOOR ENTERTAINING APPLIANCE
Step 8
After the Fresco is secured to the ceiling, loosen one clamping nut at the time
to ensure that the Fresco is horizontal and the bottom edge of the Fresco is a
minimum of 2.1m from the oor. When this is adjusted to suit the requirements
above, tighten the clamping nut.
Tie a knot in the cable after the gripper assembly and cut excess cable length. The
knot is to prevent the wire from slipping through the clamp if it becomes loose.
Note: The lowest point of the heater must be a minimum of 2.1m from the oor.
If this is not done, the installation is not complaint.
Note: The clamping nut MUST be very tight to ensure that the wire does not
slip out. Refer to the image below.
Step 9
Connect the power cord to a socket outlet located in close proximity to the Fresco.
The Fresco is now ready to operate.
Note: It is not recommended to connect the Fresco in an extension cord.
Note: Only a licensed electrician can shorten the power cord if it is too long.
When shortening the Power Cord the internal wiring of the Fresco unit
must not be disrupted in any way.
Clamping
Nut
Excess
Wire
Knot
Gripper
Assembly
12

6. Operating Instructions
6.1 Fresco (Model No. 22001)
The IXL Fresco can be controlled via two methods - the touch panel located at the
power cord end of the unit or with the remote control provided. The IXL Fresco
Aurora app will not work with this model.
When the power is turned on at the power point, the unit can be operated by
the touch sensitive buttons or the remote control to turn either the heat or light
On/Standby.
Before operating the remote, please remove the clear plastic from the remote to
allow the battery to power the remote.The top button on the remote, controls the
heat lamp and the bottom button controls the LED lights. This remote is an infrared
remote and needs to be pointed at the touch screen to operate the unit.
6.2 Fresco Aurora (Model No. 23101)
The Fresco Aurora can be controlled via the Fresco app or via a remote control,
which is sold separately (Model No. 29000). The Fresco app is available to
download from the App Store for iPhone and iPad and Google Play for Android
devices. The app to download is called “IXL Fresco Aurora”.
When the power is turned on at the power point, make sure that the switch on the
end of the Fresco Aurora is turned to the “ON” position.
HEAT
LIGHT
STANDBY
ON
FRESCO OUTDOOR ENTERTAINING APPLIANCE
13

6. Operating Instructions
6.3 Connecting the Fresco Aurora to your wireless network
6.3.1 Step 1
Turn the power on to the Fresco Aurora and wait for the Coloured LED lights to
turn Green on top of the unit. This indicates the access point on the unit is ready to
connect to the wireless network. This can take up to 30 seconds.
6.3.2 Step 2
Using an Android or iOS device (smart phone or tablet) ensure that the wireless
LAN/Wi-Fi setting is enabled. Download and install the IXL Fresco App via the Apple
App Store or Google Play.
6.3.3 Step 3
Using an Android or iOS device, ensure that the Wireless LAN is enabled and
initiate a Wireless LAN search and connect to the Fresco Aurora. The Fresco
Aurora will be identied by the following: FRESCO_xxxxxxxxx, where the xxxxxxxxx
is the unique serial number of the control board in the Fresco Aurora.
6.3.4 Step 4
When connecting to the Fresco Aurora, the following password IXLFRESCO is
required to be added. The Fresco is now connected to your device and the coloured
LED lights will turn yellow indicating connection made to the Access Point.
Fresco Aurora – Coloured Light Indicators for connection
Green Light Access Point Ready
Yellow Light Successful Connection to Access Point
Red Light Disconnect from Access Point
Blue Light on for Successful connection to a network
20 seconds
FRESCO OUTDOOR ENTERTAINING APPLIANCE
14

6. Operating Instructions
6.3.5 App set process
FRESCO OUTDOOR ENTERTAINING APPLIANCE
15

6.3.6 Fresco Aurora App Troubleshooting
1. The Fresco Aurora lights up a particular colour, what does this mean?
• Green: Fresco Aurora in AP Mode (ready to be setup)
• Yellow: Device connected to Fresco Aurora while in AP Mode (partly setup)
• Blue: Fresco Aurora successfully connected to Home Network
(normal operation, setup complete)
• Red:An Error has occurred. Please refer to Step 6
2. Your Home Network is not being automatically found within the APP
If your home network Wi-Fi does not auto appear, please go to the web browser
and type in http://192.168.1.1/ then type in your router name and password to
connect manually.
3. Your APP gets stuck in a step of set up
Exit APP and re-enter the APP. The APP should progress to the next step.
4. Your Fresco Aurora is not working with the APP
Reset the unit with a paperclip/pin. Turn the unit off and then on, then re-set up
the APP. Refer to Section 7
Fresco Aurora is supported by iOS 9 and above.
5. Your Fresco Aurora App starts from setup when you open it.
If you manually turned your unit off and on, please allow 1 minute for the app and
Fresco Aurora unit to connect. Exit app and return to app after 1 minute and you will
see you remote home screen.
6. How to connect a second Fresco Aurora Unit to your smart phone:
• Setup the rst unit (as per the instructions on APP). Once setup is complete
and the Fresco Aurora lights up blue, switch power off.
• With the rst unit is still powered off, power on the second device and setup to
the same network as the rst one.
• Once the setup on the second unit has been completed, switch on the power
to the rst unit and wait for the light to turn on blue.
• You will now be able to control both lights with the 1 APP.
6. Operating Instructions
FRESCO OUTDOOR ENTERTAINING APPLIANCE
16

7. Fresco Aurora lights up Red when powered up
This occurs when the Home network router is either turned off or the password
has changed.
• Make sure the home network router is turned on for at least 2 minutes before
switching on the Fresco Aurora (which will then turn on blue if successful).
• If the password has changed, press the reset button on the Fresco Aurora unit
and wait for the unit to change to green. Once the Fresco Aurora has gone green,
run the APP to go through setup again.
8. APP keeps showing the welcome page when starting up.
• Make sure Wi-Fi is switched on before loading APP.
• Make sure device is connected to same network as Fresco Aurora unit. If unsure,
press the reset button on the Fresco Aurora unit and complete the setup
process again.
6. Operating Instructions
FRESCO OUTDOOR ENTERTAINING APPLIANCE
17

7. Resetting the Fresco Aurora
The Fresco Aurora unit can be reset if required. The resetting switch is located on
the end panel, where the power cord enters into the unit. Using a paper clip, insert
the clip into the hole, as shown in the picture below to reset the unit. After resetting
the unit, the Fresco will need to be paired with your smart device again, refer to
Steps 1- 9.
LED indicator
Resetting Switch
FRESCO OUTDOOR ENTERTAINING APPLIANCE
18

8. Replacement Parts
All replacement parts, except for the remote control, will need to be replaced by an
authorised service agent or qualied electrician. For ordering replacement parts,
please contact IXL.
8.1 Remotes
Note: The remotes are to be located in a position protected from any rain and direct
sunlight.
8.2 Fresco (22001 model)
The remote for the Fresco model 22001, comes as standard, if a replacement is
required contact “IXL Home” to organise one.
8.3 Replacing the battery (22001 model)
This remote control uses a lithium battery type CR2025, 3V. To remove this battery,
turn over the remote and unscrew the screws located at the lower end of the
remote. When this is done, slide out the battery and replace it. Repeat the steps
to secure the battery. The back of the remote shows illustrations on removing the
battery.
8.4 Fresco Aurora (23101 model)
The remote of the Fresco Aurora model 23101 is available as an accessory
(Model No. 29000). This remote uses 2 x AA batteries. To remove the batteries, turn
over the remote control and remove the back cover to access them. Replace the
batteries and repeat to secure the cover.
FRESCO OUTDOOR ENTERTAINING APPLIANCE
19

9. Cleaning / Maintenance
When cleaning, the Fresco unit must be turned off at the power point to ensure that
there is no power to the unit. Allow the unit to cool down for at least 30 minutes
after last used before cleaning. Use a soft brush to remove dust from wire mesh on
the outer wrap. Use a damp cloth to clean all of the surfaces of the Fresco. When
cleaning the glass panel, use glass cleaning liquid.
FRESCO OUTDOOR ENTERTAINING APPLIANCE
20
Other manuals for fresco Aurora
1
This manual suits for next models
3
Table of contents
Other IXL Heater manuals
Popular Heater manuals by other brands

Heater Craft
Heater Craft G200X Installation and owner's manual

Sicce
Sicce Scuba instruction manual

Master
Master MH-221A-120 User's manual & operating instructions

SUNTEC
SUNTEC RC 2000 Series operating instructions

Sealey
Sealey IR18 instructions

Schwank
Schwank ECOSCHWANK-MILLIVOLT Installation & owner's manual