J D UltraSonics sonicom ATLAS Manual

sonicom™
J D UltraSonics
ULTRASONIC NOZZLES & AIR ATOMISERS
DUST SUPPRESSION - HUMIDIFICATION - ATOMISING - FOGGING
ATLAS ULTRA VIOLET
DISINFECTION UNIT
OPERATING AND MAINTENANCE
sonicom™
J D UltraSonics
GENERAL INFORMATION
An Ultra Violet Disinfection System is a versatile unit designed to kill waterborne bacteria using the proven
method of exposure to ultra violet light.
The unit is made from a tubular
quartz sleeve in which a UV lamp is inserted. Both components are housed in a
stainless steel outer chamber called a reactor. Water is disinfected as it passes through the reactor and is exposed
to a high intensive UV light that penetrates and deactivates bacterial cells.
The outer of bacteria and viruses differ in thickness and it is this thickness of skin which determines the amount of
UV light exposure to prevent their reproduction, rendering them dead.
UV systems should be installed with pre-filtration down to 5 micron. This prevents an effect called shadowing
where micro-organisms could hide behind particles in the water.
LOCATION
The steriliser should be mounted in a location
allowing sufficient room at the end of the unit to
withdraw the lamp and quartz sleeve. If this is not
possible use a flexible hose set allowing the chamber
to be unclipped from it’s mounting bracket(s) for
service and lamp change. Where possible the unit
should be installed to treat all the water as it enters
the system. If treated water is to be stored, the
storage tank should be fitted with a close fitting lid
and the overflow protected with a fly screen (Water
by-law 30). Tanks should only hold sufficient water for
a few hours use.
LAMP LIFE
The lamp will continue to emit sufficient ultra violet
for efficient operation of the unit for a period of
4,000 hours. The lamp must always be replaced at
this interval although a safer recommendation
usage period is one year or 2,000 hours. Failure to
change the lamp will result in insufficient UV
dosage for bacteria killing.
ELECTRICAL INSTALLATION
All metal components should be earth bonded.
Ensure the earth wire from the power supply is
connected to the earth point located at the one end
of the chamber. To avoid possible electric shock,
special care should be taken since water is present
near electrical equipment.
PLUMBING INSTALLATION
Although the chamber can be mounted at any
angle, the outlet connection should always be
uppermost to prevent airlocks in the chamber - the
ideal installation is vertical. Good quality pre
filtration is essential for correct operation. Replace
filters as required and always fit new elements,
never wash a dirty filter.
QUARTZ SLEEVE
The quartz sleeve should be checked and cleaned
periodically. When cleaning the quartz sleeve
ensure the unit is isolated from the electrical supply
and check the water supply is also turned off prior
to servicing.
www.jdultrasonics.co.uk | +44 (0)1924 378 448
UV DISINFECTION - OPERATING & MAINTENANCE
Never operate the unit if the lamp is outside the chamber.
Never stare at the light source.
Exposure to ultra violet light can cause conjunctivitis and erythema.
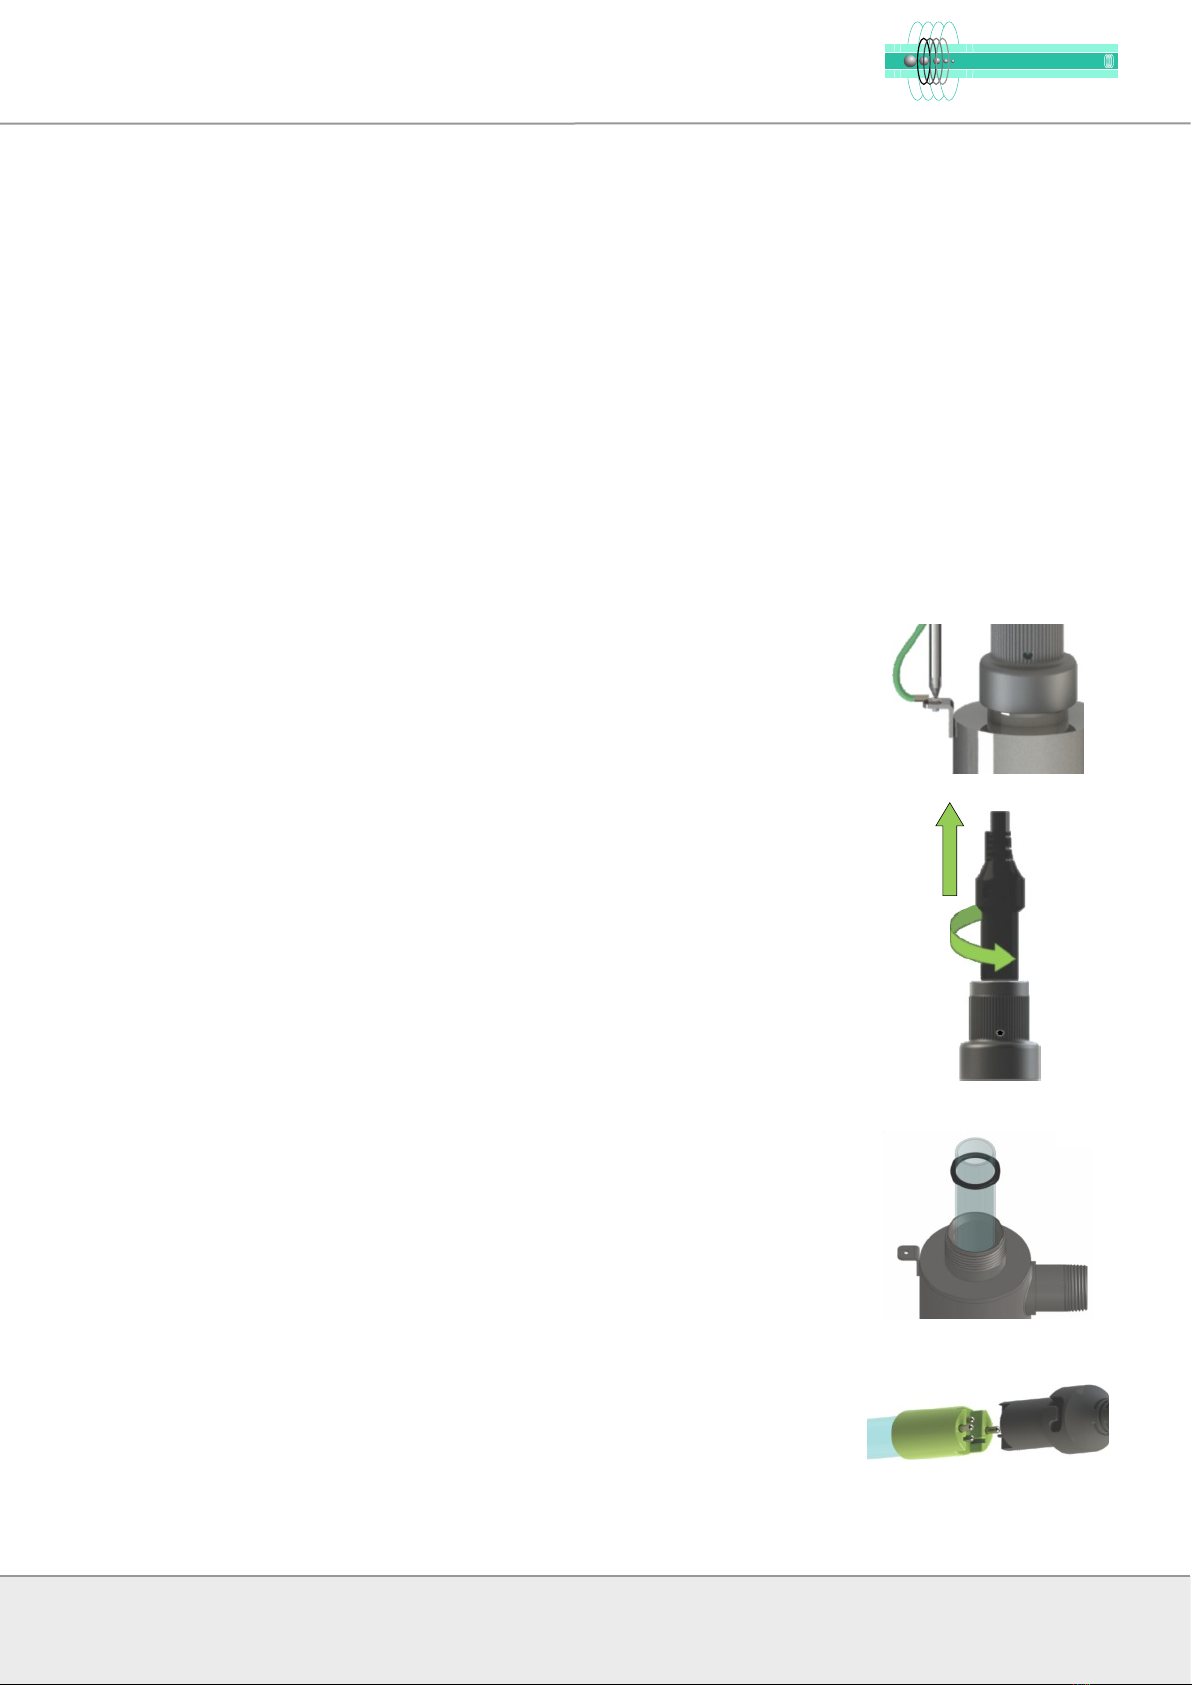
1. Disconnect the main power supply and allow the unit to power down.
Remove the earthing screw from the small tab located at the top rim of the
reactor chamber.
2. Gently push down and twist the lamp connector a quarter turn anti-clockwise
and the bayonet fitting will release the lamp holder from the Gland Nut. The
lamp will lift due to the spring which is loosely located in the bottom of the
quartz sleeve.
Lift the lamp clear of the reactor chamber and quartz sleeve and remove the
lamp from the connector by holding the green ceramic end and gently pulling
the lamp clear.
3. Nip the rim of the quartz sleeve and ease it free from the reactor chamber by
carefully twisting and pulling until it releases from the spring clip at the bottom
of the chamber. If the sleeve appears to be clean, wash it in warm, soapy
water and replace it into the chamber taking care not to lose the spring and
o-ring.
4. When handling a new lamp, the use of cotton gloves is recommended.
Remove the lamp from its packaging and set aside the lamp key which can be
found on the top end of the lamp. Fit the new lamp into the connector by
holding the ceramic end and noting the keyed format which ensures correct
connection.
www.jdultrasonics.co.uk | +44 (0)1924 378 448
UV DISINFECTION - OPERATING & MAINTENANCE
OPERATING AND MAINTENANCE INSTRUCTIONS
Caution: Prior to performing any work on the disinfection system, always disconnect the power
supply first
To replace the lamp, it is not necessary to disconnect the system from the water supply, or to drain the water
from the reactor chamber. Lamp replacement is a quick and simple procedure requiring only standard hand
tools. The UV lamp must be replaced every 2000 hours of operation (approximately one year) in order to
ensure adequate disinfection.
The Atlas range of UV units are supplied with a ballast controller interface and features a user friendly colour
LCD display which provides meaningful user feedback messages, including remaining lamp life and total days
operation.
Each controller requires a lamp key to be inserted into the lower RHS of the unit and one is supplied with
each new lamp. It is important to change the key every time a new lamp is fitted as they are supplied as a
matched pair with information linked to each other.
1
2
sonicom™
J D UltraSonics

5. Insert the lamp back into the quartz sleeve until the spring resists further
travel. Gently push down and twist the lamp connector a quarter turn
clockwise - the bayonet fitting will hold the lamp holder in place.
6. Insert the lamp key into the ballast controller.
7. Reconnect the earth wire to the chamber tab.
www.jdultrasonics.co.uk | +44 (0)1924 378 448
UV DISINFECTION - OPERATING & MAINTENANCE
INITIATE LAMP COUNTDOWN SEQUENCE
After changing the lamp on the system, the controller
must be reset in order for the system to begin its
countdown function on a newly installed lamp. To
perform this reset, firmly depress the button on the
front of the controller and then manually power up the
unit.
Keep holding down the button for five seconds until the
controller has reset the internal timer. Release the
button and the lamp countdown feature has now been
reset. An audible chirp will be heard as well as the
“lamp life reset” screen.
Atlas UV
Atlas UV
Atlas UV
lamp life reset
continue holding
button to reset
lamp timer
5s
screens during reset
2
1
sonicom™
J D UltraSonics


