J.E. Adams Turbo Towel 18500 User manual

Models- 18500, 18500-220V "Turbo Towel"
Page 2 Product Information
Page 3 Specifications
Page 4 Important Safety Instructions
Page 5 Product Dimensions
Page 6-12 Installation
Page 13 Installation and Operating Safety
Page 14 Operating Instructions and Maintenance
Page 15 Troubleshooting
Page 16 Drawings
REV 12-28-2018
1

PRODUCT INFORMATION
Please take a moment to fill out the information below in order to aid us with any future sales
or service inquiries. Model number and serial number information can be found on the
serial tag located inside the control box and/or on the lower exterior of the can. Key
number can be found on the tag that comes attached to the keys. There may be more than
one key number depending on unit.
Please keep this information with your records.
MODEL#:____________________________
SERIAL#:____________________________
KEY NUMBER(S):_____________________
DATE PURCHASED:___________________
DISTRIBUTOR:_______________________
J.E. Adams Industries
1025 63rd Ave. S.W.
Cedar Rapids, IA 52404
1-800-553-8861
www.jeadams.com
REV 12-28-2018
2

Specifications
REV 12-28-2018
3
120 Volt model
Unit specifications: 18500
Voltage: 120vac, 60hz
Amperage: (1) 30 amp service is required for this unit, dedicated line.
Blower specifications
Blower –(1) High performance Regenerative blower, 120vac, 20 amps, 60hz
---------------------------------------------------------------------------------------------------------------------------------------------------------------------
220 Volt model
Unit specifications: 18500-220V
Voltage: 220vac, 60hz
Amperage: (1) 20 amp service is required for this unit, dedicated line.
Blower specifications
Blower –(1) High performance Regenerative blower, 220vac, 6 amps, 60hz
DUTY CYCLE: 6 minutes on, 4 minutes off.
NOTE: “UNIT INTENDED FOR COMMECIAL USE ONLY”

REV 12-28-2018
4
When using an electrical appliance, basic precautions should always be followed, including the following:
READ ALL INSTRUCTIONS BEFORE USING (THIS APPLIANCE)
WARNING –To reduce the risk of fire, electric shock, or injury:
•Use only as described in manual. Use only manufactures recommended attachments.
•Do not allow to be used as a toy. Close attention is necessary when used by or near children.
•Do not put any object into openings. Do not use with any opening blocked; keep free of dirt and anything that may reduce
flow.
•Keep hair, loose clothing, fingers, and all parts of body away from openings and moving parts.
•Do not use near flammable or combustible liquids, such as gasoline, or use in areas where they may be present.
•Do not use near anything that is burning or smoking, such as cigarettes, matches, or hot ashes.
•Do not spray of the chemicals on dashboard, instrument area, consoles, door panels, etc. Decorative trim pieces such as
these can become damaged from contact with chemicals.
SAVE THESE INSTRUCTIONS
•Installation Instructions:
•Determine location to mount unit (“DANGER” “THIS EQUIPMENT INCORPORATES PARTS SUCH AS SWITCHES,
MOTORS, OR THE LIKE THAT TEND TO PRODUCE ARCS OR SPARKS THAT CAN CAUSE AN EXPLOSION. WHEN
LOCATED IN GASOLINE-DISPENSING AND SERVICE STATIONS INSTALL AND USE AT LEAST 20 FEET (6 M)
HORIZONTALLY FROM THE EXTERIOR ENCLOSURE OF ANY DISPENSING PUMP AND AT LEAST 18 INCHES (450
MM) ABOVE A DRIVEWAY OR GROUND LEVEL.”
•Run electrical service to that location.
•Grounding Instructions: This appliance must be connected to a grounded metal, permanent wiring system; or an
equipment-grounding conductor must be run with the circuit conductors and connected to the equipment-grounding terminal
or lead on the appliance.
•All local and national electric codes must be followed for installation and use.
•Licensed electricians are recommended for installation.
INSTALL INBAY INSTRUCTION SIGN NEAR HOSE OR END USER AREA!
IMPORTANT SAFETY INSTRUCTIONS
REV 12-28-2018
5
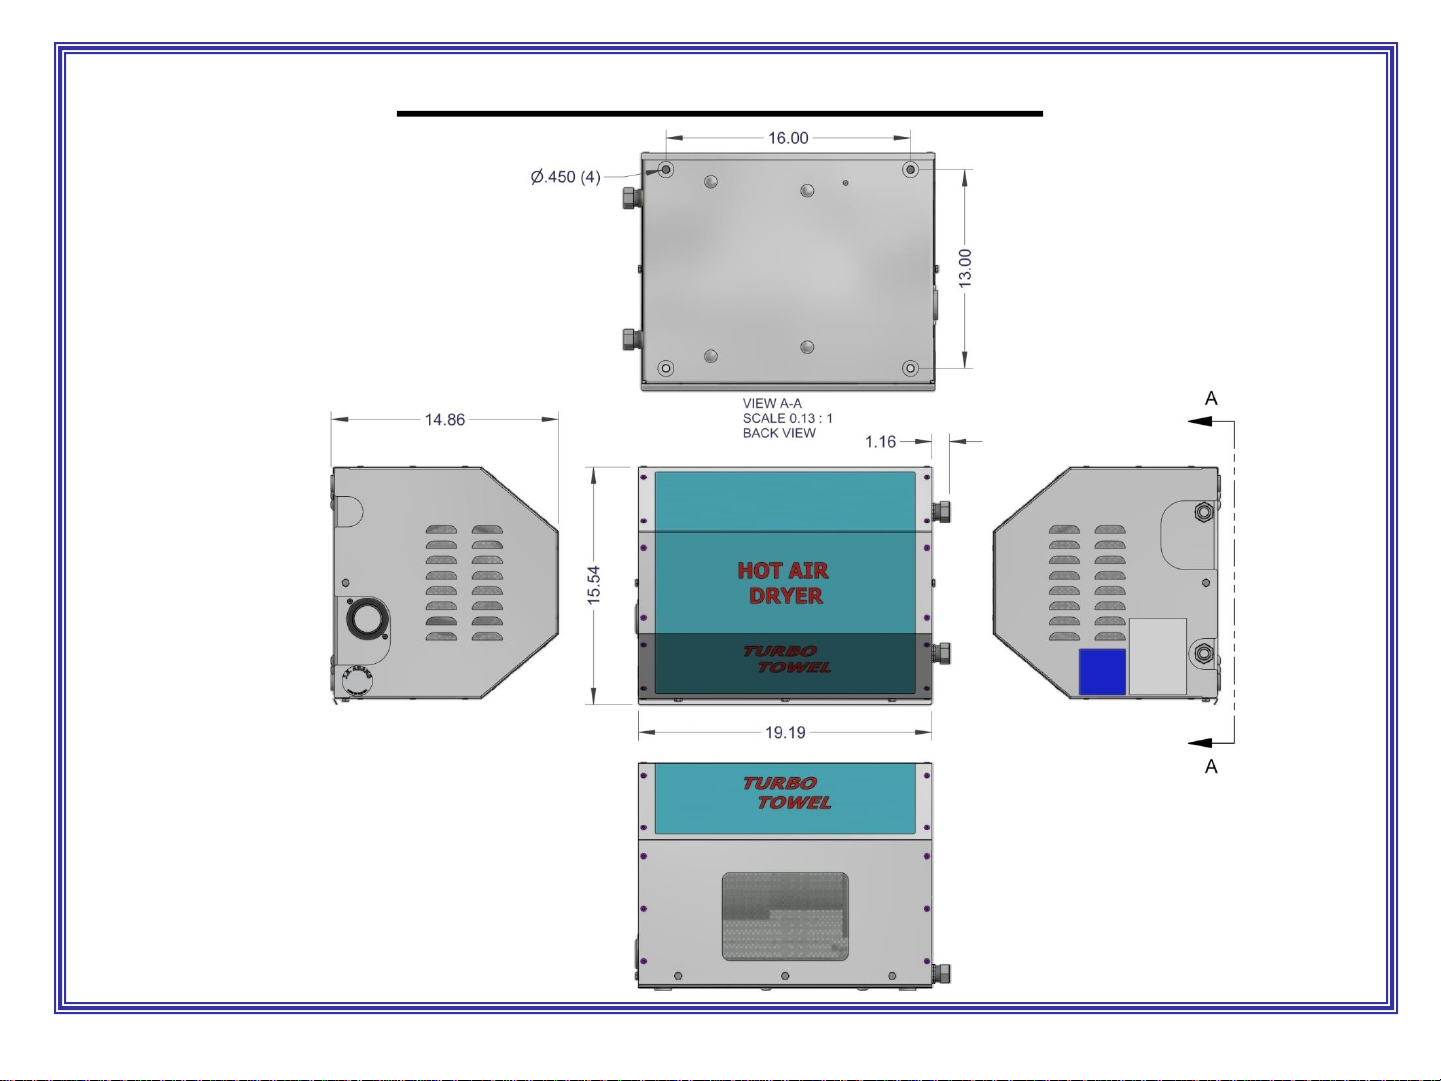
PRODUCT DIMENSIONS

REV 12-28-2018
6
Typical in-bay installation with boom (cutting hose is mandatory when using boom).
When no boom is used, simply locate hose hanger under Turbo Towel unit. Note
blower must be mounted with motor axis horizontal never vertical.
Instruction sign can be
installed anywhere in bay.
Optional 18000-HH hose
hanger can be installed
near boom “home
position” against wall.
Optional 18000-NH
nozzle holder can
be installed near
boom “home
position” against
wall.
Turbo Towel unit is
typically installed
high in the bay, but
underneath of
boom if using
boom. It can be
installed to the left
or right of boom
(right example
shown).
Hose joining
boom and Turbo
Towel should be
relaxed and not
taut.
Boom is typically installed
above Turbo Towel unit so it
does not hit the cover of Turbo
Towel when being used.
TYPICAL INSTALLATION

REV 12-28-2018
7
Mounting unit flat vs. wall mount is optional but only when unit is in a clean dust free, moisture
protected environment. Area within 2 feet of Turbo Towel must be free of any insulation so as not
to impact air intake.
Instruction sign can be
installed anywhere in bay.
Optional 18000-HH hose
hanger can be installed
near boom “home
position” against wall.
Optional 18000-
NH nozzle holder
can be installed
near boom
“home position”
against wall.
Axis of motor must always
remain horizontal.
Mounting unit flat as
shown can only be done
in sheltered environment
free of dust and moisture.
Hose joining
boom and Turbo
Towel should be
relaxed and not
taut.
OPTIONAL HORIZONTAL INSTALLATION

REV 12-28-2018
8
Mounting Instructions
Very important that all (4) mounting holes
on base plate engage structure capable of
supporting 100 lbs minimum.
Turbo Towel cover hooks over top of base
plate so surface unit is mounted needs to
be reasonably flat so this spacing is
maintained. Cover screw hole alignment
could also be compromised if mounting
surface is extremely uneven.

REV 12-28-2018
9
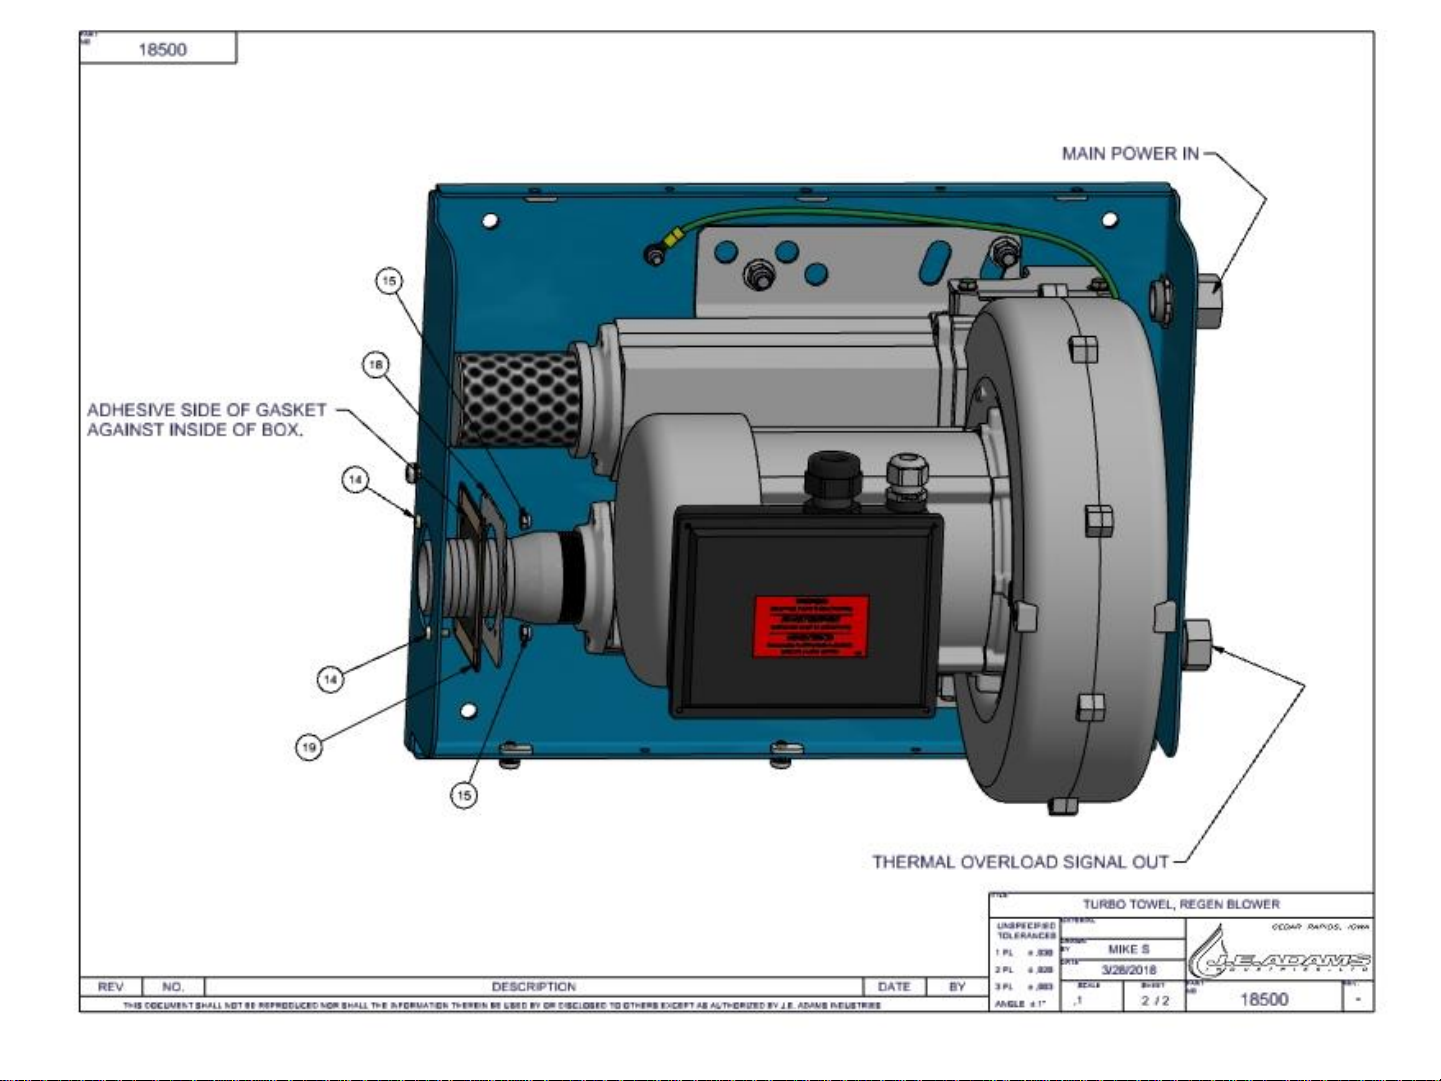
Wiring Instructions
Wires from each conduit connector should
be routed through adjacent cavity blower
bottom and blower mounting bracket.
Liquidtite conduit can be routed to these
two connectors, one for power to motor,
the other to thermal protection which is
wired to motor contactor.

REV 12-28-2018
10
120VAC Motor Wiring Instructions
Ground screw is tucked
underneath capacitor. 8mm nut, 5mm thread.
#10 ring terminal

REV 12-28-2018
11
220VAC Motor Wiring Instructions
Ground screw is tucked
underneath capacitor.
8mm nut, 5mm thread.
#10 ring terminal
REV 12-28-2018
12
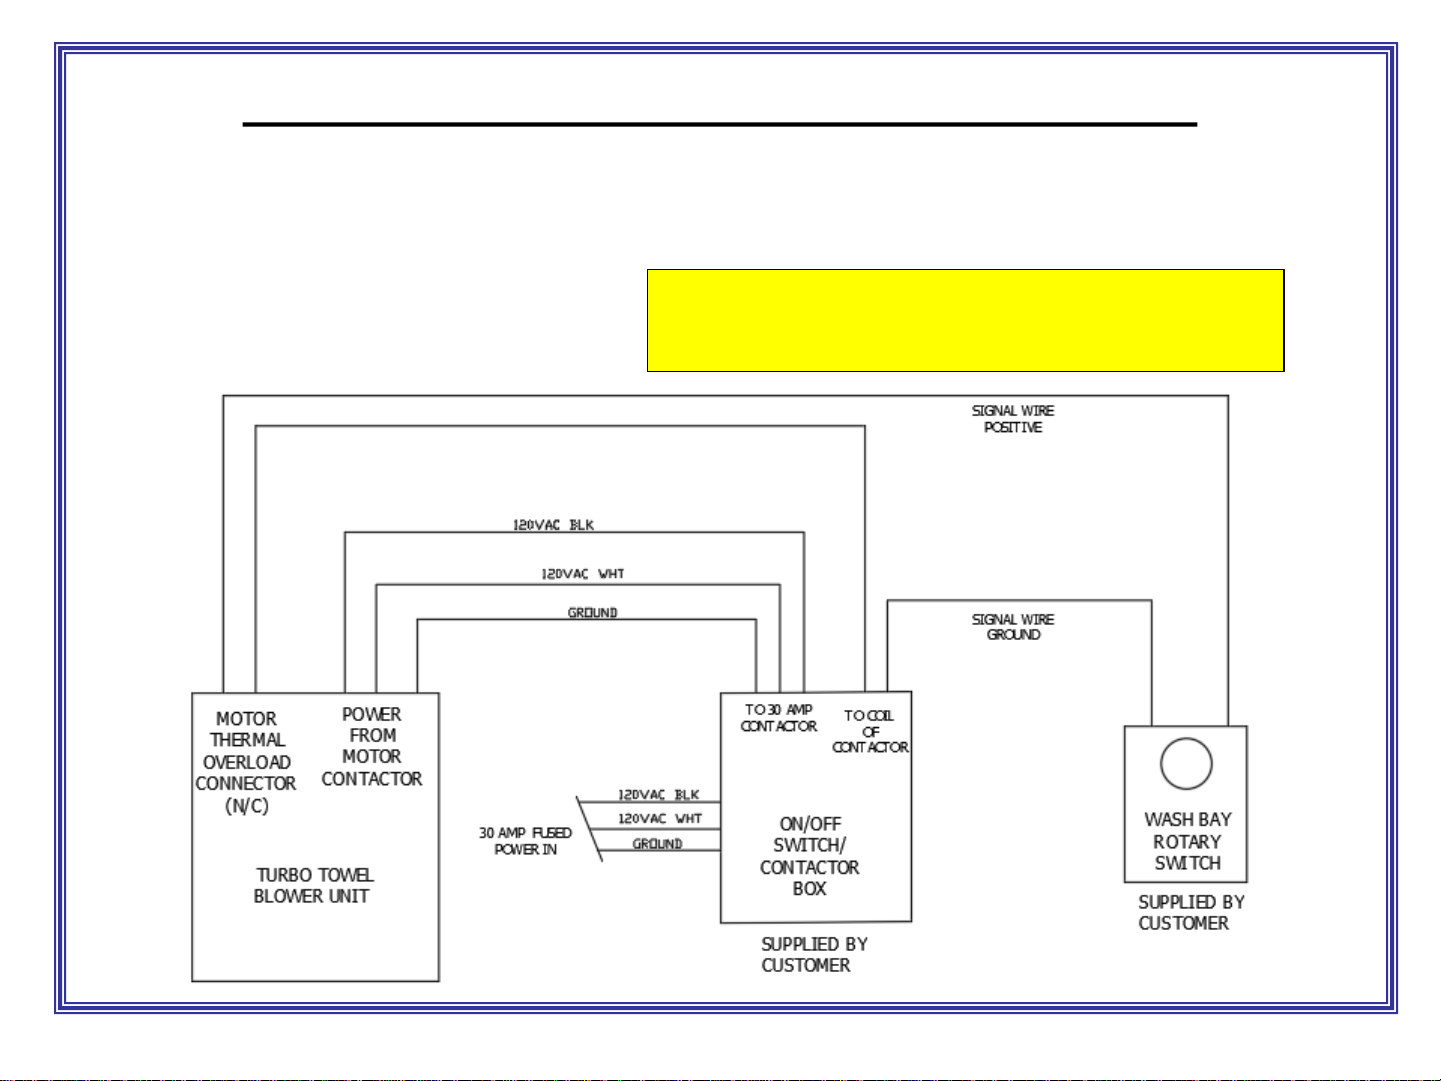
EXTERNAL BLOWER CONTROL WIRING SCHEME
When wiring direct to the rotary switch in a carwash bay, below is a typical 120V scenario showing a shut off
box with motor contactor. NOTE: TURBO TOWEL SHOULD BE INSTALLED AND SET UP PER LOCAL
ELECTRICAL CODES BY QUALIFIED ELECTRICIAN.
120VAC
Example
Signal wire coming from wash bay’s equipment selector
switch could be many voltages and AC or DC. Determine
signal attributes and purchase compatible motor contactor.
REV 12-28-2018
13
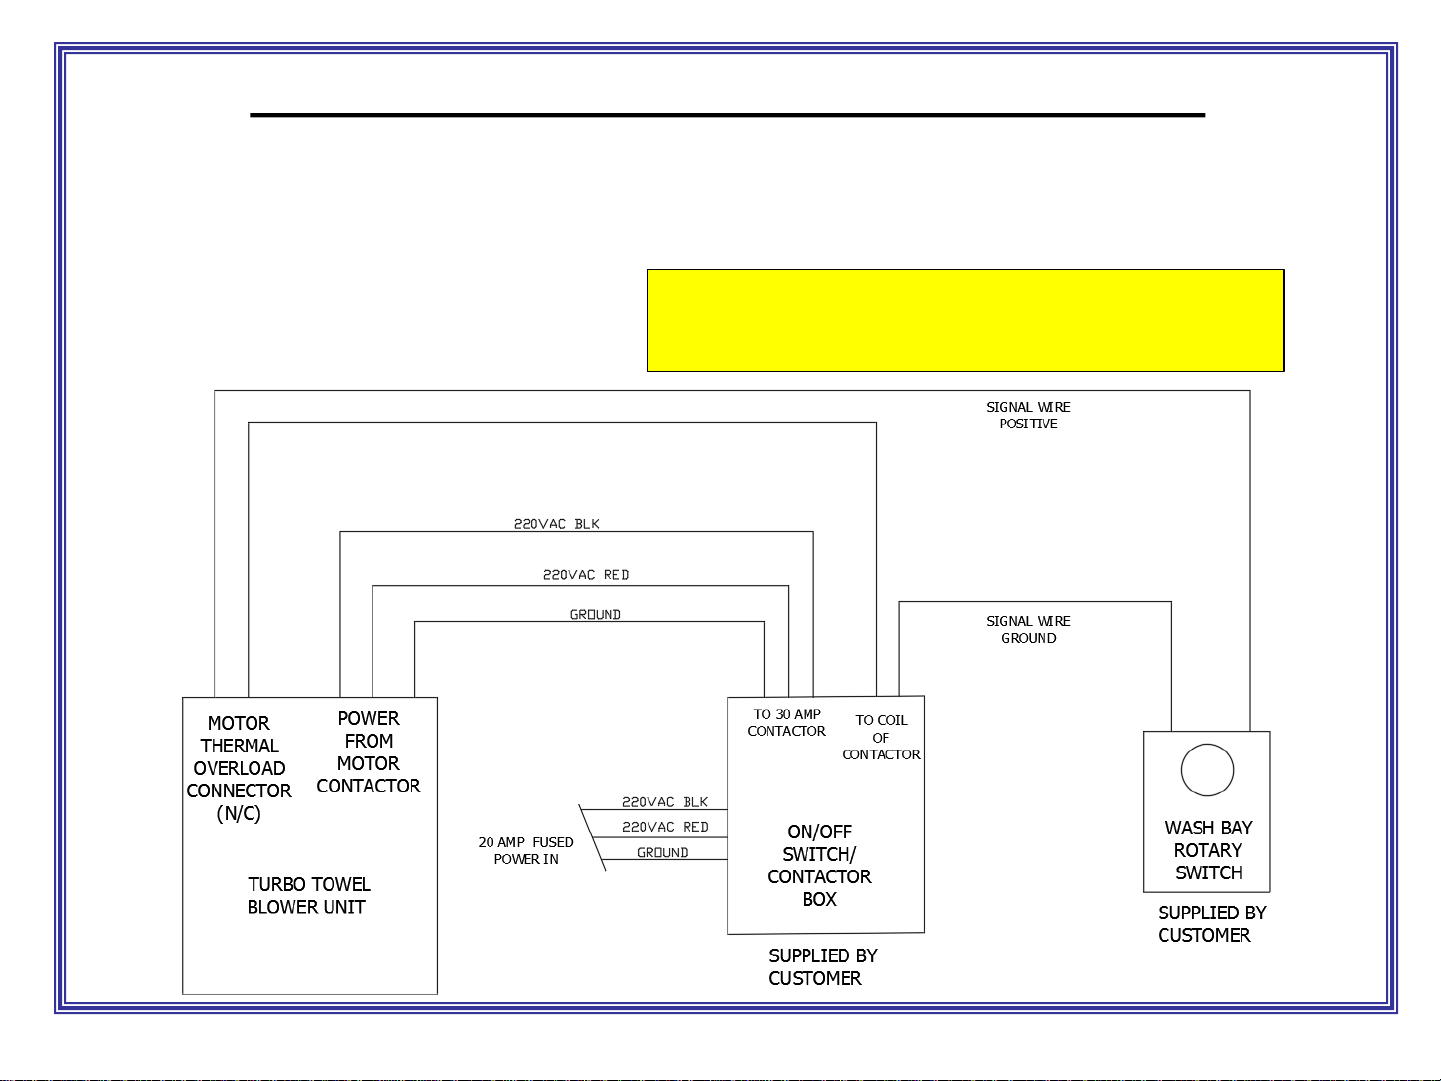
220VAC
Example
Signal wire coming from wash bay’s equipment selector
switch could be many voltages and AC or DC. Determine
signal attributes and purchase compatible motor contactor.
EXTERNAL BLOWER CONTROL WIRING SCHEME
When wiring direct to the rotary switch in a carwash bay, below is a typical 220V scenario showing a shut off
box with motor contactor. NOTE: TURBO TOWEL SHOULD BE INSTALLED AND SET UP PER LOCAL
ELECTRICAL CODES BY QUALIFIED ELECTRICIAN.

REV 12-28-2018
14
INSTALLATION / SAFETY INSTRUCTIONS:
1) Always use qualified electrical and mechanical personnel for installation and maintenance of equipment.
2) Disconnect electrical power before working on the system.
3) Make sure the motor is electrically grounded, the mounting bolts are properly secured, and all guards are in
place during operation.
4) Wear safety glasses and earplugs when working on blower.
5) Do not operate blower motor with the outlet open to the atmosphere. Connect system exhaust hose to
prevent overloading the motor and damage to the heating element. Check the final installation for proper amp
load.
6) Keep all tools, loose clothing, and hands away from motor air intake.
7) Inspect the blower at regular intervals for damage or worn parts. Replace parts immediately –never operate a
unit with damaged parts.
8) Use only genuine OEM replacement parts.
END USER OPERATING / SAFETY INSTRUCTIONS:
1) Use only for vehicle detailing.
2) Do not permit children to operate this unit.
3) Close supervision is necessary when using near children or those who need assistance.
4) Always hold onto nozzle tightly while in use.
5) Never leave unattended while in use.
6) Do not allow nozzle to come in contact with skin.
7) Never point air stream at others or self.
8) Allow a six inch minimum between nozzle and object to dry.
9) Use caution when directing air stream into tight crevices such as headlight assemblies, mirrors, dashboard,
carpeting, etc.
10) Never blow debris in the direction of others.
INSTALL INBAY INSTRUCTION SIGN NEAR HOSE OR END USER AREA!

REV 12-28-2018
15
Machine Operating Instructions:
1) Read safety instructions on previous pages.
2) Hold nozzle in hand.
3) Insert coins or bills to start.
4) Machine will start and air will begin to blow.
5) For best results, start at the top of the car and blow water downward.
6) Hang hose up when finished.
Maintenance:
•All servicing of machine should be conducted by an authorized service representative!
•Inlet screens on cover and on blower should be inspected weekly to ensure clear of debris and
unrestricted.
•Periodically inspect electrical wires and connections for wear or fatigue.
•Inspect hoses and blower nozzle for wear once a week.
•Clean housing with a stainless steel cleaner as needed.
•Decals can be cleaned with mild soap and water.
•Once per month the stainless steel cabinet should be removed and the inside components should be wiped
down. Look for any wear items or damage.
•Parts can be ordered through JE Adams or your nearest distributor.
WHEN PERFORMING MAINTENANCE OR TROUBLE-SHOOTING, TURN POWER OFF! QUALIFIED
PERSONNEL ONLY!

REV 12-28-2018
16
Troubleshooting (120V example):

REV 12-28-2018
17
REV 12-28-2018
18

REV 12-28-2018
19

REV 12-28-2018
20
Table of contents
Other J.E. Adams Dehumidifier manuals


