Jørn Iversen Viktoria User manual

User Manual
Viktoria/Viktor
Power MPF
Jørn Iversen Rødekro ApS
Hydevadvej 48
DK-6230 Rødekro
Tlf: +45 74 66 92 42
www.ji.dk

Contents
General directions............................................ 3
Before you go your rst trip............................ 4
Your rst trip..................................................... 5
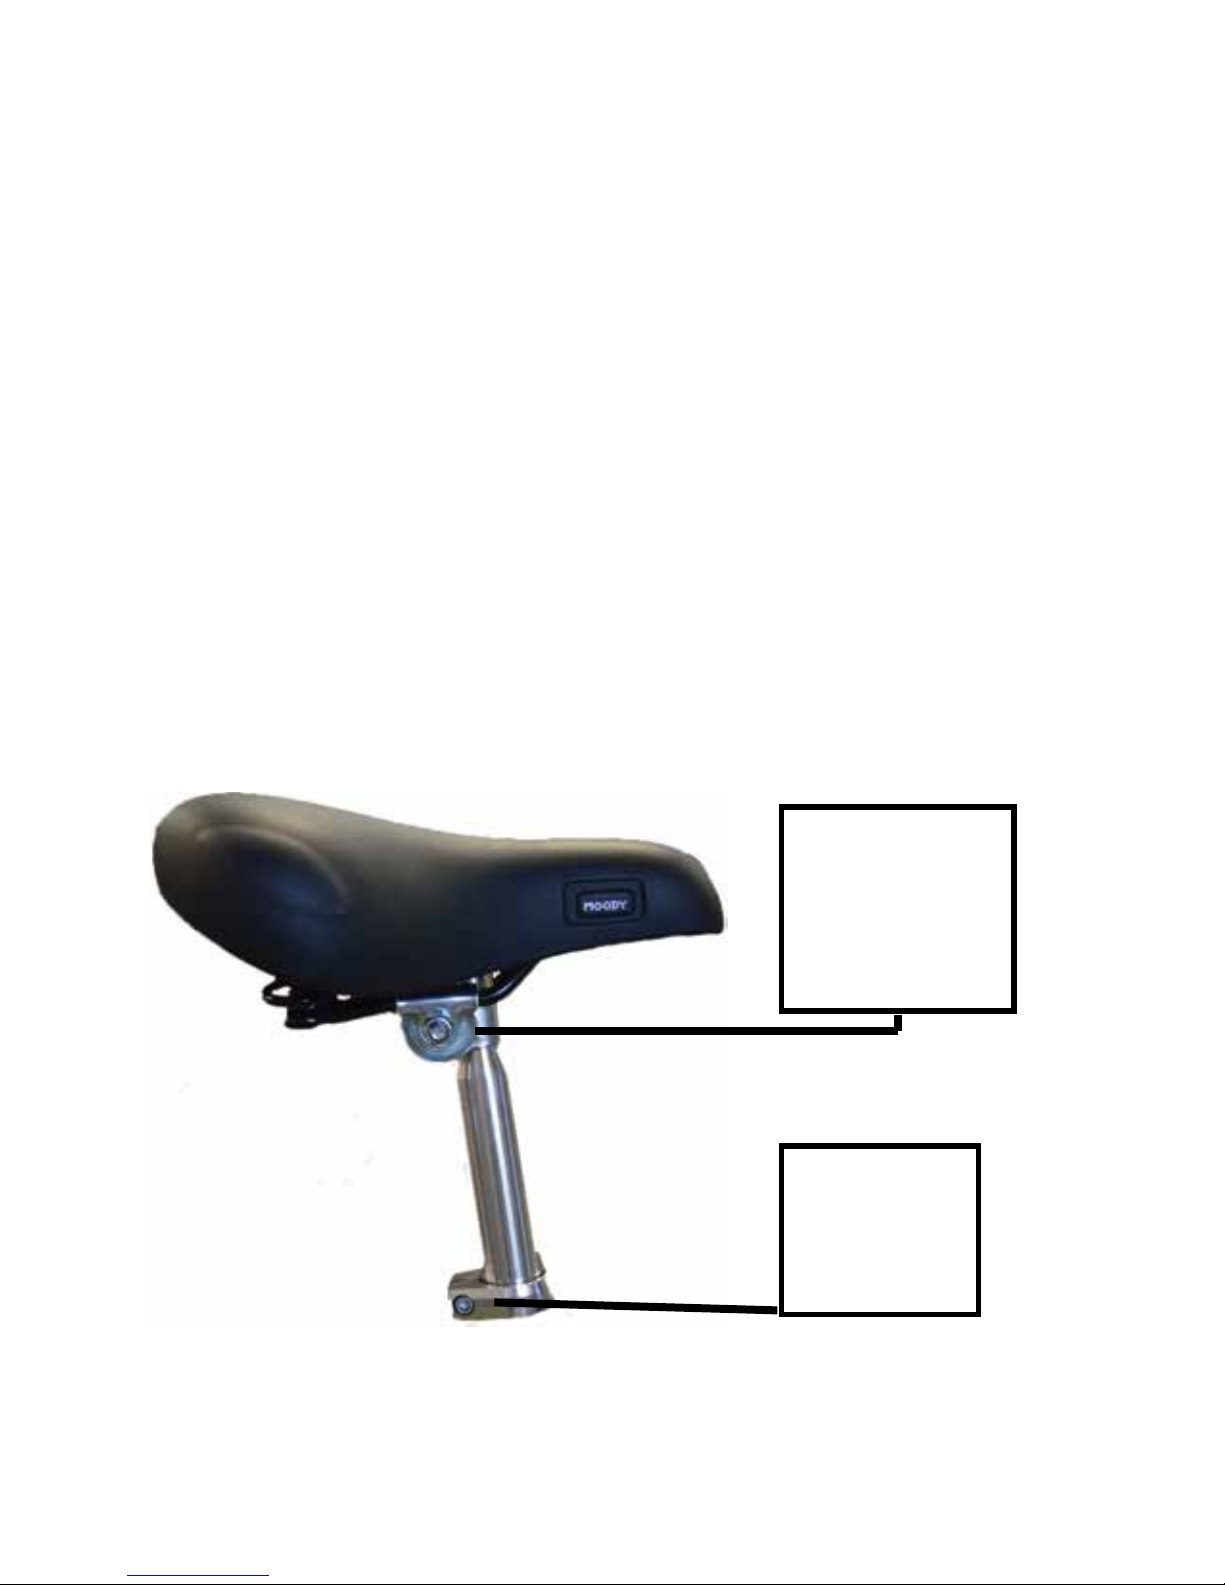
Adjusting your tricycle.................................... 8
Lock.................................................................. 9
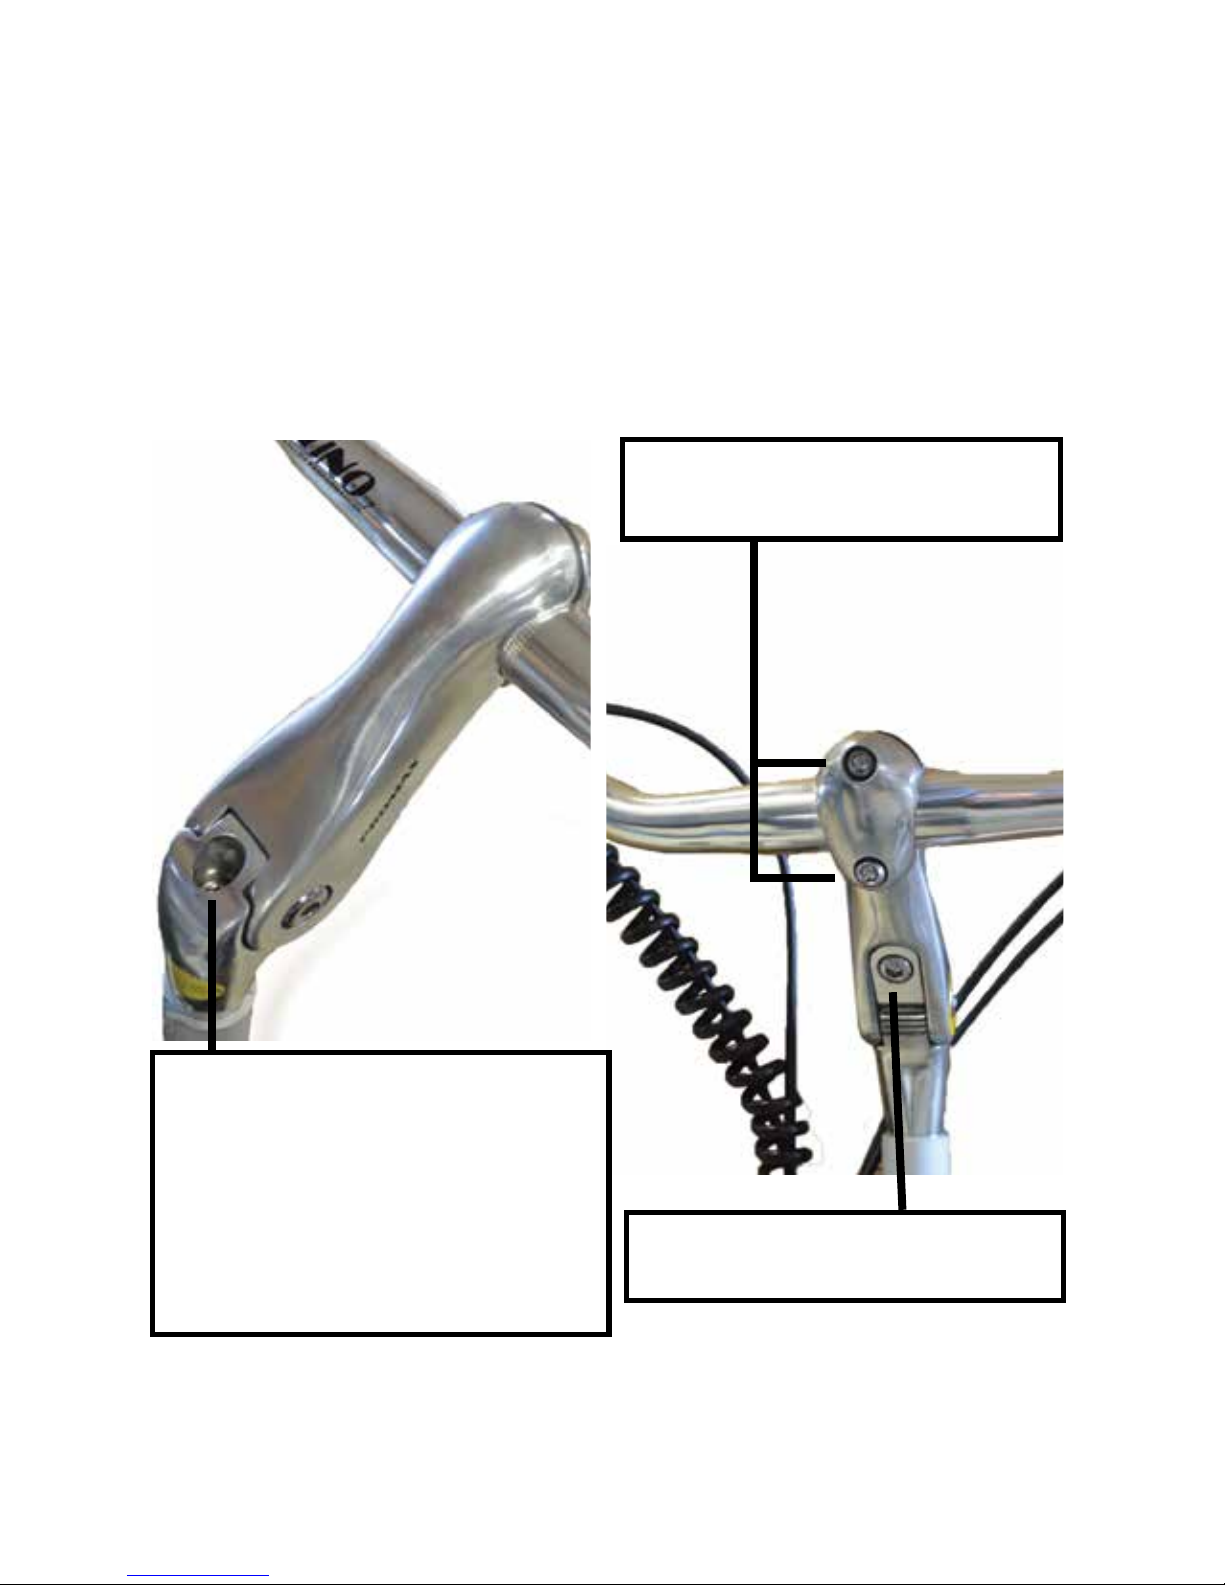
Adjusting the handlebars............................... 10
Handbrake....................................................... 12
Adjusting the handbrake cable..................... 13
Adjusting the chain....................................... 14
Gear................................................................. 15
Adjusting the gear lever and cable.............. 15
Cleaning the bike.......................................... 17
MPF DRIVE System......................................... 18
MPF DRIVE speed Sensor.............................. 19
MPF DRIVE display......................................... 20
MPF DRIVE battery......................................... 21
How to charg the Battery............................... 22
Managing the Display.................................... 25
Additional information............................. 28
Display........................................................ 29
Ekstra information.................................... 31
Accessories................................................ 32
Periodic inspection of your bike............... 36
Jørn Iversen Rødekro Aps. - Hydevadvej 48 - Hydevad - DK-6230 Rødekro

3
Congratulations on your new
tricycle!
General directions
The tricycle is at delivery assembled and ready for use, adjusted to the
individual user.
Saddle and handlebars can be adjusted.
Use the tricycle carefully. It is not a two-wheeled bike. It may take a
little driving to get used to the fact that you are safe and comfortable
with the new way of riding a cycle.
Do not hand over the tricycle to people who have not had a proper
instruction on how to ride it.
Avoid tilting the tricycle. Always go straight up and straight down
curbs and obstacles. Slow down when turning.
It is the user who is responsible for the tricycle being in proper order.
Warning
A maximum weight of 120 kg. If the user weighs
more than 120 kg, contact the manufacturer.
Jørn Iversen Rødekro Aps. - Hydevadvej 48 - Hydevad - DK-6230 Rødekro
Always read the instructions and the manual before using the
tricycle for the rst time.
We hope you will have many positive adventures with your tricycle.
And that it will be a long and trouble-free experience.

4
Before you go your rst trip
there are a few things you need to know.
When you have become condent with the tricycle, it will fell very
comfortable to drive.
This is not a bicycle and it is not driven like a bicycle!
A tricycle is always dependent on the surface. If, for example, you are
driving along a sloping surface you may feel the tricycle pulls to the
downward sloping side.
Maintain the balance on a bicycle a certain speed is required. This is
not true for a tricycle. The fastest way to learn how to use a tricycle is
to go very slowly, about the same speed as pedestrians.
Always reduce speed when turning.
Always go straight up and down curbs and obstacles. Both front
wheels must go up/down the curb at the same time. Otherwise,
there is a risk the tricycle might overturn.
The tricycle is tted with one hand brake that works on both front
wheels. The same brake is also used as the parking brake.
The other hand brake works on the rear wheel.
If your tricycle is tted with a xed hub, your feet always follow the
pedals round. To stop or slow down, use the hand brake and/or hold
back on the pedals. Check this before your rst trip.
Jørn Iversen Rødekro Aps. - Hydevadvej 48 - Hydevad - DK-6230 Rødekro

5
Warning
• Never turn the tricycle when at full speed; it may
overturn.
• Never block the brakes when at full speed
because the tricycle might overturn.
• Never use the tricycle for transport of other
people.
• Remember that free wheel equal no foot brake.
Your rst trip
Pull your tricycle to an area where there is no trac and the surface
is as even as possible.
Pulling the handbrake handle all the way to the handlebar activates
the parking brake. Then push in the lock.
Lift one foot over the centre frame so you stand with your back to
the saddle with one foot on each side of the frame.
Step on to one of the pedals and seat yourself on the saddle. Place
your feet on the pedals. This is a new feeling – to be seated on the
saddle with both feet on the pedals – without the tricycle being in
motion.
Turn the gear lever to 1st gear.
Release the parking brake by rst pulling the handbrake handle all
the way to the handlebar and then letting go of the grasp.
Now tread the pedals as slowly as you can.
Practice stop and go many times.
Practise turning a little to the left and a little to the right to make you
sway a bit. Always remember to keep an eye on the trac.
Jørn Iversen Rødekro Aps. - Hydevadvej 48 - Hydevad - DK-6230 Rødekro

6
Practise making U-turns. Drive close to the curb and stop. Then look
over your shoulder. If there is no trac, then turn the handlebars as
much as you can and start pedalling.
When this is practised several times and you feel comfortable
making turns, you can start practicing going straight up and down
curbs.
Remember that both front wheels must go up/down at the same
time. If this is not possible, you must step down from the tricycle and
push it up/down.
Because the widest point of the tricycle is at the front, you will
always be aware how close you are to curbs and obstacles.
This is also an advantage when pushing the tricycle. You can walk
close to the tricycle without having a rear wheel hitting you from
behind.
Warning
• If your tricycle is tted with reverse gear: When
driving backwards in reverse gear and xed hub,
the tricycle becomes unstable because the
direction of travelling is changed.
Jørn Iversen Rødekro Aps. - Hydevadvej 48 - Hydevad - DK-6230 Rødekro

7
For optimal use of the bike, it’s important to get it properly adjusted.
For further information please contact us at tel. (+45) 74 66 92 42
Jørn Iversen Rødekro Aps. - Hydevadvej 48 - Hydevad - DK-6230 Rødekro

8
Adjusting your tricycle
In order to obtain the best use of your tricycle it is important it is
adjusted correctly according to your needs.
Adjusting the saddle
The height is adjusted by loosening the Allen screw using an Allen
key. Then the saddle post can be pulled up or pushed down to the
desired height. Tighten the Allen screw.
The angle can be adjusted by loosening the bolt using an Allen key.
Adjust the saddle to the desired angle, and then tighten the bolt.
Adjust the
saddle back/
forth and
angle.
Adjust the
saddle
up/down
Jørn Iversen Rødekro Aps. - Hydevadvej 48 - Hydevad - DK-6230 Rødekro

9
Lock
Lock paddle
Jørn Iversen Rødekro Aps. - Hydevadvej 48 - Hydevad - DK-6230 Rødekro
The saddle can get very hot when your tricycle is
parked directly in the sun.
There must always remain 5 cm of the saddle post
in the tricycle frame.
Warning
1. To lock your tricycle, turn the key clockwise and push the locking
lever all the way down. Hold the locking lever down and turn the
key counter-clockwise. Let go of the lever and take out the key.
The tricycle is now locked.
2. To unlock, place the key in the lock and turn clockwise. The key
can also be removed when the tricycle is not locked.

10
Adjusting the handlebars
Jørn Iversen Rødekro Aps. - Hydevadvej 48 - Hydevad - DK-6230 Rødekro
Standard and hanger handlebars height and angle can be adjusted.
Distance between handlebar and saddle is changed by changing the
angle of the handlebar stem. If the distance from handlebar to
handlebar stem needs to be shorter, turn the handlebar stem
backwards.
Loosen the two allen screws to
move the handlebar up/down.
Loosen the allen screw to move
the handlebar stem up/down.
Remove the plastic cap, loosen
the allen screw 2-3 turns. Leave
the allen key in the screw, hit it
lightly with a hammer 2-3 times,
which will loosen the handlebar
stem and then it can be
elevated or lowered.

11
Warning
• When climbing the tricycle, all your weight is put
on the handlebars. Therefore they must be tight-
ened completely.
• There must always remain 5 cm of the handlebar
post in the frame. Do not raise the handlebars
higher than the max mark.
Jørn Iversen Rødekro Aps. - Hydevadvej 48 - Hydevad - DK-6230 Rødekro
The stem points backwards.
This position gives a shorter
distance to the handlebars.
The stem points forwards. This
position gives a longer distance
to the handlebars.

12
Handbrake
Tricycle is mounted with a combined hand and parking brake that
activates the drum brakes on the front wheels.
Activate the parking brake by pulling the handbrake handle towards
the handlebars, and at the same time activate and hold the hand-
brake lock.
To release the parking brake, gently pull the hand brake handle
towards the handlebar. This releases the lock.
Now, release the handbrake lever.
The hand brake can be placed on either the left or the right side of
the handlebars.
Handbrake activated.
The catch is locked in
forward position.
The handbrake is
unlocked. When the
catch is loosened again.
Jørn Iversen Rødekro Aps. - Hydevadvej 48 - Hydevad - DK-6230 Rødekro

13
Adjusting the handbrake cable
Coaster brake
The brake should brake equally much on each of the front wheels. If
not, the cables need adjusting.
The adjusting screw is placed at each front wheel at the end of the
black brake cable. If the handbrake is slack, turn counter-clockwise.
If the brake is too tight (i.e. the wheel cannon spin freely), turn the
screw clockwise until the wheel can spin freely
The handbrake cable.
Wrong Right
Jørn Iversen Rødekro Aps. - Hydevadvej 48 - Hydevad - DK-6230 Rødekro
When the rear wheel is removed, for example because of
puncturing or wheel change, must the hanger be correctly installed.

14
Adjusting the chain
Loosen the nuts holding the rear wheel so the rear wheel can be
moved. Use the two 6mm nuts in the rear to tighten or losen the
chain, until the chain can be moved ½ cm up and down in the
middle between the crank wheel and the rear gear wheel, be at the
same time aware of the wheel must be centered, tighten the two
main nuts again.
Check that the chain can move ca. 0.5 cm up and down.
One of the main nuts that
holds the rear wheel.
The 6 mm nut.
Jørn Iversen Rødekro Aps. - Hydevadvej 48 - Hydevad - DK-6230 Rødekro

15
Gear
Viktoria Power MPF and Viktor Power MPF is equipped with 7 gears.
When shifting gears up or down, do not apply the gear lever
when treading the pedals. The gear lever can be mounted on ei-
ther the left or the right hand side of the handlebars
Adjusting the gear lever and
cable
Red mark shows
the actual gear.
The small handle
shifts to a lower
gear.
The big handle shifts
to a higher gear.
The Adjusting screw is placed at the gear lever on the handle bar.
Pull out the adjusting screw, ca. 0.5 cm.
The adjusting screw can now be turned clockwise and
counter-clockwise.
Turn the gear lever to 4th gear. Then locate the two yellow markings
at the rear wheel hub. If the markings are level, the gear cable is
adjusted correctly. In case the two markings are staggered, turn the
adjusting screw on the gear lever either clockwise or
counter-clockwise until the markings are level. Remember that the
adjusting screw must be pulled out, ca. 0.5 cm before you turn it.
Jørn Iversen Rødekro Aps. - Hydevadvej 48 - Hydevad - DK-6230 Rødekro

16
Turn the gear lever to 4th gear.
The two yellow markings,
are level, the gear cable is
adjusted correctly.
The rear wheel
hub
Pull out the adjusting
screw, ca. 0.5 cm before
adjusting the cable.
Jørn Iversen Rødekro Aps. - Hydevadvej 48 - Hydevad - DK-6230 Rødekro

17
Warning
Warning
• Remember that children can hurt their ngers by
playing with the chain or cogwheel.
• Remember to tighten the rear wheel each time it
has been dismantled.
Maintenance of the bike
Monthly
Check the air pressure in all three tyres.
Rinse the chain in hot water, oil the chain.
Check that all cables to the brakes and the gear work freely.
If necessary, put a drop of oil into the cable housing.
Every six months
Check, all screws, nuts and bolts for the steering, gear and wheels.
Tighten them, if necessary.
Check wear on the tyres.
Check that all cables to the brakes and the gear work freely.
If necessary, put a drop of oil into the cable housing.
Check the chain for wear. Replace if necessary.
Jørn Iversen Rødekro Aps. - Hydevadvej 48 - Hydevad - DK-6230 Rødekro

18
MPF DRIVE System
MPF DRIVE Motor
The electric motor ensures that the bike will be easier for you.
MPF DRIVE is a perfect interaction between pedal force and electric
power.
Besides the crank arm rotation, torque and force sensor, the crank
arm speed and bicycle speed are collected and redirected provided
to the computer. The necessary electrical force is then calculated at
the same time. This means that the MPF DRIVE motor adapts to your
surroundings so you can get the right motor-help for the right
situation.
Jørn Iversen Rødekro Aps. - Hydevadvej 48 - Hydevad - DK-6230 Rødekro
Viktor Power and Viktoria Power is tted with a MPF DRIVE
motor. MPF DRIVE system ensures that the cycling becomes a lot
easier for you.
The electric motor makes Viktor Power and Viktoria Power to a
dierent bike to cycle, than tricycles without engine.

19
How to turn on the motor
To turn on the motor, you rst have to push the blue button on the
front of the battery, then push the ON/OFF button on the display, so
the display is turned on. Know you are reday to go riding on your
bycicle.
Jørn Iversen Rødekro Aps. - Hydevadvej 48 - Hydevad - DK-6230 Rødekro
The blue button
ON/OFF button

20
MPF DRIVE speed Sensor
With help from the speed sensor, the computer display gure out
how much help the MPF DRIVE engine must provide.
Speed sensor
Jørn Iversen Rødekro Aps. - Hydevadvej 48 - Hydevad - DK-6230 Rødekro
This manual suits for next models
1
Table of contents