JA SOLAR JAM60S01 PR Series User manual

JA
SOLAR TECHNOLOGYCO., LTD.
Building No.8, Nuode Center, Automobile Museum Easl Roed, Fengtai
Dislriol, Beijing, China
Tel: +86(10)63611888
Fax: +86(10)63611999
JA
SOLAR
Version no.
N17

Don'tstep, stand
or
sil
on modules
while
instal ,ng
or
cleaning.
IMPORTANT SAFETY INSTRUCTIONS
This manual contains important safety instructions for the Solar Photovoltaic Modules (hereafter referred to as
"Modules")
of
JA
Solar Technology Co., Ltd. (hereafter referred to
as
"JA Solar). lnstallers should follow all safety
precautions described in this guide as well
as
local codes when installing a Module.
lnstalling solar photovoltaic systems requires specialized skills and knowledge. lnstallation should only be
performed by qualified personnel.
Before installing a solar photovoltaic system, installers should familiariza themselves with its mechanical and
electrical requirements. Keep this guide in a safe place for futura reference and in case
of
sale
or
disposal
of
the
Modules.
For any questions, please contact ourGlobal Quality and Customer Service department
for
further information.
CONTENTS
1
2
3
4
5
lntroduction
··································································
1
Codes and Regulations
····
·
··································
1
General
·········································································
1
1 Product ldentification ··············································· 2
2 Conventional Safety
·····
········································
··
· 2
3 Electrical Performance Safety ··························
····
·· 2
4 Operating Safety ······················································· 3
5 Fire Safety ··························································
·······
3
lnstallation Condition
········································
··
··4
1 lnstallation position and working environment ·
··
·· 4
2 TiltAngle Selection
······
··
···
····································
··
· 4
Mechanical lnstallation ..
..
............................
.
....
...5
1 TiltAngle Selection ·················································· 5
2 lnstallation methods
·····-
······································
··
·· 5
6
7
8
Electrical lnstallation
··
···
·
·······
·
·················
·
···
·
···
····
9
1 Electrical Property ··················································9
2 Cables and Wiring ·················································· 1
O
3 Connectors ··············
··
···
·
···
·
···
·······················
···
··
···
·
···
1O
4 Bypass Diodes
-····-
·
···
·
···
··
···
·
···
·················
·-
····
···
·
···
·· 1O
Grounding
·································································
11
1 Grounding by using grounding bolt ·····················
11
2 Grounding by using unused mounting hole
·········
12
3Additional Third-party Grounding Devices·
··
··
···
·
··
12
Operation and Maintenance
············
·
·-·
··
···
·
···
·· 12
1 Cleaning ·······················································
············
12
2 The visual inspection
of
the Modules ··················· 12
3 lnspection
of
the connector and the cable
··········
13
PRODUCT SUPPLEMENT
··
··
·
·························
··
···
·
···
···13

1 INTRODUCTION
Thank
you
for
choosing
JA
SOLAR
modules!
This lnstallation Manual contains essential information for electrical and mechanical installation that you must know before handling,
installing
JA
SolarModules. This Manual also contains safety information you need to be familiar with.
AII
the information described in this
Manual is the intellectual property
of
JA
Solarand is based on the technologies and experience that have been acquired and accumulated
by
JASolar
.
This Manual does not constitute a warranty, expressed
or
implied.
JA
Solar does
not
assume responsibility and expressly disclaims
liability for loss, damage,
or
expense arising out
of
or
in
any
way
connected with installation, operation, use
or
maintenance
of
Modules.
No responsibility isassumed by
JA
Solarforanyinfringement
of
patents
or
otherrights
of
third partiesthat mayresultfrom
use
of
Modules.
JA
Solarreserves the right
to
make changes
to
the product, specifications
or
installation manual without prior notice.
Failure to comply with the requirements listed
in
this manual will invalidate the Limited Warranty for Modules
as
provided by
JA
Solar
at the same time
of
sale to the direct customer. Additional recommendations are provided
to
enhance safety practices and performance
results. Please provide a copy
of
this manual to the
PV
system owner
for
their reference, and inform them
of
all relevan! aspects
of
safety,
operation, and maintenance.
2 Codes
and
Regulations
The mechanical and electrical installation
of
PV
systems should
be
performed in accordance with all applicable codes, including electrical codes,
building codes and electric utility interconnection requirements. Such require-
ments
may
vary for mounting location.Requirements
may
also vary with
system voltage, and for DC
or
AC
application. Contact local authorities
for
governing regulations.
3 General
1. Aluminum Frame 2. Glass 3. Encapsulating EVA 4. Cell
7. Juntion Box 8. Label 9. Cable 10. Connector
13. Drainage holes 14. Cell
5. Backsheet 6. Silicone adhesive
11.
Mounting hole 12. Grounding hole
JA
SOLAR INSTALLATION MANUAL
01

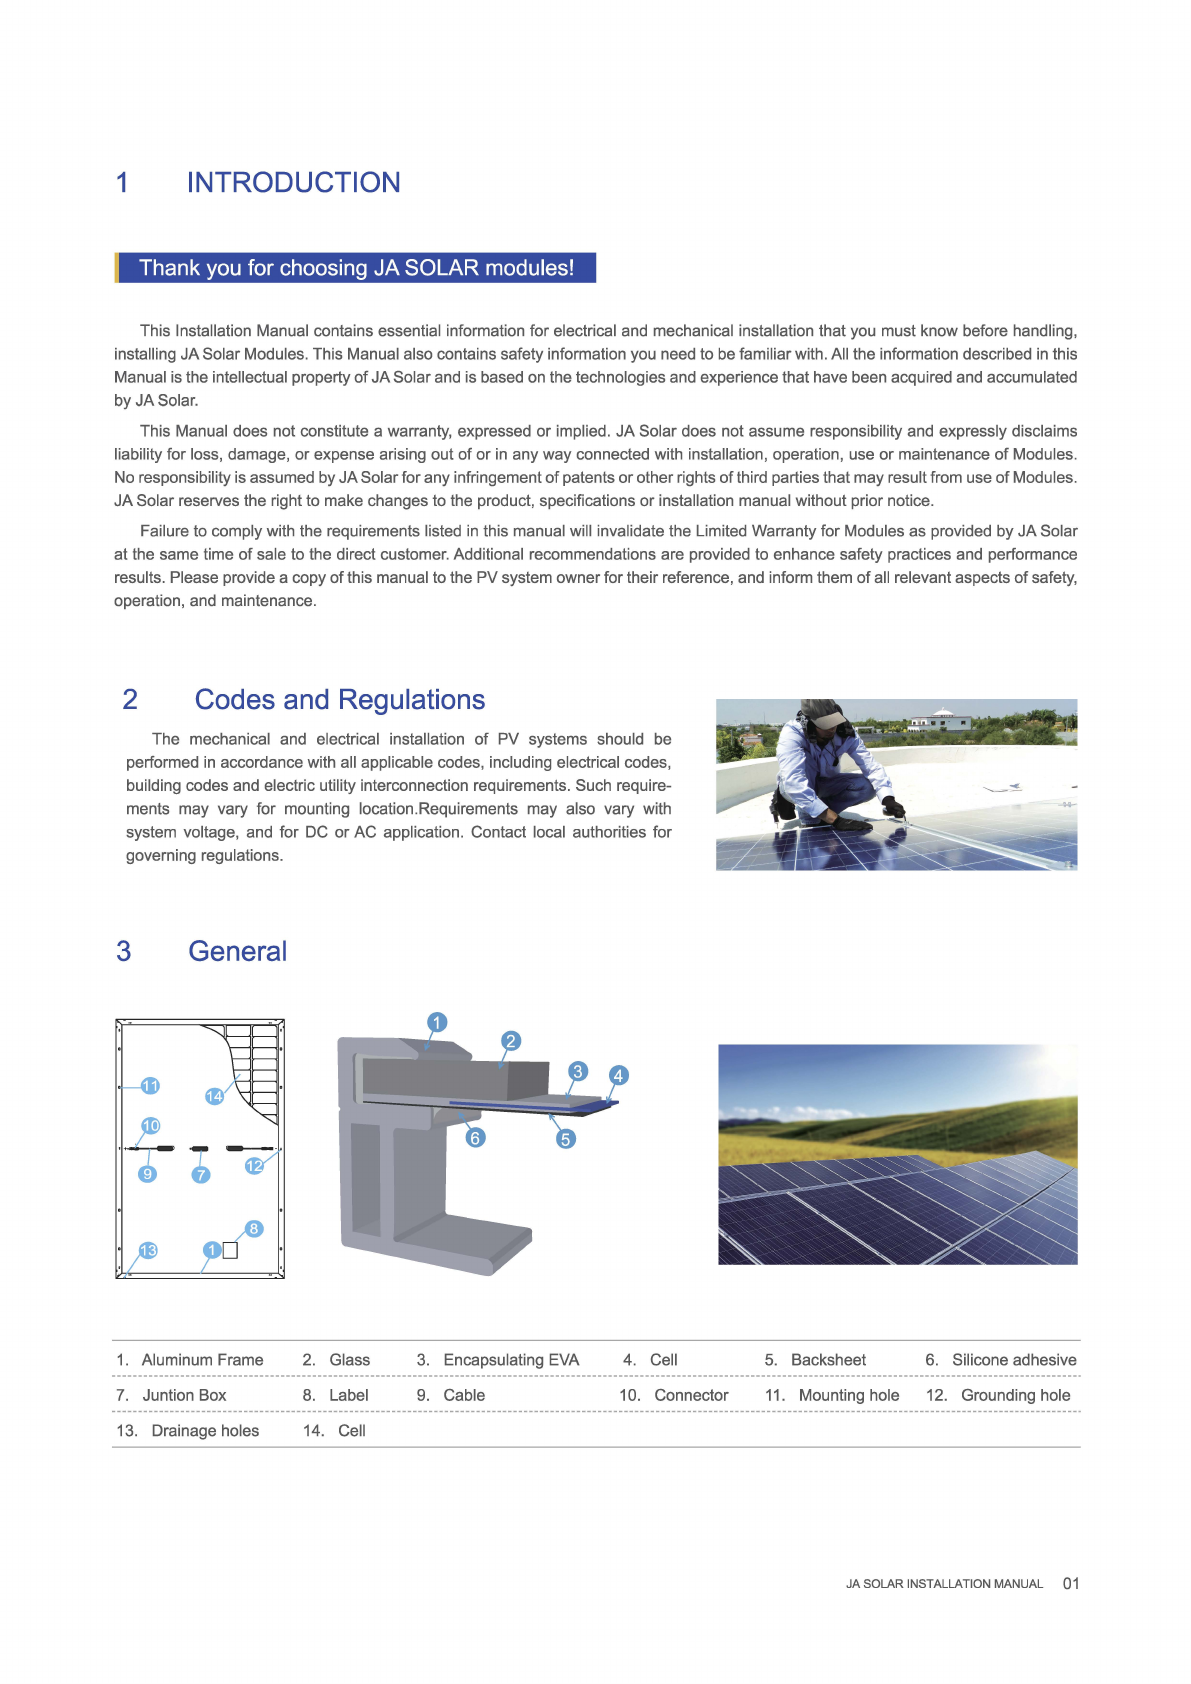
1. Product ldentification
Each module has three labels providing the following information:
1. Nameplate: describes the product type: Peak power, Max. power current, Max. power voltage, open circuit voltage, short circuit
current, all as measured understandard test conditions; Certifications mark,the maximum system voltge etc.
2.
Current Sorting: Modules are sorted out according to their Max. powercurrent, referred as a corresponding symbol "Current class
X" attached, in which x takes the value H, M or
L(H
marks physically the highest current).
To
get optimal performance out of a string
of
Modules it is recommended to connect only Modules
of
the sama "Current class X" class (for example only H Modules)
in
one given
string.We recommend the modules with
and
without
LRF
should notbe installed in a inverter, even
if
they are the same currentclass. For
the rest
of
modules with differentcurrent classes, the modules with adjacent current class can be installed in onegiven string.
3.
Serial number: each individual module has a unique serial number. The serial number has 16 digits. The 1stand the 2nd digits are
the year code,
and
the 3th is the month code {A,
B,
e stands for October, November and December respectively). For example,
121XXXXXXXXXXXXXmeans the module was assembled and testad
in
the January
of
2012. Each module has only one barcode.
lt
is
permanentlyattached
to
theinterior
of
the module and is visible from the
1Dp
front ofthe module. This barcode
is
insertad priortolaminating. 1n
addition, you can find the same barcode beside the nameplate.
2. Conventional Safety
JASolar Modules are designad to meet the requirements
of
IEC 61215 and IEC 61730, application classA. Modules rated for use in
this application class may be used
in
system operating at greater than 50V DC
or
240W, where general contact access is anticipated.
Modules qualified forsafetythrough I
EC
61730-1
and IEC 61730-2
and
within this application classareconsidered
to
meetthe requirements
for safety class
II
equipment.
When Modules are mounted on rooltops, the roofmusthave a fire resistant covering suitableforthis application. Rooltop PVsystems
should only
be
installed on rooftops capable ofhandling the additional weighted load
of
PVsystem components, including Modules, and
have a complete analysis ofthe structure performed by a certified building specialist
or
engineer.
Foryoursafety,
do
notattempttoworkon a rooftop until safetyprecautions have been identified
and
taken, includingwithout limitation:
fall protection measures, ladders or stairways, and personal protective equipment.
For your safety, do not instan or handle Modules underadverse conditions, including without limitation strong or gusty winds, and wet
or
frosted roofsurfaces.
3. Electrical Performance Safety
Pho1Dvoltaic
Modules can produce DC electricity when exposed to light and therefore can produce
an
electrical shock
or
burn. DC
voltage of30 Volts or higher is potentially lethal.
Modules produce voltageeven when not connected
to
an
electrical circuit
or
load. Please use insulatedtools and electricallyinsulated
gloves when working with Modules in sunlight.
Modules have no on/off switch. Modules
can
be rendered inoperative only by removing them from sunlight, or byfully covering their
front surfacewith cloth, cardboard,
or
other completely opaque material, or byworking with Modules face down
on
a smooth, flat surface.
In order to avoid ares and electrical shock, please do notdisconnect electrical connections underload. Faulty connections
can
also
result in ares and electrical shock. So pisase keep connectors dryand clean, and ensure thattheyare
in
properworking condition. Nevar
insert metal objects intothe connector,
or
modifythem in anywayin orderto secure an electrical connection.
Also in arder to avoid the sand
or
water vapor entering which may cause a safety issuewith the connection, the modules need
to
be
installed and connected to the combiner box once they are taken outfrom the carton box, keep the connectors dryand clean during the
installation, ifthe modules are not be installed within a week, rubber connectorcovers shall be added as a protective measure. Note that
pollution from sand, dustand waterwill result in ares and electrical shock
of
connectors. We suggest the customers add rubber connector
covers
as
a protection method specific to the area with heavy dust or seaside areas with highersalinity
or
serious polluted areas.
Reflection from snow
or
water can increase sunlight and therefore boost current and power.
In
addition, colder temperaturas
can
substantially increase voltage and power.
lf
the glass or othermaterial is damaged, please wear personal protection equipment and separate the module from the circuit.
No matter howweather condition is, personnel entering the power station shall wear safety helmet, insulating gloves and insulating
shoes correctly, taking self-safety protection measures.
JA
SOLAR
INSTAI..LATION
MANUAL 02

Work only under dry conditions,
and
use
only dry tools.
Do
not handle Modules when they are wet unless wearing appropriate protective
equipment. lf
you
need
to
clean
the
Modules, please follow the cleaning requirements mentioned
in
the
manual.
lnstallation must
be
carried out under the guidance ofa qualified electrician.
1
4.
Operating
Safety
Do
not open the package
of
JA Solar Modules during
transportation and storing until they are ready to
be
installed.
At the same time please protect the package against
exposure to damage. Secure pallets from falling over.
Do
not exceed the maximum height
of
pallets to
be
stacked, as indicated
on
the pallet packaging.
Store pallets
in
a ventilated, rain-proof and dry location
until the Modules are ready to be unpacked.
Please unpack the package
of
JA Solar Modules
according to "JA Solar Modules Un-Pack lnstruction".
Do
not lift the Modules by grasping the Module'sjunction
box or electrical leads
in
any condition.
Do
not stand or step
on
the Modules.
Do
not drop the Modules
on
another Module.
Do
not place any heavy objects
on
the Modules to avoid
glass breakage.
Be
cautious when setting the Modules down
on
to a
surface, especially
on
the comer
of
the Modules.
lnappropriate transport and installation may break the
Modules.
Do
not attemptto disassemble the Modules, and do not remove
any attached nameplates or components from the Modules.
Do
not apply paint or adhesive to the Modules top surface.
To avoid damage to the backsheet, do not scratch or hit the
backsheet.
Do
not drill hales
in
the frame. This may compromise the frame
strength and cause corrosion
of
the frame.
Do
not scratch the anodized coating
of
the frame (except for
grounding connection). lt may cause corrosion
of
the frame or
compromise the frame strength.
Do
not attempt to repair the Modules with damaged glass.
The scrapped modules shall be recovered and disposed by the
qualified institution.
In
dry areas, modules are easily affected by static electricity
during installation. So the installation personnel should wear
anti-static assembly to ensure that the equipment and installation
personnel are not affected or hurt by static electricity.
JASOLAR
INSTALLATION MANUAL 03

1.
lnstallation position and working environment
JA
Solar Modules are intended
for
use in terrestrial applications only-no outerspace use.
Do not use mirrors or other magnifiers to concentrate sunlight onto the modules.
Modules mustbe mounted on appropriate mounting structures positioned on suitable buildings, theground,
or
otherstructuressuitable
for modules (e.g. carports, building facades or PV trackers).
Modules must not be installed in locations where they could be submerged in water.
The recommended ambient temperature should be within -40ºC(-40ºF)
to
40ºC(104ºF).The temperature limits are defined as !he
monthly average high and low
of
the installation site. The limit operating temperature should
be-40
ºC (-40ºF) and 85ºC (185º
F).
Ensure Modules are notsubject to wind
or
snow loads exceeding the maximum permissible loads.
The Modules should be installed in a location where there's no shading throughout the year. Ensure there's no obstacle to block li
ght
nearthe installation site.
Lightning protection is recommended for PVsystems that are to be installed in locations with high probability
of
lightning strikes.
Do not use Modules nearequipment
or
in
locations where flammable gasses maybe generated
or
collected.
Modules cannot be installed
or
used in extreme areas
or
weatherconditions, and highlycorrosive areas should be considered careful-
ly. Please adopt appropriate measures to ensure the performance and safety
of
the Moduleswhen they are installed
or
operated in areas
with heavy snow, extremely cold, strong wind,
ornearan
island
or
desert that is prone to produce sal!fog,
ornear
water.
JASolar
Moduleshave passed the IEC 61701 salt-mist, bu!galvaniccorrosion can occurbetween thealuminum frame
ofthe
Modules
and mounting
or
grounding hardware
if
such hardware is comprised
of
dissimilar metals.
JA
Solar Modules can be installed
al
seaside
locations 50m to 500m from the sea, butthe components should be protected against corrosion. For!he detailed requirements, follow
JA
Solarseaside installation instructions.
The moduleswith LRF can have sorne light reflections
at
certain angles and lightpollution
if
there are provisions in place, an assess-
ment bythe planner might be needed.
Modules cannot be applied
for
sorne special requirements, e.g.
for
marine and vehicle applications. Please refer to local law and
regulations for details.
JA
SOLAR INSTALLATION MANUAL 04

5.
Mechanical
lnstallation
1.
Conventional
requirements
Ensure the installation method and supporting system
of
Modules is strong enough to withstand all the load conditions. The lnstaller
must provide this guarantee. The installation supporting system must be tested by the third-party organization with the analysis ability
of
Static Mechanical, according to the local national or intemational standards.
The Modules mounting structure must be made
of
durable, corrosion-resistant and UV-resistant material.
Modules must be securely attached to the mounting structure.
In
regions with heavy snowfall
in
winter, select the height
of
the mounting system, so that the lowest edge
of
the Modules is not
covered by snow for any length
of
time.
In
addition, ensure that the lowest portien
of
the Modules is placed high enough so that it is not
shaded by plants
or
trees
or
damaged by flying sand.
When the Modules are supported parallel to the surface
of
a building wall or roof, a minimum clearance
of
10 cm between the Module
frame and the surface
of
the wall
or
the roof is required to allow air to circulate behind the Modules and to prevent wiring damage.
Do not attempt to drill holes in the glass surface and the Modules frames
of
the Modules as this will void the warranty.
Before installing Modules on a roof, ensure that the roof construction is suitable.
In
addition, any roof penetration required to mount
the Modules must be properly sealed to prevent leaks.
Observe the linear thermal expansion
of
the Modules frames, must ensure that the minimum distance between neighboring frames
is 10mm.
The module frames will warp at low temperatura.
Avoid the frame receiving the lateral tension and pressure, causing the frame off
or
crushing the glass.
Always keep the module backsheet free from foreign objects
or
structural elements, which could come into contact with the panel,
especially when the panel is under mechanical load.
Modules have been certified for a maximum static load on the back side
of
2400 Pa(i.e. wind load) and a maximum static load on the
front side
of
either2400 Pa or 5400 Pa(i.e. wind and snow load), depending on the modules type (please refer to the following installation
methods for details).
The mounting method must not result in the direct contact
of
dissimilar metals with the aluminum frame
of
the Module as it will
result in galvanic corrosion. IEC 60950-1 standard recommends metal combinations not exceed an electrochemical potential
difference
of
0.6 Volts.
Modules can be mounted in landscape or portrait orientation.
JA SOLAR
INSTALLATION
MANUAL
05

1.
Modules installed with mounting hole
Modules should be bolted to support structures through
mounting hales located
in
the frame's back flanges. Refer to
what is shown in Figure 2 (Mounting Details).
SOLAR MOOULE Foryour reference, please use the components specified below:
.
;:
;"
~
J;:
;r;:
-
WASH
ER
1. Bolt
Material: Q235B/SUS304
Size and Length: M8*16mm
3. Spring Washer
Material: Q235B/SUS304
Size: M8
2. Washer
Material: Q235B/SUS304
Size: M8
4. Nut
Material: Q235B/SUS304
Size: M8
~
SPR
ING
WASH
ER
rr::IJ
NUT
Recommended torque is between 12N.m to 16N.m.
Figure 2 Mounting Details
2 Modules installed with clamp
Modules should be mounted using specialized clamps as shown in Figure
3.
A.
Modules should be attached on a supporting structure rail by
metal clamps.
lt
is recommended to use the clamps under the
following condition
or
approved by system installation:
Width: Clamp A no less than 50mm Clamp B no less than 38mm;
Thickness: No less than 3mm;
Material: Aluminum Alloy;
Bolt:
MB;
B.
The torque range
of
screw tightening is between 1
BN.m
to
24N.m
C.
The Modules clamps must not contact the front glass
or
deform the frame in anyway, the contact area
of
the clamp with the
front
of
the frame must be smooth, otherwise may damage the
frame
or
break the modules. Avoid shading effects from the
Modules clamps. Drainage hales on the Module frame must not be
closed
or
obscured by the clamps.
Metal Cla
mp
B
Me
tal
C
lam
p
A---~
Mounting
St
ru
ct
ure
Rail
JA
SOLAR INSTALLATION MANUAL
06

ClampB
í/
)'
v.,,t;t
X=height
of
PV module
Clamp A Figure 3 Clamp Details (Units:mm) Clamp B
3.
lnstallation position and corresponding static loads
The low/normal level ofload condition is applicable to
the installation
in
most of environmental conditions: the
maximum static load
on
the back
of
the modules is 2400
Pa(i.e. wind load), and the maximum static load
on
the
front
of
modules
is
2400
Pa
(i.e. wind and snow load).
The high level
of
load condition is applicable to the
installation
in
harsher environmental conditions such as
storm, heavy snow, etc: the maximum static load
on
the
back
of
the modules is 2400
Pa
(i.e. wind load), and the
maximum static load
on
the front
of
modules is 5400
Pa
(i.e. wind and snow load), depending
on
the pressure
level that it would endure according to IEC standard.
For the dynamic loads, such as wind, the safety
factor needs to
be
increased by 3times. lt means that the
maximum dynamic load
is
800
Pa
when the wind speed
is less than 130 km/h.
Mounting by inner four hales
Module length L
Mounting by clamps (S=1/4L±50)
OOmm
Mounting by 400mm spaced hales
n,
_____
n
LJ
LJ
Mounting by outer four hales
1
::i:::
_l_
1
::i:::
_l_
,
-~-------
·
Module width W
Mounting by clamps
(O<
H<
1/4W)
JA
SOLAR INSTALLATION MANUAL 07

·
..
Jdle::::~~tall~ti:~~et:ds
Mounting
by
Mounting
by
Mounting
lnner Outer clamps clamps on the
by400mm
four holes four holes short frame spaced
Mou S=1/4L±50 H=1/4W±50 holes*
JAM60S01 PR/ +5400/-2400 N/A +5400/-2400 ±2000 N/A
JAP60S01
se
Series
JAM60S03 PR/ +5400/-2400 N/A +5400/-2400 ±2000 N/A
JAP60S03
se
Series
JAM60S09 PR/ +5400/-2400 N/A +5400/-2400 ±2000 N/A
JAP60S09
se
Series
JAM60S10 PR/JAP60S10 +5400/-2400 N/A +5400/-2400 ±2000 N/A
Se/JAM60S10 MR Series
JAM68S11 PR(B) Series +5400/-2400 N/A +5400/-2400 N/A N/A
JAM76S11 PR(B) Series +5400/-2400 N/A +5400/-2400 N/A N/A
JAM66S1O
MR
Series +5400/-2400 N/A +5400/-2400 ±2000 N/A
JAM60S20 MR Series +5400/-2400 N/A +5400/-2400 ±2000 N/A
Single-glass JAM72S01 PR/ ±2400 N/A +5400/-2400 ±1800 ±2400
modules JAP72S01
se
Series
JAM72S03 PR/ ±2400 N/A +5400/-2400 ±1800 ±2400
JAP72S03
se
Series
JAM72S09 PR/ ±2400 N/A +5400/-2400 ±1800 ±2400
JAP72S09
se
Series
JAM72S10 PR/JAP72S10 ±2400 N/A +5400/-2400 ±1800 ±2400
Se/JAM72S10 MR Series
JAM78S1O
MR
Series ±2400 N/A +5400/-2400 ±1800 N/A
JAM72S20 MR Series ±2400 N/A +5400/-2400 ±1600 ±1800
JAM54S30 MR Series +5400/-2400 N/A +5400/-2400 ±1800 N/A
(Specific clamp)
N/A ±1200
JAM66S30 MR Series +5400/-2400 +5400/-2400 (Specific clamp) ±2400
JAM72S30
MR
Series +5400/-2400 +5400/-2400 +5400/-2400 ±1200 ±1800
(Soecific clamp)
JAM72S17
GR
Series +5400/-2400 N/A +5400/-2400 ±1800 N/A
(Specific clamp)
JAM78S30 MR Series +5400/-2400 +5400/-2400 +5400/-2400 N/A N/A
"N/A'' means nat applicable;"--" means
in
verificatian
*
Far
installatian with 400mm maunting hales,
please
consult with tracker campanies abaut the warkable installatian solutian ifrequired test load
is
aver 2400Pa.
Figure 4 lnstallation Position and Corresponding Load Relation
JA SOLAR INSTALLATION
MA
N
UA
L 08

6. Electrical lnstallation
1. Electrical Property
Rated electrical characteristics
such
as Pmax is within +/- 3 % and
Voc
within +/-3% and lsc within +/-4% of tolerance values at
Standard
Test
Conditions. Standard Test Conditions: 1
OOOW/m
2 lrradiance,
25
·e
Cell Tempertature and 1.5Air Mass.
Undernormal
conditions,
the photovollaicModules
may
experience conditions lhat
produce
more current and/or
voltage
than
reported et
Standard Test Conditions. Accordingly, the values ofshortcircuit current, lsc, and open circuit voltage,
Voc,
marked
on
Modules should
be multiplied by a factor
of
1.25 when determining component voltage ratings, conductor capacities, fusing sizes, and size
of
controls
connected to the Modules output.
Voltages areadditive when Modules are connected directly
in
series, and Modulescurrents are additive when Modulesareconnected
direc11y
in
parallel, as illustrated
in
Figure 5.
Modules with different electrical characteristics must not
be
connected directly
in
series.
Serleswlrlng Parallel wiring
Serles wlrlng
and
Parallel wlrlng
-W-
Diodes
-!SI-
Over-<:urrent
-ca-
Connector
protactlon
dev1ces
Figure 5: Electrical diagrams
of
series and parallel wiring
The
maximum
number
of
Modules
that
can
be
connected
in
aseries
string
must
be
calculated
in
accordance
with
applicable regulations
in
such
a way that the
specified
maximum
system vollage (The
maximum
system
voltage of
JA
SolarModules
is
DC
1
OOOV/1
SOOV
according
to
the safety
appraisal
of
the
IEC61730)
of
the
Modules
and all otherelectrical
DC
components will
not
be
exceeded
in
open-circuit
operation
et
the lowest temperatura expected atthe PV
system
location.
Correction factor for the open-circuit voltage can be
calculated
basad
on
the following formula:
c....=1
~x(25-
n.
T is the lowest
expected
ambient temperature at the system
location.
13(%/C)
is the temperature coefficient of lhe
selected
module
Voc
(refer
to
corresponding
datasheet).
An
appropriately rated over-current protection devicemust be
used
when the
reverse
current
could
exceed
the
value
of
the
maximum
fuse
rating
of
the
Modules.
An
over-currentproteclion
device
is
required
for
each
seriesstring
if
more
than
two
seriesstringsare
connected
in
parallel,
as
illustrated
in
Figure
5.
JA
SOLAR
INSTAl.!ATION
MANUAL
09

2.
Cables
and
Wiring
111ege
Junctlon
boxe&
llave
been
designad
to
be
easlly
lnterconnec:ted
In
senes
forthelrwell·conneded
cable
end
the
connedor
wlth
IP67
{IP68)
protection
grade.
Eacn Modulas
ha.s
t'NO
single-canductor
wires.
ona
positive
and
ona
negativa.
which
are
pr&-wired intida
the
ju"*n
box. The
connecton1
at
the
opposite
end
of
these
wiresallow easy
eeries
connection
of
adjaoent
Modules
by
firmly
inserting
the
posltlve
connector
ofa
Moclula
lnt.o
the
negatlve
connector
of
an
adjacent
Module
untll
the
oonnec:tor
Is
fully
seat.ed.
Use
fleld
wfrfng
wlth
sultable
aosa-sedlonal
areu
that
are
approved
for
use
atthe
maxlmum
ihort~rtult
c:urrent
of
the
Modules.
JA
Soler
recommends
lnstelllll"&
use
onty
sunllght
resl&te.nt
cables
quellfled
fordlrect
c:urrent
(OC)
wlrlng
In
PV
systems.
The
mlnknum
wlre
size
lhouk:I
be
4mm
1
(12AWG).
Raling
Required
Minimum
F"ield
Wiring
Testlng
standard
EN
50618:2014
4nrn•
Temperaú.lre
RaUng
·400C
1D
t9()0C
Cablell
should
be
fix&d
to
the
mounling
stru<:ture
in
slJ<:h
awaythat
mec;hanical
dama
ge
of
the
cable
andfor
the
Modulas
is
avoided.
Do
not
appty
snss
lo
the
cables.
The
mlnlmum
cables
bendlng
radliJS
should
be
38.4mm.
Any
cable
damage
caused
by
bendlng
too
mlJ<:h
or
cable
mane.gement
system
Is
not
covered
under
JA
Sole.r's
we.rre.nty.
F«
ftxlng,
use
e.pproprlete
mee.ns,
such
as
sunllght
reslstant
cable
tias
andfor
wire
managemant
dips
spacifically
deaigned
to
attach
totha
Modula
trama.
Whila
the
cablas
ar&
sunlight
re1iatant
and
waterp!Wf,
where
l)08llible,
avoid
di~
sunlight
exposure
andwater
immen1ion
of
the
cables.
Ce.ble
arrangement
must
comply
wlth
local
laws
and
rwgulatlons.
3.
Connectors
Kaep
connectors
dry
and
clean.
and
ensure
lhat
connactor
caps
are
hand
tlght
befo
re
connectlng
tha
Modul811.
Do
not
~t
maldng
an
elec::trical
cor111action
with
'W8t..
soiled,
orotherwill&faulty
conn&dors.
Avoid
sunlight
axposu111
and
water
immeniion
of
lhe
connec::tom.
Avold
connectoni
resllng
on
lhe
ground
orroof
surface.
Faulty
connections
can
result
in
a~
and
electric8111hock.
Check
that
ali
electrical
connections
arv
11ec:urvly
fast8ned.
Make
11ure
that
all
loc:ldng
connect.or&
are
fulty
engaged
and
locked.
Connect.or
lnt&rconnect
muat
reach
lhe
correspondlng
IP
protectlon
leve!,
60
as
to
actlleve
tha
alactrlcal
securtty.
11
Is
not
rac:ommandad
to
lntarconnact
dtffarent
types
of
connectors.
Do
not
contad
orge.nlc
SOM!nts
and
olher
corrosiva
me.terlels
In
connec:tor
oonnectlon
end
the
uslng
envlronment
such
as
e.Jcohol,
gasolina,
pasticidea,
hart>icid811,
etc.
Pl88119
consult
JA
for
datails.
Otherwill&. JAwill not
ba
rasponsibla
for
connect.or
etacking
caused
by
thia
aspect.
Two
examplell
of
inco~
usaee
are
liatad
below:
Pktasepay
attentlon
thatthe
unlock:
melhod
of
connecixlrti
III
dlffenlnt
accordlng
to
local
laws
and
regulatlOl'III.
4.
Bypass
Diodes
Tha
junction
box&11
used
wilhJA
SOiar
Modulas
contain
bypass
diod811
wirad
in
parallal
with
tha PV
call
lltrings.
In
!ha
C8ll8
of
partial
11hading,
the
dieldee
bypass
the
current
generat.ed
by
the non-ihaded
cella,
thervby
limiting
Modules
heating
and
performance
losllell.
Bypass
dlodes
are
not
over-current
protec:tlon
devloes.
In
lhe
event
of
a
known
or
11uspeded
dlod&
fallun1,
lnatallerti
or
rnalntenance
provlden1
should
canta.et
JA
Solar.
Never
attempt
to
open
the
Junctlon
box
by
yourse!f.
Please
pay
attentlon
to
guard
agalnst
lnduc:ttve
llghtnlng,
baclcflow
and
wrong
conn&c:tlon.

7.
Grounding
JA
SolarModules use an anodic oxidized aluminum frame
to
resist corrosion. So the frame
of
Modules should be connected
to
the
equipment grounding conductor
to
preventlhunderand electrical shock.
The grounding device should fully contactwith the inside
of
the aluminum alloy, and penetrate the surface
of
the frame oxidationfilm.
Please don'tdrill anyaddilional grounding holaontheframe
of
the
Modules,
o1herwise
JA
Solarexpressly
disclaim
liabilityforvoiding lhe
warranty.
To
acquirethe best
power
output,
JA
recommends clients
to
instan moduleswilh anli-PID inverter.
Thegroundlng method should notresuttInthedlrectcontactofdlsslmllarmetalswlth thealumlnum frame
of
the Modulesthatwlll result
in
galvanic corrosion. IEC 60950-1 standard recommends metal combinations notexceed
an
electrochemical potenlial difference of0.6
Volts.
The frame rails have pre-drilled holes marked wilh a grounding sign. These holes should
be
used forgrounding purposes and should
not
be
used for mounling the Modules.
The following grounding melhodsare available.
1 1.Grounding
by
usinggrounding bolt
There Isa groundlng hola wtth 4.2
mm
dlameteron the edge sida closer
to
the mlddle
of
the
bacl<
frame
of
the Modules. The mlddle
line
of
the grounding mark isovertapped wilh thegrounding hola, and the direction is same as the longarframe.
The grounding between Modules must be approved
by
a qualified electrician. The grounding devioe should produoed
by
a qualified
electrical manufacturar. The recommended torque value is 2.3
N.m.
A 12
AWG
copper wire can
be
used as the equipment grounding
conductor
in
conjunction with the grounding bolt. The copperwire should not
be
compressed during the instellalion.
WasherNut WireBolt Hex Nut
~-@
04.0mm / 0S.Omm WireSlot:2.5-1
Ommsq
/14-6AWG
Figure 6: lnstallation Methods
JASOLAR
INSTAUATIONMANUAL
11

2.
Grounding
by
using
unused
mounting
hole
The existing mounting holes which have not been used can be used
for
grounding.
A. Direct the grounding clamp
to
the mounting holes in the trame. Thread !he grounding
clamp and the frame with grounding bol!.
B.
Pul
the toothed gasket
into
the other side, then tighten and lock
!he
nut.
The
recommended torque
of
locking
the
nut
is 2.0 N•M-2.2 N•M.
C. Thread the grounding clamp with grounding wire. The materiel and size
of
grounding
wire should meetthe relevant requirements
of
the national, regional and local code, law and
standard.
D.
Finish the mounting with tightening the binding bolt
of
grounding wire.
3.
Additional
Third-party
Grounding
Devices
c:r:::::r:::J
Lock Nut
T
oot
h W
as
her
W
ire
Bind
ing
L
ug
G
ro
und
Bo
lt
Figure
7:
lnstallation Methods
JA
Solar Modules can be grounded using third party grounding devices
so
long as they are certified
for
grounding modules and
the devices are installed according
to
the manufacturer's specified instructions.
8.0peration and Maintenance
lt
is required to perform regular inspection and maintenance
of
the Modules, especially within warranty scope.
lt
is the user's
responsibility
to
report to the supplier regarding the damages found within 2 weeks.
1.Cleaning
The dust accumulated on the front transparent substrate may reduce the power output, and may even cause regional hot-spot
effect. Industrial effluents
or
bird drops may be a serious case, and the extent
of
the severity depends on the transparency
of
the
foreign objects. lt's usually notdangerous forthe accumulated dust to reduce the sunshine, because the light intensityis still homogeneous
and the power reduction usually is
not
obvious.
When Modules are operational, there may exist environmental factors that cast dust, plants and so on, that may distinctly reduce
the power output.
JA
Solar advises that there should be no obstructed object over the Modules surface
at
any time.
The cleaning frequency depends on the accumulating velocity
of
the fouling. In many instances the front substrate is cleaned with
the rain, and
we
can decrease the cleaning frequency.
lt
is recommended
to
wipe the glass surface with wet sponge
or
soft cloth.
Please do not clean the glass with cleaning agent which contains acid
or
alkali.
Please refer to "cleaning manual" for specific contents.
2.The
visual
inspection
of
the
Modules
lnspect the Modules visually to find
if
there are appearance defect, the following three types need more attention especially:
A. Whether the glass is broken;
B.
Corrosion along the cells' bus-bar. The corrosion is caused by the dampness infiltrated into the Modules when the surface
encapsulation material is damaged during the installation
or
transportation.
C.
lf
there is burning vestige on the backsheet.
JASOLAR
INSTALLATION MANUAL 12

3.lnspection
of
the
connector
and
the
cable
lt's recommended
to
implement !he
following
preventive maintenance every 6 months:
A.
Check !he encapsulation of !he connector
with
!he cable.
B.Check the sealing
gel
of
the junction box
to
ensure
it
is
not cracked
ar
creviced.
PRODUCT SUPPLEMENT
The installation manual applicable module types are
as
follows.
The module types are subject
to
changes without
prior
notice
due
to
continuous product innovation, research and development.
"XXX"
shows the
PEAK
power of the
Module
Label
in
increments
of
5.
Dimension
(LxWxH)
[mm]
Module
Type
UL
61215&61730
TUV
UL
1703
JAM60SO
1-XXX/PR
1650x991x35 1650x991x35
JAM72SO
1-XXX/PR
1960x991x40 1960x991x40
JAP60S01-XXX/SC 1650x991x35 1650x991x35
JAP72S01-XXX/SC 1960x991x40 1960x991x40
JAM60S03-XXX/PR
1678x991x35 167ax991x35
JAM72S03-XXX/PR
2000x991x40 2ooox991x40
JAP60S03-XXX/SC 1678x991x35 1678x991x35
JAP72S03-XXX/SC 2000x991x40 2000x991x40
JAM60S09-XXX/PR
1657x996x35 1657x996x35 1666x1005x35
JAM72S09-XXX/PR
1979x996x40/1979x996x35 1979x996x40/1979x996x35 1988x1005x40
JAP60S09-XXX/SC 1657x996x35 1657x996x35 1666x1005x35
JAP72S09-XXX/SC 1979x996x4Q/1979x996x35 1979x996x40/1979x996x35 1988x1005x40
JAM60S
10-XXX/PR
1689x996x35 1689x996x35 1698x1005x35
JAM68S11-XXX/PR(B)
1638x1084x35
JAM76S11-XXX/PR(B)
1644x12Q4x40
JAM72S
10-XXX/PR
2015x996x4Q/2015x996x35 2015x996x40/2015x996x35 2024x1005x40
JAP60S10-XXX/SC 1689x996x35 1689x996x35 1698x1005x35
JAP72S
10-XXX/SC
2015x996x4Q/2015x996x35 2015x996x40/2015x996x35 2024x1005x40
JAM60S10-XXX/MR
1689x996x35 1689x996x35 1698x1005x35
JAM72S10-XXX/MR
2015x996x4Q/2015x996x35 2015x996x40/2015x996x35 2024x1005x40
JAM66S
10-XXX/MR
1852x996x35 1852x996x35
JAM78S10-XXX/MR
2180x996x40 2180x996x4Q
JAM60S20-XXX/MR
1776x1052x35/1769x1052x35 1776x1052x35/1769x1052x35
JAM72S20-XXX/MR
2120x1052x4Q/2112x1052x35 212Qx1052x40/2112x1052x35
JAM54S30-XXX/MR
1722x1134x30 1722x1134x30
JAM66S30-XXX/MR
2094x1134x35 2094x1134x35
JAM72S30-XXX/MR
2279x1134x35/2278x1134x35 2279x1134x35/2278x1134x35
JAM72S17-XXX/GR
196Qx996x30
JAM78S30-XXX/MR
2465x1134x35 2465x1134x35
*
JAM68S11-XXX/PR(B)
module
is
not
far
sale,
distribution
ar use outside
of
Asia.
JA
SOLAR INSTALLATION MANUAL
13
This manual suits for next models
29
Table of contents
Popular Solar Panel manuals by other brands

Viessmann
Viessmann Vitosol 200-T installation instructions

Schüco
Schüco MPE 85 AL 01 manual

Baxi
Baxi Solarflo installation guide

Van Der Valk
Van Der Valk ValkField installation manual

Solarbayer
Solarbayer NANOSOL 135 Product information

Clenergy
Clenergy PV-ezRack SolarTerrace III Planning and installation guide