JACKSON.AUDIO GOLDEN BOY User manual

GOLDEN BOY OVERVIEW
"The bluesbreaker circuit has been my favorite overdrive
circuit forever. I have a collection of clones that I love. The
Golden Boy takes that classic tasteful circuit adds some 3D
depth, marries it with the modern ideas of Brad Jackson and
turns it into an absolute Swiss Army knife for just about any
pedalboard." - Joey Landreth
The GOLDEN BOY is a very flexible overdrive with 4 presets for clipping options,
an innovative gain adjustment feature that we call GAIN CYCLE, and a 3 band
active EQ for maximum tonal flexibility. To top it off, we added a boost circuit
which is the same type of MOSFET boost circuit found on our top
selling Preamp pedal.
BOOST OVERVIEW
The boost circuit is in its own true bypass loop which means it can be used
independently of the DRIVE circuit. The boost circuit in the GOLDEN BOY is a
MOSFET based boost much like the AMP MODE found in our best
selling Preamp pedal. To activate/deactivate the boost circuit simply press
the BOOST footswitch.
One of the things that makes the boost in the GOLDEN BOY different from other
boosts on the market is that it has 4 presets available. Each preset is EQ’d slightly
differently to allow it to alter how it interacts with the overdrive circuit in the
GOLDEN BOY or any other pedal you may have in your rig
PRISM
PRISM
Preset 1– YELLOW LED: Bright Boost.
Very useful for creating a thinner sound
or when boosting a thick sounding
overdrive.

Preset 2– GREEN LED: Mid Boost.
Not as thin as the yellow mode, the
green mode allows more lows and
takes on the character of a mid
boost.
Preset 3– AQUA LED: Tailored
Boost. Most people will find this a
perfect setting that will complement
most any overdrive setting in the
GOLDEN BOY.
Preset 4– BLUE LED: Full Range. No
tonal coloring here! Just your
guitars natural tone!
To select a boost preset, press and
hold the BOOST footswitch for more
than 1 second and boost program
mode will become active.
When in this mode, the BOOST led
will flash to indicate that you are in
program mode. A quick tap on the
BOOST footswitch will cycle the
boost presets and you’ll be able to
hear these presets change as you
cycle through them, assuming that
the boost circuit was active when
the boost program mode was
entered. Once you arrive at a boost
preset that you want to use, press
and hold the BOOST footswitch for

more than 1 second and boost
program mode will exit.
EASTER EGG!
There is an easter egg in
the boost circuit of the GOLDEN BOY!
The boost circuit is based on a MOSFET
transistor which is a very popular type
of transistor to use for boost circuits
because it has many “amp like”
characteristics when it clips etc. There
can be downsides to this circuit though.
Several very popular MOSFET boost
circuits on the market have a very
noticeable crackle when their boost
knobs are rotated. We fixed this
issue in the GOLDEN BOY and our
boost is perfectly silent when the
boost knob is rotated. The only
downside to our fix of this problem
is that we lose about 5% of the gain
at the highest rotation setting. To
most people this would never be a
problem as the boost on the
GOLDEN BOY is crushingly loud as it
it.
However if you are a purist, or you
just want to hear the difference, I
have good news for you. We
included an internal jumper that
you can move to go back to stock
MOSFET boost operation with 100%
gain and all the crackle your heart

OVERDRIVE OVERVIEW
The Golden Boy is based on the Bluesbreaker/King of Tone circuit, so the resulting
tone is very open, uncompressed and transparent sounding. Think John Mayer
overdriven tones. The Golden Boy sits in the mix perfectly and while it adds
overdrive and grit, your guitar still sounds like your guitar!
Where the Golden Boy differs from other Bluesbreaker type circuits is that it has
the ability to run much higher gain and instantly switch to a low gain transparent
overdrive with a tap of the footswitches. With four gain settings at your feet while
you play, you can use the GOLDEN BOY as an always on tone shaper, a low gain
transparent overdrive, a mid gain drive or a high gain solo drive all without
bending down to adjust settings! With the GOLDEN BOY, you keep playing and use
your foot (or MIDI) to adjust the gain for you!
CLIPPING DIODE PRESETS
The GOLDEN BOY allows for 4 different presets of clipping diodes which
themselves drastically alter the tone and feel of the way the overdrive clips and
could ever desire! Quiet or Crackle.
The choice is yours!
STND BOOST– Our version of the
MOSFET boost. Same tone, no
noise.
ALT BOOST– Modified version of
the MOSFET boost. Same tone,
slightly more gain, crackles when
you turn the knob.

distorts.
To select a clipping preset, press and hold the DRIVE footswitch for more than 1
second and the clipping program mode will become active. When in this mode,
the DRIVE led will flash to indicate that you are in program mode. A quick tap on
the DRIVE footswitch will cycle the clipping presets and you’ll be able to hear
these presets change as you cycle through them, assuming that the drive circuit
was active when the clipping program mode was entered. Once you arrive at a
clipping preset that you want to use, press and hold the DRIVE footswitch for
more than 1 second and clipping program mode will exit.
Preset 1– GREEN: Classic Screamer.
Two symmetrical silicon diodes give
the classic drive and compression
that the Tube Screamer is known
for.
Preset 2– MAGENTA: Asymmetric
Clipping. Three asymmetric silicon
diodes will clip the top and bottom
portions of your guitars waveform
differently resulting in a more
complex and interesting tone. This
sounds great when laying down
aggressive rhythm parts!
Preset 3– BLUE: Symmetrical
Clipping. Four symmetric silicon
diodes will clip the top and bottom
portions of your guitars waveform
evenly which gives a more focused
and direct tone.Two notable pedals

6/12
Changing clipping diodes are a great way to radically change how an overdrive
pedal sounds and feels but oftentimes the change that you perceive has more to
do with a change in volume than an actual change in tone….until now!
When we were designing the GOLDEN BOY we knew we wanted to give the
overdrive section a lot of tonal flexibility and most importantly make that
flexibility useful on stage. So when changing clipping diodes we included circuitry
that level matches the output of the pedal as various clipping diodes are selected.
So now you can select between all four clipping options, your volume level will
remain constant. More importantly, the difference that you hear between the
clipping modes will be because of the difference in how those clipping diodes
sound and not because your volume is jumping all over the place as it does with
other designs.
GAIN CYCLE
The most exciting feature of the GOLDEN BOY is the new feature that we
developed called GAIN CYCLE. GAIN CYCLE takes the GAIN knob setting, which
selects your maximum gain, and divides that level of gain into 4 equal parts. Say
for instance you have your GAIN knob set at the maximum setting or in other
that uses this style of clippingare
the Timmy and the King of Tone.
Preset 4– AMBER: Vintage Marshall.
Two RED LED’s are used to
symmetrically clip the top and
bottom portions of your guitars
waveform evenly. The LED’s allow
MUCH higher headroom so your
tone will stay more open and less
compressed much like a vintage
Marshall.

9/16/21, 1:32 PM
words, 100% gain. Every time you
press both footswitches simultaneously
, the
gain of the pedal will jump up 25% until you get to 100%. The following press after
100% will cause the gain cycle to start again at 25%.
TIP: Set the GAIN control to around 3:00+ to have 4 distinct overdrive settings as
you cycle through the gain!
My goal with the GAIN CYCLE
feature is to allow guitarists to
easily ramp their gain up without
having to bend down and change it
or try to adjust it with the edge of
their foot while playing live. Here’s a
perfect use case!
Let’s assume the GAIN control is set
to 100%
Verse 1 – Gain cycle set at 25% –
Slightly overdriven edge of breakup
tone.
Press GAIN CYCLE
Chorus – Gain cycle set at 50% –
Distinct overdriven tone.
Press GAIN CYCLE
Bridge – Gain cycle set at 75% –
Heavy overdrive tone.
Press GAIN CYCLE

The brightness of the DRIVE led will change to let you know which percentage of
gain you have selected. The higher the percentage, the brighter the DRIVE led. For
instance:
GAIN CYCLE #1– DIM LED – 25% of GAIN knob value.
GAIN CYCLE #2– BRIGHTER LED – 50% of GAIN knob value.
GAIN CYCLE #3– BRIGHT LED – 75% of GAIN knob value.
GAIN CYCLE #4– VERY BRIGHT LED – 100% of GAIN knob value.
3-BAND ACTIVE EQ
To top it off, the DRIVE circuit of the GOLDEN BOY has a 3 band active EQ. The EQ
circuit features a studio grade EQ that gives tremendous tonal flexibility to the
GOLDEN BOY. Based on the legendary Baxandall EQ that is featured in countless
studio EQ’s, the GOLDEN BOY EQ takes this circuit and tailors it for guitarists! We
spent tons of time on this EQ dialing it in so it would hit all the frequencies that
Solo – Gain cycle set at 100% –
Heavily saturated overdriven tone!
TIP: Add the BOOST to push the
overdrive even harder for endless
sustain!
It’s important to remember that
GAIN CYCLE setting #4 (100%) will
be as much gain as you have the
GAIN knob set for. Think of the
GAIN knob on the GOLDEN BOY as
your
maximum
gain with each GAIN
CYCLE setting being a percentage of
that maximum value.

guitarists need to adjust, and then sweetened it by removing the ear fatiguing
highs and lows that can appear at extreme settings.
EQUALIZER CIRCUIT FEATURES:
Studio-grade EQ with High Bandwidth and Flat Response at 12:00
+/- 12dB Boost/Cut per control
Center Detents on the pots that make it easier to get back to a neutral or flat
response.
MIDI FEATURES
It's 2020 and it's time to expect more from an analog overdrive pedal! Since the
BROKEN ARROW came out in 2019, all of our overdrive pedals have featured MIDI
control over clipping options, gain cycle options, boost eq options as well as
ON/OFF of the overdrive and boost circuits and the GOLDEN BOY is no exception.
We always want to make sure that our pedals areas easy to integrate into
complex rigs as they are into simple rigs and MIDI makes that happen!
CABLE INFORMATION: In order to use MIDI on the GOLDEN BOY, you will need a
cable that converts a MIDI (DIN-5) connector to a TRS cable. This is the cable that
we have used with great success and can't recommend it enough.
For those building their own cables, the GOLDEN BOY receives MIDI information
via the RING connection on a TRS (Tip, Ring, and Sleeve) connector.
Check out this link for some detailed wiring: https://www.midi.org/articles-
old/trs-specification-adopted-and-released
MIDI CHANNEL
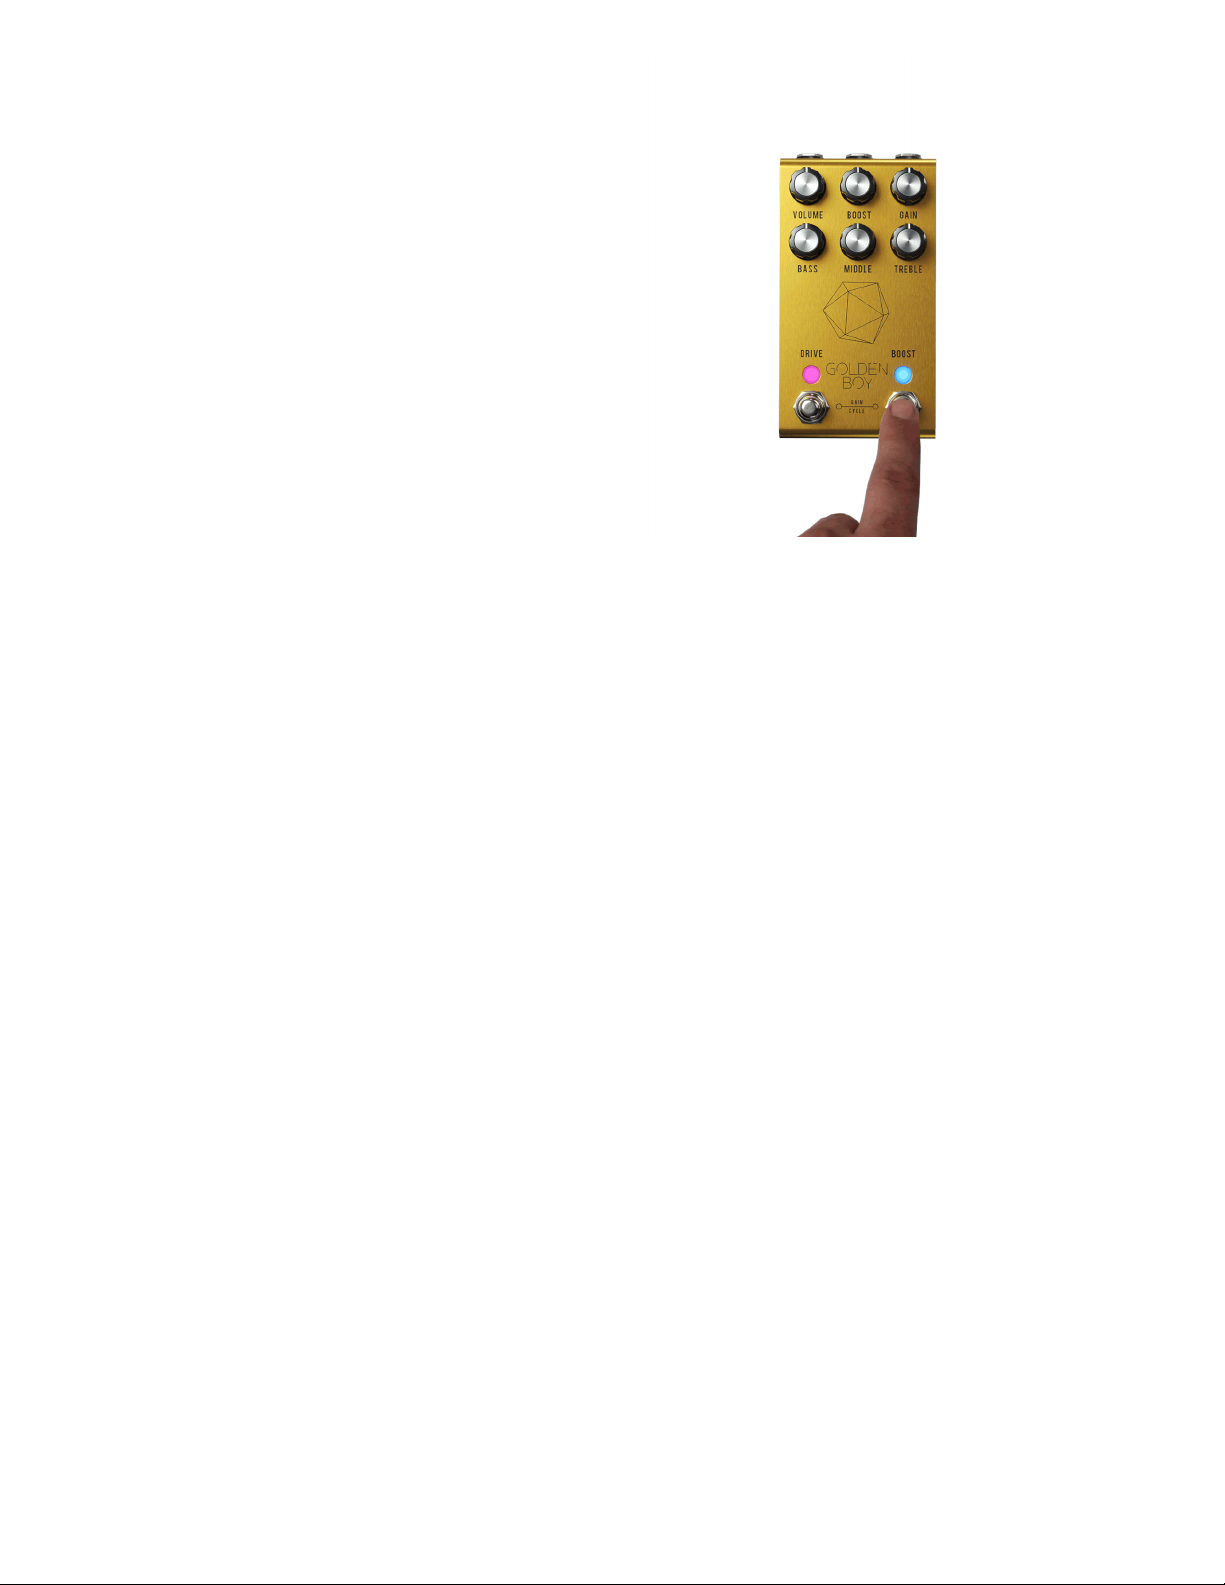
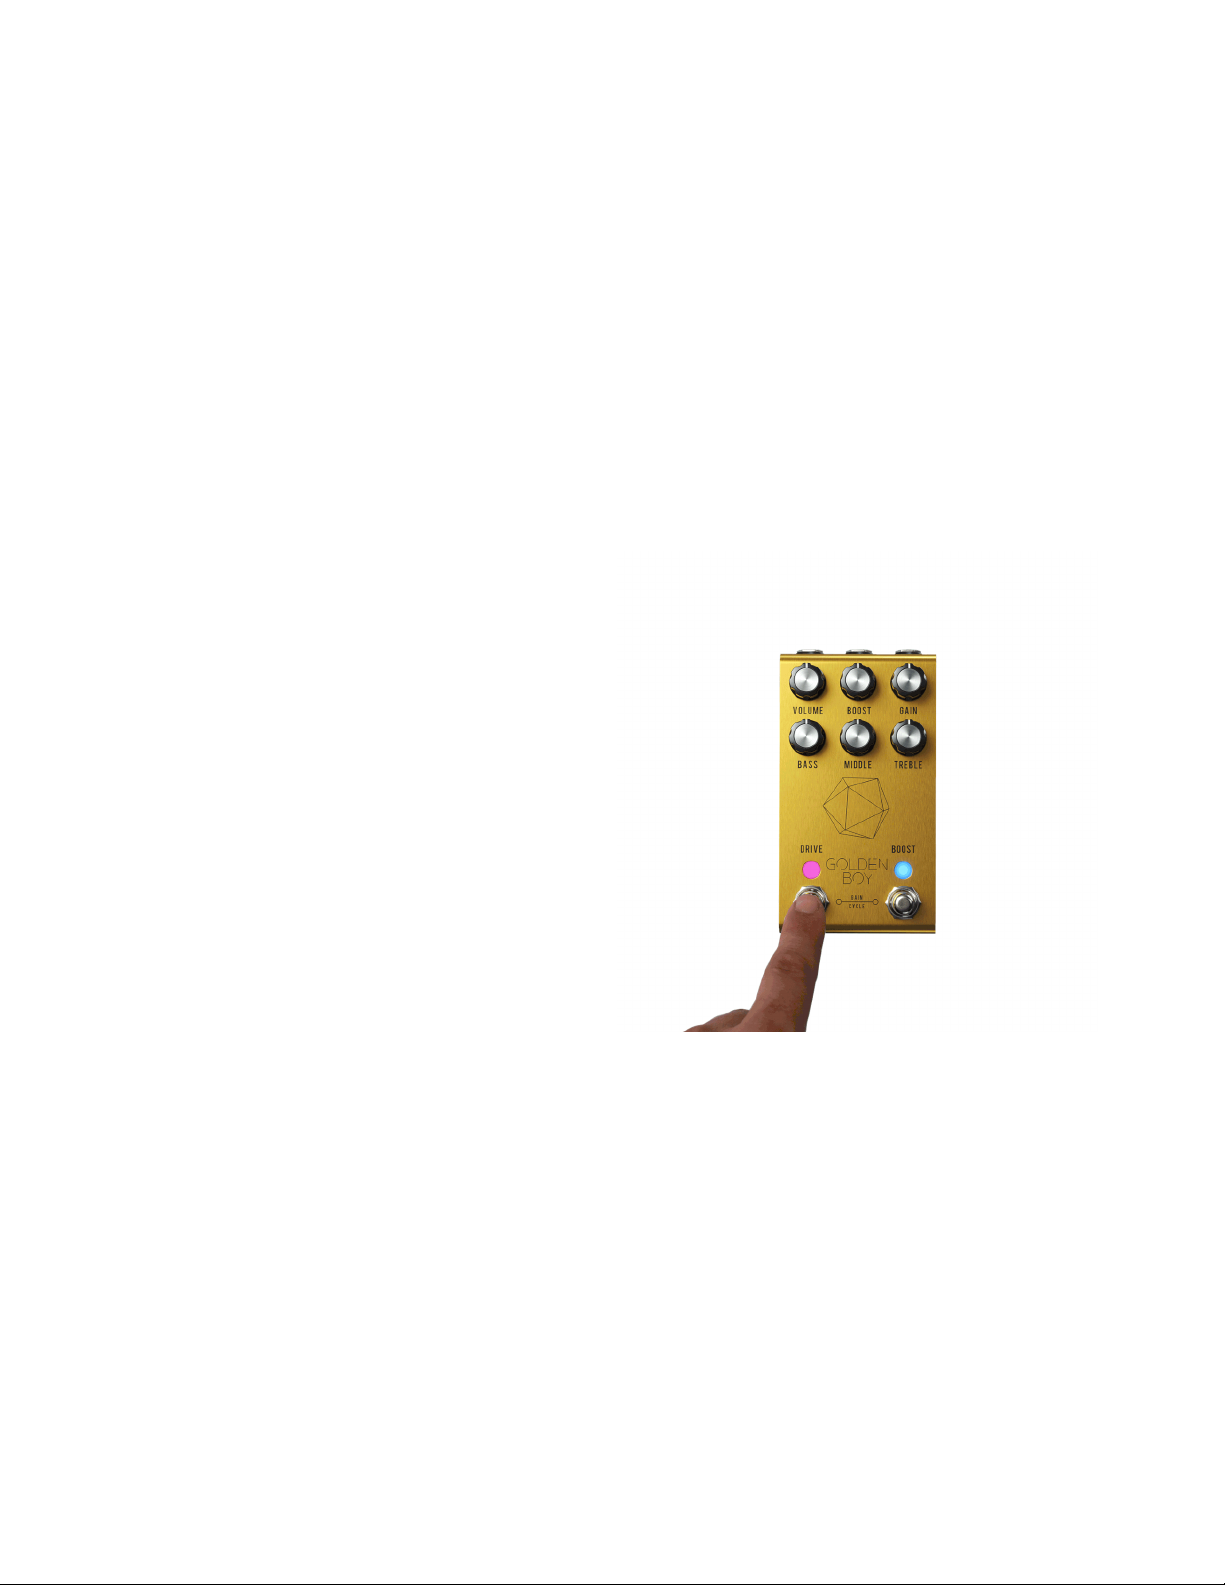
By default, the GOLDEN BOY ships with MIDI Channel 1 being the selected
channel. This can be changed by pressing and holding the DRIVE footswitch while
https://www.disasterareadesigns.com/shop/p/mj-5p-midi-cable

10/12
applying power to the GOLDEN BOY. Press the BOOST footswitch to increment the
MIDI channel number.
You’ll notice that as you continue to hold the DRIVE footswitch, the BOOST LED
will flash to indicate which MIDI channel you have selected. IE – 7 flashes = MIDI
Channel 7. After the LED flashes, we inserted a 2-second pause so you could tell
when the LED was finished flashing. The LED will continue flashing as long as you
are holding down the DRIVE footswitch. Once you have selected the MIDI channel
you want and have verified it by counting the flashes, simply release the DRIVE
footswitch and the pedal will save this MIDI Channel to the internal EEPROM on
the microprocessor and reboot.
MIDI DETAILS
Accessing the new MIDI features of the GOLDEN BOY is done by Control Changes.
Below is a list of the features of the GOLDEN BOY that can be accessed via MIDIas
well as how to access them.
CC #1 – DRIVE ON/OFF (value of 127 = ON /value of 0 = OFF)
CC #2 – BOOST ON/OFF (value of 127 = ON /value of 0 = OFF)
CC #3 – CLIPPING DIODES
(value of 1 = 2x SYMETRICAL DIODES)
(value of 2 = 3x ASYMETRICAL DIODES)
(value of 3 = 4x SYMETRICAL DIODES)
(value of 4 = 2x SYMETRICAL RED LED's)
CC #4 – GAIN CYCLE
(value of 1 = 25% GAIN)
(value of 2 = 50% GAIN)
(value of 3 = 75% GAIN)
(value of 4 = 100% GAIN)

CC #5 – BOOST EQ
(value of 1 = BRIGHT BOOST)
(value of 2 = MID BOOST)
(value of 3 = TAILORED BOOST)
(value of 4 = FULL BOOST)
VOLUME
Acts as a master volume for the
overdrive circuit.
BOOST
BASS
The 12:00 position is totally flat with
+/-12dB boost/cut on either side of
center.
MIDDLE

TECHNICAL SPECS
Input Impedance: 1M
Output Impedance: 100k
Power Supply: DC
Voltage Input: 9V MAX
Polarity: Center Negative
Min Current Required: 150mA
Dimensions: 2.7” x 4.875″
Sets the amount of boost when the
BOOST footswitch is engaged.
GAIN
Sets the maximum gain for the
overdrive circuit.
The 12:00 position is totally flat with
+/-12dB boost/cut on either side of
center. The mid frequency is
centered around 660hz.
TREBLE
The 12:00 position is totally flat with
+/-12dB boost/cut on either side of
center.
Table of contents
Popular Circuit Breaker manuals by other brands

Siemens
Siemens 3VA25-JP Series operating instructions

Doepke
Doepke DFS 6 A EV OCP Series Usage information

Rockwell Automation
Rockwell Automation Allen-Bradley 140G-N Getting started

GE
GE Rapid TripFix troubleshooting guide

OEZ
OEZ 3VA9-RS-2VBD1 Installation, service and maintenance instructions

nader
nader NDM3EU Series product manual