manuals.online logo
Brands
  1. Home
  2. •
  3. Brands
  4. •
  5. Bticino
  6. •
  7. Circuit Breaker
  8. •
  9. Bticino L4412CM2 User manual

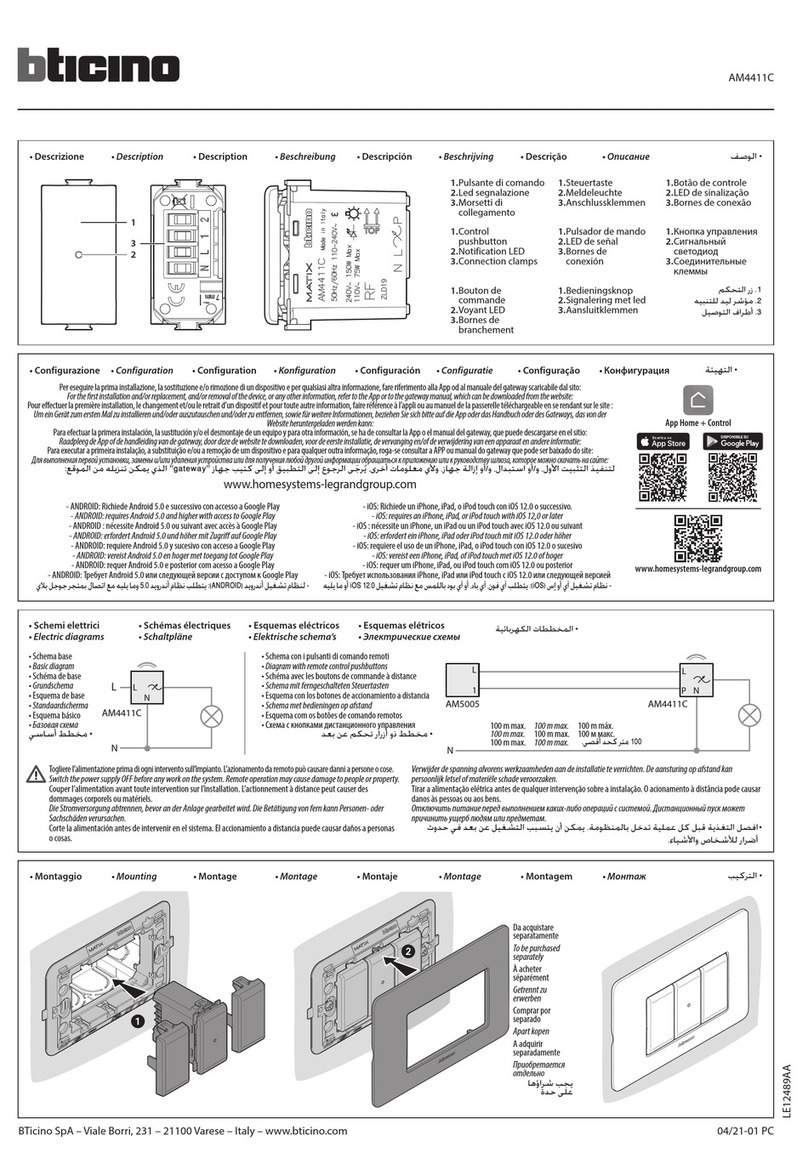
Bticino L4412CM2 User manual

L4412CM2
N4412CM2
NT4412CM2
05/21-01 PC
LE12664AB
BTicino SpA – Viale Borri, 231 – 21100 Varese – Italy – www.bticino.com
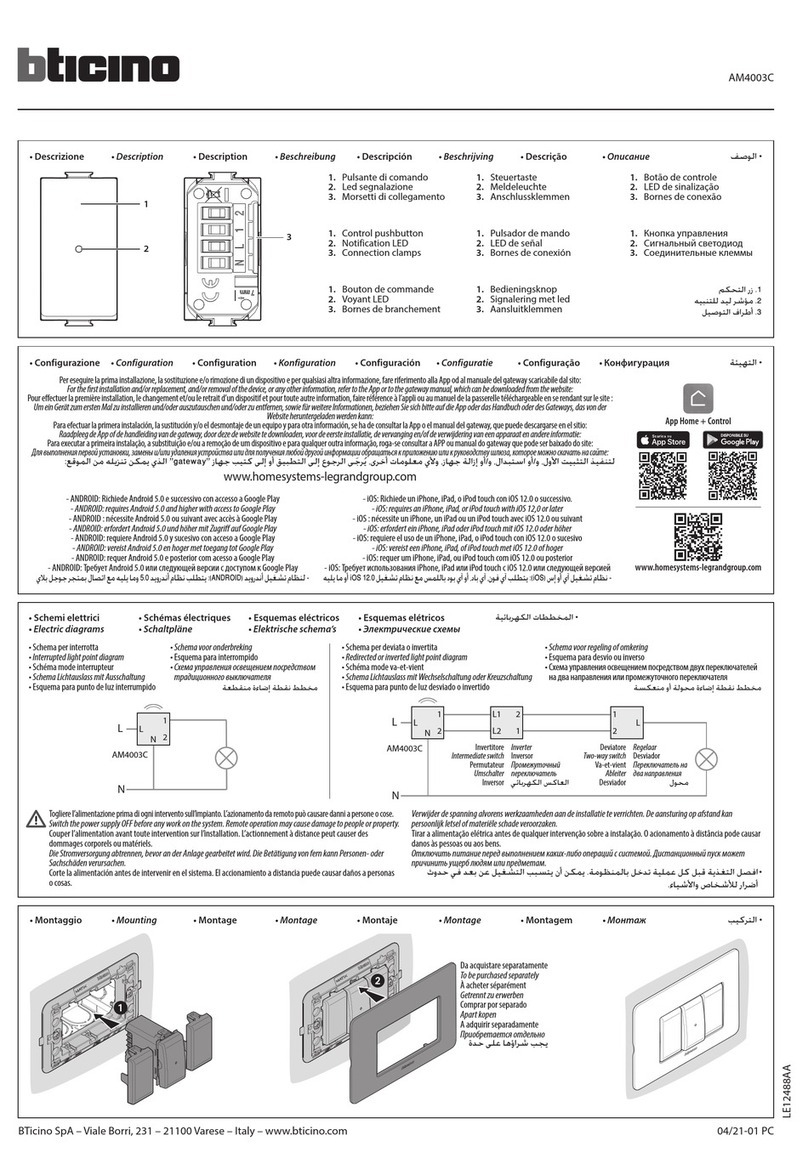
• Descrizione • Description • Description • Beschreibung • Descripción • Beschrijving • Descrição • Описание 
• Configurazione • Configuration • Configuration • Konfiguration • Configuración • Configuratie • Configuração • Конфигурация 
Per eseguire la prima installazione, la sostituzione e/o rimozione di un dispositivo e per qualsiasi altra informazione, fare riferimento alla App od al manuale del gateway scaricabile dal sito:
For the rst installation and/or replacement, and/or removal of the device, or any other information, refer to the App or to the gateway manual, which can be downloaded from the website:
Pour eectuer la première installation, le changement et/ou le retrait d’un dispositif et pour toute autre information, faire référence à l’appli ou au manuel de la passerelle téléchargeable en se rendant sur le site :
Um ein Gerät zum ersten Mal zu installieren und/oder auszutauschen und/oder zu entfernen, sowie für weitere Informationen, beziehen Sie sich bitte auf die App oder das Handbuch oder des Gateways, das von der
Website heruntergeladen werden kann:
Para efectuar la primera instalación, la sustitución y/o el desmontaje de un equipo y para otra información, se ha de consultar la App o el manual del gateway, que puede descargarse en el sitio:
Raadpleeg de App of de handleiding van de gateway, door deze de website te downloaden, voor de eerste installatie, de vervanging en/of de verwijdering van een apparaat en andere informatie:
Para executar a primeira instalação, a substituição e/ou a remoção de um dispositivo e para qualquer outra informação, roga-se consultar a APP ou manual do gateway que pode ser baixado do site:
Для выполнения первой установки, замены и/или удаления устройства или для получения любой другой информации обращаться к приложению или к руководству шлюза, которое можно скачать на сайте:
gateway
www.homesystems-legrandgroup.com
- ANDROID: Richiede Android 5.0 e successivo con accesso a Google Play
- ANDROID: requires Android 5.0 and higher with access to Google Play
- ANDROID : nécessite Android 5.0 ou suivant avec accès à Google Play
- ANDROID: erfordert Android 5.0 und höher mit Zugriff auf Google Play
- ANDROID: requiere Android 5.0 y sucesivo con acceso a Google Play
- ANDROID: vereist Android 5.0 en hoger met toegang tot Google Play
- ANDROID: requer Android 5.0 e posterior com acesso a Google Play
- ANDROID: Требует Android 5.0 или следующей версии с доступом к Google Play
5.0ANDROID
- iOS: Richiede un iPhone, iPad, o iPod touch con iOS 12.0 o successivo.
- iOS: requires an iPhone, iPad, or iPod touch with iOS 12,0 or later
- iOS : nécessite un iPhone, un iPad ou un iPod touch avec iOS 12.0 ou suivant
- iOS: erfordert ein iPhone, iPad oder iPod touch mit iOS 12.0 oder höher
- iOS: requiere el uso de un iPhone, iPad, o iPod touch con iOS 12.0 o sucesivo
- iOS: vereist een iPhone, iPad, of iPod touch met iOS 12.0 of hoger
- iOS: requer um iPhone, iPad, ou iPod touch com iOS 12.0 ou posterior
- iOS: Требует использования iPhone, iPad или iPod touch с iOS 12.0 или следующей версией
iOS
www.homesystems-legrandgroup.com
App Home + Control
• Schemi elettrici
• Electric diagrams
• Schémas électriques
• Schaltpläne
• Esquemas eléctricos
• Elektrische schema’s
• Esquemas elétricos
• Электрические схемы

• Togliere tensione dall’interruttore generale. L’azionamento da remoto può causare
danni a persone o cose.
• Cut the power at the general circuit breaker. Remote operation may cause damage to
people or property.
• Coupez le courant au disjoncteur général. L’actionnement à distance peut causer des
dommages corporels ou matériels.
• Den Hauptschalter stromlos machen. Die Betätigung von fern kann Personen- oder
Sachschäden verursachen.
• Quitar tensión al interruptor general. El accionamiento a distancia puede causar daños
a personas o cosas.
• Verwijder de spanning van de hoofdschakelaar. De aansturing op afstand kan persoonlijk
letsel of materiële schade veroorzaken.
• Desligar a tensão do interruptor geral. O acionamento à distância pode causar danos
às pessoas ou aos bens.
• Отключить напряжение главного выключателя. Дистанционный пуск может
причинить ущерб людям или предметам.

L
N
L
N
L4412CM2
N4412CM2
NT4412CM2
•Schema base
• Basic diagram
•Schéma de base
• Grundschema
•Esquema de base
• Standaardscherma
•Esquema básico
• Базовая схема

•Schema con i pulsanti di comando
remoti
• Diagram with remote control pushbuttons
•Schéma avec les boutons de commande
à distance
• Schema mit ferngeschalteten Steuertasten
•Esquema con los botones de
accionamiento a distancia
• Schema met bedieningen op afstand
•Esquema com os botões de comando
remotos
• Схема с кнопками дистанционного
управления 
N
L
NP
L4005
N4005
NT4005
L4412CM2
N4412CM2
NT4412CM2
L
1
100 m max.
100 m max.
100 m max.
100 m max.
100 m max.
100 m max.
100 m máx.
100 м макс.

1. Botão de controle
2. Bornes de conexão
3. LED de sinalização
1. Кнопка управления
2. Соединительные клеммы
3. Сигнальный светодиод
1. Bedieningsknop
2. Aansluitklemmen
3. Signalering met led
1. Pulsante di comando
2. Morsetti di collegamento
3. Led segnalazione
1. Control pushbutton
2. Connection clamps
3. Notification LED
1. Steuertaste
2. Anschlussklemmen
3. Meldeleuchte
1. Pulsador de mando
2. Bornes de conexión
3. LED de señal


3
1. Bouton de commande
2. Bornes de branchement
3. Voyant LED
1
2
3
1
2
• Reset alle impostazioni di fabbrica
• Reset to the factory settings
• Rétablissement des réglages par défaut
• Default-Einstellungen wieder herstellen
• Restablecer los ajustes de la fábrica
• Reset van de fabrieksinstellingen
• Resetar definições de fábrica
• Восстановление фабричных настроек

Attenzione: la pressione involontaria breve del pulsante reset, avvia l'associazione (LED verdi accesi di tutti gli altri dispositivi dell'impianto).
Premere brevemente e contemporaneamente i due tasti del comando K4570CW Master per terminarla.
Warning: a short accidental pressure of the reset pushbutton, starts the association (the green LEDs of all the other system devices are ON).
Press quickly and at the same time the two keys of the K4570CW Master control to end it.
Attention : une brève pression involontaire sur le bouton de reset active l’association (voyants verts de tous les autres dispositifs de l’installation allumés).
Appuyer brièvement et simultanément sur les deux touches de la commande K4570CW Master pour la terminer.
Achtung: Durch den kurzen versehentlichen Druck der Reset-Taste wird die Zuordnung gestartet (grüne LED leuchtet an allen anderen Geräten der Anlage).
Drücken Sie kurz und gleichzeitig die beiden Tasten der Master-Steuerung K4570CW, um sie zu beenden.
Atención: la presión involuntaria breve del botón reset acciona la asociación (LEDs verdes encendidos en todos los otros equipos del sistema).
Presionar al mismo tiempo brevemente los dos botones del mando K4570CW Master para acabar la asociación.
Opgelet: wanneer de resetknop per ongeluk kort ingedrukt wordt, wordt de koppeling gestart (de groene leds van alle andere apparaten van de installatie branden).
Druk de twee toetsen van de bediening K4570CW Master tegelijkertijd kort in om de procedure af te ronden.
Atenção: a pressão involuntária breve do botão Reset, inicia a associação (LED verdes acesos de todos os outros dispositivos do equipamento).
Carregar brevemente e em simultâneo nas duas teclas do comando K4570CW Master para terminá-la.
Внимание: случайное кратковременное нажатие на кнопку сброса запускает сопряжение (горят зеленые светодиоды всех других устройств системы).
Кратковременно и одновременно нажать на две кнопки главного устройства управления K4570CW для его завершения.
 
• Montaggio • Mounting • Montage • Montage • Montaje • Montage • Montagem • Монтаж 
1
2
1
Premere e mantenere premuto il pulsante reset , il LED lampeggia blu, poi si spegne, poi diventa rosso.
A questo punto rilascia il pulsante. Il LED diventa rosso fisso. Il reset è eseguito.
Press and hold down the reset pushbutton , the LED flashes blue, then it goes off, then turns red.
Now release the pushbutton. The LED turns red steady. The reset has been done.
Appuyer sur le bouton de reset et le maintenir enfoncé : le voyant clignote en bleu, s’éteint puis devient
rouge.
Ensuite relâcher le bouton. Le voyant devient rouge fixe. Le reset est effectué.
Drücken die Taste Reset und halten Sie sie gedrückt. Die LED blinkt blau und erlischt, dann leuchtet sie rot auf.
Nun die Taste loslassen Taste. Die LED leuchtet rot auf. Reset durchgeführt.
Presionar sin soltar el botón reset , el LED parpadea de color azul, luego se apaga y se pone de color rojo.
Entonces soltar el botón. El LED se pone rojo fijo. El reset se ha efectuado.
Houd de resetknop ingedrukt. De led blauw knippert blauw, gaat vervolgens uit en kleurt daarna rood.
Laat de knop nu los. De led kleurt rood en brandt. De reset is verricht.
Carregar e manter carregado o botão reset , o LED pisca azul, depois desliga-se, então torna-se vermelho.
Nesta altura soltar o botão. O LED torna-se vermelho fixo. O reset foi efetuado.
Нажать и удерживать нажатой кнопку сброса , светодиод начнет мигать синим светом, затем
погаснет и загорится красным светом.
После этого отпустить кнопку. Светодиод загорится постоянным красным светом. Сброс
выполнен.
 
6
2
Da acquistare separatamente
To be purchased separately
À acheter séparément
Getrennt zu erwerben
Comprar por separado
Apart kopen
A adquirir separadamente
Приобретается отдельно

3
5
4
3
Carichi Lampada incandescente o lampada alogena Lampada a LED
240 VAC 150 W 150 W
110 VAC 75 W 75 W
Tensione 110 – 240 Vac
Frequenza di funzionamento 50/60 Hz
Tecnologia Radio (Maglie di rete senza fili)
Livello di potenza <100mW
Frequenza di banda da 2,4 a 2,4835 GHz
Loads Filament lamp or halogen lamp LED lamp
240 VAC 150 W 150 W
110 VAC 75 W 75 W
Voltage 110 – 240 Vac
Operating frequency 50/60 Hz
Technology Radio (Wireless meshed network)
Power level <100mW
Band frequency from 2,4 to 2,4835 GHz
Charges Ampoule à incandescence ou lampe halogène Ampoule à LED
240 VAC 150 W 150 W
110 VAC 75 W 75 W
Tension 110 – 240 Vac
Fréquence de fonctionnement 50/60 Hz
Technologie Radio (Réseau maillé sans fil)
Niveau de puissance <100mW
Fréquence de bande de 2,4 à 2,4835 GHz
Stromlasten Glühlampe oder Halogenlampe LED-Lampe
240 VAC 150 W 150 W
110 VAC 75 W 75 W
Spannung 110 – 240 Vac
Betriebsfrequenz 50/60 Hz
Technologie Radio (Maschen eines drahtlosen Netzes)
Leistungsniveau <100mW
Bandfrequenz von 2,4 bis 2,4835 GHz
Cargas Bombilla incandescente o bombilla halógena Bombilla LED
240 VCA 150 W 150 W
110 VCA 75 W 75 W
Tensión 110 – 240 Vca
Frecuencia de funcionamiento 50/60 Hz
Tecnología Radio (Mallas de red sin hilos)
Nivel de potencia <100mW
Frecuencia de banda de 2,4 a 2,4835 GHz
Ladingen Gloei- of halogeenlamp Ledlamp
240 VAC 150 W 150 W
110 VAC 75 W 75 W
Spanning 110 – 240 Vac
Werkfrequentie 50/60 Hz
Technologie Radio (draadloos netwerkschakels)
Vermogensniveau <100mW
Frequentieband 2,4 t/m 2,4835 GHz
• Caratteristiche tecniche
• Technical features
• Caractéristiques techniques
• Technische Daten
• Características técnicas
• Technische eigenschappen
• Características técnicas
• Технические характеристики 
+ 45 °C
45+
+ 5 °C
5+
1 x 1,5 mm2
1 x1.5 mm2
1 x 1,5 мм2

4
Il fabbricante, BTicino S.p.A., dichiara che il tipo di apparecchiatura radio Dimmer/Interrutore connesso art. L/N/NT4412CM2 è conforme alla direttiva 2014/53/UE. Il testo completo della dichiarazione di conformità UE è disponibile al
seguente indirizzo Internet: www.bticino.it/red
Hereby, BTicino S.p.A., declares that the radio equipment type Connected dimmer/switch
item L/N/NT4412CM2 is in compliance with Directive 2014/53/EU. The full text of the EU declaration of conformity is available at the following internet address:
www.bticino.it/red
- Il prodotto funziona in modalità interruttore o in modalità dimmer
- Viene consegnato in modalità interruttore
- In modalità dimmer, è necessario utilizzare lampade a LED dimmerabili
- Il passaggio alla modalità dimmer avviene tramite app
- The product works in switch mode or in dimmer mode
- It is provided in switch mode
- In dimmer mode, it is necessary to use dimmer LED lamps
- Switching to dimmer mode is done through the App
- Le produit fonctionne en mode interrupteur ou en mode dimmer
- Il est livre en mode interrupteur
- En mode dimmer il faut utiliser des lampes à LEDs dimmables
- Le basculement en mode dimmer se fait depuis l'Appli
- Das Produkt funktioniert entweder im Modus Schalter oder im Modus Dimmer
- Das gelieferte Produkt ist werkseitig auf den Modus Schalter eingestellt
- Im Modus Dimmer sind regelbare LED-Lampen zu verwenden
- Das Umschalten auf den Dimmer-Modus erfolgt über App
- El producto funciona en la modalidad interruptor o en la modalidad dimmer
- Se entrega en la modalidad interruptor
- En la modalidad dimmer, se han de utilizar lámparas de LED con regulación de intensidad
- El paso a la modalidad dimmer se realiza mediante la app
- Het product werkt als een schakelaar of als een dimmer
- Bij de levering werkt het als een schakelaar
- In de werking als dimmer moeten dimbare ledlampen worden gebruikt
- De overschakeling naar de werking als dimmer vindt met de app plaats
- O produto funciona em modo interruptor ou em modo dimmer
- É fornecido em modo interruptor
- Em modo dimmer, é necessário utilizar lâmpadas de LED co dimmer (gradadores)
- A passagem ao modo dimmer ocorre através da app
- Устройство может работать в режиме выключателя или в режиме диммера
- Устройство поставляется в режиме выключателя
- В режиме диммера необходимо использовать диммируемые светодиодные лампы
- Переход в режим диммера осуществляется через приложение




Cargas Lâmpada incandescente ou lâmpada de halogênio Lâmpada de LED
240 VCA 150 W 150 W
110 VCA 75 W 75 W
Tensão 110 – 240 Vca
Frequência de funcionamento 50/60 Hz
Tecnologia Rádio (links de rede sem fio)
Nível de potência <100mW
Frequência de banda de 2,4 a 2,4835 GHz
Нагрузка Лампа накаливания или галогенная лампа Светодиодная лампа
240 Пер. 150 Вт 150 Вт
110 Пер. 75 Вт 75 Вт
Напряжение 110 – 240 В Пер.т
Рабочая частота 50/60 Гц
Технология Радио (Ячейки беспроводной сети)
Уровень мощности <100мВт
Полоса пропускания от 2,4 до 2,4835 ГГц
  
  
75 75 
 
 
 
 
 

This manual suits for next models

2

Other Bticino Circuit Breaker manuals

Bticino MA400/630E User manual

Bticino

Bticino MA400/630E User manual

Bticino Btdin B6338D User manual

Bticino

Bticino Btdin B6338D User manual

Bticino Megabreak MP4 Series User manual

Bticino

Bticino Megabreak MP4 Series User manual

Bticino Megabreak T804L630 Operating manual

Bticino

Bticino Megabreak T804L630 Operating manual

Bticino F8443A User manual

Bticino

Bticino F8443A User manual

Bticino G884 Series User manual

Bticino

Bticino G884 Series User manual

Bticino MA-MH160 User manual

Bticino

Bticino MA-MH160 User manual

Bticino Megabreak 2500 User manual

Bticino

Bticino Megabreak 2500 User manual

Bticino Legrand MyHOME 3518 User manual

Bticino

Bticino Legrand MyHOME 3518 User manual

Bticino G47XM63 User manual

Bticino

Bticino G47XM63 User manual

Bticino AM4411C User manual

Bticino

Bticino AM4411C User manual

Bticino AM4003C User manual

Bticino

Bticino AM4003C User manual

Bticino SP102 User manual

Bticino

Bticino SP102 User manual

Bticino T734F100EBD User manual

Bticino

Bticino T734F100EBD User manual

Bticino GC8230AC10 User manual

Bticino

Bticino GC8230AC10 User manual

Bticino KW4691 User manual

Bticino

Bticino KW4691 User manual

Bticino FC80AC User manual

Bticino

Bticino FC80AC User manual

Bticino MA 400/630MT User manual

Bticino

Bticino MA 400/630MT User manual

Popular Circuit Breaker manuals by other brands

bonitron M3575T Customer Reference Manual

bonitron

bonitron M3575T Customer Reference Manual

Siemens SENTRON 3WL10 manual

Siemens

Siemens SENTRON 3WL10 manual

LSIS Susol instruction manual

LSIS

LSIS Susol instruction manual

Siemens 5SL5 RC Series operating instructions

Siemens

Siemens 5SL5 RC Series operating instructions

Gould K-3000 instructions

Gould

Gould K-3000 instructions

ABB SACE Tmax T4 quick start guide

ABB

ABB SACE Tmax T4 quick start guide

Delixi NAVIGATOR Series user manual

Delixi

Delixi NAVIGATOR Series user manual

Siemens 3WN6 operating instructions

Siemens

Siemens 3WN6 operating instructions

VMC V140 manual

VMC

VMC V140 manual

Moeller NZM1-XKS installation instructions

Moeller

Moeller NZM1-XKS installation instructions

Fuji Electric BT2 Series manual

Fuji Electric

Fuji Electric BT2 Series manual

Noark Ex9M4 Mounting instructions

Noark

Noark Ex9M4 Mounting instructions

Eaton UVU-NZM14 Instruction leaflet

Eaton

Eaton UVU-NZM14 Instruction leaflet

GE PVDB-28kV instructions

GE

GE PVDB-28kV instructions

OEZ AFD-16-1N Series Instructions for use

OEZ

OEZ AFD-16-1N Series Instructions for use

Eaton FAZ-XHIN11 installation instructions

Eaton

Eaton FAZ-XHIN11 installation instructions

Siemens 3WX3653-1JB00 operating instructions

Siemens

Siemens 3WX3653-1JB00 operating instructions

Rockwell Automation Allen-Bradley 140U Instruction leaflet

Rockwell Automation

Rockwell Automation Allen-Bradley 140U Instruction leaflet

manuals.online logo
manuals.online logoBrands
  • About & Mission
  • Contact us
  • Privacy Policy
  • Terms and Conditions

Copyright 2025 Manuals.Online. All Rights Reserved.