Jas Audio PLATO User manual

JAS AUDIO SPEAKERS
PLATO
OWNER’S MANUAL with assembly instructions
Please take some time to read this manual before unpacking your Plato system!
For additional requests _________________________
If you have any additional questions regarding the installation or operation of our products, you are
welcome to contact us directly via email: “ enquiry@jas-audio.com “, and please check frequently our JAS
Audio official website: “ http://www.jas-audio.com “.
Page 1 of 12
http://www.jas-audio.com

JAS AUDIO
PLATO HIGH FIDELITY LOUNDSPEAKERS SYSTEM
Plato, 3-Way-Plus, Tri-wiring, 5 unit separated cabinets floor-standing
speakers ( with selectable on/off control rear super tweeter ), downward air-
ported loudspeaker with 360 degree dispersion controlling cones, selectable
operation frequency points and level controls for rear super tweeters. Drive-
units: 4.5" twin-ribbon super tweeter, 1" inverted ceramic-dome tweeter, 5."
ceramic-cone midrange unit, two 9" ceramic-cone woofers (per channel).
This new speaker frontier - Plato can easily be achieved to create a spacious
soundstage with great detail on resolution, high dynamic sound pressure and
ultra transparent timbres that all give a sense of wisdom to set your mind free!
Introduction
Congratulations. Thank you for purchasing the JAS Audio Plato flagship speakers. This manual provides
useful information to make your pleasure of easy-installing and happy-listening to the Plato even higher.
JAS Audio line of speakers are designed and manufactured to the highest quality standards. The Plato
speakers combine ribbon and ceramic driver technologies to produce a line of world-class speaker in
performance and appearance.
Page 2 of 12
http://www.jas-audio.com

This modern stereo speakers’ system features a super tweeter, allows the high-
frequency-band and the high internal sound velocity features speedy and accurately
impulse response, which is important for a high breakup frequency point and extended
linear range. With selectable operation frequencies and levels control on this system
that produces extremely clean and quick transients as well as enormous soundstage both
in width and depth.
Moreover, the choice of ACCUTION ceramic series on tweeter, midrange and dynamic bass all ceramic
drive * units are diligently done in effort to allow seamless integration with our unique aluminum twin-
ribbon super tweeters. The result is yielding the lowest coloration and maximum tonal definition.
* “The ultra hard ceramic dome material moves like a piston well above the audible frequency band and the high
internal sound velocity features very low distortion and virtually no coloration” – quoted from www.accuton.com
By special order, Plato can be upgraded to use the cost-no-object ACCUTON diamond tweeter, which
membrane has a pure artificial diamond vibrating from 2 kHz to almost 100 kHz and shows harmonic
distortion magnitudes lower than conventional tweeters. The sound propagation in the diamond material
is almost 18,000 m/sec, the highest in any existing material.
____________________________________________________________________________________
These Plato extremely high quality speakers need careful installation.
Please read the assemble / installation instructions before unpacking the speakers,
the following pages should be carried out setup information in full,
and the mentioned precautions taken to get the expected result and to avoid damages!
____________________________________________________________________________________
Page 3 of 12
http://www.jas-audio.com

Preliminaries
The JAS Plato designed in very innovative acoustic technology to achieve a ultra high level of reproducing sound
definition and neutrality never before in a full-spectral audio range speaker system. Please read the following
instructions very carefully. This high-precision reference speaker is extremely revealing and can provide the best
sound only if it used properly.
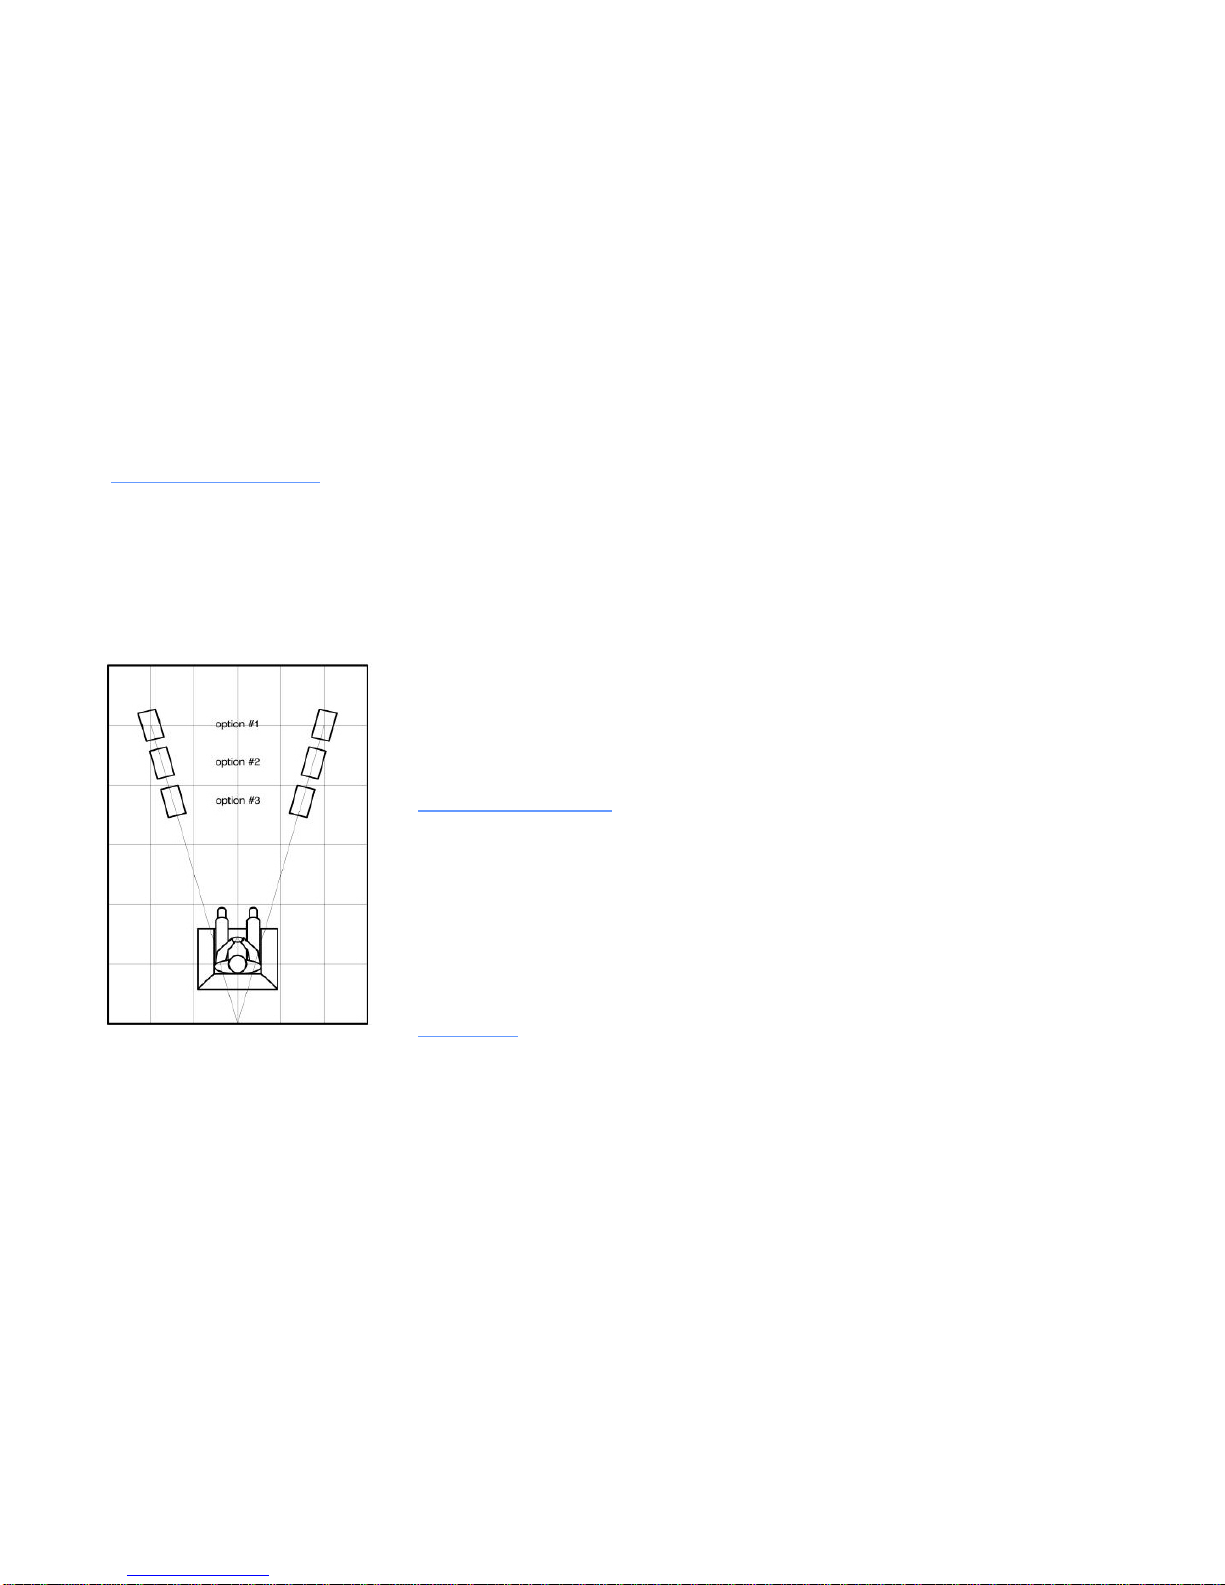
Before to setup and optimize your Plato speaker system, you have to associate 3 units altogether to become a
typical stereo system (one satellite monitor + one woofer unit + one base plate) to perform full audio range
playback. It’s most usual configuration in stereo as (2 channels) right and left. The assembly instructions for all
Plato units are included in this manual.
Nevertheless, if the instructions are followed in full, you will notice that the main-point of assembling and installing
is simpler than before. The key is to understand how to remove those “big-cakes” out of the original Plato’s
Packing - cabinets (Box A, B & C); and setup all Plato units and parts in right orders. The performance of Plato
Speaker System should sound incredibly dynamic, precise and open. Let’s try to discover those boxes, you will
find a pair satellite monitor, accessories and parts are fully stored in the Packing-Box-A; and also you will
surprise that all Plato units are well-protected (sandwiched) by surrounding thickness EVA bonding. Are you (4
guys) ready to taste and setup the Plato now?
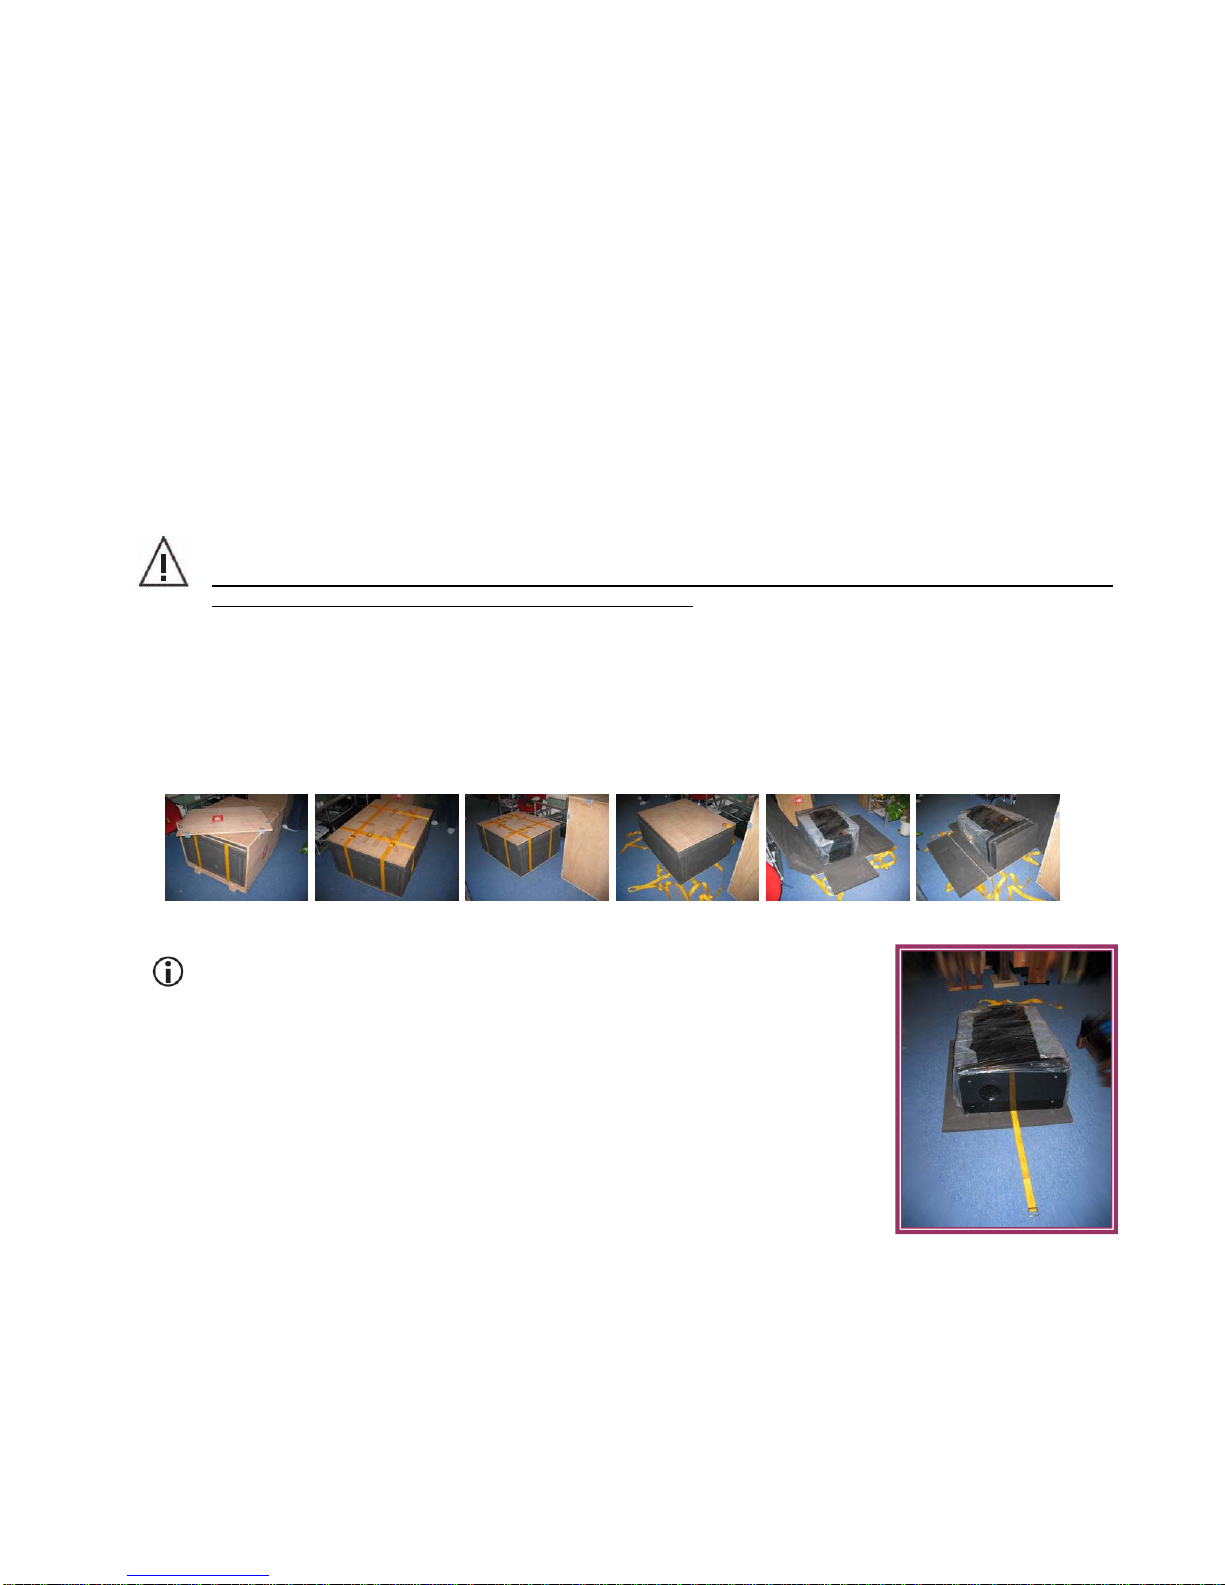
Unpacking the Plato
Since the Packing Box-B and C are identical to each others, both separate contain the same woofer unit
that u need to unpack them twice. Please execute all following steps with great care. Plato’s setup
procedure as following:
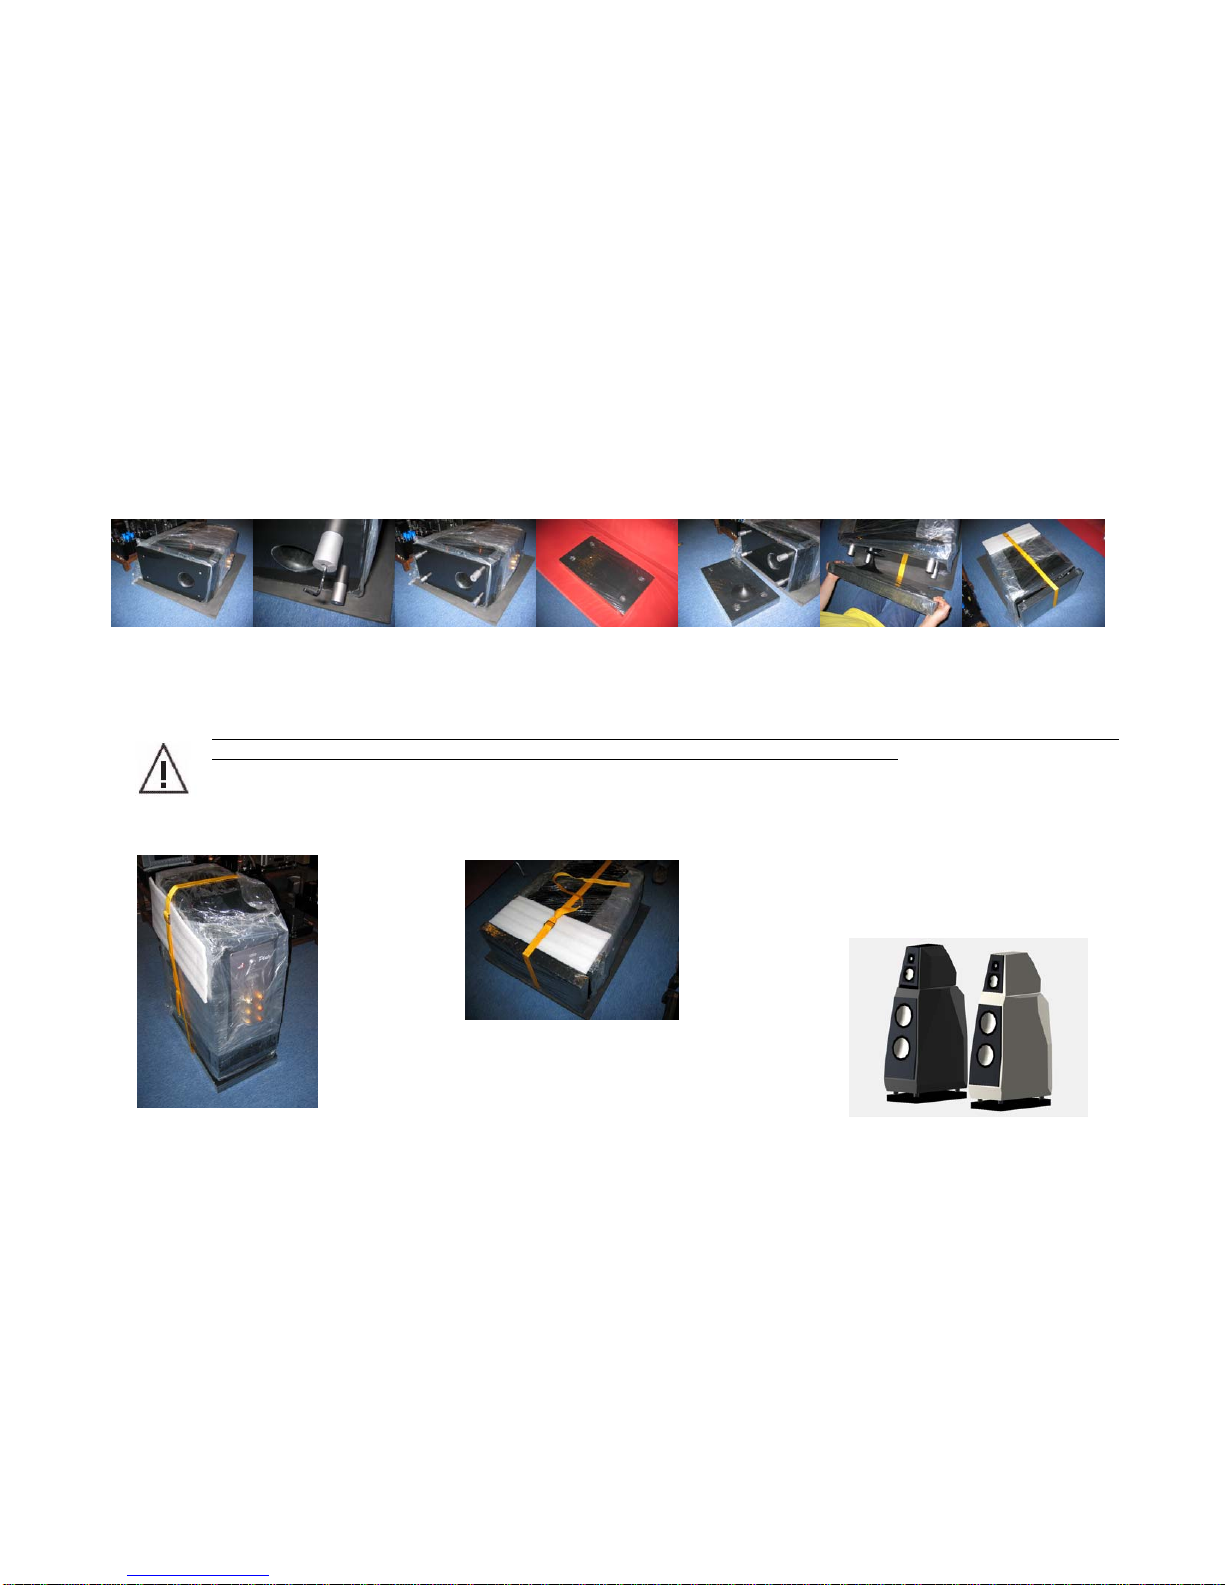
ATTENTION 1
If you need to return the speaker to the factory or to your local dealer for a warranty repair,
please note that it must be repacked in the original packaging. This packaging has been
designed specifically to full protect the Plato in transit. Use of alternative packaging is very
likely to result in damage, invalidating warranty cover.
Page 4 of 12
http://www.jas-audio.com

It is necessary for four (4) people to install the Plato, because the speaker is extremely heavy and some
handling steps necessitate a lot of care. Do not try to do any assembly without the necessary helps.
After opened up the Box-A (smaller), please keep the same action by unscrewing and removing the side
cover of the Plato Packing Box-B and Box-C (each of them contains one Plato woofer unit).
Locate and set it up one after one in its final position following the instructions detailed
below before starting to assemble the full system.
To maneuver the Plato Packing Boxes safely, you just need to open and unscrew a side cover (the marked
one side) to let it free. After removing the side cover, the Plato Sandwich is ready to land on the ground by
pulling out gently (see picture). We suggested 1 person slid it out horizontally by pulling out at the bottom
side of the wooden plate rather than the tighten belts; moreover, at least 2 people hold it to the ground side by
side as working-partner. The setup procedure captured as following clips:
ATTENION 2
Be careful all hands and fingers, 4-metal-tracking-rollers
have been attached under the Plato-Sandwich.
Now, the Plato Sandwich is ready to disassemble by unzipping the secure-belts. All
you need is to keep working on removing out all the protective-covers, and set the
Plato woofer-unit sleeps alone and stays in “neutral-position” (see bottom-right
picture).
Page 5 of 12
http://www.jas-audio.com

ATTENTION 3
The weight of the Plato woofer-unit makes movement difficult, especially on the rigid floor.
Be careful not to scratch the wood or tile floor by moving the speaker without installing the
[ Air-Cushion-Pads *] (see upper left picture).
*Since the Plato base-unit is not only designed to place at carpeted floor, but also can be placed at wood or tile
floor. The solution is simple and optional, 4 pieces of self-adhesive [ Air-Cushion-Pads ] accessories are
necessary to attach at the bottom side corners of one base unit. Again, Plato accessories and parts are stored well
at the Plato Packing-Box-A (see below).
|Opened the Plato’s Packing-Box-A |Plato’s accessories (cable, tools, parts … …) show up | Well Prepared |
ATTENTION 4
Four sets of the Plato’s stand-poles and screws must be tighten by using a strong screwdriver inserted in
its lateral hole. Do not over tighten the screws when installing the poles. Doing so might risk
breaking the fixing holes. When un-installing the poles, hold the pole tightly so that it will not turn with
your unscrewing action.
Page 6 of 12
http://www.jas-audio.com

For those reasons, please choose the best location as final placing position before starting the next precedence.
Now it’s time to attach the Plato base-unit. The setup procedure captured as following clips:
|Neutral-position |4 Stand-poles screwing |Base unit & Phase Plug installed |Ready to couple |zip by a belt |
After coupling the base-unit secured to the woofer-unit, be sure that the belt is well zipped. In addition,
insert a soft sheet of foam enclosure to the belt-connector to avoid scratching. Now, the final stage is
the most important setup procedure, which is to lift up (rotate 90°) and upside down “the
cake” safely without handles (see below pictures).
ÍBefore
After up side down
Page 7 of 12
http://www.jas-audio.com

The rest step is to let the “cake” be naked … … (detaching all the left packing). At that moment, you eyes need to
turn back to the Plato Packing Box-A, which contains the Plato-Satellite-Monitor allows to be automatically aligned
with the woofer-drive, due to the Plato-Twins-Disc smart design. Handle with deep care to finish the “locked up”
procedure, Plato will start its bravo exploration after next chapter!
Speaker Connections
The cables used to connect the speakers to the power amplifier can have a significant effect on the sound of your
audio system. Your authorized JAS Audio dealer can recommend the appropriate speaker cables for your audio
Page 8 of 12
http://www.jas-audio.com

system setup. We highly recommended the selected-custom-made speaker and jumper cables.
Each speaker has six terminals on the rear panel. The terminals ar s that accept either spade lugs,
pins and banana plugs. Make sure the cables connected to both speakers are in phase with each other: connect the
(+) binding post on the amplifier to the (+) terminal on the speaker, and the (-) binding post on the amplifier to the
(-) terminal on the speaker. In most configurations, Plato’s speaker jumper cables need to be attached at the Tri-
wiring crossover network (see picture). The default setting captured as following clips:
e binding post
Inspection after unpacking
The super tweeter of JAS Plato speaker (@ backside) is protected with a
Transparent-Protective-Sheet to prevent damaging on the Tweeter Unit.
Customers are recommended to remove the Transparent-Protective-
Sheet immediately before using or installing on your listening system!
Page 9 of 12
http://www.jas-audio.com

Speaker Placement
The JAS Plato speakers can produce excellent sound in any location. Therefore you should use these guidelines as a
starting point and make minor adjustments to the position of the speakers and other objects in the room until you
find the combinations that sound best to you. As a general rule, the distance between the front plane of the
speakers and the front wall of your listening room should be approximately 20% of the total length of the room; the
distance from each speaker to the closest side wall should be about 20% of the total width of the room. The
distance from the listener’s chair or couch to the wall behind the listener should be about the same as the distance
between the speakers and the front wall.
This figure shows the relative position of the two speakers and the
listening position. The front of each speaker should be angled toward
the listening position. ( Result might vary depending on the room
acoustic conditions, desirable result can be achieved by continuous
tweaking.)
Running-in Period
The performance of the speaker will change subtly during the initial listening
period. The drive unit suspensions will loosen up during the first hour of use and
continue to loosen up until it reaches its optimal operation state. The time taken
for the speaker to achieve its intended performance will vary depending on the
environment and its previous storage conditions as well as how it is used. As a
guide, allow up to a week for the temperature effects to stabilize and 15 hours
of average use for the mechanical parts to attain their intended design
characteristics. And up to 300 hours of use to reach its optimal condition.
Aftercare
To prevent damage to the delicate ribbon and ceramic drivers of your JAS speakers, do not vacuum the front grille
metal panel when it is mounted on the speakers. Always remove the grille cloth panels before cleaning the grille.
Page 10 of 12
http://www.jas-audio.com

The high quality clear sealed piano finish of the wood cabinet surface only requires dusting. If needed, a damped
cloth can be used for further cleaning. Avoid use of any abrasive compounds on the cabinet as doing so may
damage the fine finish.
Caution
Do not use vacuum cleaner on the drive units.
Doing so may damage your speakers.
i. Do not place any kinds of metal pieces, such as: keys, needles, staples... etc. near or closed to the
Plato’s tweeter units, because the magnetic field can cause a strong attractive force to damage the
speaker.
ii. Do not use vacuum cleaner on the speaker drivers; on the other hand, do not direct coupling the
speaker drivers by strong air via compression gun. Any extreme blowing may damage the
speakers.
iii. If you feel the speakers sounded very muffled and distant
(abnormal); as if, please double check the super tweeter unit
were covered by the Transparent-Protective-Sheets or not?
Technical Specifications
Product Model: PLATO
Description: 3 way + vented, 5 units
Standard Finish: Taffeta white / Metallic black, exotic colors can be by special order
Technical Features: Aluminum front panels and Twins-Disc auto-alignment
Matrix Construction with inner horizontal plane bracing adds extreme rigidity
Top grade authentic wood veneer with polyester piano finish
Selectable operation frequency and level controls on rear ribbon super tweeter
Patented 360
°
Downward bass port w/ unique phase-plug and standing base plane
Page 11 of 12
http://www.jas-audio.com

Drive Units per channel: Twin Aluminum ribbon tweeter with 5”face-plate (inch)
1” Top notch Ceramic Tweeter
5.5” ceramic-cone midrange unit
Two 9” Ceramic-cone woofers
Frequency Response: 20Hz - 25kHz ± 3dB, (20kHz–60 KHz ± 3dB with rear super tweeter on)
Sensitivity: 89 dB / 1W/ 1M
Nominal Impedance: 6 ohms
Min. Amplifier Power: 25 Watts per channel
Crossover Frequencies: 3000Hz and 300Hz , 10KHz and 14KHz (0db/+3db)
Speaker Dimensions: W 13.7 x H 48.2 x D 26.4 (inch)
3 Packing Box Sizes: Box A -> W 52 x H 43 x D 84 (inch)
Box B and C -> W 82 x H 63 x D 101 (inch)
Net Speaker Weight: 85kg per channel
Shipping Weight: 120kg x 2 + 60kg x 1 (Total Gross 300kg weight)
JAS AUDIO is constantly striving new design improvements, we reserve the right
to change or modify product specifications without prior notice or obligation.
Happy and Good Listening to all music lovers!
Best Regards,
Set your mind free!
Revised Version 1.1 and Copyright ©March 2006 JAS AUDIO
Page 12 of 12
http://www.jas-audio.com
Table of contents
Other Jas Audio Speakers manuals