JB Systems PPA-122 User manual


ENGLISH OPERATION MANUAL
JB SYSTEMS®1/6 PPA-122
OPERATION MANUAL
Thank you for buying this JB Systems®product. To take full advantage of all possibilities, please read these
operating instructions very carefully.
FEATURES
•A powerful portable PA-speaker with internal MP3-player (also plays WMA) + FM-radio + Bluetooth™.
•The MP3-player accepts both USB-sticks and SD-HC memory cards up to 64GB
•The FM-radio has an internal antenna (no broken antennas) and automatic station preset programming
•Powerful 250Wrms amplifier (500W music)
•In addition to the internal player, you can also connect:
•2 MIC inputs (bal + unbalanced)
•1 LINE input (bal + unbalanced)
•1 Stereo Mini Jack (only available when the internal player is not used)
•LINE OUT (balanced) to connect extra speakers
•Treble / bass tone controls
•Heavy duty Polypropylene cabinet housing
•Built-in heavy duty carrying handle
•Built-in 35mm stand adapter
•Built-in Rigging points
•High power 12” Woofer
•High power 1.35” Compression Driver
BEFORE USE
•Before you start using this unit, please check if there’s no transportation damage. Should there be any, do
not use the device and consult your dealer first.
•Important: This device left our factory in perfect condition and well packaged. It is absolutely necessary
for the user to strictly follow the safety instructions and warnings in this user manual. Any damage caused
by mishandling is not subject to warranty. The dealer will not accept responsibility for any resulting
defects or problems caused by disregarding this user manual.
•Keep this booklet in a safe place for future consultation. If you sell the fixture, be sure to add this user
manual.
•To protect the environment, please try to recycle the packing material as much as possible.
Check the contents:
Check that the carton contains the following items:
•User manual
•PPA-122
•IR remote

ENGLISH OPERATION MANUAL
JB SYSTEMS®2/6 PPA-122
SAFETY INSTRUCTIONS:
•Even if the speaker cabinet is made of water resistant material, the woofer and tweeter are not protected
against humid and rain. Therefore this speaker is intended for indoor use only, use of this product
outdoors, in humid conditions, voids all warranties.
•Always mount this speaker in safe and stable matter.
•Take special care when the cabinets are suspended. This is potentially dangerous and should only be
carried out by technicians who have knowledge of the techniques and regulations of rigging speakers!
•To prevent fire or shock hazard, do not expose this appliance to rain or moisture.
•To avoid condensation to be formed inside, allow the unit to adapt to the surrounding temperatures when
bringing it into a warm room after transport. Condense sometimes prevents the unit from working at full
performance or may even cause damages.
•Don’t place metal objects or spill liquid inside the unit. No objects filled with liquids, such as vases, shall
be placed on this appliance. Electric shock or malfunction may result. If a foreign object enters the unit,
immediately disconnect the mains power.
•No naked flame sources, such as lighted candles, should be placed on the appliance.
•Don’t cover any ventilation openings as this may result in overheating.
•Prevent use in dusty environments and clean the unit regularly.
•Keep the unit away from children.
•Inexperienced persons should not operate this device.
•Maximum save ambient temperature is 40°C. Don’t use this unit at higher ambient temperatures.
•Always unplug the unit when it is not used for a longer time or before you start servicing.
•The electrical installation should be carried out by qualified personal only, according to the regulations for
electrical and mechanical safety in your country.
•Check that the available voltage is not higher than the one stated on the rear panel of the unit.
•The socket inlet shall remain operable for disconnection from the mains.
•The power cord should always be in perfect condition. Switch the unit immediately off when the power
cord is squashed or damaged. It must be replaced by the manufacturer, its service agent or similarly
qualified persons in order to avoid a hazard.
•Never let the power-cord come into contact with other cables!
•When the power switch is in OFF position, this unit is not completely disconnected from the mains!
•This appliance must be earthed to in order comply with safety regulations.
•In order to prevent electric shock, do not open. There are no user serviceable parts inside.
•Never repair a fuse or bypass the fuse holder. Always replace a damaged fuse with a fuse of the same
type and electrical specifications!
•In the event of serious operating problems, stop using the appliance and contact your dealer immediately.
•Please use the original packing when the device is to be transported.
•Due to safety reasons it is prohibited to make unauthorized modifications to the unit.
CAUTION: To reduce the risk of electric shock, do not open. No
user-serviceable parts inside. Refer servicing to qualified service
personnel only.
The lightning flash with arrowhead symbol within the equilateral triangle is intended to alert the
use or the presence of un-insulated “dangerous voltage” within the product’s enclosure that may
be of sufficient magnitude to constitute a risk of electric shock.
The exclamation point within the equilateral triangle is intended to alert the user to the presence
of important operation and maintenance (servicing) instructions in the literature accompanying
this appliance.
This symbol means: indoor use only
This symbol means: Read instructions
This speaker can easily reproduce sound pressure levels (SPL) sufficient enough to
cause severe and permanent hearing damage. Always protect your ears when you are
exposed for a longer period to SPL in excess of 85dB!

ENGLISH OPERATION MANUAL
JB SYSTEMS®3/6 PPA-122
FUNCTIONS
1. USB-input: here you can connect a USB-
stick. As soon as the memory device is
inserted, the display shows “-- USB --”,
followed by the total number of songs
detected.
Important note: the USB-memory should be
formatted in FAT16 or FAT32. If a new USB-
stick is not detected, please format it first
using a Windows PC.
2. SD-CARD input: here you can insert an SD
or SDHC-card. Insert the card gently with the
upper side (printed side) facing to the left. As
soon as the memory device is inserted, the
display shows “-- SD --”, followed by the total
number of songs detected.
Important note: the SD-card should be
formatted in FAT16 or FAT32. If a new SD-
card is not detected, please format it first
using a Windows PC.
3. LCD DISPLAY: shows valuable information
about the played music or radio stations.
4. PLAY/PAUSE button:
Player operation:
•Press shortly: to start/pause the
current audio track.
•Press longer: to enter folder select,
use buttons (7) and (8) to browse the
folders.
Radio mode:
•Press shortly: tuner scans the FM-
band and programs the FM-preset
stations automatically.
5. SOURCE button: press this button to toggle
between MP3-player, FM-tuner (radio),
Bluetooth™or LINE IN (21).
6. RANDOM button: press this button to
choose one of the different random modes:
•REPEAT ONE: repeat the current track.
•REPEAT FOLDER: repeat current folder.
•REPEAT ALL: repeat all tracks on the
USB-memory. This is the “standard”
playback mode.
•REPEAT RANDOM: play all tracks in
random order.
7. PREVIOUS TRACK button:
Player operation:
•Press shortly:
•Normal playback: select previous
track.
•Folder select: (see: 4): select
previous folder.
•Press longer: reduce the volume of player. Standard the volume is set to maximum: we advice
to keep it at maximum and use the rotary knob (10) to change the volume.
Radio mode:
•Press shortly: select the previous preset.
•Press longer: reduce the volume of player. Standard the volume is set to maximum: we advice
to keep it at maximum and use the rotary knob (10) to change the volume.
8. NEXT TRACK button:
Player operation:

ENGLISH OPERATION MANUAL
JB SYSTEMS®4/6 PPA-122
•Press shortly:
•Normal playback: select next track.
•Folder select: (see: 4): select next folder.
•Press longer: increase the volume of player. Standard the volume is set to maximum: we
advice to keep it at maximum and use the rotary knob (10) to change the volume.
Radio mode:
•Press shortly: select the next preset.
•Press longer: increase the volume of player. Standard the volume is set to maximum: we
advice to keep it at maximum and use the rotary knob (10) to change the volume.
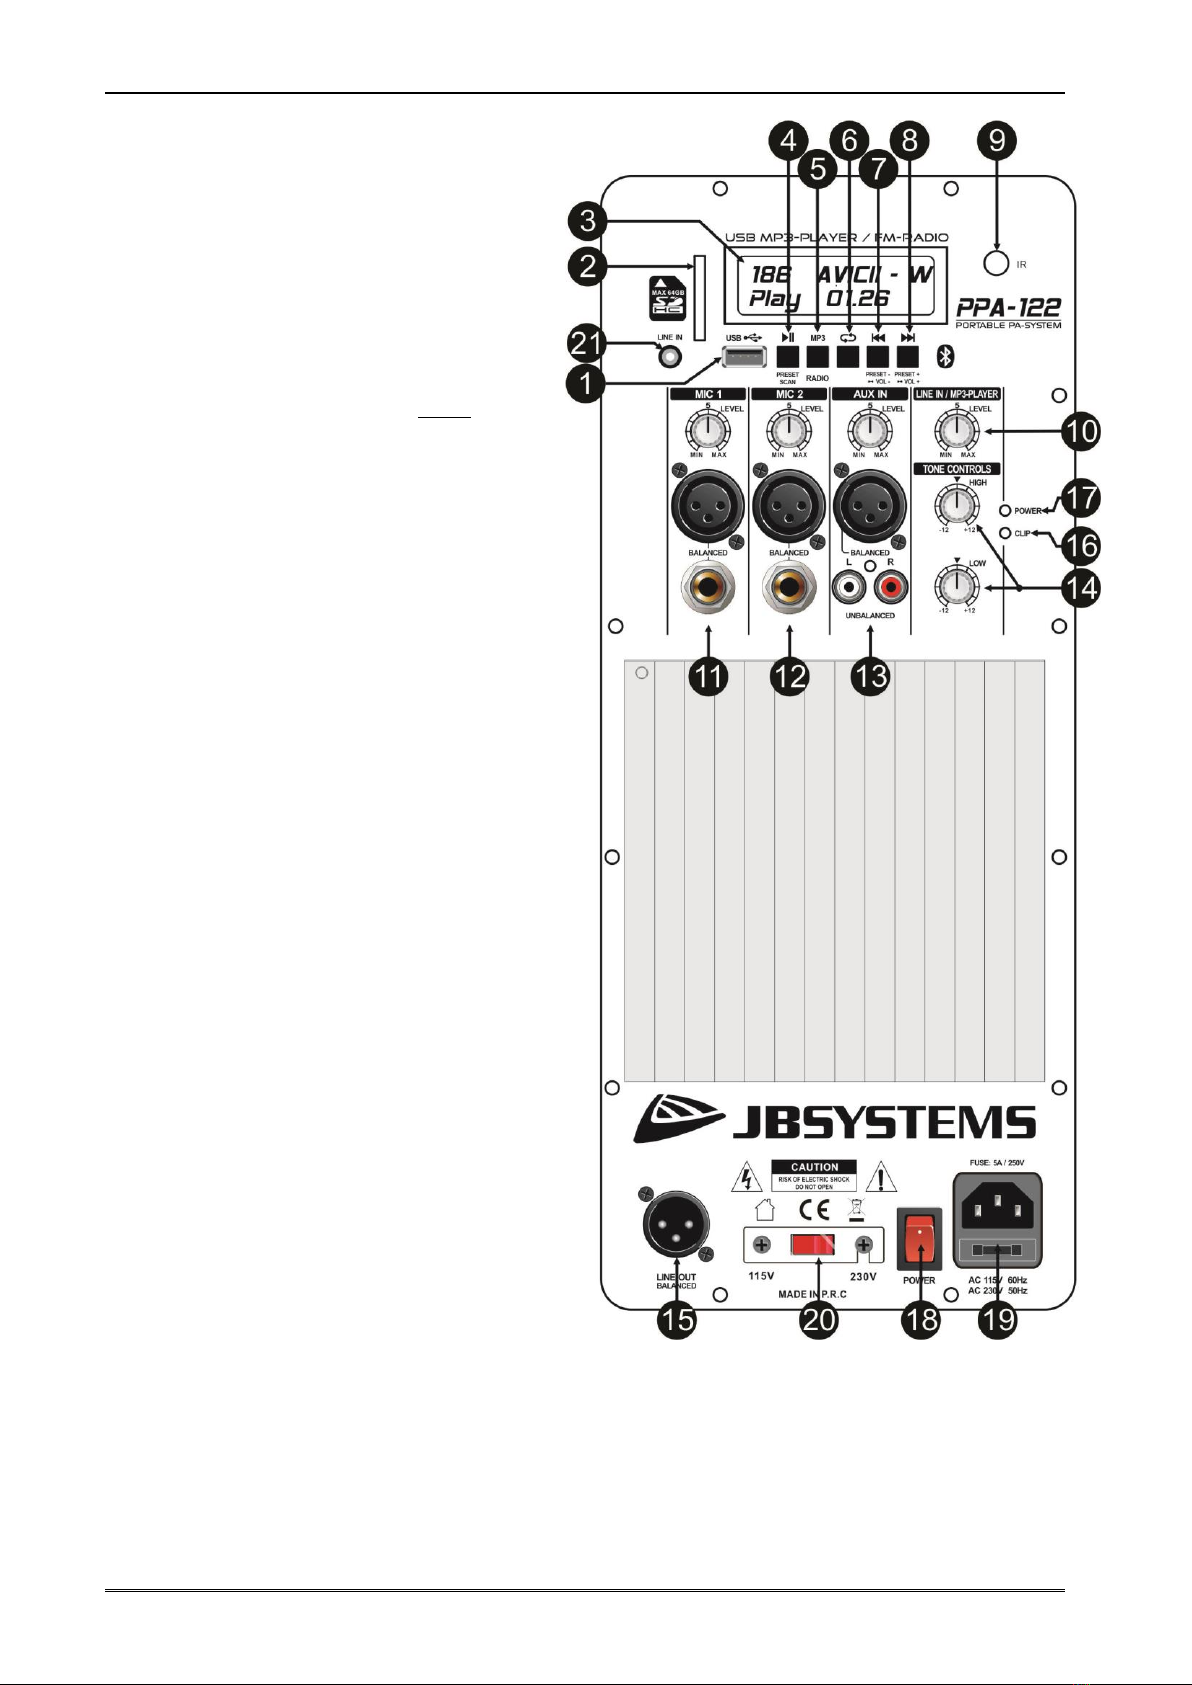
9. IR-RECEIVER: receives IR-signals from the remote control.
Important note for numbers 10+11+12+13: To prevent damage to the speakers of your speaker cabinet,
please set all input levels always to zero before you switch the device on or connect a microphone / audio
source. After this you can turn the level up to the desired level.
10. LINE IN / MP3-PLAYER VOLUME: used to adjust the volume of the internal player or the stereo mini
jack input (21).
11. MIC 1 INPUT + VOLUME: This input accepts both balanced and unbalanced microphones. You can
use both ¼”jack and male 3pin-XLR connectors. First always set the volume knob to zero, after that
turn it slowly up to the desired level.
12. MIC 2 INPUT + VOLUME: same functionality as MIC 1, see: (11).
13. AUX INPUT + VOLUME: This input accepts both balanced (3pin-XLR) and unbalanced (RCA, cinch)
line level audio signals like for example: CD-player, tuner, MP3-player, ... First always set the volume
knob to zero, after that turn it slowly up to the desired level.
14. TONE CONTROLS: Used to adjust the treble and bass of the master signal.
15. LINE OUTPUT: This balanced output (3pin-XLR) makes it possible to connect several speaker cabinets
together, the line output is NOT influenced by the settings of the tone controls (14).
16. CLIP LED: is lit when the amplifier is clipping (close to distortion). You are working on the limits of the
amplifier, please turn the volume a little down.
17. POWER LED: indicates that the amplifier is switched on.
18. POWER SWITCH: Used to switch the internal amplifier on/off. The Power led (17) is lit while the
cabinet is switched on.
19. MAINS INPUT: Mains input with IEC socket and integrated fuse holder, connect the supplied mains
cable here.
20. VOLTAGE SELECTOR: used to select the mains input voltage, 115Vac or 230Vac. Check this switch
BEFORE you connect the unit to the mains.
21. LINE INPUT: stereo mini jack input that can be used to connect external audio devices like a
smartphone, tablet, computer, etc. To be able to use this input you need to select source source in the
menu of the player via button (5) .
THE USE OF BLUETOOTH™:
Connect your smartphone via Bluetooth to stream music from your phone to the PPA-122:
•Switch on the PPA-122
•Scan the available Bluetooth units with your smartphone.
•The unit can be found under the name BLUETOOTH.
•Make the connection and wait till you phone is connected to the PPA-122
•When the connection is OK, [CONNECTED] will also appear on the screen of the PPA-122
Important: if you had already Bluetooth in the memory of your phone (used previously with another device),
then first delete this unit from your list and scan again.
iOS & Android app for remote settings
if you would like to control several settings of the PPA-122 media player with your smartphone, you can
download the app: RY-Speaker-APP
•Android app: https://play.google.com/store/apps/details?id=com.sancochip.ry
•iOS app : https://apps.apple.com/nl/app/ry-speaker/id1439987938
IMPORTANT: first connect your smartphone via Bluetooth to the PPA-122 as mentioned above
before to start the app. If you don’t respect this order, some functions of the app might not work
and streaming music to the PPA-122 is impossible !

ENGLISH OPERATION MANUAL
JB SYSTEMS®5/6 PPA-122
Once the Bluetooth connection is OK, test if the transmission is working properly. Just play some music on
your smartphone to check if the sound comes out of the PPA-122.
Once this is ok, you can start up the app.
1. Press the Bluetooth button
2. The [SEARCH] window opens. →press the blue [SEARCH] button
3. When [RY-APP] appears on the screen, press on this [RY-APP] bar
4. Once the connection is made, [RY-APP] will appear in the light blue bar. This means the connection
is set. You can now control the media player of the PPA-122 via your smartphone.
RIGGING
•Important: The installation must be carried out by qualified service personal only. Improper
installation can result in serious injuries and/or damage to property. Overhead rigging requires
extensive experience! Working load limits should be respected, certified installation materials
should be used, the installed device should be inspected regularly for safety.
•Make sure the area below the installation place is free from unwanted persons during rigging, de-rigging
and servicing.
•The cabinet should be installed out of reach of people and outside areas where persons may walk by or
be seated.
•Before rigging make sure that the installation area can hold a minimum point load of 10times the
cabinet’s weight.
•Always use a certified safety cable that can hold 12 times the weight of the cabinet while installing the
unit. This secondary safety attachment should be installed in a way that no part of the installation can
drop more than 20cm if the main attachment fails.
•The cabinet should be well fixed; a free-swinging mounting is dangerous and may not be considered!
•The operator has to make sure that the safety-relating and machine-technical installations are approved
by an expert before using them for the first time. The installations should be inspected every year by a
skilled person to be sure that safety is still optimal.
•The cabinet has 4 rigging points using M8 inserts. These can be used to
suspend (fly) the cabinet in the air. For this purpose you can use heavy duty
eyebolts with metric M8 thread. In most cases 2 cables will be attached to the
top and one is used to pull up the back.
•Anyway always take special care when the cabinets are suspended. This is
potentially dangerous and should only be carried out by technicians who have
perfect knowledge of the techniques and regulations of rigging speakers!

ENGLISH OPERATION MANUAL
JB SYSTEMS®6/6 PPA-122
SPECIFICATIONS
This unit is radio-interference suppressed. This appliance meets the requirements of the current European
and national guidelines. Conformity has been established and the relevant statements and documents have
been deposited by the manufacturer.
PLAYER
USB-memory: <64GB –formatted FAT16 / FAT32
SD-card: SD + SDHC <64GB –formatted FAT16 / FAT32
Accepted audio files: WMA, MP3 (different sample rates, up to 320kbps)
FM Radio freq range: 87,5 to 108MHz
IR-Remote replacement battery: CR2025 3V battery (included)
AMPLIFIER
Amplifier Power 250Wrms
Freq. Resp. (+/-3dB) 45 –20.000Hz
THD (1kHz / 1W) 0,12%
Input Sensitivity line 1V
Input Sensitivity micro 15mV
Input impedance 20kohm
S/R ratio (mic off) >85dB
EQ low +/-12dB @ 100Hz
EQ high +/-12dB @ 10kHz
Cooling natural air cooling
Microphone input Bal/unbal XLR/Jack
Line input Bal/unbal XLR 3pin
Line output Bal/unbal XLR 3pin
Fuse (5x20mm) F5A / 250V
Power supply 115Vac/60Hz 230Vac/50Hz
Dimensions HxWxD 580 x 372 x 315 mm
Weight 15 kg
Every information is subject to change without prior notice
You can download the latest version of this user manual on our website: www.jb-systems.eu

Table of contents