Trevi XR 400 APP User manual

ALTOPARLANTE AMPLIFICATO CON APP DEDICATA, RADIO/USB/BT
Manuale d'uso e collegamento
PORTABLE SPEAKER WITH APP CONTROL, RADIO/USB/BT
Connection and Operation Manual
HAUT-PARLEUR PORTABLE AVEC APP CONTROL, RADIO / USB / BT
Mode d'emploi et branchement
TRAGBARE LAUTSPRECHER MIT APP-STEUERUNG, RADIO / USB / BT
Gebrauchs- und Anschlusshandbuch
ALTAVOZ PORTATIL CON APP, RADIO / USB / BT
Manual para el uso y la conexión
APP
CONTROL
USB
CHARGE
XR 400 APP
Guida d’uso
User guide
DISCO
LIGHT
60 W
MAX
BT
BLUETOOTH
Per informazioni integrative ed aggiornamenti su questo prodotto visita www.trevi.it
For additional information and updates of this product see www.trevi.it

2
XR 400 APP
ATENÇÃO
PERIGO DE CHOQUES ELÉTRICOS
NÃO EXPOR A CHUVA E UMIDADE
ATENÇÃO: NÃO ABRIR O APARELHO. NO INTERIOR DO MESMO NÃO EXISTEM
COMANDOS OU PEÇAS DE SUBSTITUIÇÃO QUE POSSAM SER MANIPULADOS
PELO USUÁRIO. EM CASO DE EVENTUAL OPERAÇÃO DE SERVIÇO, DIRIGIR-SE
A UM CENTRO DE ASSISTÊNCIA AUTORIZADO TREVI
PROSOCH
PROSOCH. MHN ANOIGETE THN SUSKEUH. DEN UPARCOUN
STO ESWTERIKO THS ENTOLES POU NA MPOREI NA CEIRISTEI
O KATANALWTHS OUTE ANTALLAKTIKA TMHMATA. GIA OPO-
IADHPOTE EPISKEUH H¢ SUNTHRHSH APEUQUNQEITE SE ENA
APO TA EXOUSIODOTHMENA KENTRA ANTIPROSWPEIAS TREVI.
KINDUNOS HLEKTROPLHXIAS
MHN EKQETETE
SE BROCH KAI UGRASIA
ATTENZIONE
RISCHIO DI SCOSSE ELET-
TRICHE!
NON ESPORRE A PIOGGIA E
UMIDITÀ
ATTENZIONE: NON APRITE L'APPARECCHIO. ALL'INTERNO NON VI SONO
COMANDI MANIPOLABILI DALL'UTENTE NE PARTI DI RICAMBIO. PER TUTTE
LE OPERAZIONI DI SERVIZIO RIVOLGERSI AD UN CENTRO DI ASSISTENZA
AUTORIZZATO TREVI
WARNING!
WARNING: DO NOT OPEN THE SET. NEITHER CONTROLS OR SPARE PARTS TO
BE USED BY THE USER ARE TO BE FOUND INSIDE IT. APPLY TO AUTHORISED
TREVI CENTERS FOR SERVICE OPERATIONS.
DANGER OF ELECTRIC SHOCK!
DO NOT EXPOSE TO
RAIN OR HUMIDITY
ATTENTION
ATTENTION: NE PAS OUVRIR L’APPAREIL, A L’INTERIEUR IL N’Y A PAS DE
COMMANDESAMANIPULERPAR L’UTILISATEUR OU DE PIECES DE RECHANGE.
POUR TOUTES LES OPERATIONS DE SERVICE IL FAUT S’ADRESSER A UN
SERVICE D’ASSISTANCE AUTORISE TREVI.
RISQUE DE DECHARGES ELEC-
TRIQUES
NE PAS EXPOSER A LA PLUIE ET A
L’HUMIDITE
ACHTUNG
ACHTUNG: DAS GERÄT NICHT ÖFFNEN. IM INNERN BEFINDEN SICH KEINE VOM
BENUTZERSELBSTINSTANDSETZBARENTEILEUNDAUCHKEINEERSATZTEILE.
FÜR JEGLICHE SERVICEARBEITEN, WENDEN SIE SICH BITTE AN EINE TREVI
AUTORISIERTEN KUNDENDIENSTSTELLE.
GEFAHR ELEKTRISCHER SCHLÄGE
NICHT DER FEUCHTIGKEIT UND
DEM REGEN AUSSETZEN
ATENCION
ATENCION: NO ABRIR EL APARATO, EN SU INTERIOR NO HAY MANDOS QUE
PUEDAN SER MANIPULADOS POR EL USUARIO NI PARTES DE REPUESTO.
PARA TODAS LAS OPERACIONES DE SERVICIO DIRIGIRSE A UN CENTRO DE
ASISTENCIA AUTORIZADO TREVI.
PELIGRO DE CHOQUES
ELECTRICOS
NO EXPONER A LLUVIA Y
HUMEDAD
UK PLUG ONLY
WIRES CONNECTIONS TO A UK THREE-PIN PLUG
The wires in this mains lead are coloured in accordance with the following wiring codes:
Blue:............................................................Neutral
Brown:.........................................................Live
The wires in this mains lead must be connected to the terminals in the plug as follows:
Blue wire:.....................................................N or Black
Brown wire: .................................................L or Red
Neither wire is to be connected to the earth (E or W) terminal of three-pin plug.
Should the fuse fail in the plug remove the plug form the wall socket and replace the fuse
with a 3 Amp. ASTA approved BS 1362 fuse.
ATTENZIONE! - WARNING!

3
XR 400 APP
NOTE D'USO
Ascoltare a volume alto per lungo tempo, potrebbe danneggiare il vostro udito.
Questo apparecchio è uno strumento elettronico di alta precisione, evitate quindi di utilizzarlo nei seguenti casi:
• Vicino a campi magnetici.
• Vicino a fonti di calore come caloriferi e stufe.
• In luoghi molto umidi come stanze da bagno, piscine, ecc...
• In luoghi molto polverosi.
• In luoghi soggetti a forti vibrazioni.
• Non avvicinare l’orecchio all’altoparlante durante le fasi di messa punto e regolazioni del volume, e in particolare di tenere il
volume al minimo nella fase di accensione.
• Posizionare l’apparecchio in modo che ai suoi lati ci sia sempre abbastanza spazio per la libera circolazione di aria (almeno 5
cm).
• Se dei liquidi penetrano all’interno dell’apparecchio scollegare immediatamente la spina dalla presa e portare l’apparecchio al
più vicino centro assistenza autorizato TREVI.
• Controllare sempre prima di ricaricare l’apparecchio, che i cavi di alimentazione e di collegamento siano installati correttamente.
• Nessuna sorgente di fiamma nuda, quali candele accese, dovrebbe essere posta sull’apparecchio.
• L’apparecchio non deve essere esposto a stillicidio o a spruzzi d’acqua e nessun oggetto pieno di liquido, quali vasi, deve essere
posto sull’apparecchio.
• Conservare il presente manuale per futuri riferimenti.
CURA E MANUTENZIONE
Per la pulizia si consiglia l’ uso di un panno morbido, leggermente inumidito. Evitate solventi o sostanze abrasive.
IMPORTANTE
Questo dispositivo e' progettato per uso domestico non professionale. La buona costruzione di questo apparecchio ne garantisce
per lungo tempo il perfetto funzionamento. Se tuttavia dovesse presentarsi qualche inconveniente, sarà opportuno consultare il più
vicino Centro Assistenza autorizzato TREVI.
TREVI persegue una politica di continua ricerca e sviluppo. Pertanto i prodotti possono presentare caratteristiche diverse da
quelle descritte.
ITALIANO
DESCRIZIONE COMANDI
1. Tasto EQ/P-MODE
2. Tasto 9/-10
3. Tasto :/+10
4. Tasto // BT / SCAN
5. Tasto Volume -
6. Tasto Volume +
7. Tasto FUNC./STANDBY/LIGHT
8. Altoparlanti frontali
9. Ingresso AUX
10. Ingresso USB
11. Porta USB CHARGE per ricarica dispositivo esterno
12.Protezione di gomma
13. Indicatore led PAIR (accoppiamento BT)
14.Indicatore led di carica CHARGE
15. Display
16. Maniglia
17.Subwoofer passivi
18. Protezione di gomma
19. Presa di alimentazione
20. Interruttore ON / OFF, accensione/spegnimento
21. Antenna FM

4
XR 400 APP
ITALIANO
ALIMENTAZIONE
Questa unità funziona con batteria ricaricabile al piombo 12V 4Ah e alimentazione di rete 100-240V ~ 50/60Hz.
Quando la batteria e' in fase di esaurimento o l'apparecchio non si accende inserire il cavo di alimentazione nella presa(19) sul
dispositivo e la spina in una presa di corrente per effettuare la ricarica.
Stati della spia led CHARGE:
- Spia CHARGE ROSSA fissa: il dispositivo e' collegato con il cavo di alimentazione e la batteria e' in carica.
- Spia CHARGE VERDE fissa: operazione di ricarica terminata, la batteria e' carica.
- Spia CHARGE ROSSA lampeggiante: con il dispositivo in uso, indica che la batteria e' in fase di esaurimento ed e' necessario
ricaricarla.
Non collegare l'apparecchio a prese con tensione diversa da quella indicata.
FUNZIONI DI BASE
ACCENSIONE/SPEGNIMENTO
Premere l'interruttore di accensione(20) e portarlo in posizione ON/OFF per accendere/spegnere l'apparecchio.
NOTA: Dopo circa 15 minuti di inattivita', l'unità passa automaticamente in modalità standby.
Per accendere nuovamente l'unità, premere il pulsante FUNC/STANDBY/LIGHT(7) o agire sull'interruttore di accensione(20).
In caso di funzionamento anomalo dell'apparecchio spegnere l'apparecchio, scollegare il cavo di alimentazione ed attendere alcuni
minuti prima di ricollegarlo ed accendere l'apparecchio.
IMPOSTAZIONE DEL MODO FUNZIONE
Per cambiare la modalità di funzionamento, premere piu' volte il pulsante FUNC/STANDBY/LIGHT(7) per selezionare USB/AUX/
RADIO/BLUETOOTH(sul display compare BT).
REGOLAZIONE DEL VOLUME
Premere i tasti Volume - (5) o Volume + (6) per regolare il volume.
EQUALIZZATORE
Questa unità ha un sistema di equalizzazione audio integrato. Premere il tasto EQ(1) per selezionare un'impostazione che meglio si
adatta alla riproduzione sonora in corso. E' possibile scegliere tra le equalizzazioni FLAT, POP, CLASSIC, JAZZ, ROCK.
EFFETTI DISCO-LIGHT
Per attivare gli effetti Disco-Light premere a lungo il tasto FUNC/STANDBY/LIGHT(7). È possibile scegliere tra nove diversi effetti.
Per disattivare l'effetto Disco-Light, premere e tenere premuto il pulsante FUNC/STANDBY/LIGHT(7) piu' volte fino a che il display
mostra "OFF".
PRESA USB CHARGE
E' possibile utilizzare la presa USB CHARGE(11) per la ricarica di dispositivi esterni USB.
Nota1: non e' possibile utilizzare questa presa per la riproduzione di file audio da dispositivi esterni (utilizzare l'ingresso USB, vedi
capitolo INGRESSO USB).
RADIO FM
1. Premere il tasto FUNC/STANDBY/LIGHT(7) sull'unità e selezionare la funzione radio (sul display compare la frequenza sintonizzata
e l'indicazione FM).
2. Tenere premuto per qualche secondo il tasto //BT/SCAN(4) per effettuare una ricerca e memorizzazione automatica delle
stazioni radio; la ricerca/memorizzazione si fermerà al completamento dell’intera scansione della banda radio o al riempimento
di tutte le memorie disponibili. E' possibile memorizzare fino ad un massimo di 30 stazioni radio. Al termine verrà riprodotta la
prima stazione radio memorizzata.
3. Per richiamare una stazione memorizzata utilizzare i tasti :(3) per passare alla stazione successiva, o 9(2) per passare alla
stazione precedente.
4. Tenere premuto per qualche secondo i tasti :(3) o 9(2) sull'unità per sintonizzarsi sulla stazione radio successiva o precedente
con il miglior segnale ricevuto.
5. Per memorizzare una stazione radio:
- Portarsi sulla frequenza da memorizzare, premere a lungo il tasto EQ/P.MODE(1).
- Con i tasti :(3) o 9(2) selezionare il numero di memoria in cui si desidera salvare la stazione radio.
- Premere a lungo il tasto EQ/P.MODE(1) per confermare.
- L'apparecchio è in grado di memorizzare fino a 30 stazioni.
6. L'indicazione ST presente sul display indica la ricezione del segnale stereo.
Nota: La ricezione in FM dipende molto dal luogo dove è posto l’apparecchio.

5
XR 400 APP
La vicinanza di apparecchi TV, lampade al neon o altri elettrodomestici può provocare disturbi nella ricezione di programmi radio,
in questo caso allontanate l’apparecchio.
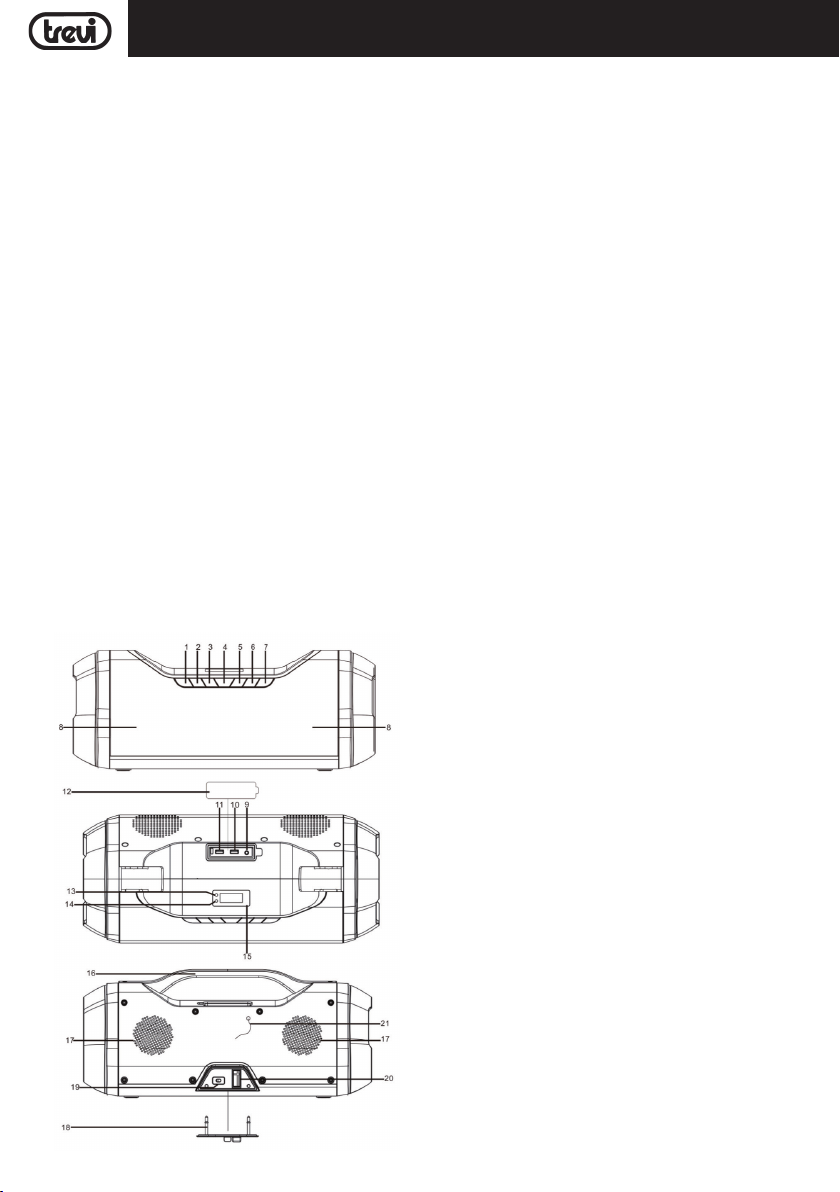
INGRESSO USB
1. Premere il tasto FUNC/STANDBY/LIGHT(7) sull'unità e selezionare "USB".
2. Inserire una memoria Usb nell'ingresso USB(10). La riproduzione viene avviata automaticamente.
3. Per mettere in pausa la riproduzione, premere il tasto //BT/SCAN(4)), il display inizia a lampeggiare.
4. Per riprendere la riproduzione, premere di nuovo il tasto //BT/SCAN(4).
5. Premendo il tasto :(3) durante l’ascolto si passa alla traccia successiva, mentre con il tasto 9(2) ai brani precedenti.
6. Premere e tenere premuto il tasto :(3) o 9(2) per saltare alla decima traccia successiva o precedente.
7. Premendo a lungo il tasto EQ/P-MODE(1) e' possibile attivare le varie modalità di ripetizione dei brani:
- Ripetizione singolo brano (sul display compare )
- Cartella (intero contenuto di una cartella solo con file MP3, compare la scritta FOLDER)
- Riproduzione casuale dei brani (sul display compare la scritta RAND)
- Ripetizione di tutti i brani (sul display compare )
Per disattivare la ripetizione premere piu' volte il tasto EQ/P-MODE(1) fino a far sparire l'icona dal display.
NOTE
- Non utilizzare la porta USB CHARGE(11) per la riproduzione audio.
- Il lettore potrebbe non supportare alcuni dispositivi USB, questo è dovuto all'incompatibilità di alcuni processori.
- Per evitare interferenze dannose, collegare sempre le periferiche USB direttamente all'unità, non utilizzare cavi di prolunga.
FUNZIONAMENTO BLUETOOTH
1. Accendere l'apparecchio e premere il tasto FUNC/STANDBY/LIGHT(7) per selezionare la funzione bluetooth, sul display compare
la scritta BT.
2. Nella modalità Bluetooth, il Led spia (13, PAIR) comincerà a lampeggiare, il sistema entra automaticamente in ricerca.
3. Attivare la funzionalità Bluetooth sul dispositivo esterno da accoppiare.
4. Avviare la ricerca dei dispositivi. Al termine selezionare il dispositivo "TREVI XR 400 APP".
Nota: potrebbe comparire un secondo dispositivo XR400APP (senza la scritta TREVI) necessario al funzionamento dell'app.
Per il collegamento BT selezionare TREVI XR 400 APP.
5. Inserire la password "0000" se richiesto.
6. Avviare la riproduzione musicale dal proprio dispositivo. Premere il tasto//BT/SCAN(4) per attivare la pausa ed i tasti 9
(2) o :(3) per la selezione dei brani.
7. Tenere premutoperqualchesecondoiltasto//BT/SCAN(4)pereliminarel'accoppiamentoedeffettuare unanuovaoperazione
di pairing.
AUX-IN
1. Premere il tasto FUNC/STANDBY/LIGHT(7) sull'unità per selezionare la modalità "AUX".
2. Collegare una qualsiasi unità provvista di uscita audio tramite apposito cavo Jack da 3,5mm (non incluso) all'ingresso AUX (9).
3. Regolare il dispositivo esterno dai propri comandi.
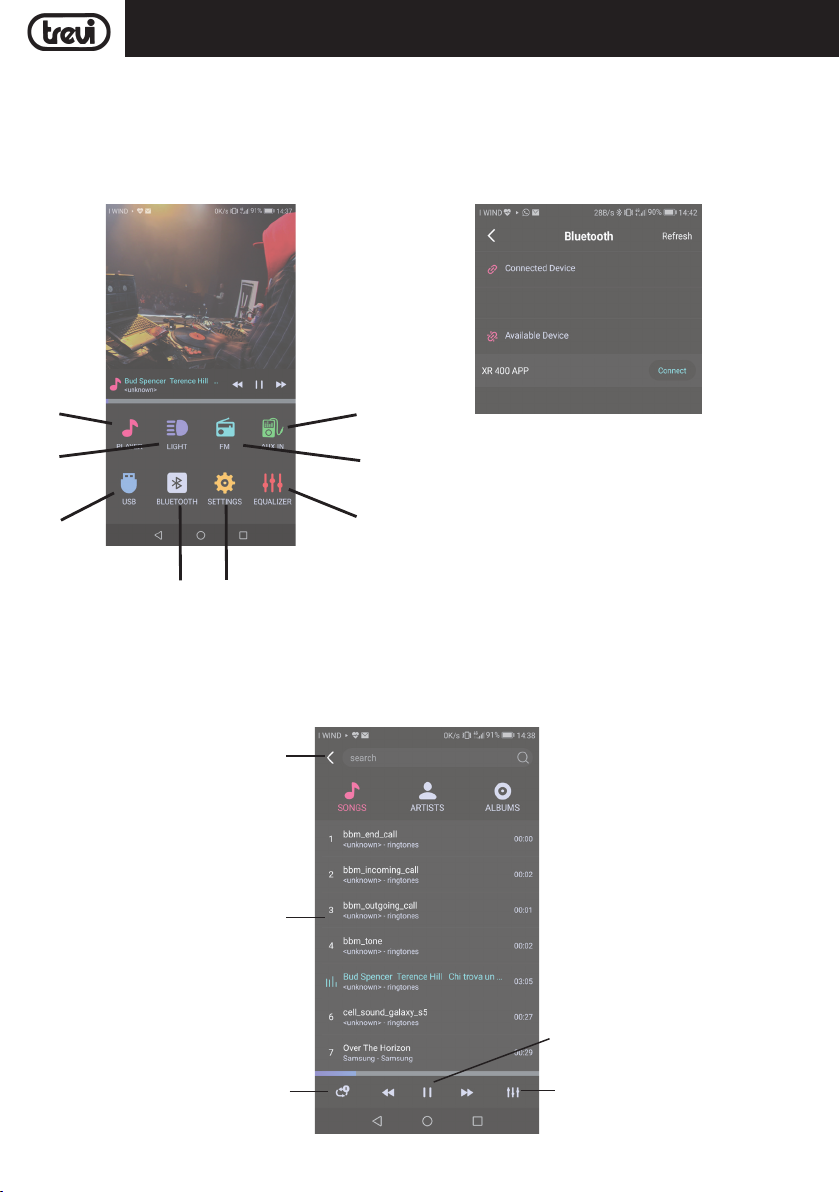
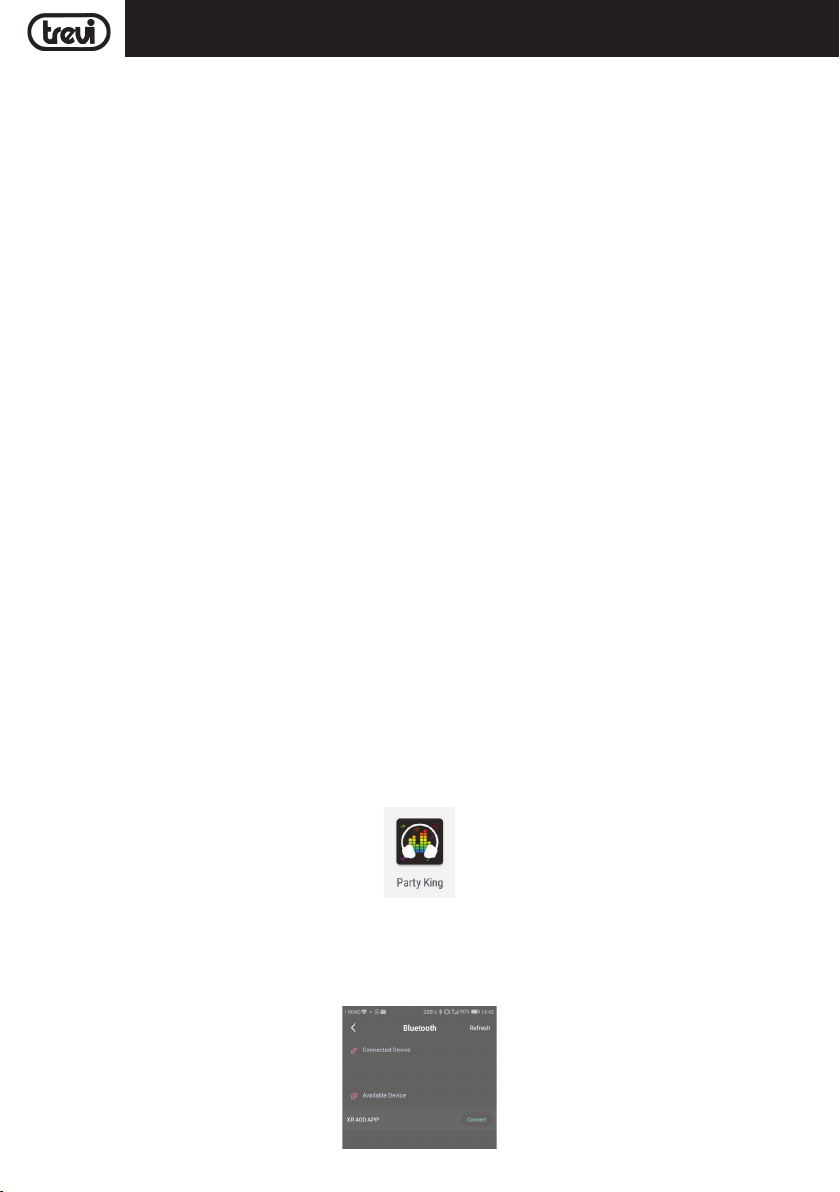
CONTROLLO APPARECCHIO TRAMITE APPLICAZIONE "PARTY KING"
ITALIANO
L'applicazione e' disponibile solo in Inglese per dispositivi Android/iOS.
Per controllare il dispositivo tramite lo smartphone, tablet, o altri dispositivi, scaricare l’applicazione “PARTY KING” dai rispettivi
market store.
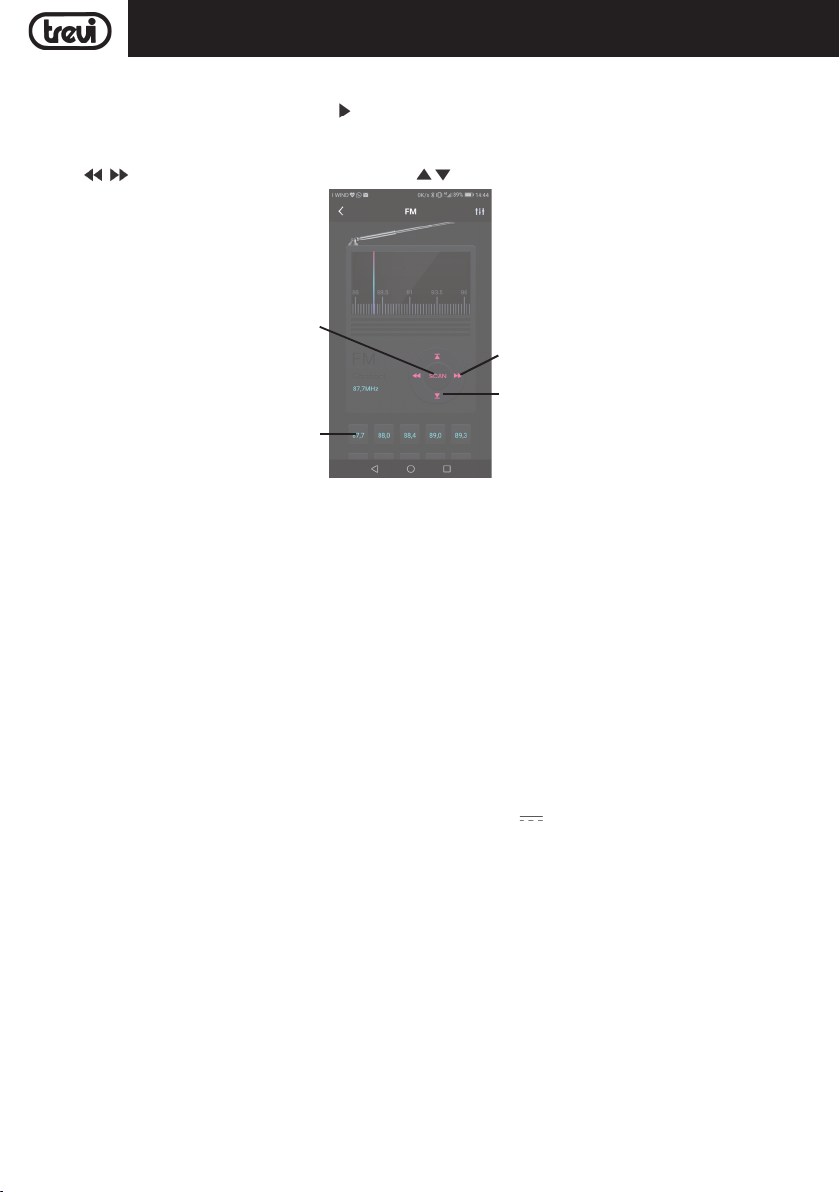
L'applicazione vi permetterà di controllare le seguenti modalità: Player, Light, ingresso USB, Radio FM, ingresso Aux In, equalizzatore.
Una volta collegato l’apparecchio al dispositivo esterno tramite connessione Bluetooth (come descritto nel paragrafo
Funzionamento Bluetooth), aprire l’app “PARTY KING” su smartphone/tablet.

6
XR 400 APP
Accoppiamento dell'applicazione al dispositivo
Dopo aver accoppiato lo smartphone/tablet come descritto nel paragrafo Funzionamento Bluetooth, e' necessario effettuare
un ulteriore accoppiamento dell'applicazione al dispositivo:
1. Premere il bottone REFRESH e quando compare nella lista dei dispositivi disponibili il modello XR 400 APP, selezionarlo.
Una volta connesso, il dispositivo si sposterà nell'elenco dei dispositivi connessi (Connected device, vedi fig.1).
Nella schermata principale sono presenti 8 icone:
Riproduzione dei file audio presenti sul telefono:
Premere l’icona A per accedere alla pagina di riproduzione musicale dei file musicali che si trovano all’interno del telefono. Selezio-
nare la canzone che si vuole riprodurre. E’ possibile mettere in pausa il brano, passare al brano precedente/successivo, attivare la
ripetizione o la riproduzione casuale. Premere “<” per tornare alla pagina principale.
Ritorno alla pagina
principale
Elenco dei brani in
ripro
duzione
Funzione di ripetizione
dei brani
Equalizzatore
Comandi di riproduzione
A
B
C
D E
F
G
H
ITALIANO
Fig.1

7
XR 400 APP
Riproduzione della memoria USB
Inserire una memoria USB nell’unità, premere l’icona C per accedere alla riproduzione della memoria USB. Scegliere un brano da
riprodurre tra quelli visualizzati in elenco, premere “ ” per avviare la riproduzione, premere “<” per tornare alla pagina principale.
Radio FM
Premere l’icona G per accedere alla modalità Radio FM, premere “SCAN” per avviare la scansione e memorizzazione automatica.
Premere per effettuare una ricerca automatica; premere per spostarsi “passo-passo” ed effettuare una ricerca fine.
Aux-in
Dopo aver effettuato il collegamento come descritto nel paragrafo AUX IN, premere l’icona H per accedere alla pagina di controllo
AUX IN.
Controllo illuminazione Led
Premere l’icona B per accedere alla pagina Light, dove è possibile selezionare il colore da visualizzare sull’unità, nonché regolare
la luminosità (controllo LUMIN). E' anche possibile scegliere tra 5 profili preimpostati (Profiles). Tramite il comando OFF/ON e'
possibile spegnere o accendere l'illuminazione led.
Per tornare alla pagina principale, premere “<” nell’angolo sinistro.
Equalizzatore e regolazione volume
Premere l’icona F per accedere alla pagina di controllo dell'equalizzatore (Equalizer) e per regolare il volume.
E' possibile impostare una equalizzazione personale oppure selezionare una tra le 5 modalità di equalizzazione preimpostate: Flat,
Pop, Classic, Jazz, Rock.
E' possibile regolare il volume dell'apparecchio.
Impostazioni
Premere l’icona E per avere informazioni sulla versione dell'applicazione.
CARATTERISTICHE TECNICHE
Alimentazione: 100-240V ~ 50/60Hz - batteria interna al piombo 12V 4Ah ricaricabile
Consumo: ................................. Max 35W
Potenza massima in uscita: ..........................................60W
Banda FM: ......................87.5 - 108.0 MHz
Potenza di trasmissione Bluetooth: ......................................2,5mW
Banda di trasmissione Bluetooth: ......................................2,4GHz
Dimensioni: .................480 x 210 x 220 mm
Peso: .......................................5,5 Kg
INFORMATIVA SULLA RIMOZIONE E LO SMALTIMENTO DELLE BATTERIE
Attenzione: Questa operazione è riservata esclusivamente al personale tecnico specializzato!
PROCEDURA PER LA RIMOZIONE DELLA BATTERIA DALL’ALTOPARLANTE AMPLIFICATO
Operare esclusivamente in assenza di collegamento dell’apparecchio alla rete elettrica!
1. Rimuovere le decorazioni color argento situate ai lati dell'apparecchio e svitare le viti presenti.
2. Rimuovere le due parti laterali del mobile;
3. Svitare le viti presenti nella parte posteriore del mobile ed aprire l'apparecchio;
3. Smontare la protezione plastica presente tra gli altoparlanti;
4. Individuare la batteria, scollegarla e rimuoverla.
Qualunque sia il tipo di batteria esaurita, essa non deve essere gettata tra i rifiuti domestici,nel fuoco o nell’acqua. Ogni tipo di batteria esaurita deve
essere riciclata oppure smaltita presso gli appositi centri raccolta dedicati.
Tasto SCAN: avvia la scansione e memo-
rizzazione automatica delle stazioni radio
Accesso diretto alle stazioni radio memo
rizzate
Ricerca manuale
Ricerca automatica sulla stazione radio
successiva
o precedente
ITALIANO

8
XR 400 APP
ENGLISH
NOTES ON USE
This is a precision electronic appliance; avoid using it in the following cases:
• Near strong heat sources, such as central heating plants or stoves.
• Listening to high volume for a long time could damage your hearing.
• In very humid places such as bathrooms, swimming pools, etc.
• In very dusty places.
• In places subject to strong vibrations.
• Position the appliance in such a way that there is always enough room for free air circulation (at least 5 cm).
• Do not block the air inlets.
• Keep the ear speaker during the steps of focusing point and volume adjustments, and in particular to keep the volume to a
minimum in the ignition phase.
• If any liquid enters the appliance, unplug it immediately from the socket and take it to the nearest TREVI authorised service
centre.
• Before switching on the appliance, always check that the power cable and the connection cable are properly installed.
• The apparatus shall not be exposed to dripping or splashing water. No objects filled with liquid, such as vases, should be placed
on the unit.
• No naked flame sources, such as lighted candles, should be placed on.
• Keep this manual.
CARE AND MAINTENANCE
Use a slightly damp soft cloth for cleaning. Do not use solvents and abrasive substances.
IMPORTANT
This device is designed for home use (not professional use). This appliance has been carefully built to ensure long-lasting perfect
performance. However, should any inconvenience occur, please contact your local authorised TREVI Service Centre.
TREVI follows a policy of ongoing research and development. Therefore products may have different features from those described.
LOCATION OF CONTROL
1. Button EQ / P-MODE
2. Button 9/-10
3. Button :/+ 10
4. Button//BT/SCAN
5. Volume Key -
6. Volume Key +
7. Button FUNC./STANDBY/LIGHT
8. Front speakers
9. AUX input
10. USB input
11. USB CHARGE, port for external device charging
12. Rubber protection
13. PAIR led indicator
14. Charge LED indicator
15. Display
16. Handle
17. Passive subwoofers
18. Rubber protection
19. Power supply socket
20. ON/OFF switch
21. FM antenna

9
XR 400 APPENGLISH
SUPPLY
This unit works with 12V 4Ah lead-acid rechargeable battery and 100-240V ~ 50 / 60Hz mains power supply.
When the battery is running out or the unit does not turn on, plug the power cord into the socket (19) on the device and plug into
a power outlet to charge.
CHARGE LED lights status:
- RED CHARGE lamp: the device is connected to the power cable and the battery is charging.
- CHARGE GREEN LED light: charging operation completed, the battery is charged.
- RED CHARGE lamp flashing: when the device is in use, it indicates that the battery is running out and needs to be recharged.
Do not connect the appliance to electrical outlets other than those indicated.
BASIC FUNCTIONS
ON / OFF
Press the power switch (20) and turn it to the ON / OFF position to turn the appliance on / off.
NOTE: After about 15 minutes of inactivity, the unit will automatically switch to standby mode.
To turn the unit on again, press the FUNC / STANDBY / LIGHT button (7) or turn the ignition switch (20).
In case of abnormal operation of the appliance, switch off the appliance, unplug the power cord and wait a few minutes before
plugging it back in and switching the appliance on.
FUNCTION MODE SETTING
To change the operating mode, press the FUNC / STANDBY / LIGHT button (7) several times to select USB / AUX / RADIO /
BLUETOOTH (BT appears on the display).
VOLUME ADJUSTMENT
Press the Volume - (5) or Volume + (6) keys to adjust the volume.
EQUALIZER
This unit has an integrated audio equalization system. Press the EQ button (1) to select a setting that best suits the current sound
reproduction. It is possible to choose between FLAT, POP, CLASSIC, JAZZ, ROCK equalizations.
DISC-LIGHT EFFECTS
Long press the FUNC / STANDBY / LIGHT button (7) to activate the Disco-Light effects. You can choose from nine different
effects.
To deactivate the Disco-Light effect, press and hold the FUNC / STANDBY / LIGHT (7) button repeatedly until the display shows
"OFF".
USB CHARGE OUTPUT
It is possible to use the USB CHARGE (11) socket to charge external USB devices.
Note1: it is not possible to use this socket to play audio files from external devices (use the USB input, see chapter USB INPUT).
FM RADIO
1. Press the FUNC / STANDBY / LIGHT button (7) on the unit and select the radio function (the display shows the tuned frequency
and FM indication).
2. Hold down the // BT / SCAN key (4) for a few seconds to search and store radio stations automatically; the search /
memorization will stop at the completion of the entire radio band scan or the filling of all the available memories. It is possible
to memorize up to a maximum of 30 radio stations. At the end, the first stored radio station will be played.
3. To recall a stored station use the keys (3) to go to the next station, or (2) to go to the previous station.
4. Hold down for a few seconds the keys (3) or (2) on the unit to tune to the next or previous radio station with the best signal received.
5. To store a radio station:
- Go to the frequency to be memorized, long press the EQ / P.MODE key (1).
- Using the keys (3) or (2) select the memory number where you want to save the radio station.
- Long press the EQ / P.MODE button (1) to confirm.
- The unit can store up to 30 stations.
6. The ST indication on the display indicates the reception of the stereo signal.
Note: FM reception depends very much on the location of the device.
The proximity of TV sets, neon lamps or other domestic appliances may cause disturbances in the reception of radio programs,
in this case

10
XR 400 APP
ENGLISH
USB INPUT
1. Press the FUNC / STANDBY / LIGHT button (7) on the unit and select "USB".
2. Insert a USB memory into the USB input (10). Playback starts automatically.
3. To pause playback, press the // BT / SCAN (4) button, the display will start to flash.
4. To resume playback, press the // BT / SCAN key (4) again.
5. By pressing the button (3) during the listening, it goes to the next track, while with the button (2) to the previous tracks.
6. Press and hold the (3) or (2) button to skip to the next or previous 10th track.
7. By long pressing the EQ / P-MODE button (1) it is possible to activate the various repeat modes of the tracks.
To deactivate the repetition, press the EQ / P-MODE button (1) several times until the icon disappears from the display.
NOTE
- Do not use the USB CHARGE (11) port for audio playback.
- The player may not support some USB devices, this is due to the incompatibility of some processors.
- To avoid harmful interference, always connect USB devices directly to the unit, do not use extension cords.
BLUETOOTH OPERATION
1. Switch on the appliance and press the FUNC / STANDBY / LIGHT button (7) to select the bluetooth function, the message BT
appears on the display.
2. In Bluetooth mode, the indicator LED (13, PAIR) will start to flash, the system will automatically search.
3. Activate the Bluetooth functionality on the external device to be paired.
4. Start the device search. At the end select the "TREVI XR 400 APP" device.
Note: a second XR400APP device (without the word TREVI) may appear for the app to function. For the BT connection select
TREVI XR 400 APP.
5. Enter the password "0000" if required.
6. Start music playback from your device. Press the // BT / SCAN key (4) to activate the pause and the (2) or (3) keys to
select tracks.
7. Hold down the// BT / SCAN key (4) for a few seconds to eliminate the pairing and perform a new pairing operation.
AUX-IN
1. Press the FUNC / STANDBY / LIGHT button (7) on the unit to select "AUX" mode.
2. Connect any unit with audio output through the appropriate 3.5mm jack cable (not included) to the AUX input (9).
3. Adjust the external device from your commands.
"PARTY KING" APPLICATION
The application is only available in English for Android / iOS devices.
Tocontrolthedeviceviasmartphone,tablet,orotherdevices, downloadthe"PARTYKING"applicationfromtherespectivemarketstores.
The application will allow you to control the following modes: Player, Light, USB input, FM radio, Aux In input, equalizer.
Once the device is connected to the external device via Bluetooth connection (as described in the Bluetooth Operation section),
open the "PARTY KING" app on the smartphone / tablet.
Pairing the application to the device
After pairing the smartphone / tablet as described in the Bluetooth Operation paragraph, it is necessary to make a further coupling
of the application to the device:
1. Press the REFRESH button and when the XR 400 APP appears in the list of available devices, select it.
Once connected, the device will move to the list of connected devices (Connected device).

11
XR 400 APP
On the main screen there are 8 icons:
Playing back audio files on the phone:
Press the A icon to access the music playback page of the music files that are inside the phone. Select the song you want to play. It
is possible to pause the song, go to the previous / next song, activate repeat or random play. Press "<" to return to the main page.
Playing USB memory
Insert a USB memory into the unit, press the C icon to access USB memory playback. Choose a song to play from those shown
in the list, press "" to start playback, press "<" to return to the main page.
FM radio
Press the G icon to enter the FM Radio mode, press "SCAN" to start scanning and automatic storage.
Aux-in
After connecting as described in the AUX IN paragraph, press the H icon to access the AUX IN control page.
Led lighting control
Press the B icon to access the Light page, where you can select the color to be displayed on the unit, and adjust the brightness
(LUMIN control). It is also possible to choose between 5 preset profiles (Profiles). Through the OFF / ON command it is possible
to turn off or switch on the LED lighting.
To return to the main page, press "<" in the left corner.
A
B
C
D E
F
G
H
Storedradio
Manual tuning
Automatic tuning
ENGLISH

12
XR 400 APP
Equalizer and volume regulation
Press the F icon to access the equalizer control page (Equalizer) and to adjust the volume.
It is possible to set a personal equalization or select one of the 5 preset equalization modes: Flat, Pop, Classic, Jazz, Rock.
The volume of the appliance can be adjusted.
Settings
Press the E icon to get information about the application version.
SPECIFICATIONS
Power Supply: ...............100-240V ~ 50/60Hz - internal lead acid rechargeable battery 12V 4Ah
Consumption: ............................................................................... Max 35W
FM frequency: ...................................................................87,5 - 108,0 MHz
Maximum output power: .......................................................................................60W
Dimensions: ...................................................................480x210x220mm
Bluetooth transmission power: ...................................................................................2,5mW
Band transmission Bluetooth: ...................................................................................2,4GHz
Weight: .................................................................................... 5,5 kg
INFORMATION NOTE ON THE REMOVAL AND DISPOSAL OF BATTERIES
Warning: Only high-qualied personnel should perform this operation!
BATTERY REMOVAL
The appliance should not be plugged to the mains socket when performing this operation!
1. Remove the screws that secure the structure of the trolley and take it apart.
2. Remove the screws that secure the rear panel speaker amplified and remove the panel;
3. Locate the battery;
4. Remove the screws that secure the supports of the battery, remove the supports, disconnect the battery and remove it.
Used batteries should not be disposed of with household waste or thrown into fire or water. Used batteries should be recycled or
disposed of in separate waste collection centres.
ENGLISH

13
XR 400 APP
NOTES D’EMPLOI
Cet appareil est un instrument électronique de haute précision ; évitez donc de l’utiliser dans les cas suivants :
• Près de grosses sources de chaleur comme des radiateurs et des poêles.
• L'écoute d'un volume élevé pendant longtemps pourrait endommager votre audition.
• Dans des endroits très humides comme les salles de bains, les piscines, etc.
• Dans des endroits très poussiéreux.
• Dans des endroits exposés à de fortes vibrations.
• Placez l’appareil de sorte qu’il y ait toujours assez d’espace sur ses côtés pour laisser circuler librement l’air (au moins 5 cm).
• Ne bouchez pas les fentes d’aération.
• Gardez le haut-parleur de l'oreille pendant les étapes de mise au point des ajustements ponctuels et de volume, et en particulier
pour maintenir le volume à un minimum dans la phase d'allumage.
• Si des liquides pénètrent à l’intérieur de l’appareil, débranchez-le immédiatement et portez-le au centre d’assistance agréé TREVI
le plus proche.
• Contrôlez toujours, avant d’allumer l’appareil, que les câbles d’alimentation et les câbles de branchement sont correctement
installés.
• L'appareil ne doit pas être exposé à des éclaboussures d'eau. Aucun objet rempli de liquide, comme des vases, doivent être
placés sur l'appareil.
• Aucune source de flamme nue, telle que des bougies allumées, doivent être placés sur.
• Conservez ce manuel.
MANIEMENT ET ENTRETIEN
Pourlenettoyage,il estconseillé d’utiliserunchiffon douxlégèrementhumide. Évitezl’emploi desolvantsou desubstancesabrasives.
IMPORTANT
Cet appareil est conçu pour un usage domestique (usage non professionnel). La bonne fabrication de cet appareil garantit un fon-
ctionnement parfait pour une longue période. Si toutefois quelques inconvénients devaient se présenter, adressez-vous au Centre
d’Assistance agréé TREVI le plus proche.
TREVI observe une politique de recherche et de développement continus. C’est pourquoi ses produits peuvent présenter des
caractéristiques différentes par rapport à celles qui sont décrites.
DESCRIPTION DES CONNECTEURS ET DES COMMANDES
1. Bouton EQ / P-MODE
2. Bouton 9/-10
3. Bouton:/+ 10
4. Bouton//BT/SCAN
5. Touche de volume -
6. Touche de volume +
7. Bouton FUNC./STANDBY/LIGHT
8. Enceintes avant
9. Entrée AUX
10. Entrée USB
11.USBCHARGE,portpourlechargementdel'appareil externe
12. Protection
13. PAIR indicateur led
14. Indicateur LED de charge
15. Affichage
16. Poignée
17. Subwoofers passifs
18. Protection
19. Prise d'alimentation
20. Interrupteur ON / OFF
21. Antenne FM
FRANÇAIS

14
XR 400 APP
FRANÇAIS
PUISSANCE
Cette unité fonctionne avec une batterie rechargeable au plomb 12V 4Ah et une alimentation secteur 100-240V ~ 50 / 60Hz.
Lorsque la batterie est presque épuisée ou que l'appareil ne s'allume pas, branchez le cordon d'alimentation dans la prise (19) de
l'appareil et branchez-le sur une prise électrique pour le recharger.
Le voyant CHARGE s'allume:
- Témoin RED CHARGE: l'appareil est connecté au câble d'alimentation et la batterie est en charge.
- Voyant CHARGE GREEN: opération de charge terminée, la batterie est chargée.
- Le témoin RED CHARGE clignote: lorsque l'appareil est en cours d'utilisation, il indique que la batterie est presque épuisée et doit
être rechargée.
Ne branchez pas l'appareil sur des prises de courant autres que celles indiquées.
FONCTIONS DE BASE
ON / OFF
Appuyez sur l'interrupteur d'alimentation (20) et tournez-le en position ON / OFF pour allumer / éteindre l'appareil.
REMARQUE: Après environ 15 minutes d'inactivité, l'appareil passe automatiquement en mode veille.
Pour rallumer l'appareil, appuyez sur le bouton FUNC / STANDBY / LIGHT (7) ou tournez le contacteur d'allumage (20).
En cas de fonctionnement anormal de l'appareil, éteignez l'appareil, débranchez le cordon d'alimentation et attendez quelques
minutes avant de le rebrancher et d'allumer l'appareil.
RÉGLAGE DU MODE DE FONCTION
Pour changer le mode de fonctionnement, appuyez plusieurs fois sur le bouton FUNC / STANDBY / LIGHT (7) pour sélectionner
USB / AUX / RADIO / BLUETOOTH (BT apparaît sur l'affichage).
AJUSTEMENT DU VOLUME
Appuyez sur les touches Volume - (5) ou Volume + (6) pour régler le volume.
EGALISEUR
Cette unité a un système d'égalisation audio intégré. Appuyez sur le bouton EQ (1) pour sélectionner le réglage qui correspond le
mieux à la reproduction sonore actuelle. Il est possible de choisir entre égalisations FLAT, POP, CLASSIC, JAZZ, ROCK.
EFFETS DE LUMIÈRE DE DISQUE
Appuyez longuement sur le bouton FUNC / STANDBY / LIGHT (7) pour activer les effets Disco-Light. Vous pouvez choisir parmi
neuf effets différents.
Pour désactiver l'effet Disco-Light, maintenez la touche FUNC / STANDBY / LIGHT (7) enfoncée jusqu'à ce que l'écran affiche "OFF".
SORTIE DE CHARGE USB
Il est possible d'utiliser la prise USB CHARGE (11) pour charger des périphériques USB externes.
Note1: il n'est pas possible d'utiliser cette prise pour lire des fichiers audio à partir d'appareils externes (utilisez l'entrée USB, voir
le chapitre USB INPUT).
RADIO FM
1. Appuyez sur le bouton FUNC / STANDBY / LIGHT (7) de l'appareil et sélectionnez la fonction radio (l'affichage indique la fréquence
accordée et l'indication FM).
2. Maintenez la touche // BT / SCAN (4) enfoncée pendant quelques secondes pour rechercher et mémoriser automatiquement
les stations de radio; la recherche / mémorisation s'arrêtera à la fin du balayage complet de la bande radio ou du remplissage
de toutes les mémoires disponibles. Il est possible de mémoriser jusqu'à 30 stations de radio au maximum. A la fin, la première
station de radio enregistrée sera jouée.
3. Pour rappeler une station mémorisée, utilisez les touches (3) pour passer à la station suivante ou (2) pour passer à la station
précédente.
4. Maintenez les touches (3) ou (2) de l'appareil enfoncées pendant quelques secondes pour syntoniser la station de radio suivante
ou précédente avec le meilleur signal reçu.
5. Pour stocker une station de radio:
- Aller à la fréquence à mémoriser, appuyer longuement sur la touche EQ / P.MODE (1).
- A l'aide des touches (3) ou (2), sélectionnez le numéro de mémoire où vous voulez enregistrer la station de radio.
- Appuyez longuement sur le bouton EQ / P.MODE (1) pour confirmer.
- L'appareil peut stocker jusqu'à 30 stations.
6. L'indication ST sur l'affichage indique la réception du signal stéréo.
Remarque: la réception FM dépend beaucoup de l'emplacement de l'appareil.
La proximité de téléviseurs, de lampes au néon ou d'autres appareils domestiques peut provoquer des perturbations dans la
réception des programmes radio, dans ce cas

15
XR 400 APP
ENTREE USB
1. Appuyez sur le bouton FUNC / STANDBY / LIGHT (7) de l'appareil et sélectionnez "USB".
2. Insérez une clé USB dans l'entrée USB (10). La lecture commence automatiquement.
3. Pour interrompre la lecture, appuyez sur la touche // BT / SCAN (4), l'affichage commencera à clignoter.
4. Pour reprendre la lecture, appuyez à nouveau sur la touche // BT / SCAN (4).
5. En appuyant sur le bouton (3) pendant l'écoute, il passe à la plage suivante, tandis que la touche (2) permet d'accéder aux
plages précédentes.
6. Appuyez sur le bouton (3) ou (2) et maintenez-le enfoncé pour passer à la 10e piste suivante ou précédente.
7. En appuyant longuement sur le bouton EQ / P-MODE (1), il est possible d'activer les différents modes de répétition des pistes.
Pour désactiver la répétition, appuyez plusieurs fois sur la touche EQ / P-MODE (1) jusqu'à ce que l'icône disparaisse de l'affi-
chage.
NOTES
- N'utilisez pas le port USB CHARGE (11) pour la lecture audio.
- Le lecteur peut ne pas supporter certains périphériques USB, cela est dû à l'incompatibilité de certains processeurs.
-Pouréviterlesinterférences nuisibles,connecteztoujourslespériphériques USBdirectementàl'unité,n'utilisez pasderallonges.
FONCTIONNEMENT BLUETOOTH
1. Allumez l'appareil et appuyez sur le bouton FUNC / STANDBY / LIGHT (7) pour sélectionner la fonction Bluetooth, le message
BT apparaît sur l'affichage.
2. En mode Bluetooth, le voyant DEL (13, PAIR) commencera à clignoter, le système recherchera automatiquement.
3. Activez la fonctionnalité Bluetooth sur l'appareil externe à jumeler.
4. Lancez la recherche de l'appareil. A la fin, sélectionnez l'appareil "TREVI XR 400 APP".
Remarque: un deuxième appareil XR400APP (sans le mot TREVI) peut apparaître pour que l'application fonctionne. Pour la con-
nexion BT, sélectionnez TREVI XR 400 APP.
5. Entrez le mot de passe "0000" si nécessaire.
6. Lancez la lecture de musique à partir de votre appareil. Appuyez sur la touche // BT / SCAN (4) pour activer la pause et
sur les touches (2) ou (3) pour sélectionner les pistes.
7. Maintenez la touche // BT / SCAN (4) enfoncée pendant quelques secondes pour éliminer le couplage et effectuer une
nouvelle opération de couplage.
AUX-IN
1. Appuyez sur le bouton FUNC / STANDBY / LIGHT (7) de l'appareil pour sélectionner le mode "AUX".
2. Connectez l'unité avec la sortie audio via le câble jack 3,5 mm approprié (non fourni) à l'entrée AUX (9).
3. Ajustez le périphérique externe à partir de vos commandes.
CONTRÔLE D'APPAREIL PAR L'APPLICATION "PARTY KING"
L'application est uniquement disponible en anglais pour les appareils Android / iOS.
Pour contrôler l'appareil via un smartphone, une tablette ou d'autres appareils, téléchargez l'application "PARTY KING" dans les
magasins du marché.
L'application vous permettra de contrôler les modes suivants: Lecteur, Lumière, Entrée USB, Radio FM, Entrée Aux In, égaliseur.
Une fois que l'appareil est connecté à l'appareil externe via la connexion Bluetooth (comme décrit dans la section Fonctionnement
Bluetooth), ouvrez l'application "PARTY KING" sur le smartphone / tablette.
Associer l'application à l'appareil
Après l'appariement du smartphone / tablette comme décrit dans le paragraphe Opération Bluetooth, il est nécessaire de faire un
couplage supplémentaire de l'application à l'appareil:
- Appuyez sur le bouton REFRESH et lorsque l'APP XR 400 apparaît dans la liste des périphériques disponibles, sélectionnez-le.
Une fois connecté, l'appareil se déplacera vers la liste des appareils connectés (appareil connecté).
FRANÇAIS

16
XR 400 APP
Sur l'écran principal, il y a 8 icônes:
Lecture de fichiers audio sur le téléphone:
Appuyez sur l'icône A pour accéder à la page de lecture de musique des fichiers musicaux qui se trouvent dans le téléphone.
Sélectionnez la chanson que vous voulez jouer. Il est possible de mettre en pause la chanson, d'aller à la chanson précédente /
suivante, d'activer la répétition ou la lecture aléatoire. Appuyez sur "<" pour revenir à la page principale.
Lecture de la mémoire USB
Insérez une mémoire USB dans l'appareil, appuyez sur l'icône C pour accéder à la lecture de la mémoire USB. Choisissez une chan-
son parmi celles affichées dans la liste, appuyez sur "" pour démarrer la lecture, appuyez sur "<" pour revenir à la page principale.
Radio FM
Appuyez sur l'icône G pour passer en mode Radio FM, appuyez sur "SCAN" pour démarrer la numérisation et le stockage automatique.
Aux-in
Après la connexion comme décrit dans le paragraphe AUX IN, appuyez sur l'icône H pour accéder à la page de contrôle AUX IN.
A
B
C
D E
F
G
H
Accès direct aux stations de radio
Recherche manuelle
Recherche automatique
FRANÇAIS

17
XR 400 APPFRANÇAIS
Commande d'éclairage Led
Appuyez sur l'icône B pour accéder à la page Lumière, où vous pouvez sélectionner la couleur à afficher sur l'appareil et régler la
luminosité (contrôle LUMIN). Il est également possible de choisir entre 5 profils prédéfinis (Profils). Grâce à la commande OFF /
ON, il est possible d'éteindre ou d'allumer l'éclairage LED.
Pour revenir à la page principale, appuyez sur "<" dans le coin gauche.
Equalizer et régulation du volume
Appuyez sur l'icône F pour accéder à la page de contrôle de l'égaliseur (Equalizer) et pour régler le volume.
Il est possible de régler une égalisation personnelle ou de sélectionner l'un des 5 modes d'égalisation prédéfinis: Plat, Pop, Clas-
sique, Jazz, Rock.
Le volume de l'appareil peut être ajusté.
réglages
Appuyez sur l'icône E pour obtenir des informations sur la version de l'application.
CARACTÉRISTIQUES
Alimentation: 100-240V ~ 50/60Hz - rechargeable batterie au plomb 12V 4Ah
Consommation: ............................................................................... Max 35W
Puissance de sortie maximale: .......................................................................................60W
Dimensions: ...................................................................480x210x220mm
Fm frequency: ...................................................................87,5 - 108,0 MHz
Bluetooth de puissance d'émission de crête:..................................................................2,5mW
Transmission de bande Bluetooth:................................................................................ 2,4GHz
Poids: ................................................................................... 5,5 kg
NOTE D'INFORMATION SUR LE RETRAIT ET ÉLIMINATION DES BATTERIES
Attention: Seul le personnel de haute qualié doit effectuer cette opération!
RETRAIT DE LA BATERIE
L'appareil ne doit pas être branché à la prise de courant lors de l'exécution de cette opération!
1. Retirer les vis qui fixent la structure du chariot et de le démonter.
2. Retirer les vis qui fixent le haut-parleur amplifié panneau arrière et retirez le panneau;
3. Repérez la pile;
4. Retirer les vis qui fixent les supports de la batterie, retirer les supports, débrancher la batterie et retirez-le.
Les piles usagées ne doivent pas être jetés avec les déchets ménagers ou jetés dans le feu ou l'eau. Les batteries usagées doivent
être recyclés ou éliminés dans les centres de collecte de déchets séparés.

18
XR 400 APP
DEUTSCH
GEBRAUCHSHINWEISE
Dieses Gerät ist ein elektronisches Instrument höchster Präzision. Die Inbetriebnahme des Geräts sollte daher in den folgenden Fällen vermieden werden:
• In der Nähe von Wärmequellen wie Heizkörpern und Öfen.
• Das Hören einer hohen Lautstärke für eine lange Zeit kann Ihr Gehör schädigen.
• In sehr feuchten Räumen wie Badezimmern, Schwimmbädern usw.
• In sehr staubigen Räumen.
• An Orten, die starken Schwingungen ausgesetzt sind.
• Das Gerät sollte so aufgestellt werden, dass an den Seiten jeweils genügend Raum verbleibt, um eine freie Luftzirkulation zu ermöglichen (min-
destens 5 cm).
• Die Ventilationsöffnungen dürfen nicht abgedeckt werden.
• Halten Sie das Ohr Lautsprecher während der Schritte des Brennpunkts und Volumenanpassungen , insbesondere die Lautstärke auf ein Minimum
in der Zündungsphase zu halten.
• Sollten Flüssigkeiten ins Innere des Geräts eindringen, den Stecker von der Steckdose unmittelbar abziehen und sich an die nächstgelegene
autorisierte TREVI-Kundendienststelle wenden.
• Vor dem Einschalten des Geräts ist sicherzustellen, dass Netzkabel und Anschlusskabel korrekt installiert sind.
• Das Gerät darf nicht mit Wasser oder Spritzwasser ausgesetzt werden. Keine Gegenstände, die mit Flüssigkeit gefüllt ist, wie Vasen, auf das Gerät
gestellt werden.
• Keine offenen Flammen, wie brennende Kerzen, platziert werden.
• In diesem Handbuch halten.
PFLEGE UND WARTUNG
Für die Reinigung wird die Verwendung eines leicht angefeuchteten, weichen Tuchs empfohlen. Der Einsatz von Lösungsmitteln
oder scheuernden Substanzen sollte vermieden werden.
WICHTIG
Dieses Gerät ist für den Heimgebrauch (nicht professionellen Gebrauch). Der fachgemäße Bau dieses Geräts gewährleistet langfristig
einen einwandfreien Betrieb. Sollten dennoch Betriebsstörungen auftreten, wenden Sie sich bitte an nächstgelegene autorisierte
TREVI-Kundendienststelle.
Die Firma TREVI verfolgt eine Politik ständiger Forschung und Weiterentwicklung. Die Produkte können daher andere als die be-
schriebenen Eigenschaften aufweisen.
BESCHREIBUNG DER ANSCHLÜSSE/BEDIENELEMENTE
1. Taste EQ / P-MODUS
2. Taste 9/ -10
3. Taste:/ + 10
4. Taste// BT / SCAN
5. Lautstärketaste -
6. Lautstärketaste +
7. Taste FUNC./STANDBY/LIGHT
8. Frontlautsprecher
9. AUX-Eingang
10. USB-Eingang
11. USB CHARGE, Anschluss für das Aufladen externer Geräte
12. Gummischutz
13. PAAR LED-Anzeige
14. Lade LED-Anzeige
15. Anzeige
16. Griff
17. Passive Subwoofer
18. Gummischutz
19. Stromversorgungsbuchse
20. EIN / AUS-Schalter
21. UKW-Antenne

19
XR 400 APPDEUTSCH
ENERGIE
Dieses Gerät arbeitet mit 12V 4Ah Blei-Säure-Akku und 100-240V ~ 50 / 60Hz Netzteil.
Wenn der Akku leer ist oder sich das Gerät nicht einschaltet, stecken Sie das Netzkabel in die Buchse (19) am Gerät und stecken
Sie es in eine Steckdose, um es aufzuladen.
CHARGE LED leuchtet Status:
- ROTE LADE-Lampe: Das Gerät ist an das Stromkabel angeschlossen und der Akku wird geladen.
- CHARGE GREEN LED leuchtet: Ladevorgang abgeschlossen, Akku ist geladen.
- ROTES LADEN-Lämpchen blinkt: Wenn das Gerät in Betrieb ist, bedeutet dies, dass der Akku leer ist und aufgeladen werden muss.
Schließen Sie das Gerät nicht an andere als die angegebenen Steckdosen an.
GRUNDFUNKTIONEN
ON / OFF
Drücken Sie den Netzschalter (20) und drehen Sie ihn in die Position ON / OFF, um das Gerät ein- / auszuschalten.
HINWEIS: Nach ungefähr 15 Minuten Inaktivität schaltet das Gerät automatisch in den Standby-Modus.
Um das Gerät wieder einzuschalten, drücken Sie die Taste FUNC / STANDBY / LIGHT (7) oder drehen Sie den Zündschalter (20).
Schalten Sie das Gerät aus, ziehen Sie das Netzkabel ab und warten Sie einige Minuten, bevor Sie das Gerät wieder anschließen
und das Gerät einschalten.
FUNKTIONSMODUS EINSTELLUNG
Um den Betriebsmodus zu ändern, drücken Sie mehrmals die Taste FUNC / STANDBY / LIGHT (7), um USB / AUX / RADIO / BLUE-
TOOTH zu wählen (BT erscheint auf dem Display).
LAUTSTÄRKEEINSTELLUNG
Drücken Sie die Tasten Volume - (5) oder Volume + (6), um die Lautstärke einzustellen.
EQUALIZER
Dieses Gerät verfügt über ein integriertes Audio-Equalizer-System. Drücken Sie die EQ-Taste (1), um eine Einstellung auszuwählen,
die der aktuellen Klangwiedergabe am besten entspricht. Es ist möglich zwischen FLAT-, POP-, CLASSIC-, JAZZ- und ROCK-
Entzerrungen zu wählen.
DISK-LICHTEFFEKTE
Drücken Sie lange die Taste FUNC / STANDBY / LIGHT (7), um die Disco-Light-Effekte zu aktivieren. Sie können aus neun verschie-
denen Effekten wählen.
Um den Disco-Light-Effekt zu deaktivieren, drücken und halten Sie die Taste FUNC / STANDBY / LIGHT (7) so oft, bis das Display
"OFF" anzeigt.
USB Ladeausgang
Es ist möglich, die USB CHARGE (11) Buchse zu benutzen, um externe USB Geräte zu laden.
Hinweis1: Es ist nicht möglich, diesen Anschluss für die Wiedergabe von Audiodateien von externen Geräten zu verwenden (verwen-
den Sie den USB-Eingang, siehe Kapitel USB-EINGANG).
FM Radio
1. Drücken Sie die Taste FUNC / STANDBY / LIGHT (7) am Gerät und wählen Sie die Radiofunktion (das Display zeigt die eingestellte
Frequenz und FM-Anzeige).
2.Halten SiedieTaste//BT/ SCAN(4)einigeSekundenlanggedrückt,um Radiosenderautomatischzu suchenund zuspeichern.
Die Suche / Speicherung wird nach Beendigung des gesamten Radio-Band-Scans oder dem Füllen aller verfügbaren Speicher
beendet. Es ist möglich, bis zu 30 Radiosender zu speichern. Am Ende wird der erste gespeicherte Radiosender abgespielt.
3. Um einen gespeicherten Sender abzurufen, verwenden Sie die Tasten (3) um zum nächsten Sender zu gehen, oder (2), um zum
vorherigen Sender zu gehen.
4. Halten Sie die Tasten (3) oder (2) am Gerät einige Sekunden lang gedrückt, um den nächsten oder vorherigen Radiosender mit
dem besten empfangenen Signal einzustellen.
5. Um einen Radiosender zu speichern:
- Gehen Sie zu der zu speichernden Frequenz und drücken Sie lange auf die Taste EQ / P.MODE (1).
- Wählen Sie mit den Tasten (3) oder (2) die Speichernummer, unter der Sie den Radiosender speichern möchten.
- Drücken Sie lange die EQ / P.MODE-Taste (1) zur Bestätigung.
- Das Gerät kann bis zu 30 Stationen speichern.
6. Die ST-Anzeige auf dem Display zeigt den Empfang des Stereosignals an.
Hinweis: Der UKW-Empfang hängt stark vom Standort des Geräts ab.
Die Nähe von Fernsehgeräten, Neonröhren oder anderen Haushaltsgeräten kann in diesem Fall Störungen beim Empfang von
Radioprogrammen verursachen

20
XR 400 APP
DEUTSCH
USB-EINGANG
1. Drücken Sie die Taste FUNC / STANDBY / LIGHT (7) am Gerät und wählen Sie "USB".
2. Stecken Sie einen USB-Speicher in den USB-Eingang (10). Die Wiedergabe startet automatisch.
3. Um die Wiedergabe anzuhalten, drücken Sie die Taste// BT / SCAN (4). Das Display beginnt zu blinken.
4. Um die Wiedergabe fortzusetzen, drücken Sie erneut die Taste// BT / SCAN (4).
5. Durch Drücken der Taste (3) während des Abhörens geht es zum nächsten Titel, während mit der Taste (2) zu den vorherigen
Titel gesprungen wird.
6. Halten Sie die Taste (3) oder (2) gedrückt, um zum nächsten oder vorherigen 10. Titel zu springen.
7. Durch langes Drücken der Taste EQ / P-MODE (1) können Sie die verschiedenen Wiederholungsmodi der Spuren aktivieren.
Um die Wiederholung zu deaktivieren, drücken Sie mehrmals die Taste EQ / P-MODE (1), bis das Symbol aus dem Display
verschwindet.
NOTES
- Verwenden Sie den USB CHARGE (11) -Anschluss nicht für die Audiowiedergabe.
- Der Player unterstützt möglicherweise einige USB-Geräte nicht, dies liegt an der Inkompatibilität einiger Prozessoren.
- Um schädliche Interferenzen zu vermeiden, schließen Sie USB-Geräte immer direkt an das Gerät an, verwenden Sie keine
Verlängerungskabel.
BLUETOOTH-BETRIEB
1. Schalten Sie das Gerät ein und drücken Sie die Taste FUNC / STANDBY / LIGHT (7), um die Bluetooth-Funktion auszuwählen.
Die Meldung BT erscheint auf dem Display.
2. Im Bluetooth-Modus beginnt die Anzeige-LED (13, PAIR) zu blinken, das System sucht automatisch.
3. Aktivieren Sie die Bluetooth-Funktionalität auf dem externen Gerät, das gepaart werden soll.
4. Starten Sie die Gerätesuche. Am Ende wählen Sie das Gerät "TREVI XR 400 APP".
Hinweis: Möglicherweise wird ein zweites XR400APP-Gerät (ohne das Wort TREVI) angezeigt, damit die App funktioniert. Wählen
Sie für die BT-Verbindung TREVI XR 400 APP.
5. Geben Sie bei Bedarf das Passwort "0000" ein.
6. Starten Sie die Musikwiedergabe von Ihrem Gerät. Drücken Sie die Taste // BT / SCAN (4), um die Pause zu aktivieren, und
die Tasten (2) oder (3), um Titel auszuwählen.
7. Halten Sie die Taste // BT / SCAN (4) einige Sekunden lang gedrückt, um das Pairing zu beenden und einen neuen Pairing-
Vorgang durchzuführen.
AUX-IN
1. Drücken Sie die Taste FUNC / STANDBY / LIGHT (7) am Gerät, um den Modus "AUX" auszuwählen.
2. Schließen Sie ein Gerät mit Audioausgang über das entsprechende 3,5-mm-Klinkenkabel (nicht im Lieferumfang enthalten) an
den AUX-Eingang (9) an.
3. Passen Sie das externe Gerät anhand Ihrer Befehle an.
GERÄTEKONTROLLE DURCH "PARTY KING" ANWENDUNG
Die Anwendung ist nur in Englisch für Android / iOS-Geräte verfügbar.
Um das Gerät per Smartphone, Tablet oder anderen Geräten zu steuern, laden Sie die Anwendung "PARTY KING" von den jeweiligen
Marktgeschäften herunter.
Mit der Anwendung können Sie die folgenden Modi steuern: Player, Light, USB-Eingang, UKW-Radio, Aux-Eingang, Equalizer.
Sobald das Gerät über eine Bluetooth-Verbindung mit dem externen Gerät verbunden ist (wie im Abschnitt Bluetooth-Bedienung
beschrieben), öffnen Sie die App "PARTY KING" auf dem Smartphone / Tablet.
Koppeln der Anwendung mit dem Gerät
Nach der Kopplung des Smartphones / Tablets, wie im Abschnitt Bluetooth-Bedienung beschrieben, muss eine weitere Kopplung
der Anwendung mit dem Gerät durchgeführt werden:
- Drücken Sie die Taste REFRESH, und wenn die XR 400 APP in der Liste der verfügbaren Geräte angezeigt wird, wählen Sie sie aus.
Sobald die Verbindung hergestellt ist, wechselt das Gerät zur Liste der verbundenen Geräte (verbundenes Gerät).
Table of contents
Languages:
Other Trevi Portable Speakers manuals

Trevi
Trevi XF 600 KB User manual

Trevi
Trevi XF 440 KB User manual

Trevi
Trevi XF 300 POP User manual

Trevi
Trevi XF 1300 BEACH User manual

Trevi
Trevi XF 1500 KB User manual

Trevi
Trevi XF 1000KB User manual

Trevi
Trevi XF 3800 PRO User manual

Trevi
Trevi XF 470 KB User manual

Trevi
Trevi XF 800 User manual

Trevi
Trevi XF 4100 PRO User manual

Trevi
Trevi XF 350 User manual

Trevi
Trevi XF 550 APP User manual

Trevi
Trevi XR 84 BT User manual

Trevi
Trevi XF 1560 KB User manual

Trevi
Trevi XF 3400 PRO User manual

Trevi
Trevi XF 300 User manual

Trevi
Trevi XF 3200 PRO User manual

Trevi
Trevi XF 950 KB User manual

Trevi
Trevi XF 1550 KB User manual

Trevi
Trevi XF 1800KB User manual