9
XF 4200 DJ
ITALIANO
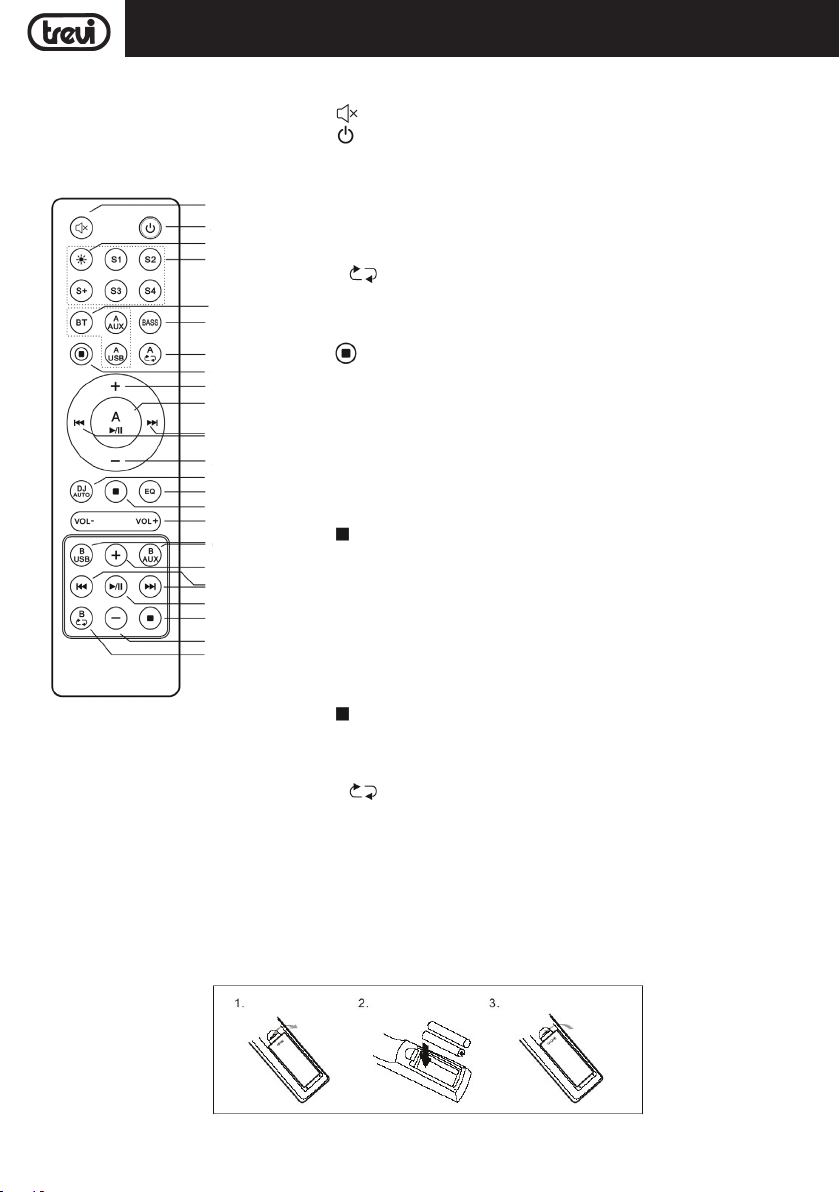
4. Premere il tasto
della
tastiera di controllo(6)
sull'unità, oppure il tasto
A
(41) sul telecomando per avviare la riprodu-
zione
;
5. Premerlo nuovamente mettere in pausa la riproduzione, ripremerlo per riprendere la normale riproduzione;
6. Premere il tasto Stop(5) sull'unità, oppure il tasto(46) sul telecomado per arrestare completamente la riproduzione;
7. Premere i tasti , (6) sull'unità, oppure i tasti :, 9(42) sul telecomando durante l’ascolto per passare alla traccia
precedente/successiva;
8. Premere i tasti -/+
della
tastiera di controllo(6)
sull'unità, oppure i tasti +(40) e -(43)
sul telecomando per passare alla cartella
precedente/successiva;
9. Premere una volta il tasto A (38) sul telecomando, sul display comparirà la scritta "RPT ONE", per riprodurre continua-
mente la stessa traccia; premerlo una seconda volta, sul display comparirà la scritta "RPT ALL", per riprodurre continuamente
tutti brani contenuti nella cartella o nel dispositivo USB. Premerlo una terza volta, sul display comparirà la scritta "RANDOM",
per riprodurre i brani in maniera casuale; premerlo una quarta volta, sul display comparirà la scritta "OFF", funzione ripetizione
disinserita.
CANALE B
3. Spostare il controllo bilanciamento(8) sull'unità verso destra (Canale B);
4. Premereiltasto
della
tastieradi controllo(11)
sull'unità, oppureiltasto
(51)sul telecomandoperavviarelariproduzione
;
5. Premerlo nuovamente mettere in pausa la riproduzione, ripremerlo per riprendere la normale riproduzione;
6. Premere il tasto Stop(12) sull'unità, oppure il tasto(52) sul telecomado per arrestare completamente la riproduzione;
7. Premere i tasti , (11) sull'unità, oppure i tasti :, 9(50) sul telecomando durante l’ascolto per passare alla traccia
precedente/successiva;
8. Premere i tasti -/+
della
tastiera di controllo(11)
sull'unità, oppure i tasti +(49) e -(53)
sul telecomando per passare alla cartella
precedente/successiva;
9. Premere una volta il tasto B (54) sul telecomando, sul display comparirà la scritta "RPT ONE", per riprodurre continua-
mente la stessa traccia; premerlo una seconda volta, sul display comparirà la scritta "RPT ALL", per riprodurre continuamente
tutti brani contenuti nella cartella o nel dispositivo USB. Premerlo una terza volta, sul display comparirà la scritta "RANDOM",
per riprodurre i brani in maniera casuale; premerlo una quarta volta, sul display comparirà la scritta "OFF", funzione ripetizione
disinserita.
Nota:
- Il lettore potrebbe non supportare alcuni dispositivi USB, questo è dovuto all'incompatibilità di alcuni processori.
- Per evitare interferenze dannose, collegare sempre le periferiche USB direttamente all'unità, non utilizzare cavi di prolunga.
- Dal computer formattare le memorie USB in FAT (16 o 32).
AUX-IN
1. Collegare una qualsiasi unità provvista di uscita audio tramite l'apposito cavo Jack da 3,5mm all'ingresso AUX IN-A(30) canale
A o AUX IN-B(30) canale B;
2. Accendere l'apparecchio e spostare il controllo bilanciamento(8) sull'unità verso sinistra (Canale A) o destra (Canale B) a seconda
dell'ingresso AUX-IN collegato;
3. Premere il tasto M(7) o M(10) sull'unità e selezionare la funzione "AUX"; o premere direttamente il tasto A AUX(36) o B AUX(48)
sul telecomando;
4. Regolare il dispositivo esterno dai propri comandi.
UTILIZZO DEL MICROFONO CON CAVO
1. Collegare il microfono con cavo (in dotazione) alla presa MIC1(23) o MIC2(21);
2. Accendere il microfono agendo sull'interruttore presente sul manico del microfono stesso portandolo in posizione ON;
3. Regolare il volume di ingresso del microfono, tramite il comando(22) sull'unità.
Nota: E' possibile utilizzare due microfoni contemporaneamente.
REGISTRAZIONE
È possibile registrare la traccia riprodotta dal canale B (USB o AUX-IN) o dal canale A (AUX-IN). La registrazione viene effettuata
solamente su USB A.
La prima volta che si registra su un dispositivo USB, viene creata automaticamente una cartella chiamata "EXT_REC" all'interno del
dispositivo e, ogni volta che si registra, i file vengono memorizzati e nominati numericamente nell'ordine in cui sono stati creati.
1. Collegare una memoria USB alla presa USB canale A(1), tutti i file audio verranno salvati su questa memoria;