JBL Active-1 User manual

Owners Manual
Active Monitor Controller

2
Important Safety Instructions
CAUTION: To reduce the risk of electrical shock, do not remove the cover or rear panel of this unit.
No user serviceable parts inside. Please refer servicing to qualied personnel only.
WARNING: To reduce the risk of re or electrical shock, do not expose this appliance to rain or moisture.
DETAILED SAFETY INSTRUCTIONS:
All safety and operation instructions of this manual should be read and adhered to before operation.
Retain Instructions:
Please retain all safety and operating instructions for future reference.
Follow Instructions:
All operation and user instructions should be followed.
Water, Liquid and Moisture:
The appliance should not be used near water, rain or other liquids. Make sure that no liquid can leak, spill
or otherwise seep intothe appliance.
Ventilation:
Please place the appliance so no obstacles interfere or impede the ow of air through the ventilation openings.
Heat:
The appliance should be situated away from other heat sources such as heaters, radiators, ovens, or other appliances
that produce heat.
Power Source:
Make sure your appliance is set to the correct voltage for the country in which it will be use before switching the device ON.
Grounding and Polarization:
Precautions should be taken so that the grounding or polarization means of an appliance is not defeated.
Power-Cord Protection:
Power supply cords should be routed so that they are not likely to be walked on, pinched, damaged, worn, or rubbed
by any other device or obstacle.
Cleaning:
The appliance should be cleaned only with a light soft cloth. Do not use any damaging or corrosive products on the unit.
Periods of inactivity:
The power cord of the appliance should be unplugged from the outlet when left unused for a long period of time or in
case a lightning storm occurs.
Damage Requiring Service:
The appliance should be serviced by qualied service personnel when:
• The power supply cord or the plug has been damaged; or
• Objects have fallen, or liquid has been spilled into the appliance; or
• The appliance has been exposed to rain; or
• The appliance does not appear to operate normally or exhibits a marked change in performance; or
• The appliance has been dropped, or the enclosure damaged.
Servicing:
The user should not attempt to service the appliance beyond that is described in the Operating Instructions.
All other servicing should be referred to qualified service personnel.

3
Contents
Important Safety Instructions ..................................................................................... 2
Introduction ................................................................................................................ 4
Connections ................................................................................................................ 5
Mains Power ......................................................................................................... 5
Sources (Inputs) .................................................................................................... 6
Outputs ................................................................................................................. 6
Footswitch (Talk Back Control) ............................................................................. 7
+4/-10 dB Switch .................................................................................................. 7
Front Panel ................................................................................................................. 8
Input Selector ........................................................................................................ 8
Headphone Ampliers ........................................................................................... 8
Dim Switch ............................................................................................................ 9
Mute Switch .......................................................................................................... 9
Mono Switch ......................................................................................................... 9
Volume Control ..................................................................................................... 9
Talkback Assignment Switches ........................................................................... 10
Monitor Select Switches ...................................................................................... 10
Applications .............................................................................................................. 11
Specifications ........................................................................................................... 12
JBL Service Contact Information ........................................................................... 14
Product Warranty Information ................................................................................ 15

4
Introduction
Thank you for selecting the JBL Active 1. This product is designed to deliver optimal performance, functionality and
years of reliable operation . To enjoy all the benets of the Active 1, please take a moment to read this document.
The versatile JBL ACTIVE-1 provides essential monitoring functions that enhance the work ow in professional
recording, post production and broadcast applications, making it a valuable control room upgrade. The ACTIVE-1
accommodates four input sources (3 x stereo analog and 1 x USB) and provides three stereo analog outputs plus
USB. In addition to allowing seamless A/B switching of input signals and monitor systems, the ACTIVE-1 delivers a
full complement of audio monitoring functions, including a precision volume control, mono summing, mute and dim.
A footswitch activated talk back system with an integrated condenser microphone allows communication with talent
via the ACTIVE-1 headphone outputs, while routing voice "slates" to recording devices.
The ACTIVE-1 was designed with computer audio production in mind. On-board USB I/O provides a direct interface
of the ACTIVE-1 to a computer, allowing computer system recording of all the input sources connected to the
ACTIVE-1. At the same time, the USB functionality allows monitoring of the mix created on the computer.
Housed in a sturdy metal chassis and tted with an array of switches and secure connectors, the ACTlVE-1 is built
to provide years of reliable operation.
JBL may update the contents of this manual without prior notice. The most recent version of this manual can be
downloaded from the JBL Professional Website at www.jblpro.com
The Active 1 packaging was designed to protect the product from shipping damage. Nevertheless, we recommend
that you carefully examine the packaging and its contents for any signs of physical damage, which may have
occurred in transit. If, upon arrival, the units exhibits damage, please notify your dealer and the shipping company
immediately.

5
Connections (rear panel)
Mains Power
The ACTIVE-1 includes an external AC power supply. The power LED on the front panel (to the left of the volume
knob) will illuminate when the external power supply is connected and mains power is present. Please ensure the
correct power supply is used with the ACTIVE-1 and that the power rating on the provided power supply suites
your AC power outlet. Please make sure your Mains voltage is compatible with the provided adaptor.

6
Inputs
Three sets of input connectors are provided to allow connection of three signal sources. Input types for the three
sources are as follows.
•Source A: Stereo RCA inputs
•Sources B and C: Two stereo sets of 1/4-inch (6.5 mm) input connectors
•Source D is the USB input. The USB input has a built in Legacy compatible driver for simple plug & play
operation. The USB input does not need mains power to operate. An ASIO driver is also available for
download from the JBL Professional website at www.jblpro.com.
Outputs
Three sets of output connectors are provided to allow ACTIVE-1 connection to powered studio monitors, PA
speakers, mixers and recording equipment. Input types for the three sources are as follows: They are line level signal
for plugging in your active studio monitors or to the inputs of a power amplier that is driving your passive monitors.
• Outputs A and B: Two stereo sets of 1/4-inch (6.5mm) TRS connectors.
• Output 2T (2 Track): 1/4-inch (6.5mm) TRS connectors that can include the talkback signal.
• Source D is the USB output with Legacy driver built in. USB does not need mains power to operate.
USB output caries the same signal that is selected using the MAIN SOURCE input.

7
TALK BACK Foot Switch Jack
You can connect a foot switch with two-conductor (Tip/Sleeve) plug to this 1/4-inch (6.5mm) jack. (optional and not
included with ACTIVE-1*) Depressing the foot switch will activate the Talk Back system.
* A momentary PRESS-AND-HOLD type of foot pedal is commonly used with electronic musical keyboards.
Alternately, if you prefer a PRESS-ON, PRESS-OFF (latching-type) foot switch, these are commonly used to
activate effects processing in guitar ampliers. Consult with your dealer for options.
+4/-10dB Output Level Switch
This switch is used to select the output level to allow compatibility with professional and consumer products with
varied input sensitivities.

8
Front Panel
Switches
Use these switches to select input signal you wish to monitor.
Headphone Amplifiers
There are two independent headphone ampliers provided on the ACTIVE-1. Each with its own volume control

9
Dim Switch
Activate this switch to decrease the level of the outputs by 20db. The DIM feature effectively reduces the output
signal and therefore the listening level to allow discussion in the control room without having to change the position
of the volume knob.
Mute Switch
Activate this switch to prevent signal output.
Mono Switch
Activate this switch to listen to the audio outputs in monophonic mode. This combines the stereo audio signal into
a monophonic signal, which is useful when checking for any phase cancellation issues in the stereo signal.
Volume Control
As it is an ACTIVE device, the ACTIVE-1’s Volume control, controls an electronic circuit, which in turn adjusts the
level of the audio going through the device, providing gain increase as well as attenuation.
10
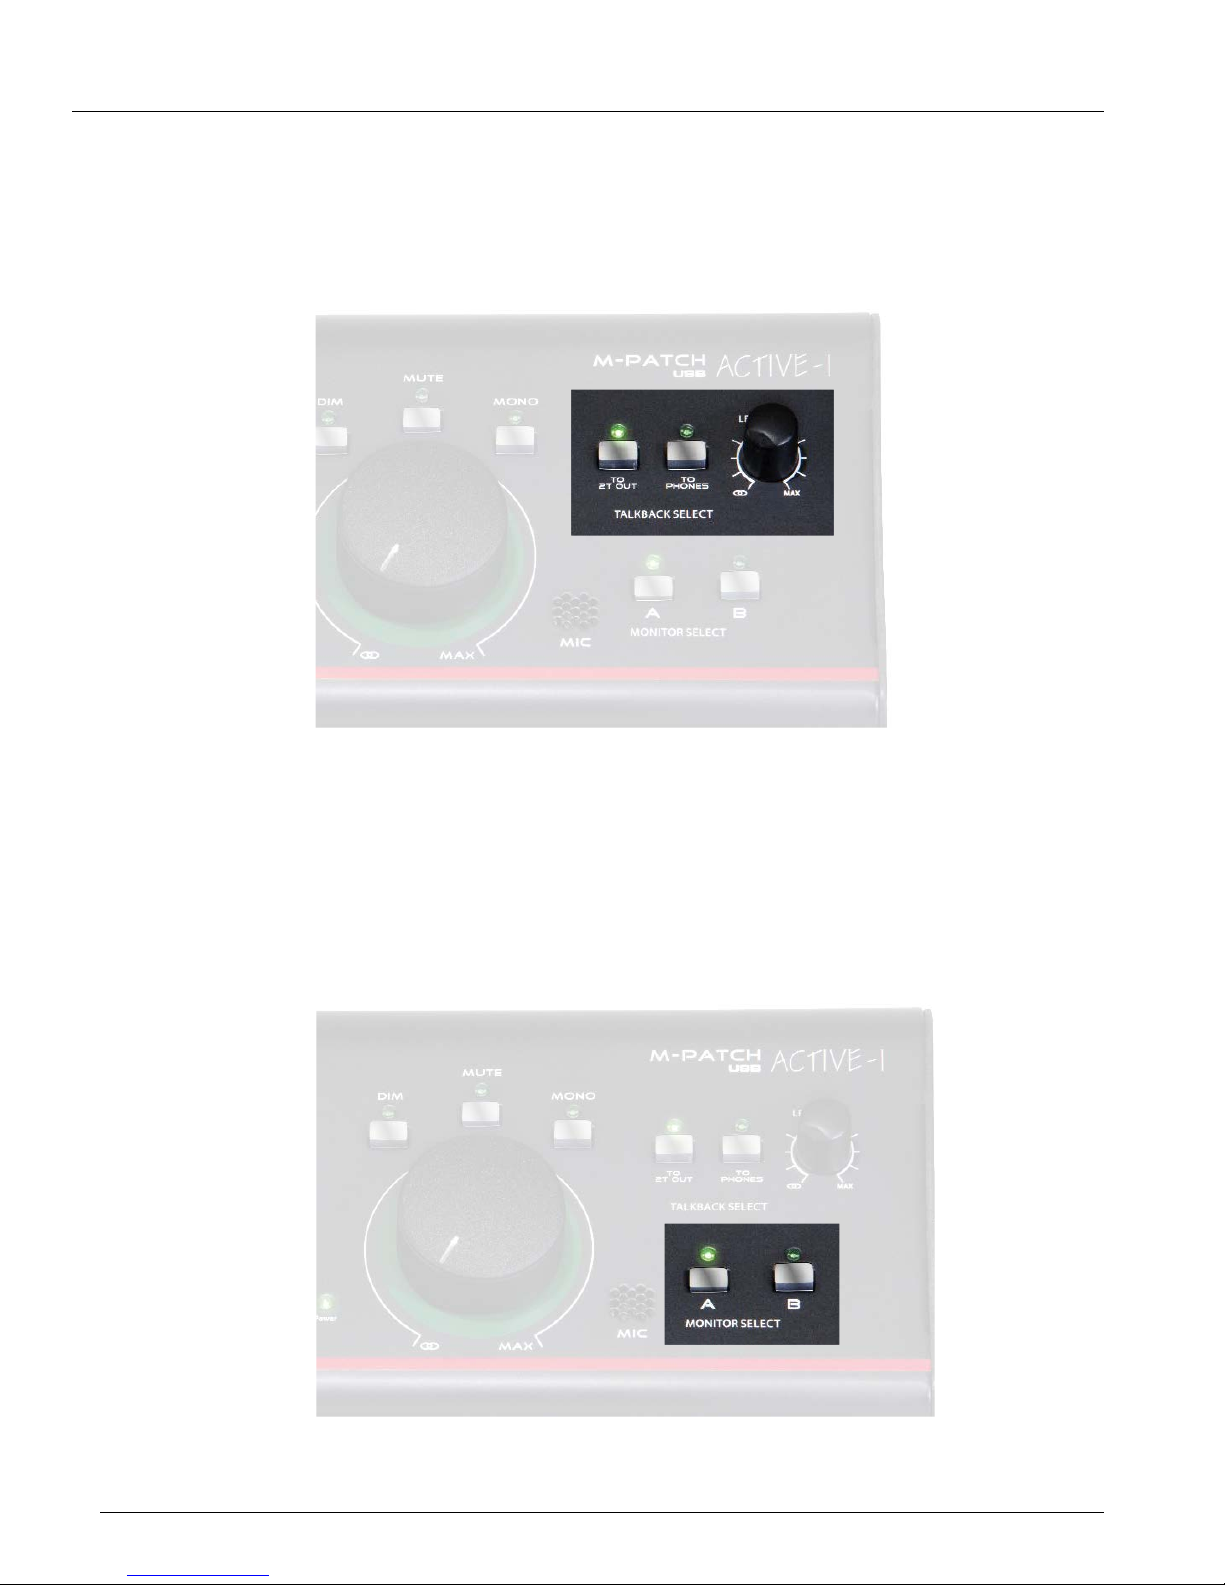
Talkback Switches and Volume
A built-in talkback microphone, can be routed to the headphone outputs or the 2TRACK outputs. When the Talkback
function is engaged, the Control Room output signal is attenuated by 20 dB.
Monitor Select Switches
The monitor select switches activate the A & B outputs respectively. The A & B outputs can be selected simultaneously.

11
Applications
The ACTIVE-1 provides essential monitor controls in a professional control room. In this
application, ACTIVE-1 allows monitoring using both large and near-eld studio monitors. A
mixer, 2 microphone preampliers and a DVD player can be recorded by a computer audio
recording system. The computer recording system is connected using the USP I/O that also
allows monitoring of the computer. An additional two-channel recorder is connected to the 2T
outputs allowing stereo recording.
When connecting PASSIVE speakers, you must rst connect the output of the ACTIVE-1 to a power amplier and
then connect the amplier to the speakers.
Do not connect the OUTPUT of a power amplifier to the ACTIVE-1 INPUTS!
DVD PLAYERTALK BACK
ACTUATION
FOOT SWITCH
MIXER
COMPUTER RECORDING SYSTEM
2 TRACK
RECORDER
PRE-AMPS
POWER AMPLIFIER
MAIN MONITOR POWERED
NEAR-FIELD
MONITOR
MAIN MONITOR
1 2
POWERED
NEAR-FIELD
MONITOR

12
Specifications
Frequency Range: Line Level Inputs and Outputs +0.5 -1dB 10hz to 30kHz
Noise: Monitor A B, Studio Outputs, 2-Track -92dBu Typical
Audio Inputs: Input Connectors 4 x TRS 1/4-inch (6.5mm) Balanced/Unbalanced
Maximum Input Level +4dBu/+22dBu
Impedance 24K ohms balanced
12K ohms unbalanced
Computer Audio Input USB 2 Channel
Audio Outputs:Output Connectors 6 x TRS 1/4 inch (6.5mm) Balanced/Unbalanced
Impednce 300ohms balanced
150ohms unbalanced
Output Level +22dBu
Master Volume Gain (Studio Outputs) 34 dB
Computer Audio Output USB 2 Channel
Headphone Output 2 x 1/4 inch (6mm) TRS stereo output
Headphone Output level Gain +32dBu
Performance: Dim Switch -20 dB
Frequency Response (Line In/Line Out) +0.5 -1dB 10hz to 30kHz
Noise (Monitor A B, Studio Outputs, 2-Track) > -92dBu Typical
Channel cross talk @ 1 kHz (Mute/Level OFF) > 92dB
Dynamic Range (Line IN to Line OUT) 114 dB
Distortion < 0.009%
USB I/O Digital Performance 48 kHz, 24-Bit
Computer Interface: Format USB1/2
Channels 2
Drivers Legacy type and ASIO
Compatibility All current USB Audio systems
Power Requirements: Included Power Supply AC 9V, 1200 MA
Physical: Dimensions W x D x H 13.0 in. x 7.5 in. x 5.0 in. (330mm x 191mm x 127mm)
Weight 2.0 lbs. (0.9 kg)

13

14
JBL Service Contact Information
TECHNICAL SUPPORT
If you have technical questions about your product or are experiencing difculties we are happy to help. You can
contact JBL Pro support by sending an email to: support@jblpro.com or by calling 1 (800) 8JBLPRO (800.853.5776)
between the hours of 8:00 am and 5:00 pm Pacic Standard Time.
REPAIRS
JBL Professional has an extensive network of authorized repair facilities in the US. To view service locations listed
by state, visit the Harman Professional Service Website athttp://www.harmanpro.com/service_centers. For factory
repair options you must obtain a service return authorization before returning your product for repair. Please send an
email request to: service.us@jblpro.com.
PRODUCT REGISTRATION:
Register your product online at www.jblpro.com/registration
On The World Wide Web:
www.jblpro.com
PROFESSIONAL CONTACTS, OUTSIDE THE USA:
Contact the JBL Professional Distributor in your area. A complete list of JBL Professional international distributors is
provided at our U.S.A. website: www.jblpro.com
EN DEHORS DES ETATS-UNIS:
Contacter votre Distributeur JBL Professional. Une liste complète de nos distributeurs internationaux est disponible
sur le site web - www.jblpro.com
INTERNATIONAL:
Wenden Sie sich an Ihre örtliche JBL Professional Vertretung. Eine vollständige Liste der internationalen
JBL-Vertretungen nden Sie auf unserer Website unter www.jblpro.com
FUERA DE LOS ESTADOS UNIDOS:
Comuníquese con el distribuidor de JBL Professional de su zona. En nuestro sitio web, www.jblpro.com, encontrará
una lista completa de los distribuidores de JBL International.

15
Product Warranty Information
The JBL Limited Warranty on professional loudspeaker products (except for enclosures) remains in effect for
ve years from the date of the rst consumer purchase. JBL ampliers are warranted for three years from the date of
original purchase. Enclosures and all other JBL products are warranted for two years from the date of
original purchase.
WHO IS PROTECTED BY THIS WARRANTY?
Your JBL Warranty protects the original owner and all subsequent owners so long as: A.) Your JBL product has
been purchased in the Continental United States, Hawaii or Alaska. (This Warranty does not apply to JBL products
purchased elsewhere except for purchases by military outlets. Other purchasers should contact the local JBL
distributor for warranty information.); and B.) The original dated bill of sale is presented whenever warranty service
is required.
WHAT DOES THE JBL WARRANTY COVER?
Except as specied below, your JBL Warranty covers all defects in material and workmanship. The following
are not covered: Damage caused by accident, misuse, abuse, product modication or neglect; damage occurring
during shipment; damage resulting from failure to follow instructions contained in your Instruction Manual;
damage resulting from the performance of repairs by someone not authorized by JBL; claims based upon any
misrepresentations by the seller; any JBL product on which the serial number has been defaced, modied
or removed.
WHO PAYS FOR WHAT?
JBL will pay all labor and material expenses for all repairs covered by this warranty. Please be sure to save the
original shipping cartons because a charge will be made if replacement cartons are requested. Payment of shipping
charges is discussed in the next section of this warranty.
HOW TO OBTAIN WARRANTY PERFORMANCE
If your JBL product ever needs service, write or telephone us at JBL Incorporated (Attn: Customer Service
Department), 8500 Balboa Boulevard, PO. Box 2200, Northridge, California 91329 (818/893-8411). We may direct
you to an authorized JBL Service Agency or ask you to send your unit to the factory for repair. Either way, you’ll
need to present the original bill of sale to establish the date of purchase. Please do not ship your JBL product to
the factory without prior authorization. If transportation of your JBL product presents any unusual difculties, please
advise us and we may make special arrangements with you. Otherwise, you are responsible for transporting your
product for repair or arranging for its transportation and for payment of any initial shipping charges. However, we
will pay the return shipping charges if repairs are covered by the warranty.
LIMITATION OF IMPLIED WARRANTIES
ALL IMPLIED WARRANTIES, INCLUDING WARRANTIES OF MERCHANTABILITY AND FITNESS FOR PARTICULAR
PURPOSE, ARE LIMITED IN DURATION TO THE LENGTH OF THIS WARRANTY.
EXCLUSION OF CERTAIN DAMAGES
JBL’S LIABILITY IS LIMITED TO THE REPAIR OR REPLACEMENT, AT OUR OPTION, OF ANY DEFECTIVE
PRODUCT AND SHALL NOT INCLUDE INCIDENTAL OR CONSEQUENTIAL DAMAGES OF ANY KIND. SOME
STATES DO NOT ALLOW LIMITATIONS ON HOW LONG AN IMPLIED WARRANTY LASTS AND/OR DO NOT
ALLOW THE EXCLUSION OF INCIDENTAL OR CONSEQUENTIAL DAMAGES, SO THE ABOVE LIMITATIONS
AND EXCLUSIONS MAY NOT APPLY TO YOU. THIS WARRANTY GIVES YOU SPECIFIC LEGAL RIGHTS, AND
YOU MAY ALSO HAVE OTHER RIGHTS, WHICH VARY, FROM STATE TO STATE.
JBL Professional
8500 Balboa Boulevard
Northridge, CA 91329 USA
Visit us online at www.jblpro.com

Part Number:
5062311
Table of contents
Other JBL Recording Equipment manuals

JBL
JBL M553 User manual

JBL
JBL Synthesis SDEC-3500 User manual

JBL
JBL M712 User manual

JBL
JBL Synthesis SDP-25 User manual

JBL
JBL SDR-35 User manual

JBL
JBL Synthesis SDEC-3000 Use and care manual

JBL
JBL Synthesis SDP-1 User manual

JBL
JBL SYNTHESIS SDEC-4500 User guide

JBL
JBL 7130 Manual

JBL
JBL Synthesis SDEC-3500 User manual


