Worlde EASYPAD User manual

WORLDE EASYPAD MIDI CONTROLLER
USER’S MANUAL

Contents
Introduction.............................................................................................................................................3
Features.................................................................................................................................................3
Parts and their functions.........................................................................................................................4
Setup......................................................................................................................................................5
Making detailed settings.........................................................................................................................5
Global..............................................................................................................................................5
Trigger pads ....................................................................................................................................6
Assignable buttons..........................................................................................................................7
Transport buttons ............................................................................................................................8
Specifications .........................................................................................................................................9

Introduction
Thank you for purchasing the WORLDE EASYPAD USB controller. To help you get
the most out of your new instrument, please read this manual carefully.
In order to use the functions of this product, you’ll need to make settings
in the application you’re using. Make settings as described in the owner’s
manual for your application.
Features
12 trigger pads with velocity and assignable to controllers.
2 assignable buttons.
6 transport buttons assignable to controllers.
4 banks for different settings.
USB interface, adaptable to USB 2.0(FULL SPEED). Power supplied by
USB.
Compatible with Win7/XP/Vista and Mac OSX. Drive free and hot-plug
supported.
Edited by the WORLDE software Editor.

Parts and their functions
1. Trigger pads
These pads can transmit note messages or control change messages.
2. Transport button
There are six transport buttons: [REW], [PLAY], [FF], [LOOP], [STOP], and [REC]. These buttons
transmit control change messages or MMC (MIDI Machine Control) messages.
3. Assignable buttons
These two buttons can be used as MIDI CC switches.
4. Bank buttons
Use this button to switch between the four banks. A “bank” is a set of parameter assignments for the
controllers (pads and buttons etc.) so that the controllers can be used to operate your DAW or software
synthesizer. The EASYPAD has four banks. The four banks are collectively called a “bank set.” You can
use EASYPAD software Editor to change the assignment of each controller. (➞“Making detailed
settings”)
5. Bank LEDs
The LED of the selected bank will light up.
6.USB connector
Connect the EASYPAD to your computer with a USB cable via this port.

7.Settled controller
This unique slider on EASYPAD is only for adjusting the master volume, it can’t be edited.
Setup
Operating requirements
Apple Macintosh computer: Computer with an Intel or PowerPC processor that has a USB port and
satisfies the requirements for running Mac OS X.
Operating system: Mac OS X 10.3.9, or Mac OS X 10.4.7 or later.
Windows Computer: Computer that has a USB port and satisfied the requirements for running Microsoft
Windows7/XP/Vista (a USB chipset made by the Intel Corporation is recommended).
Operating system: Microsoft Windows XP SP2 or later, or Microsoft Windows Vista SP1.
Connections and power: Connect the EASYPAD to your computer with a USB cable.
Making detailed settings
The following settings cannot be edited from the EASYPAD itself, so you’ll need to use the EASYPAD
software Editor. You can download the EASYPAD software Editor from the www.worlde.com.cn.
Global
Global MIDI channel
Global MIDI channel [1...16]

This specifies which MIDI channel the EASYPAD will use to transmit note messages, as well as MIDI
messages that are sent when you press the button. This should be set to match the MIDI channel of the
MIDI application that you’re controlling.
Transport MIDI Channel [1...16/Scene MIDI Channel]
Specifies the MIDI channel on which MIDI messages will be transmitted when you operate the transport
button. Set this to match the MIDI channel of the MIDI application you’re controlling. If you set this to
“Scene MIDI Channel,” the message will be transmitted on the Scene MIDI Channel.
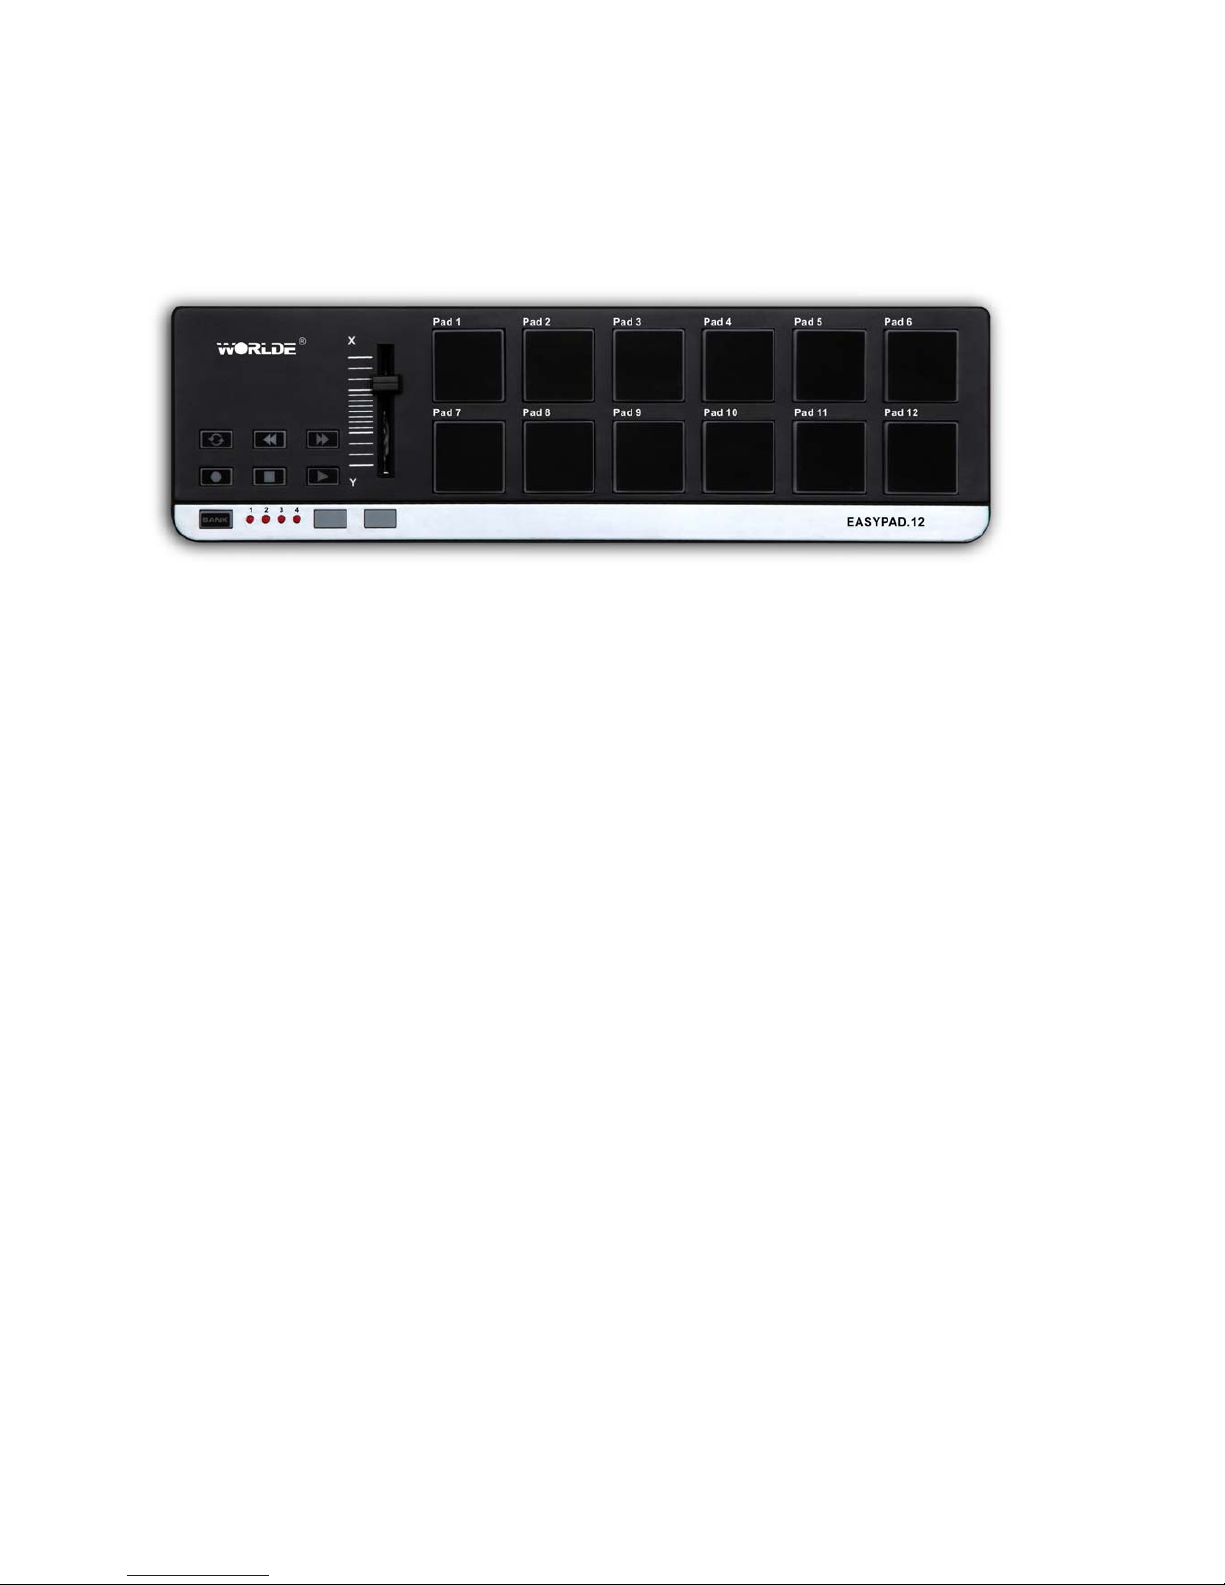
Trigger pads
Depending on the assign type, the trigger pads can transmit note messages or control change
messages. For each trigger pad, you can individually specify the assigned message, the MIDI transmit
channel, the behavior of the trigger pad, the note number, the control change number, the values
transmitted when the pad turns on or off.
Depending on its assign type, note number or control change number can be assigned to a single
trigger pad and transmitted. If you transmit note messages or control change message from a trigger
pad, all of the messages will be transmitted at the velocity or On Value/Off Value.
MIDI Channel [1...16/Global MIDI Channel]
This specifies the MIDI channel of the MIDI messages that are transmitted when you strike the trigger
pad. If you set this to “Global MIDI Channel,” the messages will be transmitted on the global MIDI
channel.
Assign Type [No Assign/Note/Control Change]
This specifies the type of message that will be assigned to the trigger pad. You can disable the pad (no
assignment), or assign a note message or a control change.
Pad Behavior [Momentary/Toggle]
You can choose one of the following two types of behavior for the trigger pad.
Momentary
The Note On or On Value will be transmitted when you press the trigger pad, and the Note Off or Off
Value will be transmitted when you release it.
Toggle
The Note On or On Value will be transmitted alternately with the Note Off or Off Value each time you
press the trigger pad.
Note Number [C-1...G9/No Assign]
This specifies the note number of the note message that is transmitted.
CC Number [0...127/No Assign]

This specifies the control change number of the control change message that is transmitted.
On Value [0...127]
This specifies the value of the message that is transmitted when the trigger pad turns on.
Off Value [0...127]
This specifies the value of the message that is transmitted when the trigger pad turns off.
You can set this only if the assign type is “Control Change.”
Assignable buttons
The button transmits a control change message. You can choose whether this button will be enabled,
the type of button operation, the control change number, and the values that will be transmitted when
the button is pressed. These MIDI messages are transmitted on the Global MIDI Channel.
Assign Type [No Assign / Note/Control Change]
This specifies the type of message that will be assigned to the button. You can disable the button (no
assignment), or assign a note message or a control change.
Button Behavior [Momentary/Toggle]
Selects one of the following two modes:
Momentary
Pressing the button will send a control change message with the On value, releasing the button will
send a control change message with the Off value.
Toggle
Each time that you press the button, the control change message will alternate between the On value
and the Off value.
Note Number [C-1...G9]
This specifies the note number of the note message that is transmitted.
CC Number [0...127]
Specifies the CC number of the control change message that will be transmitted.
On Value [0...127]
Specifies the On value of the control change or note on message.
Off Value [0...127]
Specifies the Off value of the control change message. You can set this only if the assign type is
“Control Change.”

Transport buttons
Operating the transport buttons will transmit either control change messages or MMC messages,
depending on the assign type. For each of these six buttons, you can specify the message that is
assigned, the way in which the button will operate when pressed, the control change number, or an
MMC command.
Assign Type [Control Change/MMC/No Assign]
Specifies the type of message assigned to the transport button. You can specify that the button be
disabled, or assign a control change message or MMC message.
Button Behavior [Momentary/Toggle]
Selects one of two types of behavior for the button:
Momentary: A control change message with a value of 127 will be transmitted when you press the
transport button, and with a value of 0 when you release the button.
Toggle : Each time you press the transport button, a control change message with a value of 127 or 0
will be transmitted alternately. You can’t specify the button behavior if the assign type is “MMC.” If
you’ve specified “MMC,” an MMC command will be transmitted each time you press the button.
CC Number [0...127]
Specifies the control change number of the control change message that is transmitted.
MMC Command [Stop/Play .../MMC Reset]
Selects one of the following thirteen types of MMC command as the MMC message that will be
transmitted. Stop, Play, Deferred Play, Fast Forward, Rewind, Record Strobe, Record Exit, Record
Pause, Pause, Eject, Chase, Command Error Reset, MMC Reset
MMC Device ID [0...127]
Specifies the device ID of the MMC message. Normally you will specify 127. If the device ID is 127, all
devices will receive the MMC message.

Specifications
Connectors: USB connector (mini B type)
Power supply: USB bus power mode
Current consumption: 100 mA or less
Dimensions (W x D x H): 13.4 x 3.9 x 0.8 inches / 340 x 100 x 20 mm
Weight: 15 oz / 460 g
Included items: USB cable, Owner’s manual
* Specifications and appearance are subject to change without notice.
Sales Head Office:
Hangzhou Worlde Digital Piano Co., Ltd
Add:5 Houshan Rd, Wuchang Industrial Park, Yuhang District, Hangzhou, 310023,P.R.China
Tel:0086 571 88730848 Fax:0086 571 88730748
Table of contents
Other Worlde Recording Equipment manuals

Worlde
Worlde Orca PAD48 User manual

Worlde
Worlde Panda User manual

Worlde
Worlde Orca PAD64 User manual

Worlde
Worlde Orca mini 25 User manual

Worlde
Worlde Panda User manual

Worlde
Worlde Orca PAD48 User manual

Worlde
Worlde PANDAMINI II User manual

Worlde
Worlde KS25B User manual

Worlde
Worlde ORCA PAD16 User manual

Worlde
Worlde Panda200 User manual