JBL ARENA 61C User manual

UH~
®
by
HARMAN
ARENA
61C,
ARENA
BIG,
ARENA
61CDT
In-Ceiling
Architectural
Loudspeaker
Instruction
Manual

DOCUMENTATION CONVENTIONS
This
document
contains
general
safety
,
installation
and
operation
instructions
for
the
JBL
Arena
61C,
SIC
and
61CDT
in-ceiling
loudspeakers.
It
is
important
to
read
this
document
before
attempting
to
use
this
product.
Pay
particular
attention
to:
WARNING:
Calls
attention
to
a
procedure,
practice,
condition
or
the
like
that,
if
not
correctly
performed
or
adhered
to,
could
result
in
injury
or
death.
CAUTION:
Calls
attention
to
a
procedure,
practice,
condition
or
the
like
that,
if
not
correctly
performed
or
adhered
to,
could
result
in
damage
to
or
destruction
of
part
of
or
the
entire
product.
Note:
Calls
attention
to
information
that
aids
in
the
installation
or
operation
of
the
product.
II
JBL
Arena
In-Ceiling
Architectural
Loudspeaker
Instruction
Manual
ABOUT JBL
®
IN-CEILING SPEAKERS
For
more
than
68
years,
JBL
®engine
ers
have
been
involved
in
every
aspect
of
music
and
film
recording
and
reproductio
n,
from
live
performances
to
the
recordings
you
play
on-the-go
and
in
your
home,
car
or
office
.
We're
confident
tha
t
the
JBL
system
you
have
chosen
will
provide
every
note
of
enjoyment
you
expect
-
and
that
when
you
think
about
purchasing
additional
audio
equipment,
you
will
once
again
choose
JBL
produc
t
s.
IN-CEILING LOUDSPEAKER HIGHLIGHTS
•
Long-throw
woofers
with
rubber
surrounds
provide
h
igh
output
with
low
distortion.
•
1-inch
(25mm)
silk-dome
tweeter
with
an
integrated
waveguide
provides
optimized
r
esponse
both
on
and
off
axis.
• H
ig
h-order
crossover
network
delivers
accurate
timb
re
repro
duction.
PRODUCT REGISTRATION
Please
take
a
moment
to
registe
r
your
product
on
our
Web
site
at
www.jblcom
.
You'll
enable
us
to
keep
you
posted
on
our
l
atest
advancements
and
help
us
to
understand
our
customers
and
build
products
that
meet
their
needs
and
expectations.
BOX CONTENTS
Your
JBL
in-ceiling
loudspeaker
box
should
contain
the
fo
llow
ing
items:
1x
JBL
in
-ce
iling
loudspeaker
1x
grill
e
1x
extra
scrim
cloth
for
grille
1x
mounting
template
1x
instruction
manual
UNPACKING
THE
SPEAKER
Carefully
unpack
the
speaker
.
If
you
suspect
damage
from
transit,
report
it
immedia
tely
to
your
dealer
and/or
delivery
service.
Keep
the
s
hipping
carton
and
packing
materials
for
future
use.
INSTALLATION CONSIDERATIONS
Your
new
JBL
loud
speake
rs
hav
e
been
engineered
to
provide
extremely
accu
rat
e
performance
.
However,
any
speaker's
ultimate
perfo
rm
ance
will
be
affected
by
the
speaker's
pl
acement
in
th
e
li
s
tenin
g
room
and
the
acoustics
of
the
room.
Not
all
listening
spaces
can
accommodate
the
ideal
cond
itions
of
these
two
factors
.
Therefore,
careful
attention
to
the
placement
of
your
JBL
in-ceiling
loudspeakers
will
have
a
sig
nificant
impact
on
th
e
general
performance
of
the
loud
speake
rs.
2

LOUDSPEAKER PLACEMENT FOR DISTRIBUTED
SOUND
•
Since
distributed
sound
is
general
sound
throughout
an
area,
place
the
loudspeakers
as
uniformly
as
possible
for
even
sound
coverage
throughout
the
area.
•
Place
the
left
and
right
loudspeakers
roughly
the
same
distance
from
the
primary
listener
locations.
•
To
avoid
"hot
spots"
where
the
sound
is
too
loud,
plan
to
use
more
loudspeakers,
with
each
set
to
play
at
a
lower
volume.
LOUDSPEAKER PLACEMENT FOR TWO-CHANNEL
STEREO
Place
the
left
and
right
loudspeakers
the
same
distance
from
the
primary
listening
.
area
(or
as
close
to
the
same
distance
as
possible).
The
distance
from
each
speaker
to
its
nearest
side
wall
should
also
be
the
as
close
to
the
same
distance
as
possible.
~
D~~~~~e
~
(
~
~
\
--
----
--
@!
~
--------
II
,
Equal
,
'
~Distance
----..,
'
,'
1
•'1
II
Ideally,
the
distance
between
the
left
and
right
loudspeakers
should
be
slightly
less
than
their
distance
from
the
primary
listening
area.
LOUDSPEAKER PLACEMENT FOR
HOME
THEATER
•
The
front
left,
center
and
front
right
loudspeakers
should
be
cente
r
ed
relative
to
the
video
display.
•
The
front
left,
center,
and
front
right
loudspeakers
should
be
closer
to
the
video
display
than
to
the
main
listen
i
ng
area.
For
example,
if
the
video
display
is10ft
(3m)
from
the
main
listening
area,
the
loudspeakers
should
be
6ft
(1
.8m)
or
further
from
the
main
listening
area.
•
The
front
left
and
front
right
loud
s
peakers
should
bere
latively
clos
e
to
the
sides
of
th
e
video
display.
F
or
example,
front
left
and
front
right
loudspeakers
us
ed
with
a
50
-
in
(1
.
2m)
video
display
should
generally
not
be
more
than
80
in
(2m)
apart.
•
The
center
loud
s
peaker
should
be
aligned
with
the
center
of
the
video
display
.
•
The
s
urround-channelloudspeakers
should
be
as
far
from
the
ma
in
listening
a
rea
as
possible
but
at
l
eas
t 2
feet
(0
.
6m)
from
s
id
e
and
rear
wall
s.
3
5.
1-Channel
Speaker
Placement
•
In
a5.
1-channel
system,
the
surround
left
and
surround
right
loudspeakers
should
be
located
di
r
ectly
to
the
sides
of,
or
up
to
10
degrees
behind,
the
main
listen
i
ng
area.
Video
Di
splay
Front
Left
Cente
r
Front
Right
-~~~
~
@)
_;9
.
- -
--
M
ore
than
2'
(
0.6m)
I
More
than
J
~~~
10
2' (
0.6m)
II
I
·----
~
1
)
Surround
Left
Surround
Right
7.
1-Channel
Speaker
Placement
•
In
a7.
1-channel
system,
the
su
rround
left
and
surround
righ
t
loudspeakers
should
be
located
di
r
ectly
to
the
sides
of
,
or
up
to
1
0
degrees
behind,
the
main
liste
n
ing
area.
•
In
a7.
1-channel
system,
the
surround
back
left
and
surround
back
right
loudspeakers
should
be
equidistant
from
the
prima
ry
li
stening
area
and
generally
as
far
from
it
as
possible
but
at
least
2ft
(
0.6m)
from
the
side
and
rear
walls
.
Video
Dis
play
Ce
n
te
r
Front
Right
M
ore
than
' 2' (
0.6m)
Mo
re
than
~
@)
_2'(0
i)
! I I L
--
11
'i(
~
Surround
Left
Surround
Rig
ht
Surround
Bac
k
Le
ft
~
Mo
rethan
:
~
2' (
0.6m)
i
Surround
B
ac
k
Right
~
JBL
Arena
In-Ceiling
Architectural
Loudspeaker
Instruction
Manual
••

INSTALLATION INSTRUCTIONS
CAUTION:
Do
not
use
the
tweeter-mounting
baffle
as
a
handle
to
move,
carry
or
position
the
speaker.
Doing
so
can
damage
the
baffle.
Such
damage
is
not
covered
by
the
speaker's
warranty.
JBL
architectural
speakers
are
extremely
easy
to
install.
However
,
if
you
are
unable
to
understand
and
follow
the
instructions
in
this
manual
clearly
and
fully
,
or
if
you
are
unsure
of
your
ability
to
install
these
loudspeakers
properly
,
please
contact
your
dealer
or
a
qualified
installer.
WARNING:
HARMAN
International
assumes
no
responsibility
for
improper
installation
of
hardware
or
for
any
personal
injuries
or
product
damages
resulting
from
improper
installation
or
a
fallen
loudspeaker.
II
JBL
Arena
In-Ceiling
Architectural
Loudspeaker
Instruction
Manual
CONNECTING TO THE AMPLIFIER
CAUTION:
REMOVE
POWER
You
must
connect
the
speaker
wires
before
the
speaker
is
fully
installed.
To
protect
the
audio
system
and
yourself
from
damage
or
injury
through
accidental
electrical
shorting
and
surges
during
installation,
turn
all
audio
system
power
OFF
before
beginning
the
speaker
installation.
Speaker
Wire
Use
high-quality
speaker
wire
to
obtain
the
best
performance
from
your
JBL
in-ceiling
speakers
.
•
For
wire
lengths
of
less
than
50ft
(15m),
use
at
least
16-gauge
speaker
wire.
•
For
wire
lengths
between
50ft
and
100ft (15m-
30m),
use
at
least
12-gauge
speaker
wire
.
•
For
wire
lengths
of
greater
than
100ft
(30m)
,
use
at
least
1
0-gauge
speaker
wire
.
Note:
All
speaker
wires
must
comply
with
all
local
building
and
safety
codes
for
use
in
in-ceiling
applications.
Making
Connections
Connect
each
channel's
positive
(+)terminal
on
the
back
of
the
amplifier
or
receiver
to
the
positive
(red)
terminal
on
the
corresponding
speaker
;
connect
each
channel
's
negative
(-)terminal
on
the
back
of
the
amplifier
or
receiver
to
the
negative
(black)
terminal
on
the
corresponding
speaker.
Do
not
reverse
polarities
(that
is
,
do
not
connect+
to-
,
or-
to+)
when
making
connections.
Doing
so
will
cause
poor
imaging
and
diminished
bass
response
.
Negative
Terminal
(Black)
Positive
Terminal
(Red)
Press
down
on
the
post
to
open
the
hole
;
insert
the
bare
end
of
the
wire
into
the
hole
and
release
the
post
to
secure
the
wire.
CAUTION:
To
avoid
short
circuits
that
may
damage
your
equipment,
be
certain
that
positive
and
negative
wire
strands
do
not
touch
each
other
and
do
not
touch
metal
parts
such
as
the
speaker
frame.
4

MOUNTING THE SPEAKERS
For
New
Construction
If
you
wish
to
pre-install
a
rough-in
frame
for
the
speakers
before
the
drywall
is
installed
in
new
construction,
you
will
need
to
purchase
the
correct
rough-in
frame
kit
for
your
loudspeaker
model
from
your
authorized
JBL
dealer.
Detailed
mounting
instr
uct
ions
are
supplied
wi
th
the
rough-in
kit.
After
the
drywall
is
installed,
follow
the
installation
instructions
in
For
Existing
Construction,
below.
For
Existing
Construction
Note:
The
installation
procedure
is
the
same
for
all
models
covered
by
this
manual.
1.
Ensure
that
the
drywall,
plywood
or
other
ceiling
material
is1
/2
"-
2"
(13mm
-
51
mm
)
thick
and
capab
le
of
wit
h
stand
ing
the
weight
of
the
speaker
being
installed.
Make
sure
to
allow
at
least
1"
(25.4mm)
between
the
edge
of
the
supplied
installation
template
and
any
rafters
or
other
obstructions
behind
the
wall,
so
the
speaker's
locking
mechanism
w
ill
have
room
to
engage
fully
.
Perform
an
obstruction
s
urvey
to
be
sure
that
there
are
no
studs,
lengths
of
conduit,
pipes,
he
at
in
g
ducts
or
air
returns
in
the
ce
iling
cav
i
ty
that
will
interfere
with
the
speaker.
Mounting
Opening
1"
(25
4mm)
2.
Determine
the
correct
speake
r
location
and
use
the
template
in
c
luded
with
the
speaker
to
mark
the
ceiling
material.
3.C
ut
the
ce
ilin
g
drywall
a
lon
g
th
e
mark
you
made
in
Step
2
to
c
reate
the
mounting
open
ing
.
5
4.
Connect
the
speaker
to
the
amplifier
as
explained
in
Connecting
to
the
Amplifier,
on
pa
ge
4.
NOTE:
For
61CDT
,
you
must
connect
both
left
and
right
speaker
wire
from
the
amplifier.
5.
Attach
the
speaker
's
seismic
tab
to
a
su
pport
line,
as
per
local
safety
regulation
s.
6.
Make
sure
a
ll
four
speake
rcl
amps
are
in
their
"ready-to
-
mount"
position
.
Speaker
Cla
m
ps
in
Ready
-
to
-
Moun
t
Pos
ition
JBL
Arena
In
-
Ceiling
Architectural
Loudspeaker
Instruction
M
an
ual
Ill
.

7.
Insert
the
speaker
straight
into
the
mounting
opening
.
Tighten
the
speaker
clamp
screws
on
the
front
of
the
speaker
baffle.
The
speaker
clamps
will
automatically
rotate
into
position
and
begin
clamping
the
speaker.
•
When
you
notice
resistance
on
the
screws
the
speaker
has
been
clamped
successfully.
IMPORTANT:
Always
use
low-torque
settings.
NEVER
over-
tighten
the
clamp
screws
Insert
Speaker
Straight
Into
Mounting
Cut-Out
Tighten
Clamping
Screws
8.
Attach
the
supplied
grille.
Powerful
magnets
in
the
speaker
frame
will
securely
hold
the
grille
in
place.
Attach
Supplied
Grille
Bftll
JBL
Are.na
In-Ceiling
Architectural
Loudspeaker
IIWiil
Instruction
Manual
Painting
the
Grille
JBL
architectural
loudspeaker
grilles
can
be
painted
to
match
any
decor.
If
you
wish
to
change
the
grille's
color
,
its
satin
finish
will
function
as
a
primer
coat.
For
the
best
results
follow
this
procedure:
1.
Gently
remove
the
scrim
cloth
from
the
back
side
of
the
grille
before
painting
.
2.
Use
a
high-quality
spray
paint
and
apply
a
thin
coat
of
color
.
Ensure
that
the
grille
perforations
remain
free
of
paint.
Filling
them
with
paint
wi
ll
diminish
the
speaker
's
sound
qual
i
ty
.
If
any
perforations
are
plugged
,
use
compressed
air
to
blow
the
paint
out
of
the
perforations
.
Note
:
If
you
find
any
grille
perforations
that
are
plugged
with
paint
after
the
paint
has
dried,
carefully
use
a
straight
pin
or
sewing
needle
to
remove
the
paint.
3.
We
have
included
replacement
scrim
cloths.
After
the
paint
has
dried,
apply
a
light
coat
of
spray
adhesive
to
the
inside
of
the
perforated
grille
and
attach
a
new
scr
imcl
oth
.
IMPORTANT:
Never
spray
adhesive
on
the
cloth.
EXCESSIVE OUTPUT LEVELS
Your
JBL
loudspeakers
feature
custom-designed
transducers
and
high-
quality
network
components
featuring
high-order
filters
with
steep
cutoffs
that
reduce
the
potential
of
damage
to
individual
speaker
drivers
.
and
help
the
loudspeakers
maintain
their
performance
even
under
extreme
operating
cond
i
tions.
However
,
all
loudspeakers
have
limits
when
it
comes
to
continuous
playback
.
To
extend
these
limits
,
avoid
playback
at
volume
levels
that
result
in
distorted
or
strained
sound.
OBTAINING SERVICE
To
obtain
service
,
contact
an
authorized
JBL
dealer
.
Refer
to
Limited
Warranty,
on
page
7
for
more
information.
DIMENSIONS
Mounting Opening Mounting Depth Overall Dimensions
Diameter (w/grille)
Arena SIC
9-5/8"
(2
4
4mm)
5-3/
1
6"
(1
32mm)
10-23/32"
(272mm)
Dia.
x
5-5/16"
(1
35mm)
D
eep
Arena
61C
8"
(203mm)
4-23/32"
(120mm)
9-3/32"
(23
1
mm)
Dia.
x
4-15/
1
6"
(125mm)
Deep
Arena
8"
(203mm)
4-23/32"
(120mm)
9-3/32"
(23
1
mm)
Dia.
x
61CDT
4-
1
5/16"
(125mm)
Deep
Dimensions
are
subject
to
change
without
notice
.
For
complete
performance
specifications,
please
go
to
the
JBL
Web
site
:
www
.
jbl.com
.
LIMITED WARRANTY
JBL
Series
speakers
are
warranted
against
defects
.
The
duration
of
the
speaker
's
warranty
depends
on
the
laws
in
the
country
in
which
it
was
purchased
.
Your
local
JBL
retailer
can
help
you
determine
the
length
of
your
warranty.
6

HARMAN
HARMAN
International
Industries,
Incorporated
8500
Balboa
Blvd.,
Northridge,
CA
91329
©
20
15
HARMAN
International
Industries
,
Incorporated.
All
rights
reserved.
JBL
isa
trademark
of
HARMAN
Int
ernatio
nal
Indu
s
trie
s,
In
corporated,
registered
in
the
United
States
and/or
other
countries
.
Features,
specifications
and
appearance
are
s
ubject
to
change
without
notice.
For
questions,
assistance
or
additional
in
for
ma
tion
concerning
any
of
our
products,
call
us
a
t:
(800)
336-4525
.
F
or
t
echn
i
ca
ls
upport,
s
ubmit
your
detailed
inquiry
to:c
s
upp
ort@
h
arma
n.
co
m.
TR00848
_A
II
.
,,
HARMAN
www
.
jbl.com

Barely noticeable. Until you hear them.
Floor to ceiling, JBL Arena architectural series speakers are engineered for full sound
dispersion to fill the room – no matter where installed. Specially designed with a nearly
invisible zero-bezel, fully paintable magnetic grille, the JBL Arena speakers blend into any
home environment. The JBL proprietary HDI waveguide allows the loudspeaker to fill the
room in cinema-quality, full-immersion sound from any location – even high elevations or
off-axis listening locations. The JBL Arena is ready for integration into any home audio or
theater system, with a sturdy, reliable design including a XL-2 bracket suitable for mounting
in any wall or ceiling up to 2" thick. Expertly designed, the series is matched to the award-
winning JBL Arena component speakers for a complete home audio experience. It will leave
you wondering how such spectacular sound seems to come out of nowhere.
Features
Sound Inspired by JBL’s legendary
M2 Master Reference Monitor
Paintable, nearly invisible zero-bezel
magnetic grille
Superior XL-2 installation bracket
ARENA SERIES
Arena 6IC Arena 6IW
Arena 55IW
Architectural Loudspeakers
Arena 6ICDT
Arena 8IC
Arena 8IW

Features and Benefits
Sound Inspired by JBL’s legendary M2 Master Reference Monitor
High Definition Imaging (HDI) waveguide technology takes its cues from the legendary JBL M2 Master Reference Monitor. Computer-optimized driver positioning
and network integration result in ideal performance and life-like soundstage imaging throughout the entire room, regardless of location. Proven acoustic superiority
through rigorous testing and real-world evaluation.
Paintable, nearly invisible zero-bezel magnetic grille
Speakers are nearly invisible, seamlessly blending into wall or ceiling architecture. Equally pleasing to audiophiles and interior designers as full-dispersion speakers
can be fully painted and integrated into any configuration or setup. Engineered for the custom installer with a whole-room, seamless audio and visual design in mind.
Superior XL-2 installation bracket
Sturdy, reliable design fit for easy installation in walls up to a full 2" thick. Specialty mechanical grip designed to minimize vibration regardless of installation format.
Handles custom installation better than typical 1-1/2" bracket designs.
What’s in the box:
Main Unit
Magnetic Grille
Owner’s Manual
Printed Mounting Template
Warranty Card
Architectural Loudspeakers
ARENA SERIES
Feature Arena 6IC Arena 6ICDT Arena 8IC Arena 6IW Arena 8IW Arena 55IW
Impedance: 8 ohms 8 ohms 8 ohms 8 ohms 8 ohms 8 ohms
Recommended
Amplier Power: 80W 80W 100W 80W 100W 120W
Frequency Response: 38Hz - 20kHz 38Hz - 20kHz 30Hz - 20kHz 38Hz - 20kHz 30Hz - 20kHz 40Hz - 20kHz
Loudspeaker
Sensitivity: 86dB 2.83V @ 1m 86dB 2.83V @ 1m 88dB 2.83V @ 1m 86dB 2.83V @ 1m 88dB 2.83V @ 1m 88dB 2.83V @ 1m
Low Frequency
Driver Size and
Material
6-1/2"(165mm)
Polycellulose Woofer
6-1/2" (165mm)
Polycellulose Woofer
8" (203mm)
Polycellulose Woofer
6-1/2" (165mm)
Polycellulose Woofer
8" (203mm)
Polycellulose Woofer
Dual 5-1/4" (133mm)
Polycellulose Woofer
High Frequency
Driver Size and
Material
1" (25mm) Silk-Dome
Tweeter
2 x 3/4" (19mm) Silk-
Dome Tweeter
1" (25mm) Silk-Dome
Tweeter
1" (25mm) Silk-Dome
Tweeter
1" (25mm) Silk-Dome
Tweeter
1" (25mm) Silk-Dome
Tweeter
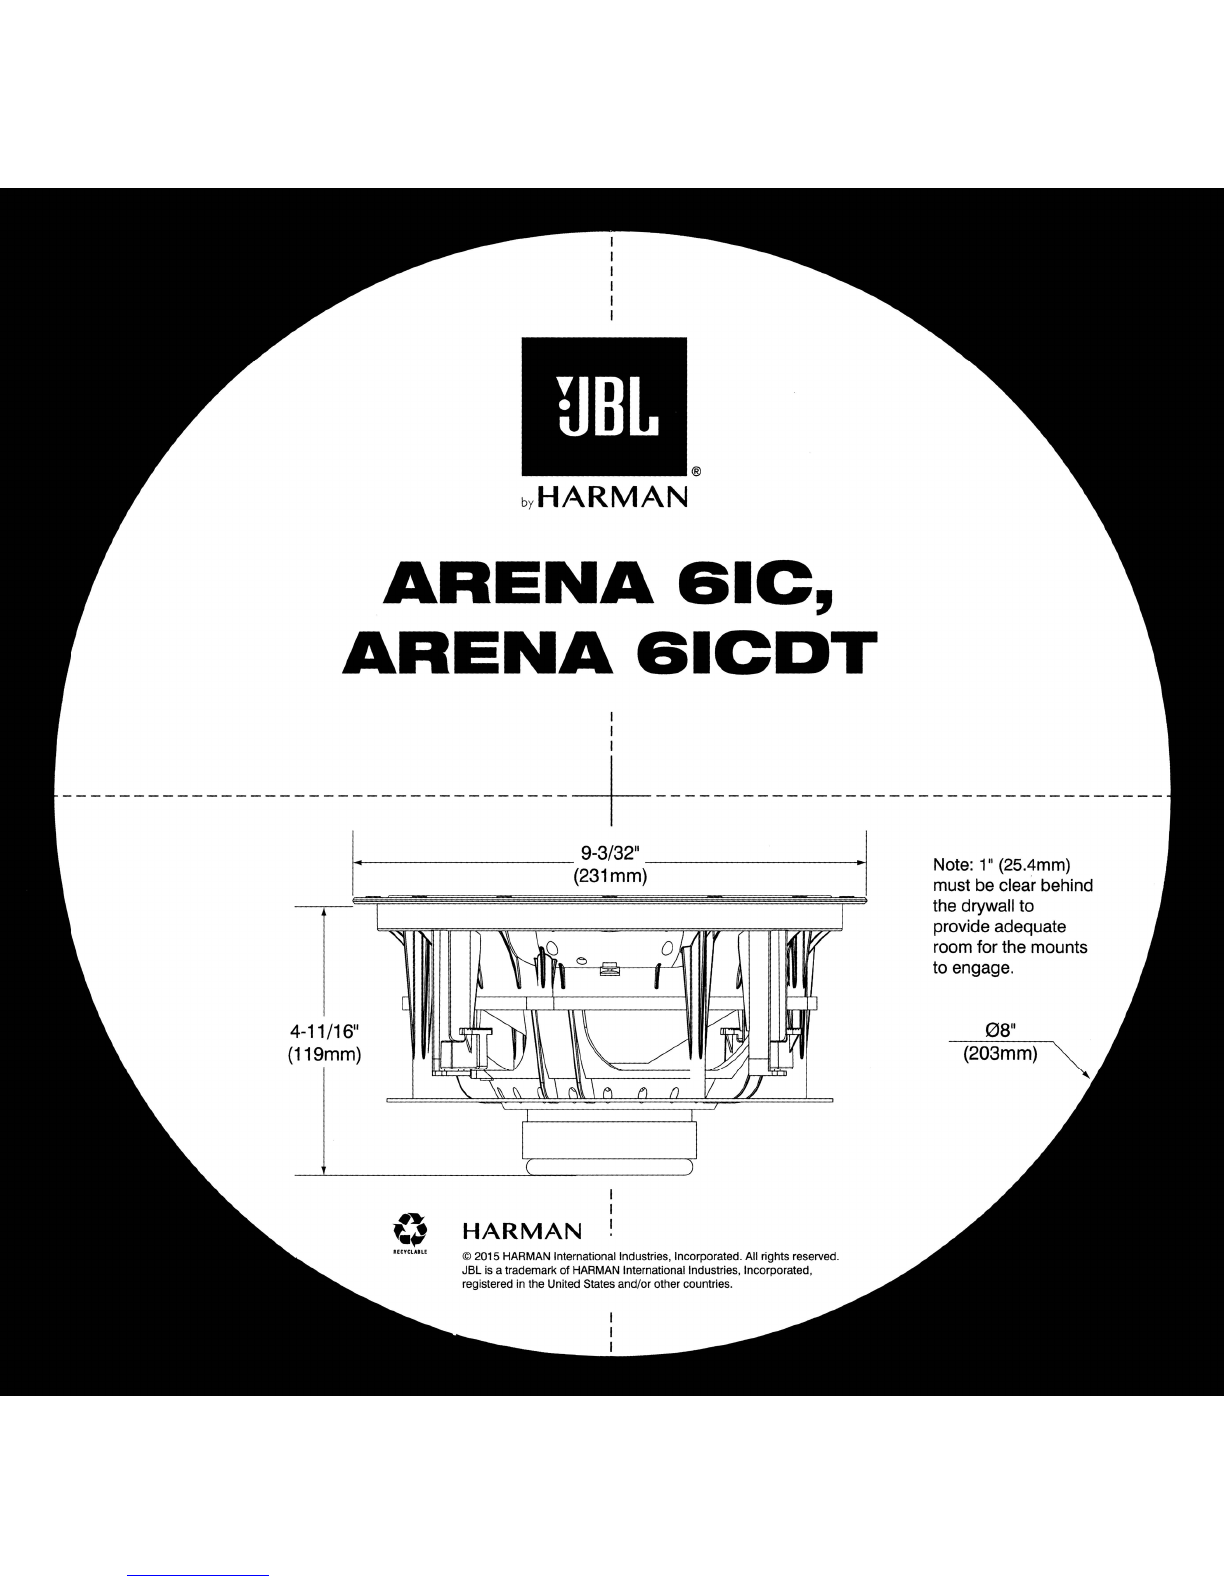
Cutout Dimensions: (D): 8" (203mm) (D): 8" (203mm) (D) 9-5/8" (244mm)
(H x W): 9-13/16" x
7-9/32"
(249mm x 185mm)
(H x W): 11-15/16" x
8-15/16"
(303mm x 227mm)
(H x W): 14-1/8" x
6-13/32"
(359mm x 163mm)
Grille Finished
Dimensions: (D): 9-3/32" (231mm) (D): 9-3/32" (231mm) (D): 10-11/16"
(272mm)
(H x W): 10-7/8"
x 8-11/32"
(276mm x 212mm)
(H x W): 13" x 10"
(330mm x 254mm)
(H x W): 15-1/8" x
7-13/32"
(384mm x 188mm)
Mounting Depth: 4-11/16" (119mm) 4-11/16" (119mm) 5-13/64" (132mm) 3-19/32" (91mm) 3-13/16" (97mm) 3.0" (76mm)
Compatible Wall
Material Thickness:
0.5" – 2.0"
(12mm – 51mm)
0.5" – 2.0"
(12mm – 51mm)
0.5" – 2.0"
(12mm – 51mm)
0.5" – 2.0"
(12mm – 51mm)
0.5" – 2.0"
(12mm – 51mm)
0.5" – 2.0"
(12mm – 51mm)
Shipping Units of
Measure: Each Each Each Each Each Each
Warranty: 5 Years 5 Years 5 Years 5 Years 5 Years 5 Years
Pre-Construction
Bracket Part number PCK6C PCK6C PCK8C PCK6 PCK8 PCK55
Back Box Part
Number FBB6C FBB6C FBB8C FBB6 FBB8 FBB55
© 2015 HARMAN International Industries, Incorporated. All rights reserved. JBL is a trademark of
HARMAN International Industries, Incorporated, registered in the United States and/or other countries.
%D@STQDRRODBHjB@SHNMR@MC@OOD@Q@MBD@QDRTAIDBSSNBG@MFDVHSGNTSMNSHBD
HARMAN International Industries, Incorporated
8500 Balboa Boulevard, Northridge, CA 91329 USA
www.jbl.com

®
by
HARMAN
ARENA
&IC,
ARENA&ICDT
I
I
I
-----------------------------------~-----------------------------------
9-3/32"
~
------------------
------------------
~
4-11 /16"
(119mm)
(231
mm)
HARMAN
©
20t5
HARMAN International Industries, Incorporated. All rights reserved.
JBL is a trademark of HARMAN International Industries, Incorporated,
registered in the United States and/or other countries.
Note:
1"
(25.4mm)
must be clear behind
the drywall to
provide adequate
room for the mounts
to engage.
08"
(203mm)
This manual suits for next models
2
Other JBL Speakers manuals