JBL GT-BassPro12 User manual

powered automotive subwoofer ®
bv
HARMAN
OWNER'S MANUAL

2
INTRODUCTION
Thank you for choosing the JBL
®
GT-BassPro12 powered automotive
subwoofer. The GT-BassPro12 has been designed to deliver great
bass performance from a compact, easily installed powered subwoofer
enclosure.
To get the best performance from your GT-BassPro12, we strongly
recommend that installation be entrusted to a qualified professional.
Although these instructions explain how to install the GT-BassPro12
in
a
general sense, they do not show specific installation methods that may be
required for your particular vehicle. If you do not have the necessary tools
or experience, do not attempt the installation yourself. Instead, please
ask your authorized JBL car audio dealer about professional installation.
In
order that we may better serve you should you require warranty
service, please retain your original sales receipt and register your
GT-BassPro12 online at www.jbl.com.
INCLUDED ITEMS
Remote
Level
Control
Mounting
Screws
~
High-Levellnput
Wiring
Harness
.INSTALLING THE SUBWOOFER
INSTALLATION WARNINGS AND TIPS
• Always wear protective eyewear when using tools.
• Disconnect the vehicle's negative (-) battery terminal before starting
the installation.
• Check clearances
on
both sides of a planned mounting surface.
Be
sure that screws or wires will not puncture brake lines, fuel lines or
wiring harnesses, and that wire routing will not interfere with the safe
operation of the vehicle.
• When making electrical connections, make sure they are secure and
properly insulated.
• If you must replace the
GT
-BassPro12's fuse, be sure to use the same
type of fuse and current rating
as
that of the original.
MOUNTING THE SUBWOOFER
Choose a location for the subwoofer that doesn't interfere with cargo,
a fold-down rear seat or the trunk lid. The best location
is
usually a
corner of the trunk or cargo area,
as
shown
in
the illustrations. Choose a
mounting location
in
the front
of
the vehicle for the remote level control.

MOUNTING THE REMOTE LEVEL CONTROL
You may mount the remote level control under the dashboard or inside
the glove box or console.
Select a mounting location that allows easy access to the remote level
control while driving. Using the level control itself
as
a template, mark and
drill holes
in
the mounting surface. Attach the level control using
two
of
the provided mounting screws.
I
1
Route the supplied remote level control cable behind the dashboard or
other interior panels and under the carpet.
Do
not route the cable outside
the vehicle. Connect the cable between the GT-BassPro12's Remote
Level Control connector and the connector on the remote level control.
Remote
Level
Control
Remote
Level
Control
Connector
l'-------==--------
(c)))
POWER
LO
\\
R
~
a:.;~\11\
f!IO
"
80
l~/i.
=@=
~
Y'
U
LJillllj
O,
so· \
l
0
q_JA+
I
I
PHA
SE
PROTE
CT
I
HIGH-LEVEL AUTO
REMOTE
l.EVEL 40Hz
INPUT IN TURN ON CONTROL
0
D
GT-BassPro12
CONNECTIONS
0
High-Level
Input
Connector
Remote
Level
Control
Connector
Fuse
+
12V
Connector
,
0
~
,
~
~f8~~:.L@)r@@
'
@-
~.
I '
'"'"
PROTECT
I \ I \ I \
HIGH-LEVEL AUTO REMOTE LEVEL 40Hz 200Hz
OdB
12dB MIN MAX
~
INPUT
IN
TURN
ON
CONTROL
D
GT-BassPro12
Line-Level
Input
Connectors
0
9.!CE:~~
Ground
Connector
i=
=l
o~
FUSE
2
5A
Uid
©
GND
REM
+12V
-
-o.CAUS<
Deav"Wld~
n
us.-,
Remote
Turn-On
Connector
0
3

4
CONNECTING THE SUBWOOFER TO YOUR VEHICLE'S AUDIO
SYSTEM
The JBL GT-BassPro12
is
equipped with two line-level
(RCA)
input
connectors and a high-level input connector. Consult the following
system application diagrams to help you plan the installation of your GT-
BassPro12. For additional installation suggestions, contact your local
authorized JBL car audio dealer.
If your car audio system's head unit has front or rear stereo line-
level outputs:
Use a stereo
RCA
audio cable (not supplied) to connect the GT-
BassPro12's line-level input connectors to the head unit's front or rear
left and right line-level outputs.
L.Front
~
Speaker~
L.
Rear
Speaker
Stereo
RCA
Audio
Cable
(not
supplied)
o
II.
GT-BassPro12
~
R.Front
~Speaker
If your car audio system's head unit has a line-level subwoofer
output:
If
the head unit has a line-level subwoofer output, you can connect it to
either of the GT-BassPro12's line-level input connectors.
L.Front
~
Speaker~
L.
Rear
Speaker
Single
RCA
Audio
Cable
(not
supplied)
Use
Either
Connector
Audio
System
Head
Unit
t
Subwoofer
Output
,"
~f@]~:~'@j®
®
(
oE3
o)
L+
R+
I
PR
O
~E
C
T
PHASE
~ ~
~
....
I
::~Ar:
I
0
HI
GH
LE
V
EL
AUTO
REM
OT
E
LEVEL
40
Hz 200Hz
OdB
12d8 MIN MAX y •
§
~
~
.
IN TURN ON
CO
NTROL G
ND
REM
+1
2V
0
B
GT-BassPro12
R.
Front
Speaker
R.
Rear
Speaker
0

If
your car audio system's head unit does not have line-level
outputs:
Connect
the
GT
-BassPro12's
high-level
inputs
to
either
the
front
or
the
rear
speaker
outputs
of
your
car
audio
system's
head unit (splice
crimps
not
included).
Make
sure
to
connect
the
car
audio
system's
"+"
speaker
wires
to
the
"+"wires
on
the
GT-BassPro12's
high-level
input
wiring harness (the
gray
and
white
leads
without
stripes);
connect
the
car
audio
system's
"-"speaker
wires
to
the"-"
wires on
the
GT-BassPro12's
high-level input wiring harness (the leads with
black
stripes). Use least
#20
AWG
(0.8128mm)
speaker
wire
for
speaker-level
input
connections.
Left
Speaker
Splices
(not
supplied)
Audio
System
Head
Unit
Splices
(not
supplied)
Right
Speaker
0 0
~=a~~\=~~~~
8(
)§Sgi~~Q~~=~
0
White
Wire
c:Jt:3:10 D
000000
D 0
White
Wire
w/Biack
Stripe
Gray
Wire
w/Biack
Stripe
High-Level
Input
Wiring
Harness
(supplied)
Gray
Wire
'o@o
'~~
8~~:~l®J®
®
(o~o)
c@
~.
~~~~
~'
' ' ' ' ' '
liiil"
HIGH-LEVEL AUTO
REMOTE
LEVEL 40Hz 200Hz
OdB
12d8 MIN MAX
<!:)
INPUT
IN
TURN
ON
CONTROL GND
REM
+
12V
•
GT-BassPro12
0
CONNECTING THE POWER AND GROUND
Use at least
#12
AWG
(2.052mm) wire
for
the
positive
battery
("+12V")
and
ground
("GND")
connections.
Connect
the
GT-BassPro12's
"+
12V"
terminal directly
to
the
battery's
"+"
(positive) terminal. Install a fuse
holder
with
a
20A
fuse within
18"
(46cm)
of
the
battery's
"+"terminal.
Audio
System
Head
Unit
Remote
Turn-On
o o
..----,.--~~~~~
8(
l8g
~
#20
AWG
=<8>0
D
DDDDDD
D 0
(0.8128mm)
Wire
.
Chassis
Ground
~
#12
AWG
2.052mm)
Wire
(bare
metal)
I
?.
#12
AWG
(2.052mm
Wire
1
I -
1 1 1 1
~~~
fDl
20A
Fuse
t.
t.
t
(46cm)
lol
:-~·
i!i~!ilt'®'®~
.-~'-.
_________
:[""
~~':"
~:
• + l
0
~~~~
-:~;(~~~:-!!~
0
~~~~~J:
I
______
_
Route all
power
wires
through
grommets
in
the
vehicle's
firewall. If
factory
grommets
are
not
available, install
grommets
yourself.
Connect
a
short
ground
wire
from
the
GT-BassPro12's
ground
terminal
to
the
nearest bare metal
surface
on
the
vehicle. For a
good
connection,
use
sandpaper
to
clear
the
paint
from
the
metal surface and
use
a
screw
with
a
lock
(star) washer.
REMOTE TURN-ON CONNECTION
When using
the
line-level
input
connections,
the
GT-BassPro12
requires
a
+5V
to
+
12V
DC signal at
the
Remote
(REM)
connector
to
turn on.
Most
head units with
preamp
outputs
provide
a
remote
turn-on
wire
that
supplies this
remote
voltage signal. (As an alternative, you can
connect
the
REM terminal
to
a
switched
ignition circuit.) Use at least
#20
AWG
(0.8128mm)
wire
for
the
remote
turn-on
connection.
5

6
NOTE: The remote turn-on connection
is
not needed when using the
high-level input connections.
See
Auto Turn-On switch,
on
this page.
USING THE SUBWOOFER
WARNING: Playing loud music
in
an automobile can hinder your
ability to hear traffic and permanently damage your hearing. We
recommend listening
at
low or moderate levels while driving
your car. We accept no liability for hearing loss, bodily injury or
property damage resulting from the use or misuse of this product.
CONTROLS AND FUNCTIONS
The JBL GT-BassPro12's control panel features controls and indicators
that make it easy for you to integrate the subwoofer's sound with almost
any vehicle's unique acoustic properties.
0
Power
Indicator
Bass
Boost
Control
",@,
,_:~-58[@]
~-~?®j®
@
'@
~.
I '""'
HIGH-LEVEL
AUT;RC
E~;MOTE
LEVEL
40~z
20~H2
0:8
12~8
M~N
M~X
INPUT
IN
JRNON CONTROL
(©~©)
FUSE
25A
©lliiill©
GNO
REM
+12V
•
GT-E
as!:
Pro12
0
Q!CE:
~~
-=~~n~
Protect
Indicator
Auto
Turn-On
Switch
Phase
Switch
Low
Pass
Level
Control
Control
0
Power indicator: This
LED
will glow green when the JBL GT-BassPro12
is
operating.
Auto Turn-On switch:
If
you
connected your GT-BassPro12 using
the high-level connectors and did not connect the Remote Turn-On
connector, set the Auto Turn-On switch to the "On" position
(in).
If
you
did connect the Remote Turn-On connector, set the Auto Turn-On switch
to the "Off" position (out).
Protect indicator: This indicator will light up
(and
the subwoofer will
stop operating) to indicate the following conditions:
• Battery voltage too high/too low
• Subwoofer amplifier over temperature
• Short-circuit
in
the subwoofer driver or wiring
Correct the condition before attempting to use the subwoofer again.
Phase switch: This switch will reverse the phase of the GT-BassPro12's
output with respect to its input. When you install the GT-BassPro12 with
an
existing factory or aftermarket system, changing the Phase switch
setting to reverse the subwoofer's phase may produce a discernable
increase or decrease
in
the amount of upper bass that the system
reproduces, depending
on
the GT-BassPro12's location
in
the vehicle
and the distance between it and the other speakers
in
the vehicle.
Level control: Use this control to balance the relative volume of the GT-
BassPro12 with the other speakers
in
the vehicle.
Low Pass control:
Use
this control to adjust the amount of high-
frequency information present
in
the GT-BassPro12's output. A lower
value allows less high-frequency content.
Bass Boost control: Use this control to increase the amount of low
bass output from the GT-BassPro12. The Bass Boost control provides
up to 12dB of boost at 45Hz.

SETTING THE CONTROLS
1.
Make sure the head-unit power
is
off
and the GT-BassPro12's Level
control
is
set to minimum.
2.
Set the GT-BassPro12's Low Pass control to its maximum frequency
of 120Hz and set the Bass Boost control to the 12 o'clock setting.
NOTE:
If
you are using the Remote Level control, set it to maximum.
3.
Turn the head unit
on
and play a selection of your favorite music track
that has substantial bass.
4.
Adjust the Low Pass control counterclockwise until you hear only bass
information coming from the GT-BassPro12. For example, you should
not hear vocals coming from the subwoofer when you are seated
in
the normal listening position.
5.
Adjust the Bass Boost control either clockwise or counterclockwise to
suit your taste.
Be
sure to find a setting that does not create audible
distortion
in
the subwoofer's sound.
6a.
If you installed the remote level control, set the subwoofer's Level
control to its maximum and set the remote level control's knob
to
the maximum
level
that provides undistorted output from the GT-
BassPro12 with the head unit's volume control at its 3 o'clock
setting. Use the remote level control to adjust the subwoofer volume
according to your taste while avoiding distortion from the GT-
BassPro12.
6b.
If
you did not install the remote level control, adjust the subwoofer's
Level control to the maximum level that provides undistorted output
from the GT-BassPro12 with the head unit's volume control at
its 3 o'clock setting. After using the subwoofer for a while, if you
find that this setting produces too much bass, you can reduce the
subwoofer's Level control setting.
7.
With the Phase switch set at
oo,
play a music track that has impactful
drums, and listen for the upper bass content, paying attention to the
impact of the drums. Then set the Phase switch to 180°, and listen
to the same music again. There may be more upper bass, less upper
bass or no change at all. The Phase switch position that provides the
most upper bass
is
technically correct, but you can choose either
setting according to your taste.
NOTE:
In
most cases the above steps will provide you with satisfactory
results. However, the actual process may require several readjustments
of each control, since the settings will interact with one another. If
necessary, consult your authorized
J-BL
car audio dealer for help
in
tuning your system. ·
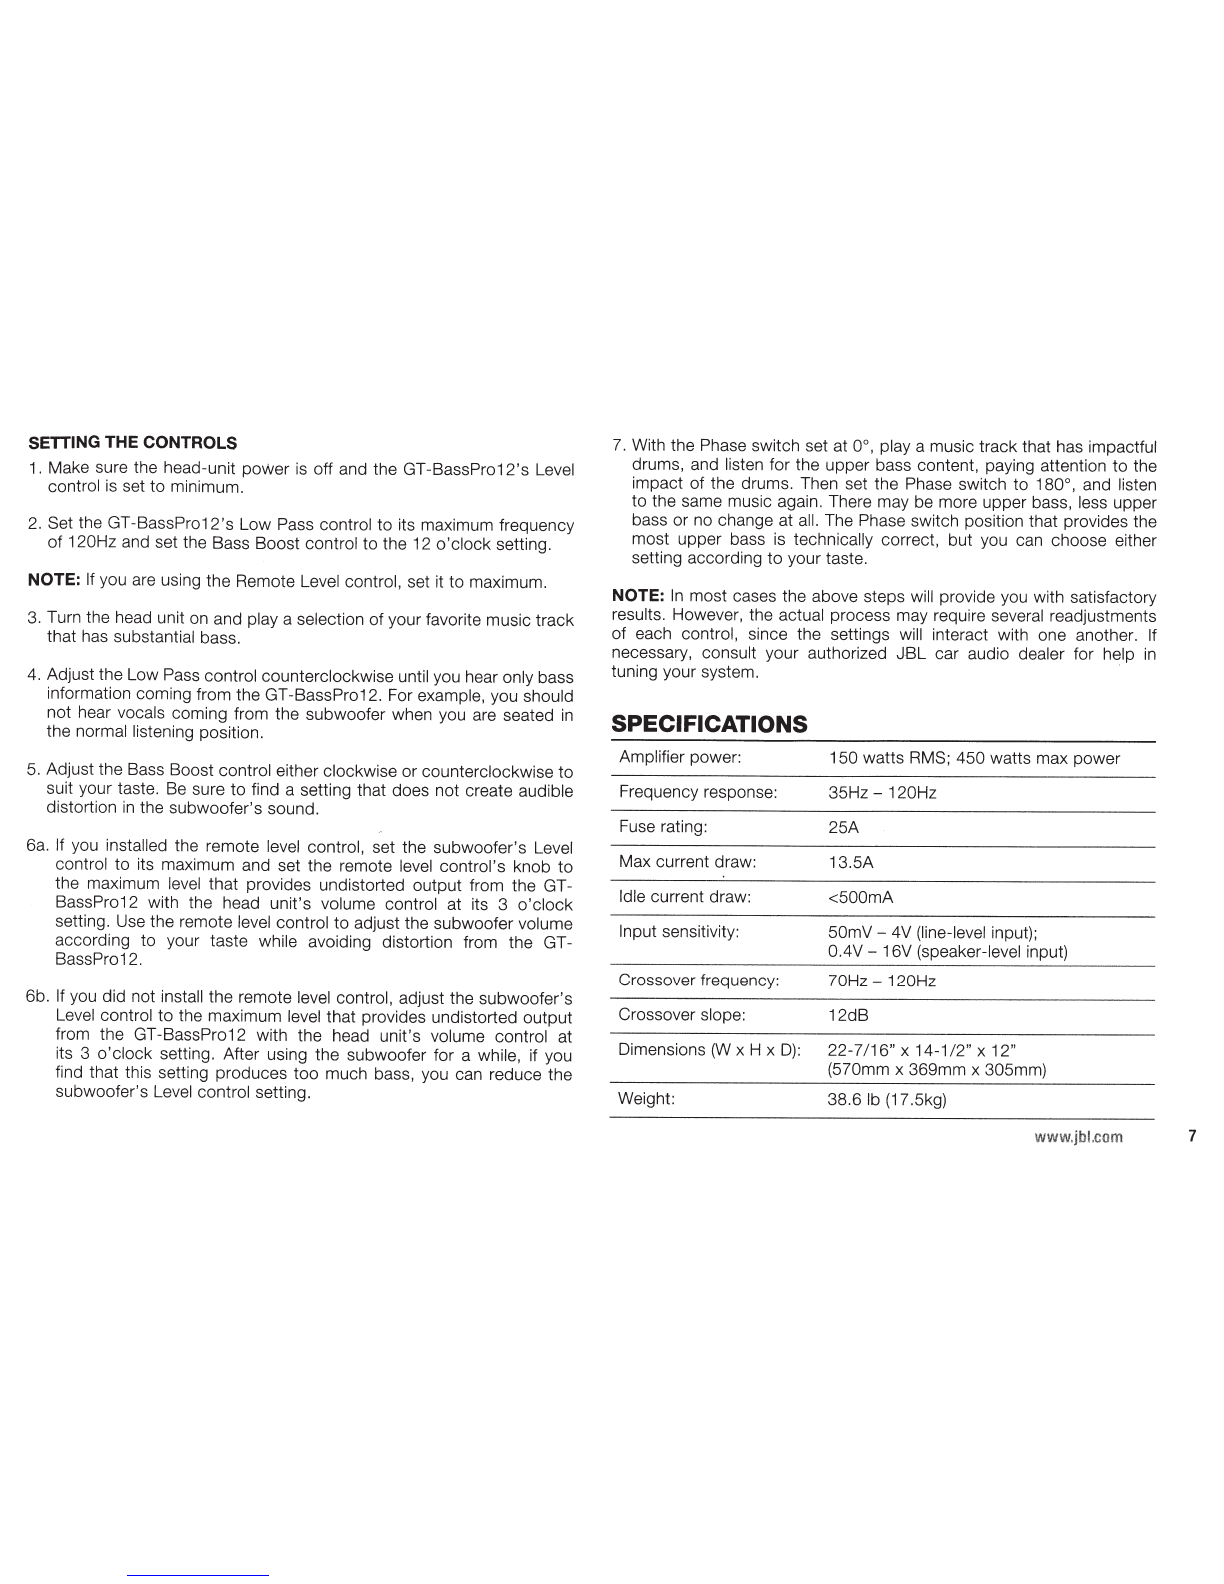
SPECIFICATIONS
Amplifier power: 150 watts
RMS;
450 watts max power
Frequency response:
35Hz-
120Hz
Fuse rating: 25A
Max current draw: 13.5A
Idle current draw: <500mA
Input sensitivity:
50mV-
4V
(line-level input);
0.4V-
16V (speaker-level input)
Crossover frequency: 70Hz -120Hz
Crossover slope: 12dB
Dimensions
(W
x H x
D):
22-7
/16" x
14-1
/2" x 12"
(570mm x 369mm x 305mm)
Weight: 38.6 lb
(17
.5kg)
www.jbLcom 7

8
TROUBLESHOOTING
If
your subwoofer isn't performing the way you think
it
should, check to see if the problem
is
covered
in
this section before calling your dealer or
contacting JBL customer service.
Problem
Power indicator
is
not lit.
Power indicator
is
lit, but there
is
no bass.
Output sounds muddy or distorted.
Output gets louder when the head-unit
balance
is
adjusted to L or
R.
Causes and Solutions
1. +12V wire fuse or subwoofer fuse
is
blown and needs replacement.
2.
Head unit not functioning properly.
3.
Check remote turn-on, +12V and GND connections.
1.
Inputs are not properly connected. Check connections.
2.
Head-unit fader controls are not set properly. Adjust head-unit controls to feed audio signals to
the subwoofer.
3.
Incorrect subwoofer Level control setting.
1
. Subwoofer Level control
is
set too high.
2.
Subwoofer Bass Boost control
is
set too high.
3.
Bass level
is
set too high
on
head unit.
4.
Head-unit output
is
distorted or blown.
See
your authorized JBL car audio dealer.
Using speaker-level input connections: One of the speaker-level input connections
is
reversed
(+/-). Reverse one channel.

-HARMAN Consumer, Inc.
~
8500 Balboa Boulevard, Northridge, CA 91329 USA
© 2011 HARMAN International Industries, Incorporated. All rights reserved.
JBL
and BassPro are trademarks
of
HARMAN International Industries, Incorporated, registered
in
the United States
and/or
other countries.
Features, specifications and appearance are subject to change without notice.
Part No. 950-0368-001
UDL
®
bvHARMAN
www.jbl.com
9

Other manuals for GT-BassPro12
1
Table of contents
Other JBL Subwoofer manuals