JDW UX379 User manual

1
JDW 5-IN-1 ELECTRIC GRILL
(5 Functions in 1: GRILL, BAKE, ROAST, FRY, STEW)
Operating Instructions
Important Safety Instructions…………………………….………....2
Unit Overview……………………………………….…………….….5
Assemble the Knob to the Glass Lid………….………………….….5
Temperature Sensor…………………………………………..………5
Preparing the Unit…….………………………………………….…..6
Connecting the Unit..…………………………...…………….….…...6
Preparing Foods.….……………………………..…………….….…..6
Recipes for Reference…………….……………………………………7
Using The Glass Lid.………………………………..………………...8
General Care and Cleaning..……………………….………….……..8
Disposal……………………….……………………………..…………8

2
Important Safety Instructions
1.Please read these operating instructions through carefully before
using the pan.
2.Only connect the unit to an AC power supply. The voltage listed on the
rating plate must coincide with the voltage of your power supply.
3.Never leave the unit unattended during use.
4.Avoid danger of tripping. Do not allow the electric cable to hang down.
5.Keep the electric cable away from hot surfaces and open flames or
sharp edges.
6.Never touch the electric cable and plug with wet hands.
7.Never immerse the unit, electric cable or plug into water or other
liquids.
8.Do not use the unit outside.
9.The unit is only intended for use in the house and not for commercial
purposes.
10. Check the unit, electric cable and plug regularly for visible damage.
Do not use the unit under any circumstances if you have noted any
damage.
11. Have damage repaired by a qualified specialist only. Never attempt
to repair any damages by yourself.
12. Only use the unit on a heat-resistance surface. Never position the
unit close to hot surfaces or open flames.
13. The High temperatures are present during operation. Only touch the
handles on the unit.
14. Only delivered connector can be used, if the connector is damaged,
please contact the manufacturer or agent.
15. Always pull out the plug before removing the temperature regulator!
16. This appliance is not intended to be operated by means of an
external timer or separate remote-control system.
17. If the supply cord is damaged, it must be replaced by the
manufacturer, its service agent or a similarly qualified person in
order to avoid a hazard.

3
18. This appliance can be used by children aged from 8 years and
above if they have been given supervision or instruction concerning
the use of the appliance in a safe way and understand the hazards
involved. Cleaning and user maintenance shall not be made by
children unless they are older than 8 years and supervised. Keep
the appliance and its cord out of reach of children aged less than 8
years.
19. Children shall not play with the appliance.
20. Appliances can be used by persons with reduced physical, sensory
or mental capabilities or lack of experience and knowledge if they
have been given supervision or instruction concerning use of the
appliance in a safe way and understand the hazards involved.
21. Keep the appliance and its cord out of reach of children less than 8
years.
22. Caution :Hot surface
23. the appliance inlet must be dried before the appliance is used again
24. only the appropriate connector must be used
Plug Wiring (UK)
This appliance is fitted with a BS1363 13 amp plug.
If you have to replace the fuse, only those that are
BSI approved to BS1362 and with a rated current of
13 amps should be used. Spares fuses are available
from electrical stores. If the plug outlets in your
home are not suitable for the plug of this product,
the plug must be removed and disposed of safely
as insertion of the plug into a socket is likely to
cause electric hazard.
A replacement plug should be wired according to
the following instructions.
If in doubt, contact a qualified electrician.

4
This appliance must be earthed. The wires in the cord
set are coloured in the following way: BLUE-NEUTRAL.
BROWN-LIVE, GREEN&YELLOW-EARTH
The wire that is coloured blue must be connected
to the terminal that is marked with the letter N.
The wire that is coloured brown must be connected
to the terminal that is marked with the letter L.
The wire that is coloured green & yellow must be
connected to the terminal in the plug that is marked
with the letter E or marked with symbol.
If the supply cord is damaged a qualified person must
replace it in order to avoid a hazard.

5
Unit Overview
Assemble the Knob to the Glass Lid
Step 1: Loosen and separate the other 4 parts from the Screw (3) with a screwdriver.
Step 2: Pick up the Transparent Ring (1) and press it on the central hole of the inner
face of the glass lid.
Step 3: Pick up the Metal Ring (2) and press it on the Transparent Ring (1).
Step 4: Insert the Screw (3) through the rings from the inside of the glass lid.
Step 5: Put the Black Ring (4) around the Screw (3) from the outer face of the glass lid.
Step 6: Put the Knob (5) on to the Black Ring (4) and the Screw (3).
Step 7: Fasten the Screw (3) and the other 4 parts with a screwdriver.
Temperature Sensor
2
1
2
3
4
1. Temperature Sensor
2. Electric Plug
3. Electric Cable
4. Temperature Regulator
5. Control Lamp
1 Basic Unit
2 Heating Plate
3 Handle (Knob+ Black Ring)
4 Glass Lid
1. Transparent Ring
2. Metal Ring
3. Screw
4. Black Ring
5. Knob
5
4
3
2
1
1
2
3
4
5
6
Preparing the Unit
Before using the unit for the first time, carefully clean the unit and lid.
Do not use any aggressive detergents, brushes with metal or nylon bristles or sharp
objects such as knives or spatulas for cleaning the unit. Avoid damaging the non-stick
coating. Always dry the unit thoroughly after cleaning it.
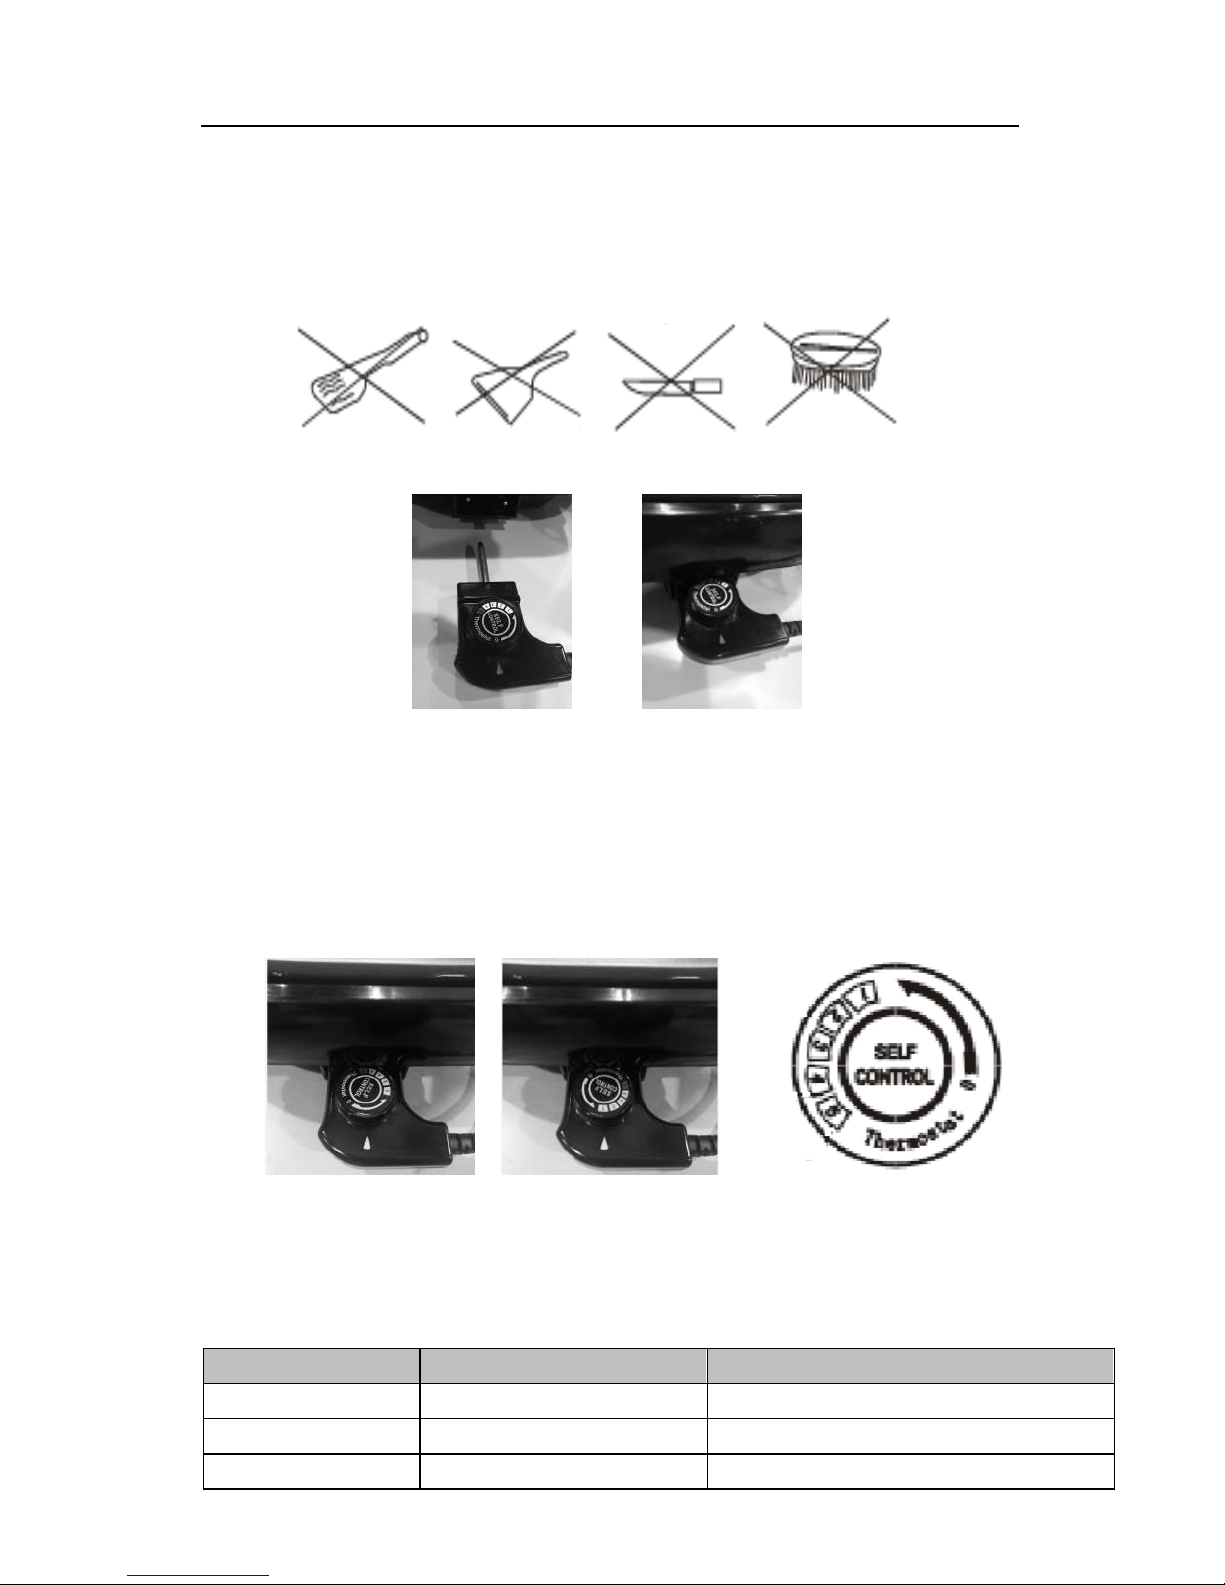
Connecting the Unit
1 .Align the temperature sensor to the central hole on a side of the base
2. Insert the temperature sensor in to the central hole of the base. Make sure that
the connection is tight.
Note: The initial status of the temperature regulator is below “0”.
2. Connect the electric plug to a 220-240Vsocket-outlet.
Preparing Foods
1. Brush the heating plate with a little cooking oil.
2. Rotate the temperature regulator clockwise over “0”. The control lamp will light up in
orange. The temperature on the heating plate begins to rise.
3. There are 5 heating levels. Rotate the temperature regulator clockwise to the level
you choose. (Picture 3 shows that the temperature regulator is at level 1.)
Heating levels
Temperature
Cooking Functions
1 & 2
100-150C°
Bake / Grill
3 & 4
150-200C°
Roast / Fry
5
About 220 C°
Stew
1
2
2
3

7
Recipes for Reference
Bake Grill
1 Bake: Dip bread slices in egg mixture Brush the heating plate with a little cooking oil
and bake till the surface turns to golden brown and flip over to another side to
continue baking. Time: about 45 seconds
1 Bake: Bake bread slices without egg mixture, till crispy and brown, and flip over to
another side to continue baking. Time: about 3 minutes
2 Grill: prepare 200g pork, slice it into about 4 cm strips. Brush the heating plate with a
little cooking oil and grill the pork strips till well done and with grilled marks on
surfaces, flip over to another side to continue grilling. Time: about 2 minutes
Roast Fry
3. Roast: prepare 4 large pieces of beef in about 2 cm thick, 200g~ 250g; Brush the
heating plate with a little cooking oil and roast the beef till medium well, flip over to
another side to continue roasting. Time: about 4 minutes.
4. Fry: prepare carrot (200g), cucumber (200g), pork (200g). Cut the ingredients into 1
x 3 cm strips. Put proper amount of cooking oil and the ingredients in heating plate.
Stir fry for 5 minutes until well done.
Level 5
5. Stew: prepare pork (500g) - diced in to about 3 x 3 cm cubes, potato (600g) -
chopped in to about 3X3cm cubes, and carrot (400g) cut in about 3cm strips. Put
proper amount of cooking oil the ingredients in heating plate, add 1000g of water,
and cover with lid. Stew for 28 minutes till well done.
Note: After cooking, turn off the heat by rotating the temperature regulator
anti-clockwise till it is below “0”and then stops rotating.

8
Using the Glass Lid
Use the glass lid where possible when cooking all food types.
The cover prevents smells from escaping and reduces cooking time.
Note: The glass lid is liable to get hot during use
General Care and Cleaning
Set the temperature regulator to the 0 level and pull the plug out of
the mains socket!
Allow the unit to cool down thoroughly before cleaning it.
Clean the Pan with a clean and dry cloth only.
Don’t use harsh abrasive cleanser or a metal sponge to clean the
Pan
After cleaning, the Pan should be stored indoors in a dry location.
It has removable plastic handle, easy to be cleaned and more safe
to be used.
Technical data
Voltage supply: 220-240V AC 50/60Hz Output: 1500W
Disposal
The packaging materials are recyclable. Dispose of the
packaging in an environmentally friendly manner and make it
available to the collection service for recyclable materials.
Dispose of the device in an environmentally friendly manner
when you decide to part with it. The device does not belong in
the household waste. Dispose of it at a recycling centre for old
electrical and electronic devices. For more information, please
contact the administration in your community.
Table of contents
Other JDW Grill manuals

Popular Grill manuals by other brands

BlueRhino
BlueRhino UniFlame GBC981W-C owner's manual

Silvercrest
Silvercrest KH 1147 operating instructions

BlackBull
BlackBull PiQoo Assembly and operating instructions

GrillChef
GrillChef 11316 Assembly instruction

MasterChef
MasterChef G42602 Assembly manual

GrillMaster
GrillMaster 720-0830K Assembly & instruction manual


FLORABEST
FLORABEST FKG 48 A1 operating instructions

Outdoorchef
Outdoorchef CHELSEA 480 G user guide

New Age
New Age Platinum Installation and operation guide

H.Koenig
H.Koenig RP2 instruction manual

Twin Eagles
Twin Eagles TEBQ36G-C Installation use and care manual

Beef Eater
Beef Eater 1100 series Assembly instructions