JEFA TECH XR PLUS Quick guide

PAGE 1
Copyright JEFA Tech, Inc. - All rights reserved - http://www.jefatech.com
JEFA TECH REPEATER XR PLUS
CONFIGURATION
INSTRUCTIONS
THANK YOU FOR PURCHASING A JEFA TECH REPEATER XR PLUS!
How the JEFA TECH REPEATER XR PLUS System Works
The JEFA Tech Repeater XR PLUS consists of two main components:
BULLET Outdoor WiFi Bridge and fiberglass antenna. It receives the signal from the
source WiFi. The antenna must be placed outside in a vertical position with the antenna
pointing straight up. Place it where it has a clear line of sight to the source WiFi.
AIRGATEWAY Indoor Access Point – this is the black device with black antenna. It
should be placed inside in a convenient location. It broadcasts a private WiFi signal that
you will connect your devices to. You can connect any WiFi device to the
AIRGATEWAY including laptops, tablets, printers, gaming consoles, or video streaming
devices.
IMPORTANT:
DO NOT PRESS RESET BUTTONS ON ANY OF THE EQUIPMENT
Doing so will put the system in a default state that will require technical support to fix.
ABOUT CONFIGURING YOUR DEVICES:
The BULLET outside antenna and AIRGATEWAY are configured independently of each other.
The following IP addresses are associated with each of the devices:
BULLET - outside antenna / WiFi receiver – used for scanning for the WiFi network to repeat:
http://192.168.123.1
AIRGATEWAY – indoor access point – used for broadcasting your private WiFi network:
http://192.168.123.2
Their interfaces look almost identical so it is important to keep track of which device you are
configuring. 99% of the time you will be using http://192.168.123.1 only

PAGE 2
Copyright JEFA Tech, Inc. - All rights reserved - http://www.jefatech.com
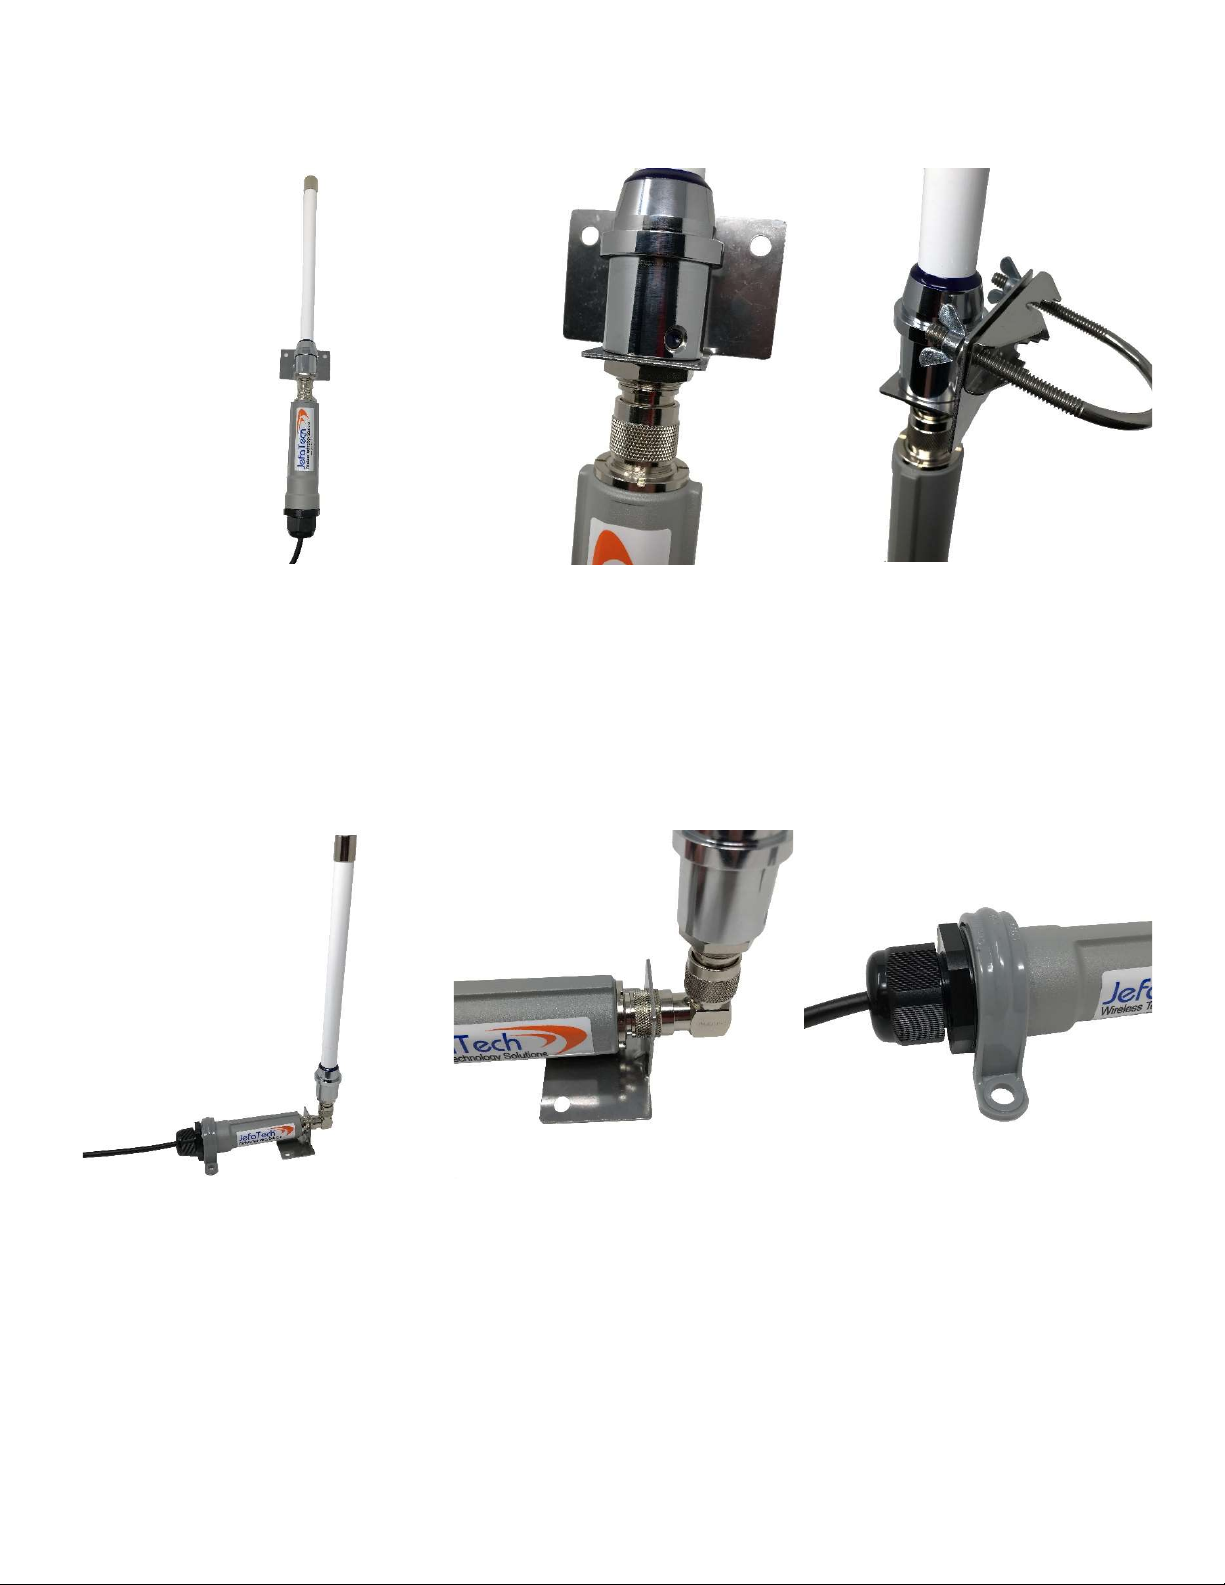
INSTALLATION OF OUTDOOR BULLET AND ANTENNA
There are various ways to install the outdoor BULLET and fiberglass antenna based on your
needs and requirements.
Key considerations for all installations:
The white fiberglass antenna must be in a vertical position – pointing straight up.
Anything other than vertical will cause decreased performance.
The BULLET (gray aluminum tube) is designed to be weatherproof. It will survive rain,
heat, cold, and salt water spray. The cable entry grommet must be in place and tightened
for the unit to remain weatherproof.
Additional sealing of the connection between the BULLET and fiberglass antenna is not
required, but it is okay to add sealant tape for extra protection.
Hand tighten the connection between the BULLET and the antenna. Using tools will
damage the connector.
Hand tighten the cable gland where the cable enters the BULLET. Using tools will
overtighten and damage the gland.
The outdoor BULLET and antenna works best when outside and up in the clear. It is not
recommended to install and operate the outdoor unit indoors. Using the BULLET
and fiberglass antenna indoors may cause connection difficulties and reduced
performance. There is also the risk of exposure to high levels of RF radio wave energy to
anyone that remains very close to the outdoor antenna for an extended period of time.
There are two installation configurations, VERTICAL and FLAT. Hardware for both types of
installations is included in the packaging.
PAGE 3
Copyright JEFA Tech, Inc. - All rights reserved - http://www.jefatech.com
VERTICAL INSTALLATION
Vertical installations are suitable for permanent or temporary mounting to the vertical section of
RV Ladders, Boat masts or stanchions, a temporary pole, or to the side of an outbuilding.
Connect the BULLET to the fiberglass antenna as pictured above
The mounting bracket can be attached either using the u-bolt and wingnuts or directly
screwed to a vertical surface
The BULLET radio can hang freely from the antenna with no further support needed
Allow enough slack in the cable so it is not pulling down tightly
FLAT INSTALLATION
Flat installations are suitable for permanent mounting to an RV Roof or Boat Deck.
Remove the angle bracket from the fiberglass antenna and slip it onto the BULLET’s
antenna connector as pictured above. It is a tight friction fit.
Connect the right angle adapter to the BULLET’s antenna connector.
Connect the fiberglass antenna to the right angle adapter
Mount the BULLET and antenna to the flat surface with the cable end of the BULLET
pointing away from the primary direction of the vehicle’s travel.
Attach the hold down clamp to the back of the BULLET as pictured
PAGE 4
Copyright JEFA Tech, Inc. - All rights reserved - http://www.jefatech.com
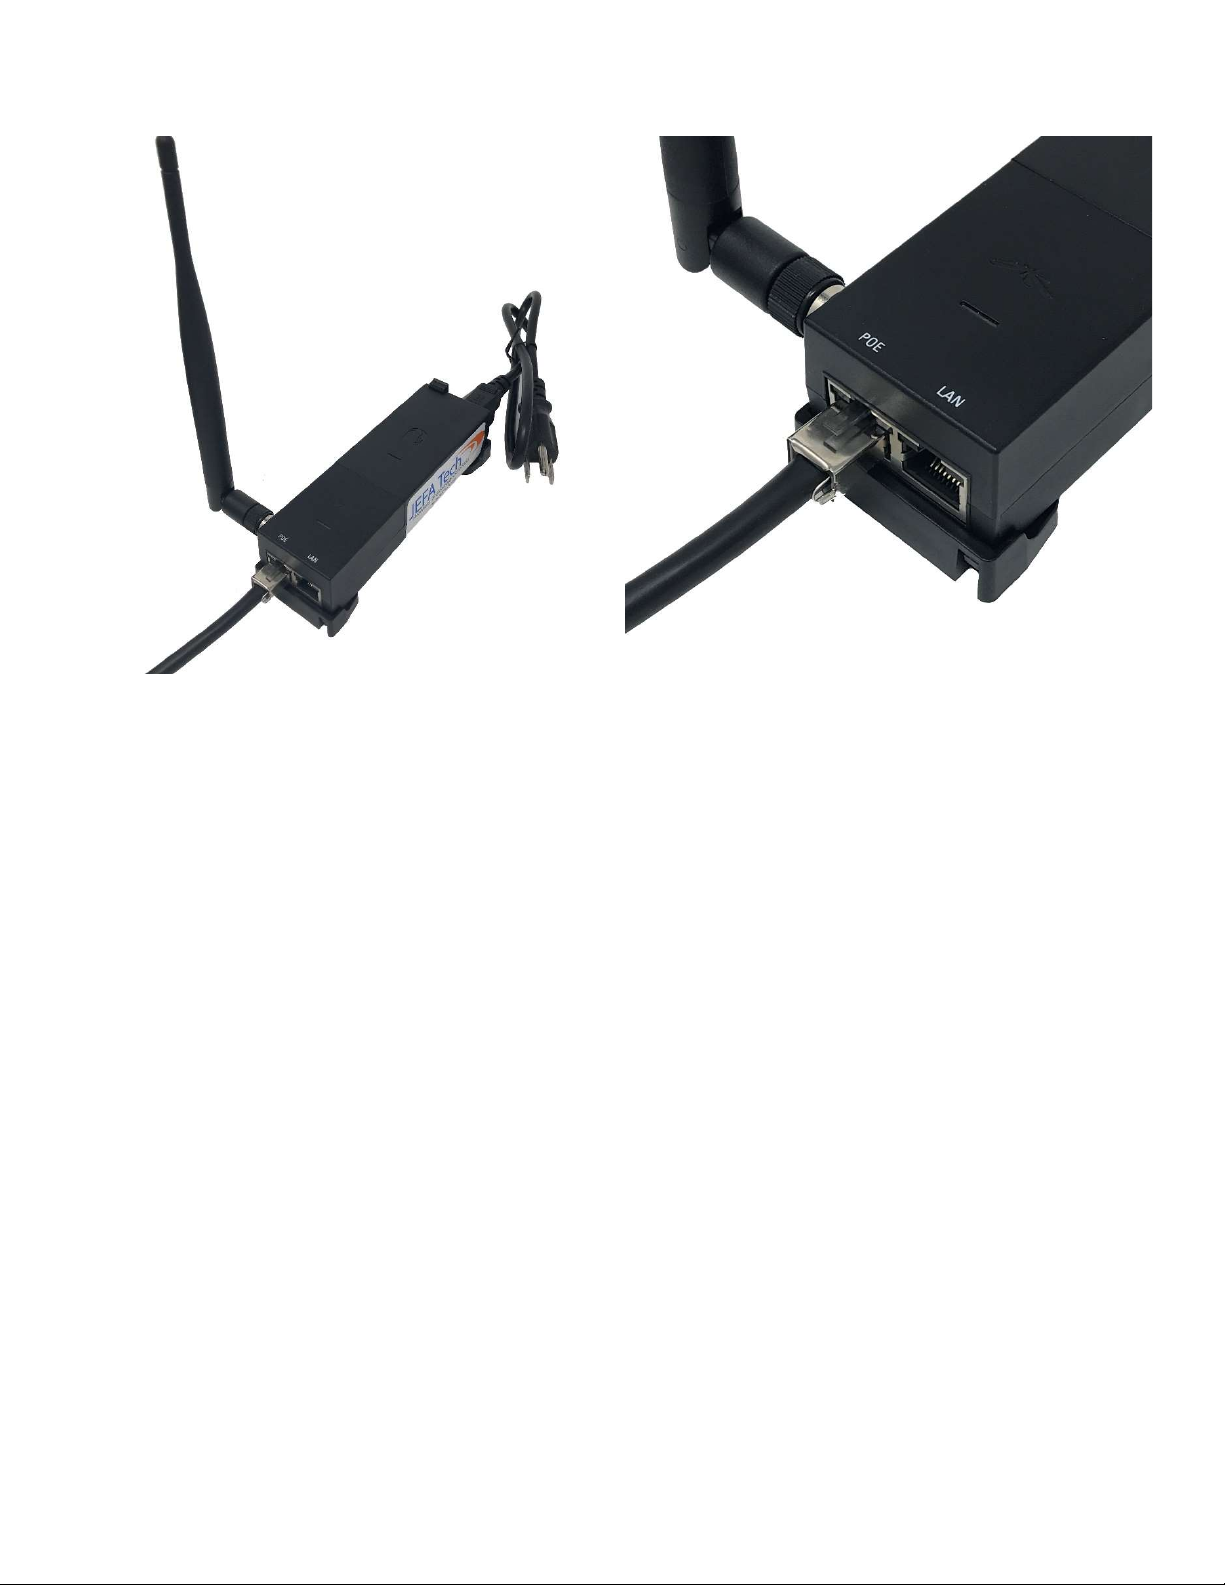
AIRGATEWAY (INDOOR ACCESS POINT) INSTALLATION
The AIRGATEWAY (black box) is an indoor unit and should be placed in a convenient
location to provide a WiFi signal to your devices. It broadcasts your private WiFi signal.
Attach the black rubber duck antenna to the AIRGATEWAY to provide maximum coverage.
The black rubber duck should ideally be vertical, but will still function if it is not. You can
use the included wall mount to attach the unit to a wall or other solid surface if desired.
Route the black Shielded Cat5e inside to where you will have your AIRGATEWAY. If you
have to pull the connector and cable through a tight opening, tape over the connector
to protect it. Be careful not to pull too hard on the connector or you may damage it.
Instead of pulling on the connector, wrap a pull string and tape around and 6 to 12 inches
down the cable so that you are pulling the cable, and not pulling the connector.
Connect the black shielded Cat5e cable to the port marked POE on the AIRGATEWAY.
Connect power to the AIRGATEWAY using the supplied AC power cord. This single
power connection will power both the AIRGATEWAY and BULLET.
PAGE 5
Copyright JEFA Tech, Inc. - All rights reserved - http://www.jefatech.com
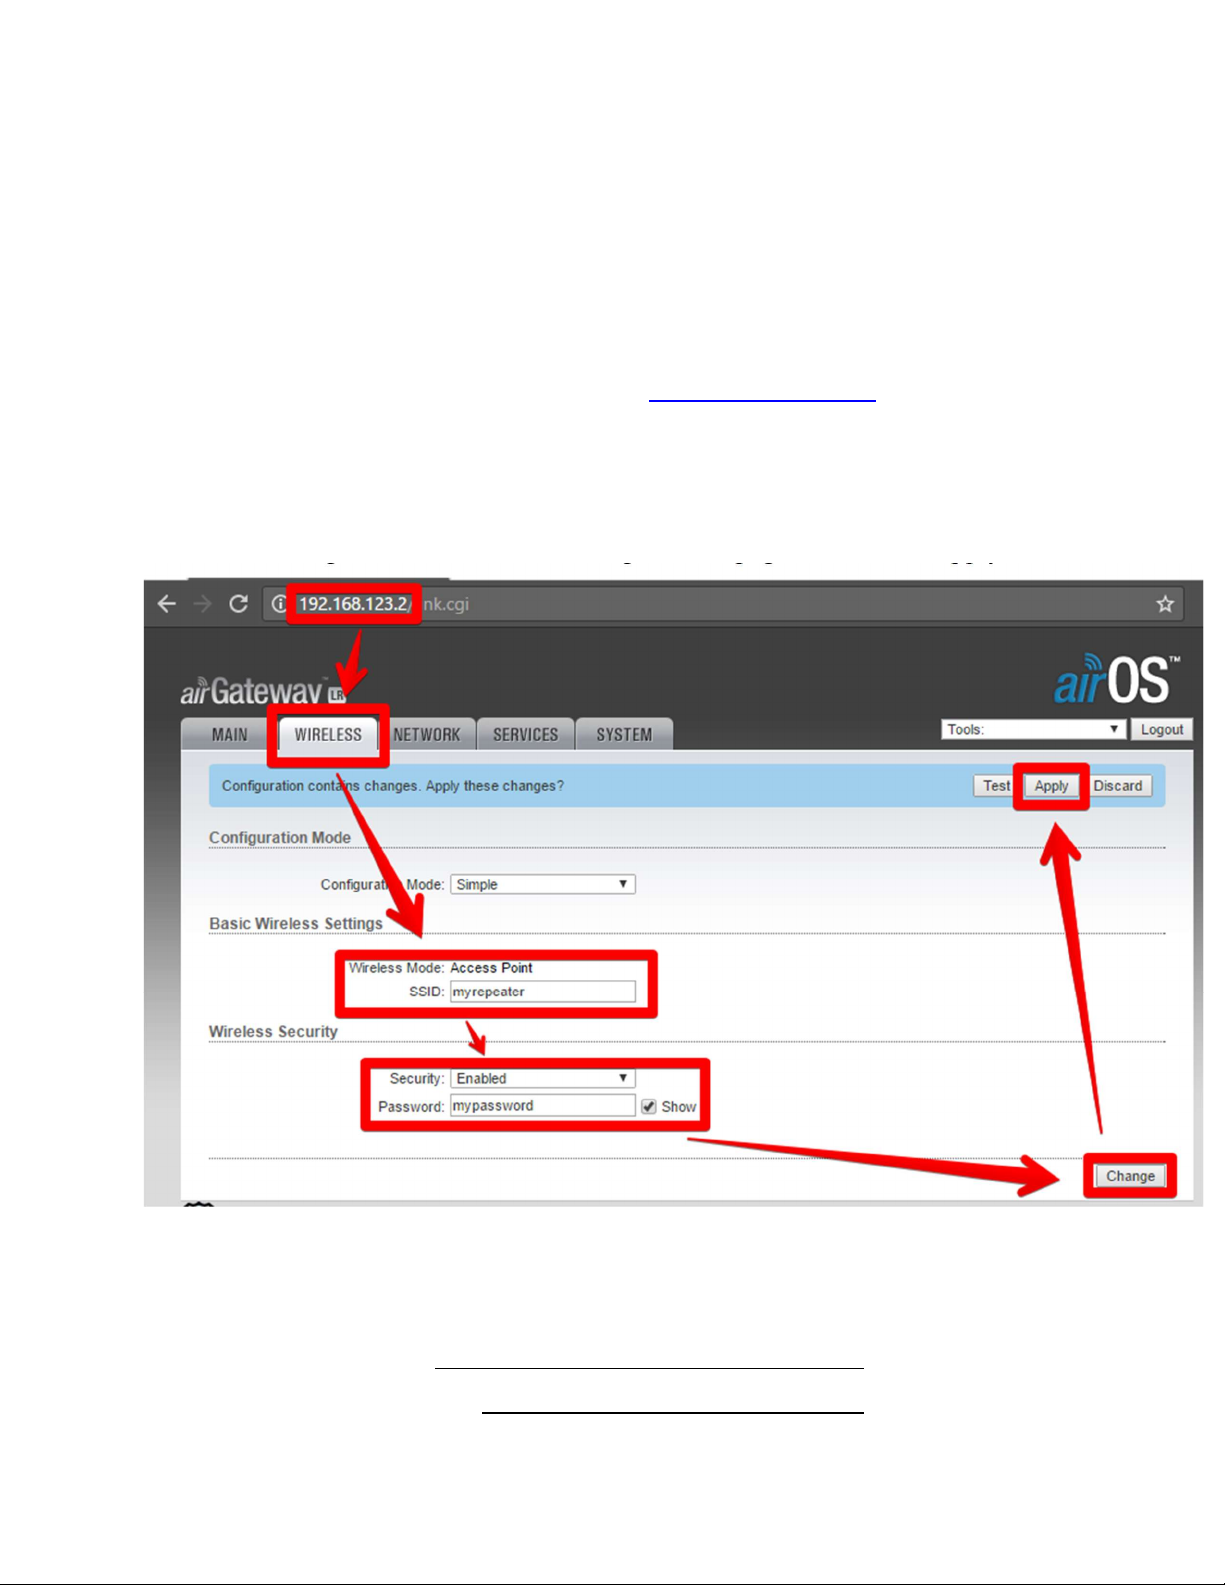
FIRST TIME SETUP:
SECURING YOUR REPEATER’S PRIVATE WIFI NETWORK
Your private WiFi network is set by default to “jefatech-repeater” and does not require a
password. You should change this name to something meaningful for you and give it a
password to keep others from using your repeater without your permission. This is a one-time
setup.
1. Connect one of your devices to the WiFi network named “jefatech-repeater”
2. Using your Web Browser, go to the address: http://192.168.123.2
3. Log in using the username “admin” and password “admin”
4. Click on the “Wireless” Tab and change the “SSID” to a name of your choice
5. If you would like a password for your private WiFi network, under “Wireless Security”
change the Security to “Enabled” and enter your password you would like to use.
6. Click the “Change” button at the bottom right of the page, then click “Apply”
7. This completes the one-time setup. You should close your web browser.
8. Write down what you have named your repeater and its password below for future
reference
SSID:
Password:

PAGE 6
Copyright JEFA Tech, Inc. - All rights reserved - http://www.jefatech.com
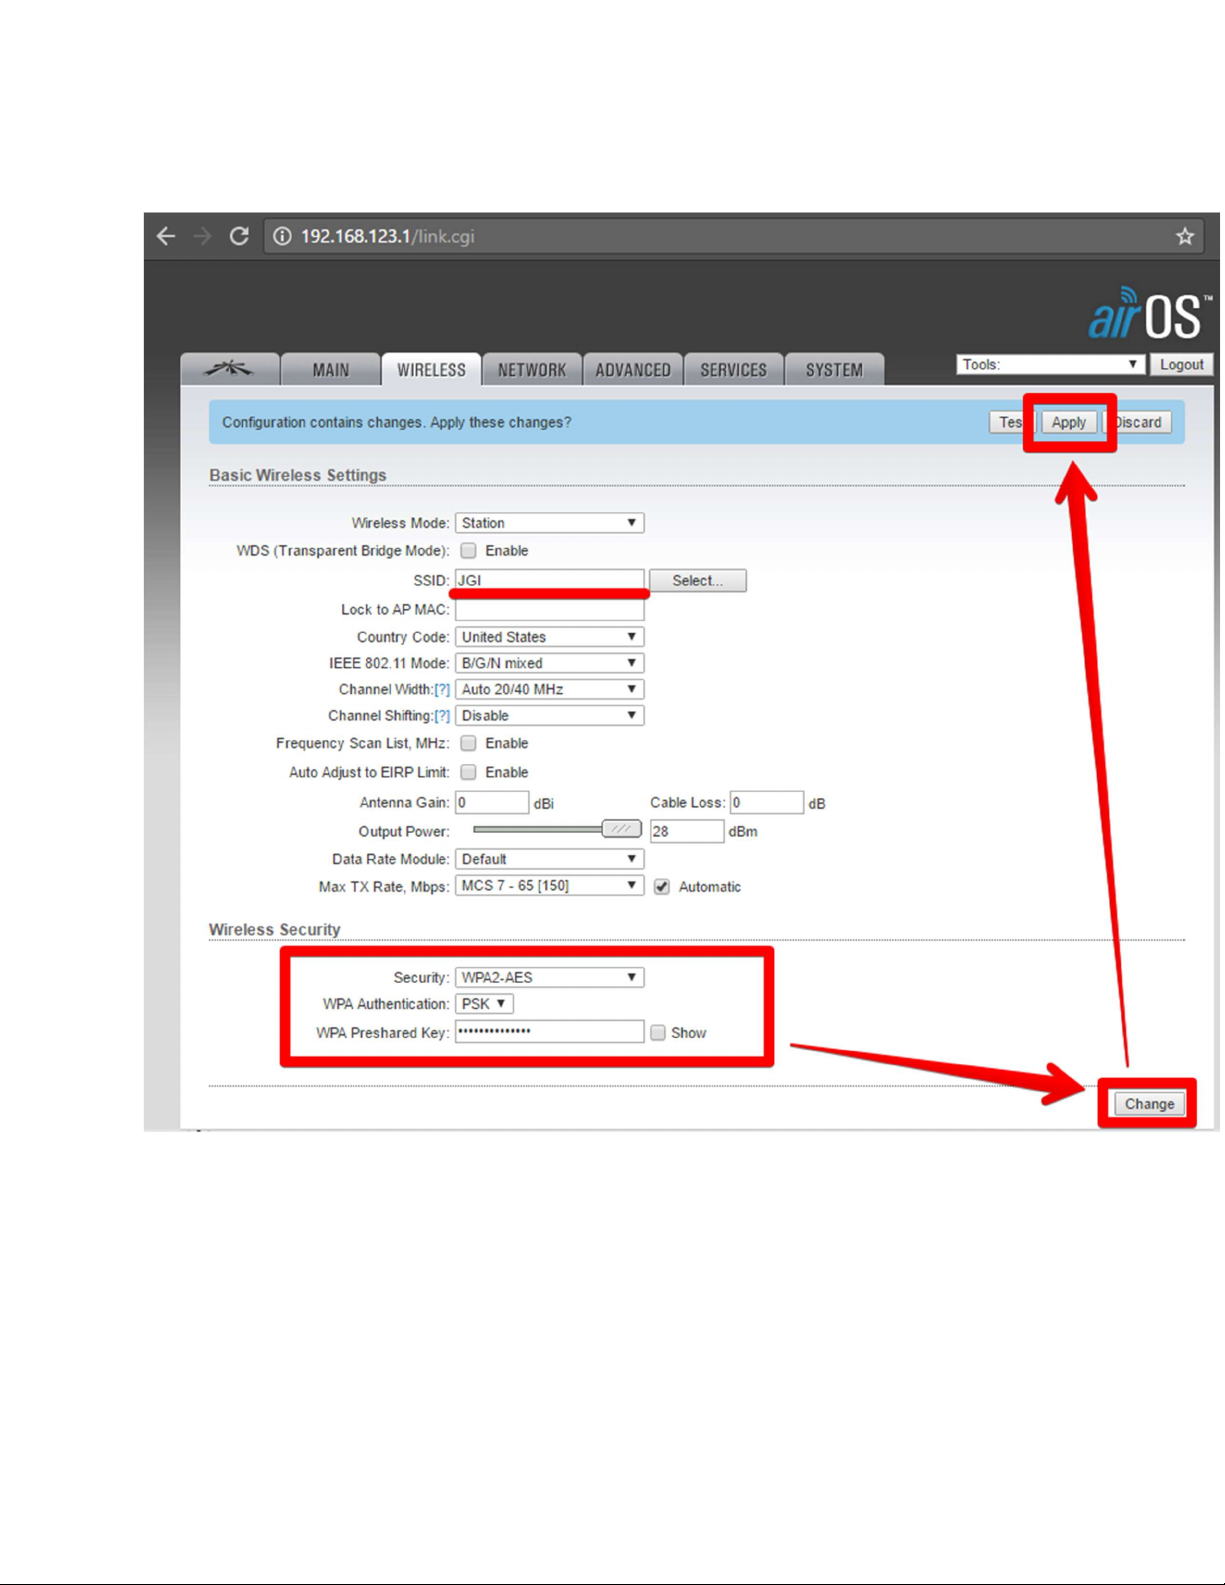
Scanning and Choosing a WiFi Network to Repeat
In order to connect to the Internet, you must find and connect to a WiFi network that can
provide you with Internet access. You will complete these steps each time you arrive at a new
location and need to connect to a new WiFi source. Connect one of your devices to your private
WiFi network (name and password found on page 5, step 8) or “jefatech-repeater” if you chose
not to rename it.
1. Using your Web Browser, go to the address: http://192.168.123.1
2. Log in using the username “admin” and password “admin”
3. Click on the “Wireless” Tab
4. Next to SSID, click the “Select…” button
5. A popup window will appear which shows the WiFi signals in your area that are
available. Choose the source WiFi network you want and click the Select button.
PAGE 7
Copyright JEFA Tech, Inc. - All rights reserved - http://www.jefatech.com
6. You will be returned to the “Wireless” tab and the SSID of the network you selected will
be filled in. If the source WiFi network requires a password, you must enter the
password for the network in the “Preshared Key” box under Wireless Security. If there is
no box to enter a password, then the network is open and does not require a password.
7. Click the “Change” button at the bottom right of the page, then click “Apply”.
8. Wait 30 seconds for the system to attempt the connection. Don’t rush this! Please wait.
9. Click “Main” tab and you will see the signal strength of the connection. If you have a
colored signal bar, you have a good signal.
10. At this point you should be able to get online. You can log out by clicking the “Logout”
button at the top right. Now try to go to your favorite website to confirm you are online.
Connect your other devices to your private WiFi network and they will be online too.

PAGE 8
Copyright JEFA Tech, Inc. - All rights reserved - http://www.jefatech.com
TROUBLESHOOTING AND TECHNICAL INFORMATION
On the main tab, my signal strength bar lights up, then disappears, then lights up again
and the cycle repeats. I can’t get online. What’s wrong?
This is the system trying over and over to connect to the source network, but the connection
is being rejected due to an incorrect password. Double check that you have entered the
correct password for the source WiFi on the Wireless tab under Wireless Security.
How do I read signal strength when doing a scan?
The Signal/Noise column indicates the strength of the source WiFi signal. A lower number
is better (ignoring the – sign). The difference between Signal and Noise will need to be
greater than 10 to be usable. In the example on page 6, the “JGI” network is -44/-93 which
is a difference of 49 so it is very strong. To compare, the example “ZF4NT” network is -
91/-93, a difference of 2. This is extremely weak and unusable.
Wow, so many settings, knobs, switches and buttons in the interface. What do they
do?!
See all of those other settings? Don’t touch them. Please. Seriously. Changing things other
than what we have outlined in this manual will lead you into a world of frustration. Trust us.
All of the settings are already optimized.
What IP address have I received from the source WiFi network?
Click on the Main Tab. Under the “Monitor” heading, click DHCP Client. You will see the
IP Address given to you from the source network. If you see “Status: Not connected” then
you are not connected to a source WiFi network.
TECHNICAL SUPPORT
We are here to help and want nothing more than to get you up and running.
Call us at 888-467-2258 or e-mail [email protected]
Table of contents


