manuals.online logo
Brands
  1. Home
  2. •
  3. Brands
  4. •
  5. Jenn-Air
  6. •
  7. Convection Oven
  8. •
  9. Jenn-Air SVE47500 User manual

Jenn-Air SVE47500 User manual

mmmJENN.AIR
Use and Care Manual
Grill-l__ge with
Self-Cleaning Conventional
and Convection Oven
Models SVE47500 and SVE47600
Model SVE47600
Congratulations on your choice of a Jenn-Air grill-range. The indoor grilling
of meats, fish or fowl is one of the most attractive and succulent methods
of preparing these foods ... a unique flexibility made possible byJenn-Air's
patented integral ventilation system.
Your Jenn-Air self-cleaning oven combinesthe best of fourcooking methods,
conventional baking or roasting, convection baking, convection roasting and
broiling. (Note: Only Model SVE47600 has the convection options.)
The Jenn-Air convection oven is actually aconventional oven that circulates
heated air within the oven. As both bake and broil heating elements cycle on
and off with the thermostat, afan keeps the heated air circulating around the
food, The constantly recirculating heated air in the convection oven strips
away the layer of cooler air that surrounds the food. Consequently, many
foods cook more quickly. Evenly distributed heat makes multiple rack
cooking possible. Convection roasted meats retain their natural flavor and
juiciness with less shrinkage than conventional roasting.
In addition to the many exclusive benefits of convection cooking, your Jenn-
Air oven is also a fine full featured conventional bake and broil oven. You can
cook your "old favorite" recipes as you have in the past. The conventional
bake oven also gives you the flexibility of preparing various foods when
convection cooking may not be as beneficial, as when cooking foods in
covered casseroles or clay pots. The broil element is convenient for top
browning and oven broiling of foods.
Before you begin cooking with your new range, please take afew minutes to
read and become familiar with the instructions in this book. On the following
pages you will find a wealth of information regarding all aspects of using your
new range. By following the instructions carefully, you will be able to fully
enjoy and properly maintain your range and achieve excellent results with the
food you prepare.
Should you have any questions about using your Jenn-Air range or need a
Use and Care manual for your cooktop cartridge, write to us. Be sure to
provide the model number.
Jenn-Air Customer Assistance
cto Maytag Customer Service
P.O. Box 2370
Cleveland, TN 37320-2370
ApplianceUsage
BeforeYou CallforService..........................................................................................46-48
CaringforyourRange
AccessPanel.............................................................................................................44
AdjustOven Temperature..........................................................................................44
ChildProtectionLock.................................................................................................43
CleaningOther Parts ofYour Range ..................................................................... 42-43
Oven Light Bulb ......................................................................................................... 45
RangeComponents............................................................................................................. 8
Safety Precautions ........................................................................................................... 4-7
Using the Cooktop and Grill
Accessories.................................................................................................................. 50-51
CooktopCartridges
HomeCanning ........................................................................................................... 11
Installation................................................................................................................. 11
Cookware .......................................................................................................................... 12
DuctingInformation ........................................................................................................... 49
Gritling
Cleaning................................................................................................................ 16-17
GrillingGuide .............................................................................................................. 15
GrillingTips ................................................................................................................ !6
Installation .................................................................................................................. 13
Usage ......................................................................................................................... 14
Surface Controls................................................................................................................ 10
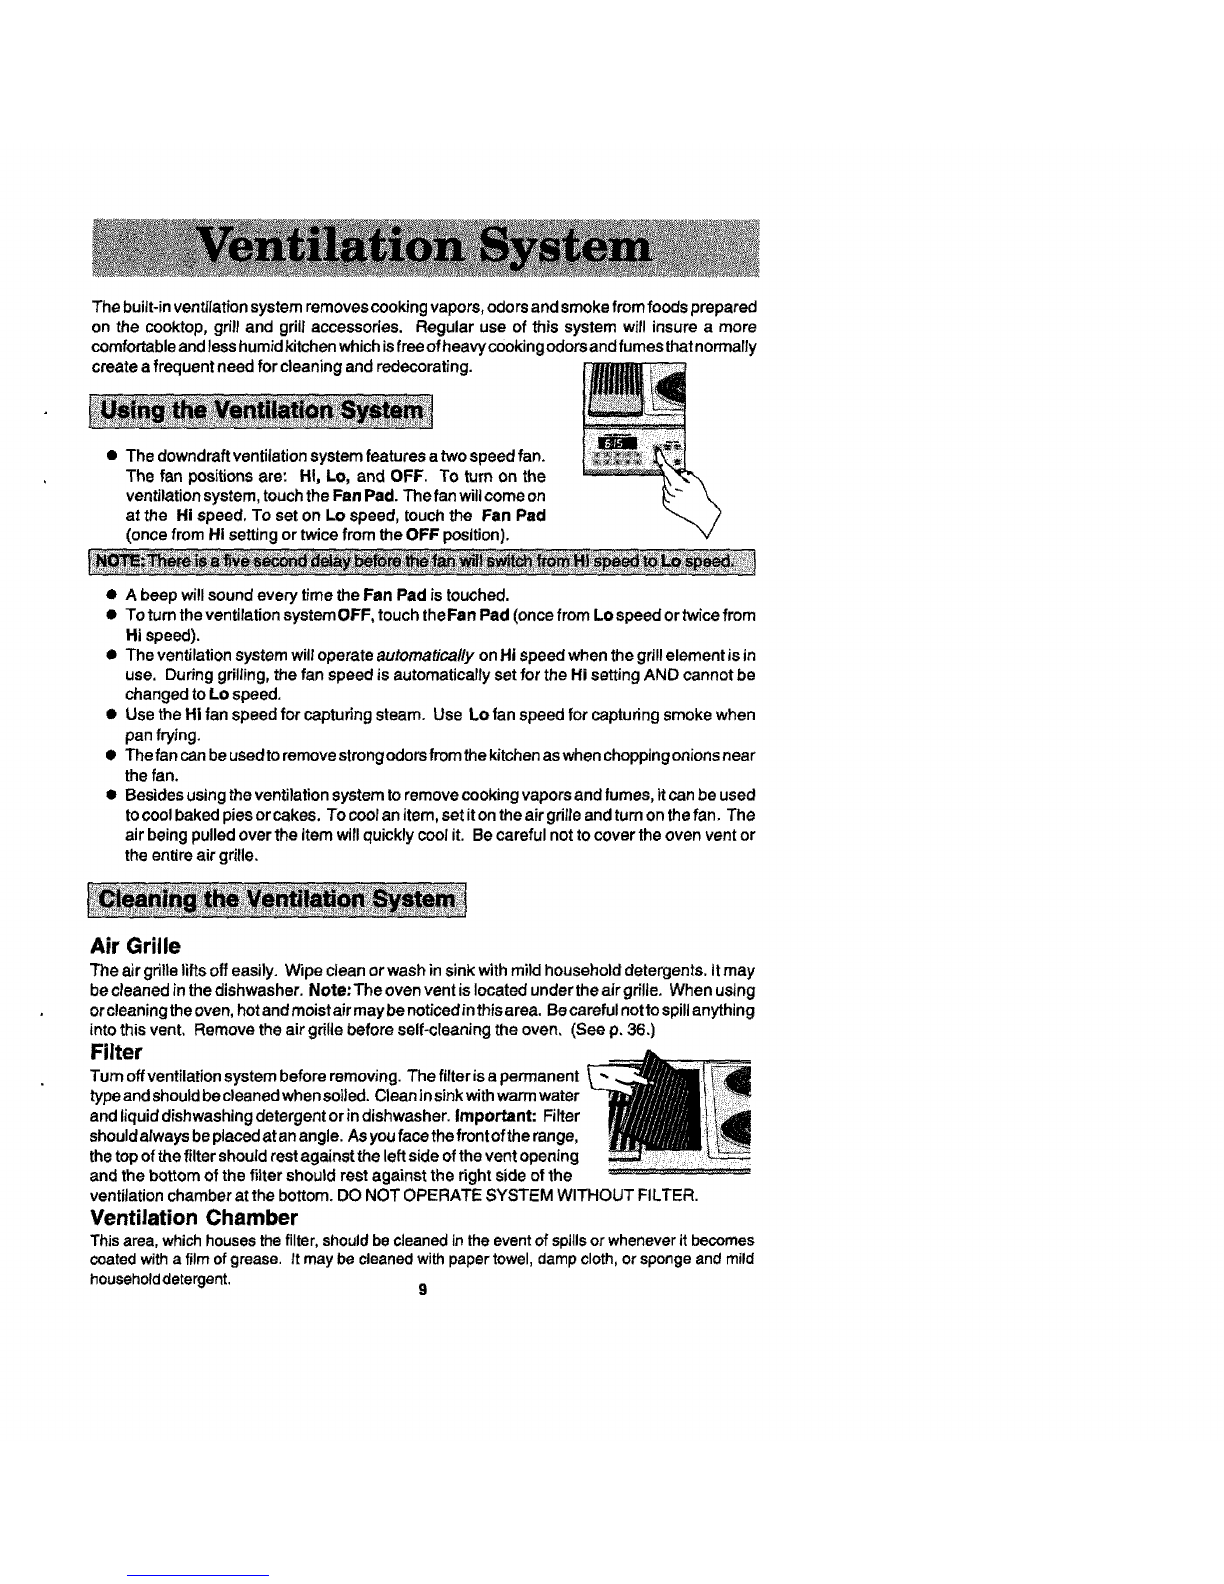
VentilationSystem............................................................................................................... 9
Using the Oven
Baking
BakingChart .............................................................................................................. 27
Causes ofCake Failure ............................................................................................. 28
ConvectBaking..................................................................................................... 28-29
GeneralRecommendations ....................................................................................... 26
Broiling ......................................................................................................................... 34-35
ClockControls
Clock Controlled Baking or Roasting .................................................................... 24-25
Time of Day Clock ..................................................................................................... 22
Timer ......................................................................................................................... 23
Oven Cleaning
Self-CleaningProcess .......................................................................................... 3641
Oven Operation
Oven ControlPanel ............................................................................................... 18-19
Rack Positions ........................................................................................................... 21
Setting Controls ......................................................................................................... 20
Roasting
Convect Roasting ...................................................................................................... 32
FrozenConvenience Foods ....................................................................................... 33
Roasting Chart ........................................................................................................... 31
General RoastingRecommendations ........................................................................ 30
3
Read before operating your range
All appliances -- regardless of the manufacturer -- have the potential
through improper or careless use to create safety problems. There-
fore the following safety precautions should be observed:
1. Be sure your appliance is properly installed and grounded by a
qualified technician.
2, Never use your appliance for warming or heating the room.
3. Children should not be left alone or unattended in area where
appliance isin use. They should never be allowed to sit or stand
on any part of the appliance.
4, Wear proper apparel, Loose-fitting or hanging garments should
never be worn while using the appliance.
5. Do not repair or replace any part of the appliance unless
specifically recommended in this manual. All other servicing
should be referred to an authorized Jenn-Air Service Contractor.
6, Flammable materials should not be stored in an oven or near
surface units.
7, Do not use water on grease fires. Smother fire or flame or use
dry chemical or foam-type extinguisher,
8, Use only dry potholders. Moist or damp potholders on hot
surfaces may result in bums from steam. Do not let potholder
touch hot heating elements. Do not use a towel or other bulky
cloth,
g, Use proper pan size, Many appliances are equipped with one
or more surface units of different size. Select cookware having
flat bottoms large enough to cover the surface unit heating
element. The use of undersized cookware wiltexpose a portion
of the heating element to direct contact and may result in
ignition of clothing, Proper relationship of cookware to heating
element will also improve efficiency and performance,
10. Never leave surface units unattended at high heat settings. Boil
over causes smoking and greasy spitlovers that may ignite,
11. Glazed cookware -- only certain types of glass, glass-ceramic,
ceramic, earthenware or other glazed cookpots are suitable for
rangetop surface without breaking due to the sudden change
in temperature. Use only such cookware as you know has been
approved for this purpose.
12.Cookware handles should be turned inward and not extend
over adjacent surface heating elements to avoid bums, ignition
of flammable mate rials and spillage due to un intentional contact
with the cookware.
13.CAUTION -- Do not store items of interest to children in
cabinets above a range or on the backguard of a range --
children climbing on the range to reach items could be seriously
injured.
14. Do not soak or immerse removable heating elements in water.
15. Do not touch surface units or areas near units, heating eJements
or intedor surfaces of oven. Surface units or heating elements
may be hot even though they are dark in color. Areas near
surface units and intedor surfaces of an oven may become hot
enough to cause burns. During and after use, do not touch or
let clothing or other flammable materials contact these areas
until they have had sufficient time to cool. Other surfaces may
become hot enough to cause burns --among these surfaces
are the cooktop, the upper door frame and glass, oven vent
opening and surfaces near the opening, and the top edge of the
control panel.
16. Use care when opening oven door. Let hot air or steam escape
before removing or replacing food.
17.Do not heat unopened food containers. Build-up of pressure
may cause container to burst and result in injury.
18. Keep oven vent ducts unobstructed. The oven vent is located
underneath the air grille.
19.Always place oven racks in desired location while oven is cool.
If rack must be moved while oven is hot, do not let potholder
contact hot heating element in oven.
20.Do not clean door gasket. The door gasket is essential for a
good seal. Care should be taken not to rub, damage or move
the gasket.
21.Do not use oven cleaners. No commercial oven cleaner or
oven liner protective coating of any kind should be used in or
around any part of the oven.
22.Clean only parts listed in this manual and use procedures
recommended.
23. CAUTION: BEFORE SELF-CLEAN ING THE OVEN, REMOVE
FOOD, BROILER PAN AND OTHER UTENSILS.
24. Listen for fan. Afan noise should be heard during the broil and
cleaning cycles. If not, call a serviceman before self-cleaning
again.
25. Do not cook on glass-ceramic cooking surface ifthe cooktop is
broken. Cleaning solutions and spillovers may penetrate the
broken cooktop and create a shock hazard. Contact an
authorized Jenn-Air Service Contractor.
26.Clean glass-ceramic cooktops with caution. If wet sponge or
cloth is used to wipe spills on a hot cooking area, be careful to
avoid steam burns. Some cleansers can produce noxious
fumes if applied to a hot surface.
27.Do not operate with damaged cooking element after any
product malfunction until proper repair has been made.
28.Keep all switches "OFF' when unit is not in use.
29. Do not allow aluminum foil to contact heating elements.
30. On conventional element cartridges make sure that drip pans
are in place. Absence of these pans during cooking may
subject wiring or components underneath to damage.
31. Do not use aluminum foil to line surface unit drip pans, grill basin
or oven bottom. Installation of these liners may result in electric
shock or fire hazard.
32.WARNING. To reduce the risk of tipping of the appliance, the
appliance must be secured by properly installed anti-tip devices.
To check if devices are installed properly, remove the access
panel and verify that the anti-tip devices are engaged.
6
33.This appliance has been tested for safe performance using
conventional cookware. Do not use any devices or accessories
that are not specifically recommended in this manual. Do not
use eyelid covers for the surface units, stovetop grills, or add-
on convection systems. The use of devices or accessories that
are not expressly recommended in this manual can create
serious safety hazards, result in performance problems, and
reduce the life of the components of the appliance.
34. PREPARED FOOD WARNING: Follow food manufacturer's
instructions, if a plastic frozen food container and/or its film
cover distorts, warps or is otherwise damaged during cooking,
immediately discard the food and its container. The food could
be contaminated.
IMPORTANT SAFETY NOTICE AND WARNING
The California Safe Drinking Water and Toxic Enforcement Act of 1986
(Proposition 65) requires the Governor of California to publish a list of
substances known to the State of California to cause cancer or repro-
ductive harm, and requires businesses to warn customers of potential
exposures to such substances. Users of this appliance are hereby
warned that when the range is engaged in the self-clean cycle, there
may be some low level exposure to some of the listed substances,
including Carbon Monoxide. Exposure to these substances can be
minimized by properly venting the range to the outdoors during the
self-clean cycle.
-SAVE THESE INSTRUCTIONS -
7
VentilationSystem
andAir OvenVent
Clock
_d Oven
Controls
Surface. ,Surface
Indicator Indicator
Lights Lights
Controls Controls
• Use to capture smoke and steam. (See p. 9.)
•Will glow when a surface unit is on. (See p. 10.)
•UsetoprovideflexibLlityinsettingselectionwhenusingthecooktopelements°rgrill
elements. (See p. 10.)
•Use the electronic touch controls to set Clock or Oven functions. (Clock - see pp.
22-25, Oven Operation -see pp, 18-21.)
Thebuilt-inventilationsystemremovescookingvapors,odorsandsmoke fromfoods prepared
on the cooktop, grilland grillaccessories, Regular use of this system will insure a more
comfortableandless humidkitchenwhichisfreeofheavycookingodorsandfumes thatnormally
createa frequent need for cleaningand redecorating.
• The downdraftventilationsystemfeaturesa twospeed fan.
The fan positionsare: HI, Lo, and OFF. To turn on the
ventilationsystem,touchthe Fan Pad. The fan wiltcomeon
at the Hi speed. To set on Lo speed, touchthe Fan Pad
(once from Hi settingor twice from theOFF position).
:_ _'_ " :'_. _ .............. :_........ '_ •...... _ __ '_i _ ......... _ ..... _ :;_!" ......... ' _ ::_' ! _ _,'_!_i_ !
• A beep willsoundevery time theFan Pad is touched.
•ToturntheventitationsystemOFF, touchtheFanPad (oncefrom Lospeedor twice from
Hi speed).
• The ventilationsystemwiltoperateautomatica/iy onHi speed when thegrillelement isin
use. Duringgrilling,the fan speed isautomaticallysetforthe Hi setting AND cannotbe
changedtoLo speed.
• Use the Hi fan speed for capturingsteam. Use Lo fan speed for capturing smoke when
pan frying.
• Thefancanbeusedtoremovestrongodorsfromthekitchenaswhenchoppingonionsnear
the fan.
• Besidesusingthe ventilationsystemtoremove cookingvaporsand fumes, itcan be used
tocoolbakedpiesor cakes. Tocoolan item, setitonthe airgrilleand turnonthefan. The
air beingpulledover the item willquickly coolit. Be carefulnot tocover the ovenvent or
the entireairgrille.
Air Grille
The airgrilleliftsoffeasily. Wipe dean orwash insink withmildhouseholddetergents, ttmay
be cleaned inthedishwasher. Note: The ovenventislocated undertheairgrille, When using
orcleaningtheoven,hotand moist airmay be noticedinthisarea. Becarefulnotto spillanything
intothis vent, Remove theair griUebefore self-cleaningthe oven, (See p, 36.)
Filter
Turnoffventilationsystembeforeremoving. The filterisa permanent
typeandshouldbecleanedwhensoiled. Cleanin sinkwithwarmwater
and liquiddishwashingdetergent orin dishwasher. Important: Filter
shouldalwaysbe placedat anangle. As youfacethefrontofthe range,
thetopofthe filtershouldrestagainst the leftsideofthe ventopening
and the bottom ofthe filter shouldrest against the rightside of the
ventilationchamberat the bottom.DO NOT OPERATE SYSTEM WITHOUT FILTER.
Ventilation Chamber
Thisarea, whichhousesthefilter,st_ouldbe cleanedintheeventof spitlsorwheneveritbecomes
coatedwitha filmofgrease. It maybe cleanedwithpapertowel,dampcloth,or spongeand mild
householddetergent. 9
•Since the controlsare a push-turn type,they must be pushed down before turning. Toset
(fromthe OFF position),push down on the controlknoband turn in either directionto
desired setting.
•Whenthecontrolisinany position,otherthanOFF, itmaybetumed in anydirectionwithout
pushingdown.
•A green indicatorlight willglow when a surface heating element is ON. There are four
indicatorlights,one for each element.
1. 2.
1. Left rear element (rear Energy-Saver orstandardgrill)
2. Leftfront element (frontEnergy-Saver)
3. Rightfront element (front Energy-Saveror standardgrill)
4. Rightrearelement (rear Energy-Saver)
NOTE: The "Energy-Saver" grill element (right) is included with Model-!
SVE47600 and may bepurchased as an option for other models, itpermits
utilizing onlyha fofthe grillarea, fdesired, orus ng different settings for the
front and rear position of the element. When using this element, both
icooktop controls, front and rear, must be turned on in order to use the fu/!
grill area.
NOTE SVE47500 Model. Only the left rear or the right front controls must
be turned on to use the futl grill.
The sizeand type ofcookwareandthe amountand typeoffood being cookedwiltinfluencethe
settingneeded for bestcookingresults. Electricalvoltagemay alsovary, whichwillaffect the
neededcontrolsetting. The settingindicated shouldserveasa guidewhileyoubecomefamiliar
withyour range.
Hi
7-10
5-6
3-4
Lo-2
A fast heat to stal_cooking quickly, to bring liquidsto a boil, to preheat oil for deep
fat frying. Use for most grilling.
(Medium High) For fast frying or browning foods, to maintain rapid boil of large
amounts of food, to maintain oil temperature for deep fat frying.
(Medium) For foods cooked in a double boiler, saut6ing, stow boil of large
amounts of food, and most frying.
(Medium Lo) To continue cooking foods started on higher settings.
Maintaining serving temperatures of foods, simmering foods, melting butter or
chocolate.
The controlsofferflexibility insettingselection. On settingsotherthanHi, you may adjustthe
controlaboveorbelowthenumberedsettingforbest results. Thisappllestosettingswhenusing
cooktop cartridgesorwhenusingthegrillorany ofthe gritlaccessories. Suggestedsettingsare
providedasgeneral guidelines. 10
Cooktopcartridges,either conventional coil, halogen, radiant or solid element, can be
installedon either side ofthe range. (See page 51 for all available cartridges and model
numbers.)
To Install Cartridges
1. Jfthe grill element, grill-rocks or grates are in place, remove before instaJlinga
cooktop cartridge. Clean porcelain basin pan of any grease accumulation. (See
page 17 for cleaning recommendations.)
2. To install any of the optional cooktop cartridges, be sure controls are turned OFF.
Positionthe cartridge terminal plugtowards the terminal receptacle. This receptacle
is located at the front of the left side and at the back of the rightside of the range.
3. Slide the cartridge towards the receptacle until the cartridge terminal plug is
completely engaged.
4. Lower the opposite end of the cartridge into the rangetop until it is flush with the
surface. Your range is now ready to use.
To Remove Cartridges
1. Controls must be OFF and the cartridge should be cool.
2. Lift up on the "tab" located on the cartridge untiltop of cartridge clears the opening
on the range by about 2 inches. Lifting the cartridge too high while stillengaged in
the receptacle could damage the terminal plug.
3. To disengage terminal, hold cartridge bythe sides and slide away from the terminal
receptacle. Liftout when fully unpiugged.
4. A storage tray, Model A350, is available and can be used for storing a cartridge,
5. Do not stack cartridges where they may fall or be damaged. Never store other
materials on top of the glass-ceramic cartridges since this could damage or scratch
the surface.
Canning should be done on the conventional coil cartridge only. Canning element
accessory, Model A145A, makes itpossible to use large canners with the conventional
coil cartridge.
11
•Select heavy gauge cookpots. Usuallyheavy gauge cookpotswillnotchange
shapewhen heated.
•Use cookpots with flat, smooth bottoms. The two ways to determine if cookpots
have aflat, smooth bottom are the ruler test and the cooking test.
Ruler Test
1. Place the edge of ruler across the bottom
of the pot.
2. Hold up to the light.
3. No light should be visible under the ruler.
Cooking Test
1. Put1 inchofwater intothe cookpot,
2.
3. Place cookpot on the element. Turn control to the Hi setting.
Observe the bubble formation to determine the heat distribution, tfthe bubbles
are uniform across the cookpot, the cookpot will perform satisfactorily. If the
bubbles are not uniform, the bubbles will indicate the hot spots.
• Match the size of the cookpot to the size of the element, ideally the cookpot
will be the same size or slightly larger.
Heavy gauge cookpots with flat, smooth bottoms will usually work in a similar way.
However, there are some differences in the cooking performance of various materials.
•Aluminumcookpotsheatquicklyandevenly. Bestsuitedforsimmering,braising,
boiling and frying.
•Stainlesssteel cookpotswil! evenly distributeheat if constructedof td-ply or
combinedwith other metalssuch as aluminum and copper. Use for cooking
functions similarto aluminum.
•Castironcookpotsare slow to heat but cook more evenlyonce temperatureis
reached. Usefor longterm lowheat cookingorfor browningand frying.
•Glassceramic,earthenware, heat-proofglassorglazed cookpotscan be used if
recommendedby the manufacturer for cookpotcooking. Do notusewithtrivets.
Bestusedon low to mediumcontrolsettings.
•Porcelain enamel-on-steel or porcelain enamel-on-cast iron should be used
accordingto manufacturer'sdirections. Do notallow to boildry.
12
Thegrillaccessoryconsistsoftwoblackgrillgrates,agrillelement, and two grill-rocks.
To Install Grill
1. Before installing grill components, be certain controls are OFF.
2. Place the two grill-rocks intoan empty basin pan with their handles running parallel
to the front of the range. These grill-rocks must be used since they support the grill
element.
3. Position the grill element with the terminal plug towards the terminal receptacle.
This receptacle islocated at the front ofthe left side and at the back ofthe rightside
of the range. Slide the element towards the receptacle until the terminal plug is
completely engaged. The gdll element should now rest on the handles ofthe grill-
rocks.
4. Place the black grill grates on the top of the rangetop.
To Remove Grill
1. Remove grill components once they are cool. Be sure controls are OFF.
2. To remove grill element, pull away from receptacle until it is unplugged. (Note:
Lifting the element more than 2 inches above the rangetop surface while it is
engaged in the receptacle could damage the terminal plug.)
3. A storage tray, Model A350, is available for purchase and can be used for storing
the grill assembly.
Installing Other Grill Accessories
1. Remove the two black grill grates from the grill. Now you are ready to use the
optional gdll accessories.
2. Review the instructionsfor installing and using the accessories that are packaged
with the accessory.
Note: Accessory options are shown on page 50.
13
Beforethefirstuse,washyournewgrillgratesinhotsoapywater,rinseanddry.
Then"season" the surface by wiping on a thin coating of cooking oil, Remove
excess oil by wiping again with another paper towel. This procedure should be
repeated when either: a) cleaning in the dishwasher since the detergent may
remove seasoning, or b) anytime a sugar-based marinade (,forexample, barbecue
sauce) is going to be used.
• Preheat the grill on Hi for 5 minutes, Preheating improvesthe flavor and
appearanceof meats and quickly searsthe meat to helpretainthejuices, The
heatingelementshouldglowa brightcherryred,
•Use nonmetallic spatulas or utensils toprevent damaging the Excalibur ® nonstick
grill grate finish.
•Excessiveamountsoffat shouldbe trimmedfrommeats. Only a normal amount
is necessaryto producethe smoke needed for that smoked, "outdoor" flavor.
Excessivefat can createcleaningand flare-upproblems.
Allowing excessive amounts of grease or drippings to constantly flame voids the
warranty on the grill grates. Excessive flare-ups indicate that either the griUinterior
needs to be cleaned or that excessive amounts of fat are in the meat or the meat
was not propedy tdmmed.
•Grease drippings will occasionally ignite to produce harmless puffs of flame for a
second or two. This is a normal part of the cooking process.
•NEVER LEAVE GRILL UNATTENDED DURING GRILL OPERATION.
Should excess grease cause sustained flare-up
1. Turn on FAN manually.
2. Immediately turn grill controt(,s}to OFF,
3. Remove meat from grill.
IMPORTANT
•Do not use aluminum foil inside the grill area.
• Do not use charcoal or wood chips in the grill area.
•Do not allow grill-rocks to become overloaded with grease. Clean frequently.
•Do not cover grates completely with meat. Leave air space between each steak,
etc. to aIfow proper ventilation as well as prevent flare-ups.
14
PreheatgrillonHI,5minutes, for best flavor,
Note: This chart is asuggestedquide. Cooking times and controlsettingsare
approximate duetovariationsin meats andvoltage.
15
WithyourJenn-Air grilland accessories, literally anyfood you've considered"atitsbest" when
preparedoutdoorscannow be preparedindoorswithless fuss and greatflavor. The following
suggestionsare goodrulesto follow and willincreaseyour enjoymentof the equipment.
• Be sureto follow directionsonpage 14 for usingthe gdlL
•Suggested cookingtimesandcontrotsettings areapproximateduetovariationsinmeats.
Experience willquicklyindicatecookingtimes aswell as whichsettingsworkbest.
•Usethe Energy-Savergrillelementforgrilling smallamountsoffoodon halfofthegrillor
forkeepingcookedfoods warmorpreparingfoods requiringdifferentcontrolsettings.Note
SVE47500 Owners: The Energy-Saver grillelement can be purchasedas an optional
accessory. (See p. 50°)
• Forbestresults,buytop grade meat. Meat that isat least 3/_inch thickwillgrillbetter than
thinnercuts,
• Score fat onedges of steak, butdo notcut intomeat, topreventcudingwhile cooking.
•Forthe attractive "branded" look onsteaks, be sure grillispreheated. Allow one side of
meattocook todesireddoneness,oruntiljuicesappearonthetopsutrace,before turuing.
Tum steaksand hamburgersjustonce. Manipulatingfood causes lossofjuices.
• Whenbastingmeats orapplyingsaucestofoods, rememberthat excessiveamountswind
upinsideyourgrilland do not improvethefood flavor. Applysauces duringthe last15 to
20minutesof cookingtimeunlessrecipespecifiesotherwise. Sugar-basedsauces, when
usedexcessively,willcarmelize on the grill-rocksand create extra cleaning.
• There are many meat marinadeswhichwiilhelptenderize lessexpensivecutsof meatfor
cookingonthe grill.
•Certainfoods, suchaspoultryand non-oilyfish, may need someextra fat. Brushwithoil
ormelted butteroccasionallywhilegrilling.
• Usetongswithlonghandlesorspatulasfor turningmeats. Donotuseforksasthesepierce
the meat, allowingjuicesto be lost,
• To help retainmeat juices, salt after cookingis completed.
•Shouldgrilledfoods be preparedand ready beforeyou're readyto serve, turncontroltoa
Iowsettingandcovermeatwithasinglesheetofaluminumfoll, Foodwillcontinuetocook.
Be sure the grillis cool and controlsareOFF.
Grill Grates
These are made fromcast aluminumandare coatedwiththeExcalibur) nonstickfinish.
• Afterthegrillgrateshave cooled,wipeoffgrateswitha papertowel. Wash coolgrates(DO
NOT IMMERSEHOTGRILL GRATES INWATER) withsoapordetergent inhotwaterinthe
sinkorwashthem inthe dishwasher.Be suretoremoveal! food residuebeforecookingon
the gril!gratesagain.
•Remove stubbornspotswitha plasticmeshpuffor pad. For best results,useonly those
cleaningproductswhich statethey are recommendedfor use whencleaning nonstick
surfaces.
• tf grateswere washed inthe dishwasher, seasonwith oilpriorto grilting. (See p. 14.)
•Donotusemetalbrushesorabrasivescouringpadsorotherscrubbersintendedtoc/ean
outdoorcharcoa/gri//s. These willremovethe finish as wellas scratchthe grates. Donot
cleanin self-cleaningoven or useoven cleaners onthegrates.
16
Grill Element
Follow instructionson page t3 forremovingthegrillelement. The grillelement shouldnever
be immersedinwater. Mostsoilwillburnoffduring use. The terminal blockmay be cleaned
witha soapy sponge. Dry thoroughlybefore reinserting inthe range.
Grill-Rocks
These are made from cast-iron whichhave been coated with porcelainenamel.
• The grill-rocksshould be cleaned frequently or after any excessive build-up of grease.
To clean lightsoil,use detergent and a plasticscrubber, suchas Tufty, or wash inthe
dishwasherif burnedonresidue isfirst removed. Forheavysoil,soak inhot,soapywater
towhicha cleanser, suchas householdammonia, has beenadded. Stubborn spotson
grill-rocks,suchas burned on residue from sauces, can be scrubbed with astiffbristle
brush.
•Anovencleaner, suchas Easy-Off,can be usedforburnedonsoil, Followmanufacturer's
directions;spray oncleaner and letsoak overnight. Do notclean grill=rocksin theself-
cleaning oven.
Porcelain Basin Pan
This area located under the grill-rocksand/or cartridges. Ctean after each use ofthe grill.
•To remove tightsoil, cleanwith soapy water or spray with cleansers suchas Fantastik
or 409. For easier cleanup: a) spray with ahousehold cleanser; b) cover with paper
towels;c) add small amount of hot water to keep the paper towels moist; d)cover and
wait 15 minutes; and e) wipe clean.
•To remove moderate soil,scrub with Comet, Bon Ami, a softscrub cleanser or plastic
scrubber.
• To remove stubborn soil, spray with an oven cleaner such as Easy-Off; let soak
overnight, wipe clean, rinse and dry.
Note: Clean the grease drain after each use. To clean: Pour about 1/3 cup of very hot tap
water mixedwith1teaspoondishdetergent downthe drain. Intheevent the drainisclogged,
due to large food particles being trapped, use the nylon stringthat was packaged with your
range. To use thenylon string,simply insertone end intothe drainopening inthe basinpan.
Feedthe nylonstringdown untilitisvisibleunderthe range. Nowpulluponthe end extending
outfrom thetopwhileholdinga paper towel aroundthe string,toctean thestringas itisbeing
pulled. Thisshouldfreeanytrappedparticlesoffood. Pouranother ti3cupofveryhotwater
mixed with dishdetergentto assure the drain is opened and clear.
Grease Containers
The containersare locatedbehindthebottomaccesspanel, underneaththe range. (See page
44 foropeningaccess panel.) There isone containerfor the leftsideand oneforthe rightside.
They collect greaseand otherliquidscreated while grillingor usingsome ofthe accessories.
Checkeach timeafter grillingand empty when grease isnoticeable. To remove,simplygrasp
the handle,and pullfromthe bracketholdingthe container.
• Checkthecontainer periodicallytopreventgreasefromspilling
over. If this should happen, the grease will flow over the
container andontothefloor.The containerandscrew-onhandle
can be washed inhot, soapy water orin the dishwasher. The
container can be replacedwith any heattempered jar, suchas
acanning jar, whichhasa standardscrew neck.
17
The control panel is designed for ease in programming. The Display Window features
Indicator Words which wit! flash to prompt you for the next step.
To program
1. Touch the function pad to give command desired_
2. Touch the appropriate number pads to enter time or temperature.
Note: Four to fifteen seconds after entering the number, the time or temperature
will automatica!ly be entered. If more than fifteen seconds elapse between touching
a function pad and touching anumber pad, the control is not set and Display will
return to previous Display.
Oven Controls i_n l_mer
Function Pads
Use for conventional baking or roasting.
Use for top browning or oven broiling.
Use to set self-cleaning process.
Use for convect roasting, (Model SVE47600 only)
Use for convect baking. (Model SVE47600 only)
Use for clockcontrolled cooking and cleaning when delayed start is desired.
(For lock function see page 43,)
Use for clockcontrolled cooking.
(For lock function see page 43.)
Cancels alt programming except Timer.
Use to turn the Ventilation System on or off. (See p. 9.)
Use to signal expiration of a time period up to 11 hours and 55 minutes.
Use to signal expiration of atime period up to 11 hours and 55 minutes,
Use to set time of day.
Use to turn oven light on and off,
18
Number Pads
Use to set time or temperature.
Oven Light Pad (Control Panel)
The oven light automatically comes on whenever the oven door isopened. When door
is closed, touch the Oven Light Pad to turn oven light on or off.
Display Window
Shows time of day, timer, and oven functions.
rtrt... ,., °°. _
DELAY START COOK TIMED GLEANBlimL
STOP TIMES [_[_ OVEN LOCKPRIMAT
888:
Display Numbers:
• Show time of day.
•Countdown of time remaining when using time functions.
• Show temperature of oven as it rises to reach programmed temperature and the
set temperature once it is reached.
• Recall programmed temperature or time when commanded.
• Rounding of Display Numbers: Temperature range is 100° to 550°F and can be set
in 50increments. When setting temperature, the control will round itto the nearest
100. For example, if237 ° is entered, the control will roundthe temperature to 240 °.
Prompts:
•Serve as a reminder to shut oven door, ifit isopen, for self-cleaning operation when
the word, door, is displayed.
• "Err" will appear in the Display when an improper temperature or time has been
entered. "Err" willflash and a beep wilt be heard three times. Then, the Display will
return to the previous Display before the error was entered.
Indicator Words:
• Flash to prompt next step.
• Indicate status of programmed function.
• Show programmed function when recalled.
Chimes vs. Beeps
• A chime sound is used to designate the end of a timing or cooking operation.
• A beep sound is used to designate an incorrect entry, door is open when set for a
self-clean, and a fault code.
lNOTE: To change the oven to a24 hour clock or Celsius (C) degrees, contact your|
/
authorized Jenn-Air service contractor or installer.
19
To set oven on Bake or Convect Bake or Convect Roast
1. Place oven racks on proper rack positions. (See p. 21.)
2, Touch Bake Pad or Convect Bake Pad or Convect Roast Pad,
indicator Words BAKE or CONV BAKE or CONV ROAST will flash and three
dashes will be shown.
Note: If more than fifteen seconds elapse between touching a pad and touching a
number pad, Display will return to previous Display.
3. Touch the appropriate number pads for desired oven temperature,
Allowable temperature range is 100°to 550°F. After four seconds the oven will begin
to preheat. The indicator Words ON, PREHEAT, and either BAKE or CONV BAKE
or CONV ROAST wilt appear in the Display. The temperature shown will be 100°
or the oven temperature whichever is higher.
Example: If at 10 o'clock you set the oven for 350 ° for convect baking, after four
seconds the Display will show:
10:00 Ioo°
COf,NSN_.
During the preheat, the Display will show a rise in 5° increments until programmed
temperature is reached. When the oven is preheated, the oven will chime, the ON
and PREHEAT Indicator Words wit1go off, and programmed oven temperature will
be displayed.
Note: Oven will preheat for approximately 7to 11 minutes.
Important: Whenever ON appears in the Display, the oven is heating.
To recall temperature set during preheat: Touch the appropriate Bake or
Convect Bake Pad or Convect Roast Pad, Temperature will be briefly displayed,
then will automatically return to on-going program.
_;_qhang_.temperatura set: Touch appropriate Bake Pad or Convect Bake Pad
or Convect Roast Pad and the appropriate number pads for the new desired
temperature.
Note: Ifyou are _owering the temperature below the current oven temperature, the
word PREHEAT and ON willappear briefly inthe Display and the preheat chime will
sound. Then, the Display wi!l show programmed temperature and indicator word
BAKE or CONV BAKE or CONV ROAST only.
4. Touch Cancel Off Pad to turn oven off at end of baking. The oven will continue
operating until the Cancel Off Pad is touched.
2O

This manual suits for next models

1

Other Jenn-Air Convection Oven manuals

Jenn-Air EXPRESSIONS W30400 User manual

Jenn-Air

Jenn-Air EXPRESSIONS W30400 User manual

Jenn-Air SVE47600 User manual

Jenn-Air

Jenn-Air SVE47600 User manual

Jenn-Air PRO-STYLE User manual

Jenn-Air

Jenn-Air PRO-STYLE User manual

Jenn-Air W188 User manual

Jenn-Air

Jenn-Air W188 User manual

Jenn-Air JDRP548W User manual

Jenn-Air

Jenn-Air JDRP548W User manual

Jenn-Air EXPRESSIONS W30400 User manual

Jenn-Air

Jenn-Air EXPRESSIONS W30400 User manual

Jenn-Air JMW3430WB01 User manual

Jenn-Air

Jenn-Air JMW3430WB01 User manual

Jenn-Air SCE70600 User manual

Jenn-Air

Jenn-Air SCE70600 User manual

Jenn-Air JER8650 User manual

Jenn-Air

Jenn-Air JER8650 User manual

Jenn-Air JMW2430WR00 User manual

Jenn-Air

Jenn-Air JMW2430WR00 User manual

Jenn-Air JDRP536WP-SP User manual

Jenn-Air

Jenn-Air JDRP536WP-SP User manual

Jenn-Air W122 User manual

Jenn-Air

Jenn-Air W122 User manual

Jenn-Air JGRP536WP User manual

Jenn-Air

Jenn-Air JGRP536WP User manual

Jenn-Air JMW3430 User manual

Jenn-Air

Jenn-Air JMW3430 User manual

Jenn-Air W2780 User manual

Jenn-Air

Jenn-Air W2780 User manual

Jenn-Air JDRP548W User manual

Jenn-Air

Jenn-Air JDRP548W User manual

Jenn-Air W122 User manual

Jenn-Air

Jenn-Air W122 User manual

Jenn-Air SDV48600P User manual

Jenn-Air

Jenn-Air SDV48600P User manual

Jenn-Air EXPRESSIONS W30400 User manual

Jenn-Air

Jenn-Air EXPRESSIONS W30400 User manual

Popular Convection Oven manuals by other brands

Bakers Pride Cyclone CO11-E1 Install and operation instructions

Bakers Pride

Bakers Pride Cyclone CO11-E1 Install and operation instructions

Moffat Blue Seal G56A Technical data sheet

Moffat

Moffat Blue Seal G56A Technical data sheet

Roller Grill FC 380 TQ Instructions for use & installation

Roller Grill

Roller Grill FC 380 TQ Instructions for use & installation

inventum OV SERIES instruction manual

inventum

inventum OV SERIES instruction manual

Broil King POV-003 instruction manual

Broil King

Broil King POV-003 instruction manual

Lang GCSF-ES Installation and operation instructions

Lang

Lang GCSF-ES Installation and operation instructions

Moffat Turbofan G32MS Specifications

Moffat

Moffat Turbofan G32MS Specifications

Rational iCombi Pro Original user manual

Rational

Rational iCombi Pro Original user manual

Cadco UNOX OV-350 Use & care manual

Cadco

Cadco UNOX OV-350 Use & care manual

Wolf Air owner's manual

Wolf

Wolf Air owner's manual

Hendi H90 user manual

Hendi

Hendi H90 user manual

Falcon E7202S Installation and servicing instruction

Falcon

Falcon E7202S Installation and servicing instruction

Blodgett ZEPHAIRE-E PLUS Specifications

Blodgett

Blodgett ZEPHAIRE-E PLUS Specifications

Unique CLASSIC UNIRERADWRH104 owner's guide

Unique

Unique CLASSIC UNIRERADWRH104 owner's guide

KitchenAid KEHC309J Use and care guide Use and care guide

KitchenAid

KitchenAid KEHC309J Use and care guide Use and care guide

Galanz GL1BO24FSAN user manual

Galanz

Galanz GL1BO24FSAN user manual

Electrolux air-o-convect Electric Hybrid Convection Oven... Short form specification

Electrolux

Electrolux air-o-convect Electric Hybrid Convection Oven... Short form specification

turbofan E9311 Installation & operation manual

turbofan

turbofan E9311 Installation & operation manual

manuals.online logo
manuals.online logoBrands
  • About & Mission
  • Contact us
  • Privacy Policy
  • Terms and Conditions

Copyright 2025 Manuals.Online. All Rights Reserved.