Jensen JE2269 User manual

22
22" 16:9 WIDE SCREEN DIGITAL LCD-TV
Please keep this operating manual for future references.
Important Notes :
1. Before operating the unit, please read these instructions carefully.
2. Retain this manual for future reference.
3. Do not remove any WARNING stickers on the unit.
4. You are advised to follow the instructions carefully when operating the unit.
5. Do not use any chemical solvent, cleaning agent or corrosive detergent to
clean away dirt on the surface of the screen. By doing so, you may cause
irreversible damage to the surface of the TFT screen. To clean off dirt or
fingerprints, we recommend the use of a soft damp lens cleaning cloth.
6. Using spare parts from another manufacturer may caused permanent
damage to the unit.
7. Install unit in a dry location away from condensation.
8. Ensure no metal or foreign materials are dropped in between the display
screen and enclosure.
9. Do not use anything to block the cooling assemblies on the unit.
10. Ensure the plugs are properly plugged in before operating the unit.
11 Should the LCD panel be broken, do avoid all human contact with the
broken glass or fluid leaking out from the enclosure. If come into contact,
do flush and clean affected areas with plenty of water. Seek medical
attention immediately.
12. When operating the display unit, do avoid touching or pressing on the LCD
glass panel. Excessive force may cause irreparable damage to the LCD
screen.
OPERATING MANUAL
JE2269
Built-in 2-Channel IR Transmitter / Appended Luminous Remote

CONTENTS
1. INTRODUCTION
Overview ----------------------------------------------------------------
Features -----------------------------------------------------------------
Contents/Accessories ------------------------------------------------
2. FRONT PANEL CONTROL
Panel Control -----------------------------------------------------------
Input/Output ------------------------------------------------------------
3. REMOTE CONTROL FUNCTION
Controls & Functions -------------------------------------------------
4. INSTALLATION GUIDE
When Connecting to a TV Cable ----------------------------------
Connecting to Other Equipment -----------------------------------
Input (RCA) from other Equipment --------------------------------
Output to Other AV Equipment -------------------------------------
Connect Power ---------------------------------------------------------
Input (Second IR Transmitter) --------------------------------------
5. BASIC FUNCTIONS
Power Signal -----------------------------------------------------------
Mode(SOURCE) ------------------------------------------------------
Volume Setting ---------------------------------------------------------
Mute Setting ------------------------------------------------------------
Channel Search -------------------------------------------------------
6. OPERATIONS
Menu Setting -----------------------------------------------------------
Sleep Timer Setting ---------------------------------------------------
Video Adjust Setting
Saturation --------------------------------------------------------------
Sharpness -------------------------------------------------------------
01
02
03
04
04
05
06
07
08
08
09
09
10
10
11
11
11
12
12
13
13
Safety Precautions:
1. Ensure the plug is securely plugged into the main socket before
operating the unit.
2. Ensure the Voltage on the main socket is the same as specified on the
unit.
3. Use parts only manufactured by the unit manufacturers.
4. Request a repair report from the technician/service personnel.
5. Ensure the battery is correctly installed before using the unit.
In case of the following emergencies, remove plug from the main
socket immediately:
1. Plug or cables are damaged.
2. Any form of foreign objects dropped inside the enclosure.
3. Unit is being exposed to rain and/or water.
4. Unit unable to operate under normal operation.
CAUTION
RISK OF ELECTRIC SHOCK
DO NOT OPEN
Notices:
1. The changes or modifications not expressly approved by the party responsible for compliance
could void the user's authority to operate the equipment.
2. To comply with the FCC RF exposure compliance requirments , no change to the antenna or
the device is permitted. Any change to the antenna or the device could result in the device
exceeding the RF exposure requirements and void user's authority to operate the device.
This device complies with part 15 of the FCC RULES. Operations is subject to the following two
conditions:
(1) This device may not cause harmful interference and
(2) This device must accept any interference received, including interference that may cause
undisried operation.

CONTENTS
Black Level ------------------------------------------------------------
Contrast ---------------------------------------------------------------
Tint ---------------------------------------------------------------------
Preset ------------------------------------------------------------------
Exit ---------------------------------------------------------------------
Audio Setting
Type --------------------------------------------------------------------
Bass --------------------------------------------------------------------
Treble ------------------------------------------------------------------
Balance ---------------------------------------------------------------
Return ------------------------------------------------------------------
CLOSED CAPTION Setting ---------------------------------------
V-CHIP BLOCK Setting --------------------------------------------
FORMAT Setting -----------------------------------------------------
Others
Language -------------------------------------------------------------
Channel Scan --------------------------------------------------------
TV Source Setting ---------------------------------------------------
External Setting -----------------------------------------------------
Speaker Setting -----------------------------------------------------
Return ------------------------------------------------------------------
7. ANNEX A
LCD Maintenance -----------------------------------------------------
8. ANNEX B
Troubleshooting -------------------------------------------------------
Common Problems ----------------------------------------------------
9. SPECIFICATIONS -------------------------------------------------
14
14
15
15
16
17
17
18
18
19
19
20
21
21
22
22
23
23
24
25
26
26
27
1. INTRODUCTION
Overview :
New technology in LCD monitors allows the enjoyment of a higher quality picture
display and higher brightness; lighter in weight and slimmer body design, power
saving capabilities and low radiation, giving you a safe, relaxing and environmental-
friendly visual enjoyment.
Our product uses high quality original imported 22 inches 16:9 (Wide) colored
"Active Matrix TFT". The Active Matrix TFT high decoding capabilities enable
display of complicated or high quality images, presenting a vivid visual reproduction
and beautiful visual display. Incorporated with a user-friendly menu, allowing easy
customization to user preferences.
The unit comes with built-in screen display controls when used with the remote
control, allowing you to make changes to the settings. It even support the use of 2
channel wireless headphones, therefore you do not need to worry that the volume
coming out from the monitor will disturb other people. The Digital True Surround
Sound capabilities’ from the 3D Stereo Speaker brings you the ultimate enjoyment
of audiovisual effects. Digital output function, when connected to other audiovisual
devices, gives you the best enjoyment in entertainment relaxation.
01

Features :
1. 22" Television / monitor for Mobile use
2. 12V DC Power
3. High Performance, 16:9 LCD Panel
4. High Brightness 450 nit
5. High contrast ratio 400:1
6. Ultra wide viewing angle 170 degrees
7. Front controls
8. Cable ready TV tuner with Closed Caption and V-Chip
9. High output speakers
10. Built in 2 Channel IR transmitter for optional wireless headphones
11. Wireless remote control included
12. Mounting bracket optional
13. Two auxiliary monitor inputs: One fixed NTSC composite, one selectable
composite, S-Video or component ( HDTV )
14. HDTV ready
02 03
Contents/Accessories :
(Please check the content of the Package.)
Remote Control Operation Manual
S-Video Cable
DC Power Harness 1
DC Power Harness 2
Antenna Cable
S-Video to Component
Video Conversion Cable
S-Video to Composite
Video Conversion Cable

2.FRONT PANEL CONTROLS
PANEL CONTROL :
1. POWER : Power On/Off
2. MODE : Source Select
3. CHANNEL : Channel Select
4. MENU : Menu Setting
5. VOLUME : Increase Volume
6. VOLUME : Decrease Volume
7. STAND BY : Standby Mode LED
8. SPEAKER : Loud Speaker
9. IR STEREO TRANSMITTER : For Wireless Headphone
04 05
INPUT/OUTPUT :
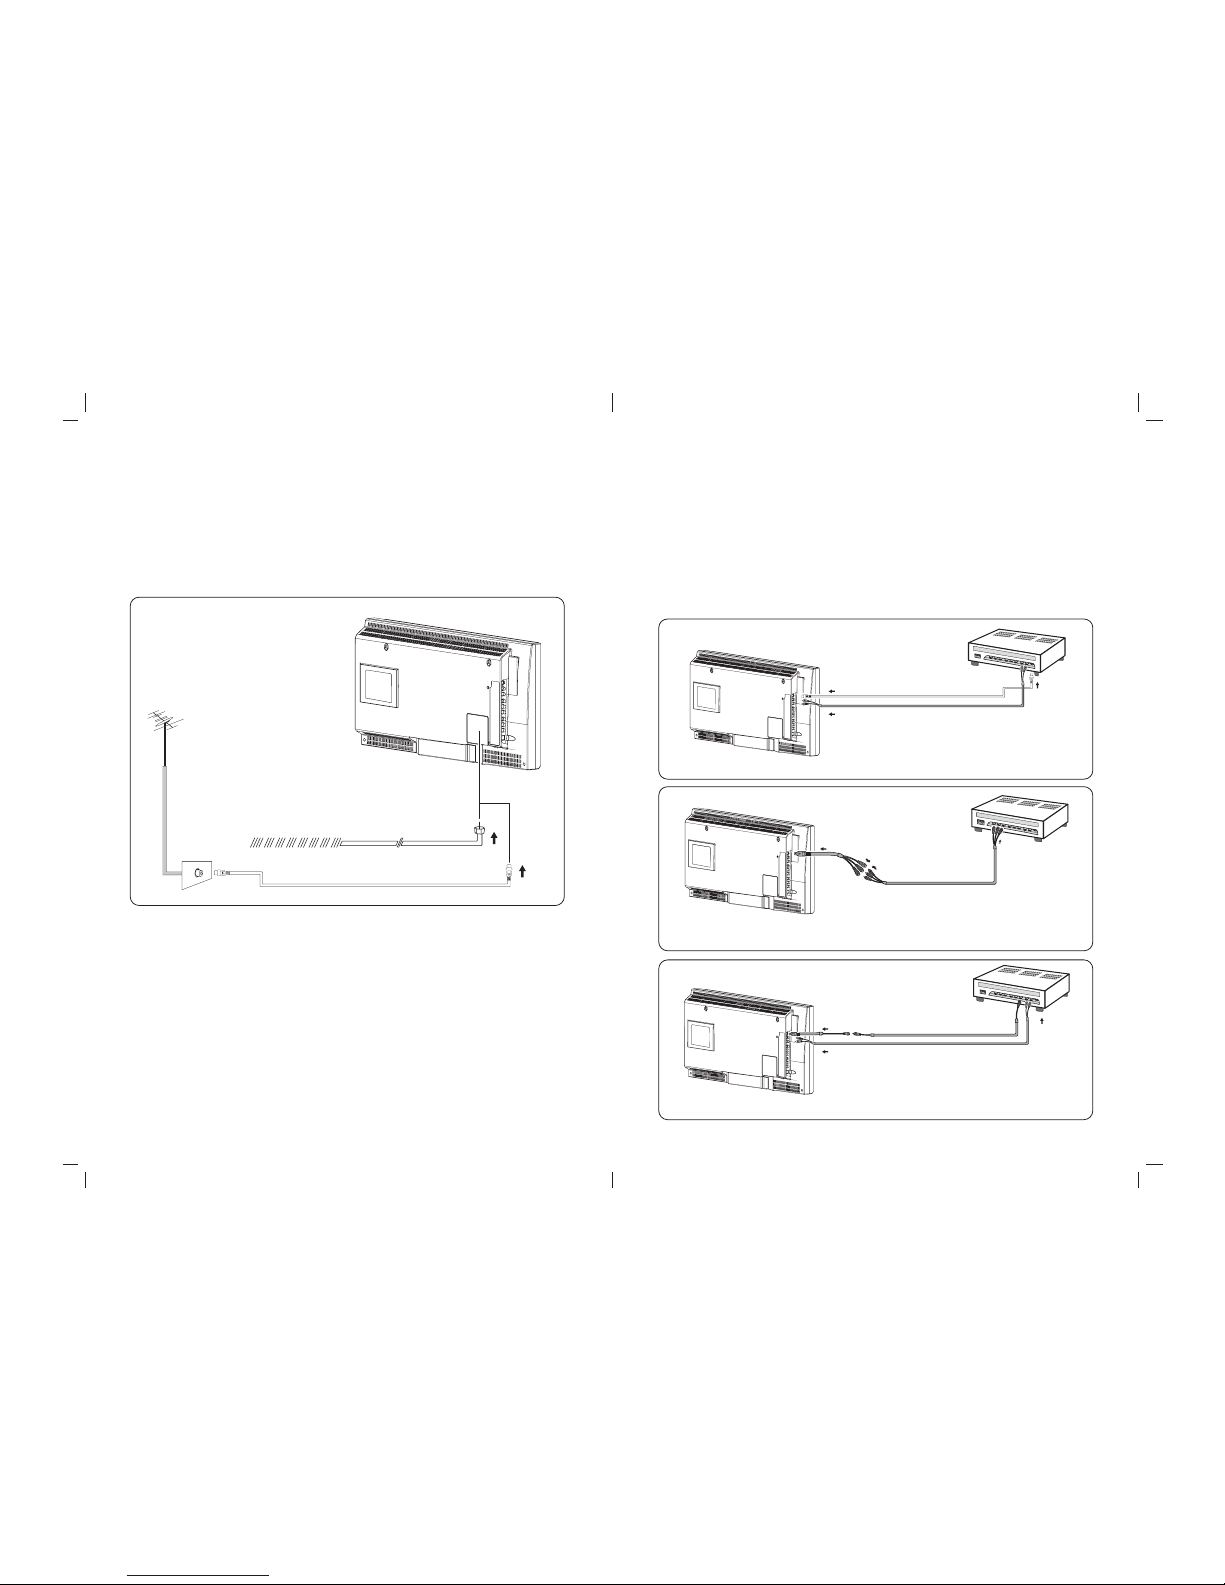
10. AV1 : S-Video/Component/
Composite Video Input
11. AV1 : RCA Left Audio Input
12. AV1 : RCA Right Audio Input
13. AV2 : RCA Video Input
14. AV2 : RCA Left Audio Input
15. AV2 : RCA Right Audio Input
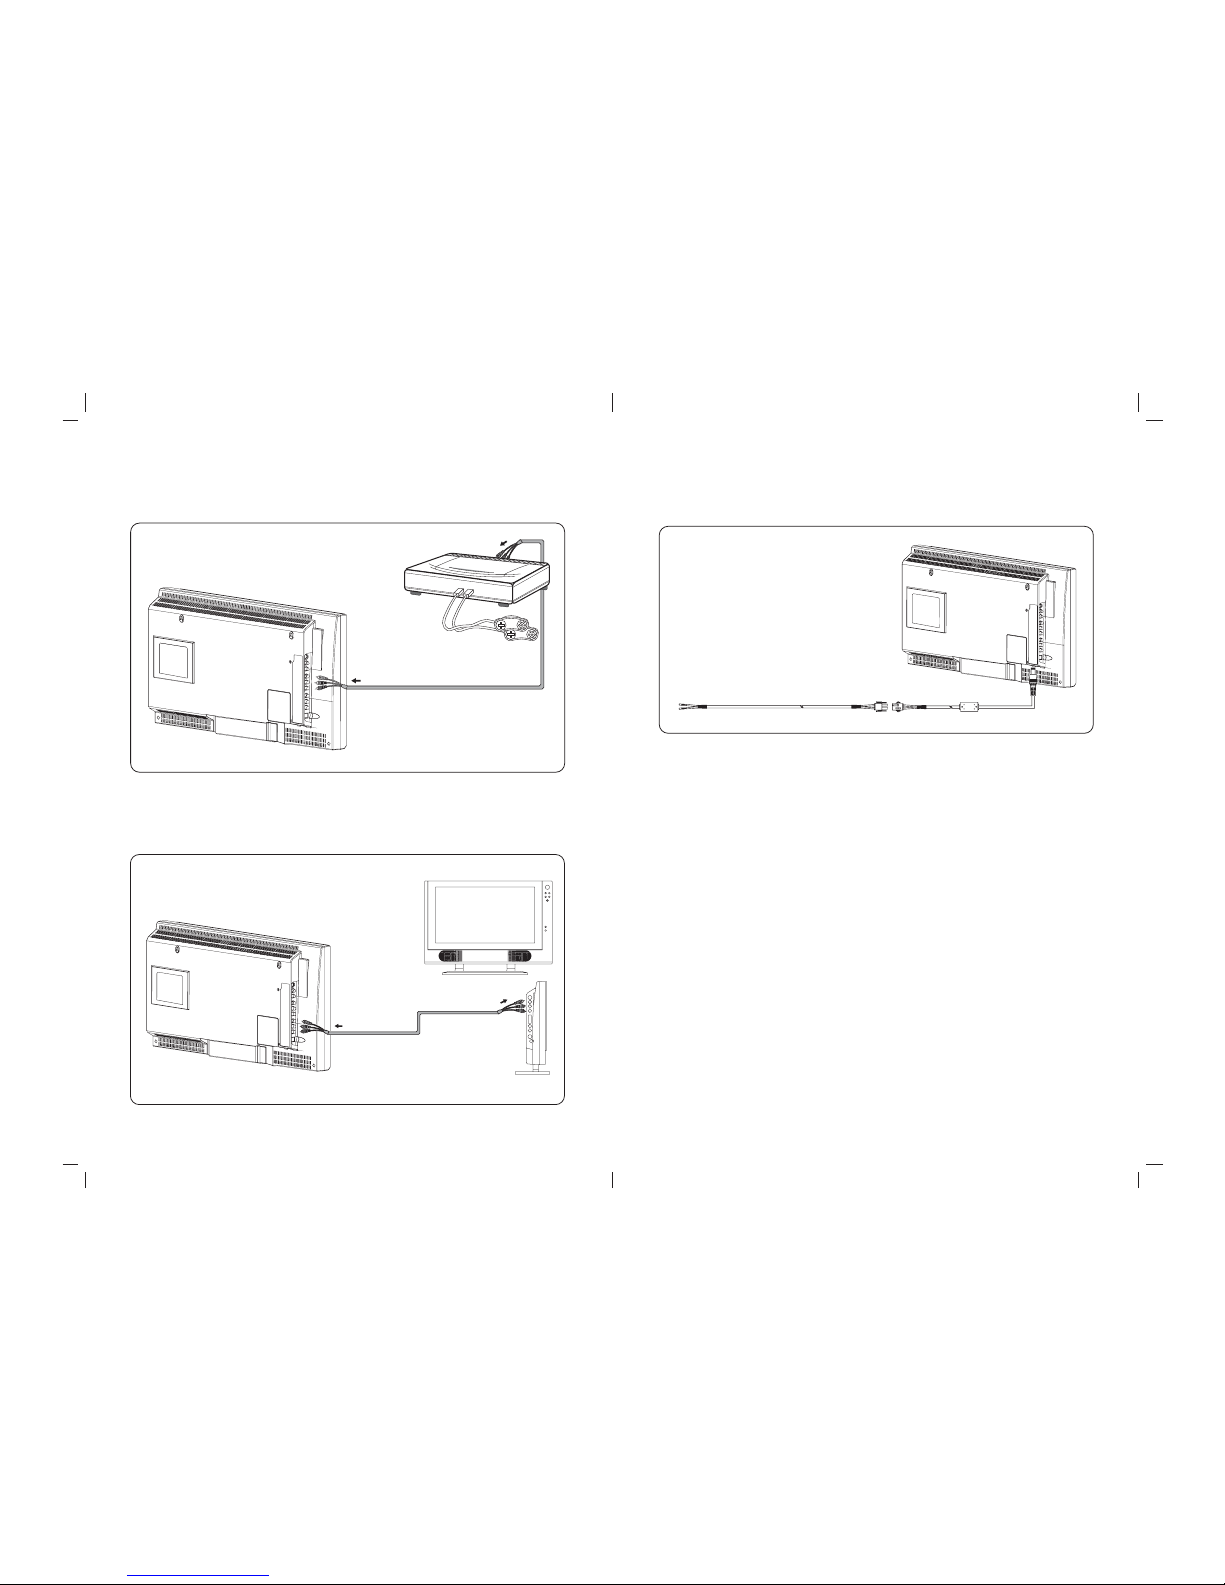
16. RCA Video Output
17. RCA Left Audio Output
18. RCA Right Audio Output
19. Antenna Input
20. Power Supply Socket
21. Second IR Transmitter Audio Input
2
22
21
24
23
26
25
28
312:
27
29 8
6
:
3
4
5
9
7
9
3. Remote Control Function :
(When using the remote control, point it towards the IR sensor.)
To prevent battery leakage which may result
in bodily injury or damage to the remote :
1. Install all batteries correctly, and as
marked on the remote control.
2. Do not mix batteries: (OLD and NEW or
CARBON and ALKALINE, etc.).
3. Remove batteries when the remote is not
used for a long time.
Note: 1. Some buttons on remote have two functions (for TV & DVD mode). When press the TV button, the
remote will get into TV function mode, each time when press the TV function button, the LED will
flash "RED" light. When in DVD Mode, each time when press the DVD function button, the LED will
flash "GREEN" light.
2.Some of the buttons are designed for operate single disc DVD player, pls read the DVD manual to
operate the DVD player.
Note : Red LED indicates Standby mode. Power is applied to the TV but is in stand by mode. Either the power
button on the remote or the "MODE" button on the front of the TV must be pressed to turn the TV on.
Green LED indicates that the TV is turned on. Press the "MODE" button to select the desired viewing mode.
Battery Usage Caution:
TV Mode: DVD Mode:
1
2
6
5
11
10
9
8
3
4
12
13
14
15
7
16
17
18
POWER : Power On/Off
SOURCE : Signal Button
AUTO PROGRAM : Channel Scanning
/ / / :
Up, Down, Left, Right Button for setting
CH (+/- ) : Channel Up/Channel Down
1/2/3/4/5/6/7/8/9/0 : Numbers Button
LED : TV Mode --- Red Flash
: DVD Mode --- Green Flash
TV : TV Mode Selected
MUTE(TV) : TV Mute Button
MENU : DVD Root Menu
ENTER : Enter Button
VOLUME (+/- ) : Volume Up/Volume Down
RECALL : Channel Return
NEXT TRACK ( ): Select Next Title/Chapter
FR( ) : FAST Reverse Play
DVD : DVD Mode Selected
FF( ) : FAST Forward Play
PREVIOUS TRACK ( ): Select Previous Title/Chapter
DVD Button : Buttons only for DVD use
1.
2.
3.
4./5./14./16.
6.
7.
8.
9.
11.
12.
13.
15.
17.
4.
5.
10.
11.
16.
18.
Second IR Transmitter Audio Input

4. INSTALLATION GUIDE:
When Connecting to a TV Cable:
1. Remove Antenna Socket cover.
2. Plug the cable to the input socket on the unit.
3. Connect the cable that comes along with the unit to the one you are using
when needed.
TV AVTENNA
CATV CABLE
06 07
Connecting to Other Equipment :
1. This unit is able to support various input setting. You can connect your video recorder,
amplifier, game console etc, to the unit, to enjoy high quality, digital audio-visual effect.
2. Connect AV equipment using S-Video. (photo.1)
3. Using the S-Video cable, connect your equipment to the S-Video/Component/Composite
socket on the TV Side Input Panel.
4. Connect your AV cable to the equipment. (photo.2)
5. Connect your AV cable to the equipment. (photo.3)
(photo.1)
(photo.2)
ATTENTION : Please refer external setting operating instruction. (P. 23)
(photo.3)

Input (RCA) from other Equipment:
Connect to the TV AV IN 2 socket.
08 09
Output (RCA) to other AV Equipment:
Output the AV Signal using the unit AV output socket.
Connect Power:
Connect to the power source using the power cable and adapter provided.
ATTENTION: Ensure the power supply is connected to the unit. When not using unit for
a long period of time, remove DC input socket from the main power point.
DC INPUT
SOCKET
DC 12V

5. Basic Functions :
POWER SIGNAL:
1. Press the front panel "Power" button, POWER indication LED on unit turns GREEN in
color indicating power is connected.
10 11
3RZHU,QGLFDWLRQ/('
MODE (SOURCE):
1. Press the "MODE" button on the TV front panel or remote control "SOURCE" button to
select from the various video source.
2. The mode setting status will change each time the "MODE" (SOURCE) button is
pressed – "S-VIDEO/AV1/AV2/CHANNEL"
** Please make sure video source is been connected properly.
** Note : Red LED indicates that the TV is in Standby mode. Press either the power
button on the remote control or the "ON / MODE" button on the front of the
TV to turn the unit on.
S-VIDEO
S-VIDEO
AV1/AV2 CHANNEL
VOLUME SETTING:
Press the "Volume Up/Down" ( / )button on the TV front control panel or remote
control to adjust the volume level.
MUTE:
1. Press the "Mute" button on the remote control to mute speakers.
2. Press the "Mute" button again or the "Volume Up/Down" ( / )button to return the
sound back to the speakers.
CHANNEL SEARCH:
1. Press the "Channel Up/Down" ( / ) button on the remote control or the TV Front
Control Panel to change/select channels.
2. Press on the Number buttons on the remote control to change/select channel directly.

6. OPERATIONS:
Menu Setting :
This Unit provide the "OSD" setting, enable you to customize the setting for the following:
12 13
Ɩ
Sleep Timer Setting:
1. Press "Menu" button on the remote control, Main Menu options will be displayed on the TV
screen.
2. Press "Enter" button, the text of the selected option will be highlighted in RED.
3. Press "Left/Right" ( / )button to select the desired time setting of "30/60/90/120"
minutes or "OFF".
4. Press "Menu" button on the remote control to exit main menu.
SLEEP TIMER 30
SLEEP TIMER 60
SLEEP TIMER 90
SLEEP TIMER 120
SLEEP TIMER OFF
1./4.
2.
3.
Video Adjust Setting:
Saturation:
1. Press "Menu" button on the remote control, Main Menu options will be displayed on the
TV screen.
2. Press "Up/Down" ( / )button to select "Video Adjust" option.
3. Press "Enter" button to confirm the selection.
4. Press "Up/Down" ( / )button to select "Saturation" option.
5. Press "Enter" button, the text of the selected option will be highlighted in RED.
6. Press "Left/Right" ( / )button to adjust the Saturation Level.
7. Press "Menu" button on the remote control to exit main menu.
Sharpness:
1. Press "Menu" button on the remote control, Main Menu options will be displayed on the
TV screen.
2. Press "Up/Down" ( / )button to select "Video Adjust" option.
3. Press "Enter" button to confirm the selection.
4. Press "Up/Down" ( / )button to select "Sharpness" option.
5. Press "Enter" button, the text of the selected option will be highlighted in RED.
6. Press "Left/Right" ( / ) button to adjust the Sharpness Level.
7. Press "Menu" button on the remote control to exit main menu.
VIDEO ADJUST
SATURATION
SHARPENESS
BLACK LEVEL
CONTRAST
TINT
PRESET
EXIT
SATURATION
16
1
9
7
16
VIDEO ADJUST
SATURATION
SHARPENESS
BLACK LEVEL
CONTRAST
TINT
PRESET
EXIT
SHARPENESS
16
1
9
7
16
1.
2.
4.
6. 3./5.
1.
2.
4.
6. 3./5.
SLEEP TIMER
VIDEO ADJUST
AUDIO ADJUST
CLOSED CAPTION
V-CHIP BLOCK
FORMAT
OTHERS
RESET
EXIT
MAIN MENU
SLEEP TIMER
VIDEO ADJUST
AUDIO ADJUST
CLOSED CAPTION
V-CHIP BLOCK
FORMAT
OTHERS
RESET
EXIT
OFF
CC1
FULL
MAIN MENU

14 15
Tint:
1. Press "Menu" button on the remote control, Main Menu options will be displayed on the
TV screen.
2. Press "Up/Down" ( / )button to select "Video Adjust" option.
3. Press "Enter" button to confirm the selection.
4. Press "Up/Down" ( / )button to select "Tint" option.
5. Press "Enter" button, the text of the selected option will be highlighted in RED.
6. Press "Left/Right" ( / )button to adjust the Tint Level.
7. Press "Menu" button on the remote control to exit main menu.
VIDEO ADJUST
SATURATION
SHARPENESS
BLACK LEVEL
CONTRAST
TINT
PRESET
EXIT
TINT
16
1
9
7
16
VIDEO ADJUST
SATURATION
SHARPENESS
BLACK LEVEL
CONTRAST
TINT
PRESET
EXIT
DARK LEVEL
16
1
9
7
16
1.
2.
4.
6. 3./5.
1.
2.
4.
6. 3./5.
Black Level:
1. Press "Menu" button on the remote control, Main Menu options will be displayed on the
TV screen.
2. Press "Up/Down" ( / )button to select "Video Adjust" option.
3. Press "Enter" button to confirm the selection.
4. Press "Up/Down" ( / )button to select "Black" option.
5. Press "Enter" button, the text of the selected option will be highlighted in RED.
6. Press "Left/Right" ( / )button to adjust the Dark Level.
7. Press "Menu" button on the remote control to exit main menu.
Contrast:
1. Press "Menu" button on the remote control, Main Menu options will be displayed on the
TV screen.
2. Press "Up/Down" ( / )button to select "Video Adjust" option.
3. Press "Enter" button to confirm the selection.
4. Press "Up/Down" ( / )button to select "Contrast" option.
5. Press "Enter" button, the text of the selected option will be highlighted in RED.
6. Press "Left/Right" ( / )button to adjust the Contrast Level.
7. Press "Menu" button on the remote control to exit main menu.
VIDEO ADJUST
SATURATION
SHARPENESS
BLACK LEVEL
CONTRAST
TINT
PRESET
EXIT
CONTRAST
16
1
9
7
16
1.
2.
4.
3./5.
1.
2.
4.
6. 3./5.
Preset:
1. Press "Menu" button on the remote control, Main Menu options will be displayed on the
TV screen.
2. Press "Up/Down" ( / )button to select "Video Adjust" option.
3. Press "Enter" button to confirm the selection.
4. Press "Up/Down" ( / )button to select "Preset" option.
5. Press "Enter" button, the text of the selected option will be highlighted in RED.
6. Press "Left/Right" ( / )button to reset to factory setting.
7. Press "Menu" button on the remote control to exit main menu.
VIDEO ADJUST
SATURATION
SHARPENESS
BLACK LEVEL
CONTRAST
TINT
PRESET
EXIT
16
1
9
7
16
1.
2.
4.
6. 3./5.

16 17
Audio Adjust :
Type:
1. Press "Menu" button on the remote control, Main Menu options will be displayed on the
TV screen.
2. Press "Up/Down" ( / )button to select "Audio Adjust" option.
3. Press "Enter" button to confirm the selection.
4. Under TV mode, press "Enter" button on the "Audio Adjust" option will highlight the
option text in RED color.
5. Press "Left/Right" ( / )button to change the setting to "STEREO/MONO/SAP"
sound type, under "Other" mode, the sound typewill be preset to "STEREO".
6. Press "Menu" button on the remote control to exit main menu.
AUDIO ADJUST
TYPE
BASS
TREBLE
BALANCE
PRESET
RETURN
STEREO
25
25
00
1./6.
2.
3./4.5.
Exit:
1. Select the "Return" option under the "Video Adjust" Menu using the "Up/Down"
button.
2. Press "Enter" button to return to the Main Menu Screen.
VIDEO ADJUST
SATURATION
SHARPENESS
BLACK LEVEL
CONTRAST
TINT
PRESET
EXIT
16
1
9
7
16
1.
2.
Bass:
1. Press "Menu" button on the remote control, Main Menu options will be displayed on the
TV screen.
2. Press "Up/Down" ( / )button to select "Audio Adjust" option.
3. Press "Enter" button to confirm the selection.
4. Press "Up/Down" ( / )button to select "Bass Level" option.
5. Press "Enter" button, the text of the selected option will be highlighted in RED.
6. Press "Left/Right" ( / )button to adjust the Bass Level.
7. Press "Menu" button on the remote control to exit main menu.
AUDIO ADJUST
TYPE
BASS
TREBLE
BALANCE
PRESET
RETURN
BASS
STEREO
25
25
00
1.
2.
4.
6. 3./5.

18 19
Return:
1. Select the "Return" option under the "Audio Adjust" Menu using the "Up/Down"
( / )button.
2. Press "Enter" button to return to the Main Menu Screen.
1.
2.
AUDIO ADJUST
TYPE
BASS
TREBLE
BALANCE
PRESET
RETURN
BALANCE
STEREO
25
25
00
Treble:
1. Press "Menu" button on the remote control, Main Menu options will be displayed on the
TV screen.
2. Press "Up/Down" ( / )button to select "Audio Adjust" option.
3. Press "Enter" button to confirm the selection.
4. Press "Up/Down" ( / )button to select "Treble Level" option.
5. Press "Enter" button, the text of the selected option will be highlighted in RED.
6. Press "Left/Right" ( / )button to adjust the Treble Level.
7. Press "Menu" button on the remote control to exit main menu.
Balance:
1. Press "Menu" button on the remote control, Main Menu options will be displayed on the
TV screen.
2. Press "Up/Down" ( / )button to select "Audio Adjust" option.
3. Press "Save/Enter" button to confirm the selection.
4. Press "Up/Down" ( / )button to select "Balance Level" option.
5. Press "Save/Enter" button, the text of the selected option will be highlighted in RED.
6. Press "Left/Right" ( / )button to adjust the Balance Level.
7. Press "Menu" button on the remote control to exit main menu.
AUDIO ADJUST
TYPE
BASS
TREBLE
BALANCE
PRESET
RETURN
TREBLE
STEREO
25
25
00
AUDIO ADJUST
TYPE
BASS
TREBLE
BALANCE
PRESET
RETURN
STEREO
25
25
00
1.
2.
4.
6. 3./5.
1.
2.
4.
6. 3./5.
1.
2.
4.
3.
Ɩ
SLEEP TIMER
VIDEO ADJUST
AUDIO ADJUST
CLOSED CAPTION
V-CHIP BLOCK
FORMAT
OTHERS
RESET
EXIT
MAIN MENU
CLOSED CAPTION CC1
CLOSED CAPTION CC2
CLOSED CAPTION CC3
CLOSED CAPTION CC4
CLOSED CAPTION T1
CLOSED CAPTION T2
CLOSED CAPTION T3
CLOSED CAPTION T4
CLOSED CAPTION OFF
CLOSED CAPTION Setting:
1. Press "Menu" button on the remote control, Main Menu options will be displayed on the
TV screen.
2. Press "Up/Down" ( / )button to select "Closed Caption" option.
3. Press "Save/Enter" button to confirm the selection.
4. Press "Left/Right" ( / )button, the OSD menu will appear "CC1/CC2/CC3/CC4/
T1/T2/T3/T4/OFF".
5. Press "Menu" button on the remote control to exit main menu.
** NOTE: "CLOSED CAPTION" function can only be used on certain system, such "U.S.A" and "CANADA".

D --- LOCK --- OFF
L --- LOCK --- OFF
S --- LOCK --- OFF
V --- LOCK --- OFF
FV --- LOCK --- OFF
20 21
ƖƖ
SLEEP TIMER
VIDEO ADJUST
AUDIO ADJUST
CLOSED CAPTION
V-CHIP BLOCK
FORMAT
OTHERS
RESET
EXIT
V-CHIP BLOCK
PASSWORD _ _ _ _
MAIN MENU
TV-Y --- OFF --- BLOCK
TV-Y7 --- OFF --- BLOCK
TV-G --- OFF --- BLOCK
TV-PG --- OFF --- BLOCK
TV-14 --- OFF --- BLOCK
TV-MA --- OFF --- BLOCK
BLOCK CONTENT --------------------------
TV GUIDELINES
G --- OFF --- BLOCK
PG --- OFF --- BLOCK
PG-13 --- OFF --- BLOCK
R --- OFF --- BLOCK
NC-17 --- OFF --- BLOCK
X --- OFF --- BLOCK
RETURN
V-CHIP MPAA
MPAA OFF
TV GUIDELINES [ D L S V ]
CHANGE PASSWORD:_ _ _ _
CONFIRM PASSWORD:_ _ _ _
RETURN
V-CHIP SETTING
V-CHIP BLOCK Setting:
1. Press "Menu" button on the remote control, Main Menu options will be displayed on the
TV screen.
2. Press "Up/Down" ( / )button to select "V-CHIP BLOCK" setting option.
3. Press "Enter" button to confirm the selection.
4. the OSD menu will show as below:
** NOTE: 1. This unit supports Prevention of Violence and Pornography setting. This function
is only applicable to certain disc and system with special settings.
2. The function can only be used in certain country like USA, Canada etc.
** NOTE: press "PASSWORD", then press "ENTER"
"V-CHIP SETTING" will appear.
PASSWORD: " 1234 "
** NOTE: select "CHANGE PASSWORD",
press the password you want, then
press "ENTER".
** NOTE: After that, the text of "CONFIRM
PASSWORD" will be highlighted in RED.
Press the same password you want again.
Then press "ENTER"
Ɩ
SLEEP TIMER
VIDEO ADJUST
AUDIO ADJUST
CLOSED CAPTION
V-CHIP BLOCK
FORMAT
OTHERS
RESET
EXIT
MAIN MENU
FORMAT Setting:
1. Press "Menu" button on the remote control, Main Menu options will be displayed on the
TV screen.
2. Press "Enter" button to confirm the selection.
3. Press "Left/Right" ( / )button to select "FORMAT" setting option.
4. the OSD menu will show as below:
Ɩ
FORMAT FULL
Ɩ
FORMAT ZOOM
Ɩ
FORMAT NORMAL
1.
2.
3.
OTHERS
LANGUAGE
CHANNEL SCAN
TV SOURCE
TV SYSTEM
VIDEO 1 SEL
SPEAKER
RETURN
ENGLISH
CABLE
NTSC-M
ON
NTSC-M
ITALIAN
PAL-BH
PAL-I
PAL-DK
PAL-BG
JAPAN
Others:
Language:
1. Press "Menu" button on the remote control, Main Menu options will be displayed on the
TV screen.
2. Press "Up/Down" ( / )button to select "Others" option.
3. Press "Enter" button to confirm the selection.
** Default Language Setting is preset to English Language.
** Only PAL TV TUNER can be selected ---- PAL-BG ; PAL-DK ; PAL-I .

22 23
Channel Scan:(Auto Program)
1. Press "Menu" button on the remote control, Main Menu options will be displayed on the
TV screen.
2. Press "Up/Down" ( / )button to select "Others" option.
3. Press "Enter" button to confirm the selection.
4. Press "Up/Down" ( / )button to select "Channel Scan" option.
5. Press "Enter" button, the text of the selected option will be highlighted in RED.
6. Press "Left/Right" ( / )button to Scan for channels and stored them to the system
memory.
7. Press "Menu" button on the remote control to exit main menu.
** After scanning is completed, press the "Save/Enter" button to confirm save.
2.
3.
5.
7.
1.
4./6.
1.
2.
4.
6. 3./5.
External Setting:
1. Press remote "SOURCE" button to select video source to "S-VIDEO" mode.
2. Press "Menu" button on the remote control, Main Menu options will be displayed on the TV
screen.
3. Press "Up/Down" ( / )button to select "Others" option.
4. Press "Enter" button to confirm the selection.
5. Press "Up/Down" ( / )button to select "Video 1 Select" option.
6. Press "Enter" button, the text of the selected option will be highlighted in RED.
7. Press "Left/Right" ( / )button to select "S-Video" or "Com[CVBS]" or "Com[Y/C]"
option.
8. Press "Menu" button on the remote control to exit main menu.
** Note : Video 1 is selectable between S-video, COM CVBS for composite, and COM Y/C
for component.
** Please set the option according to the external device specifications. (Page 7)
OTHERS
LANGUAGE
CHANNEL SCAN
TV SOURCE
TV SYSTEM
VIDEO 1 SEL
SPEAKER
RETURN
1.
2.
4.
6. 3./5.
TV Source Setting:
1. In TV Mode, press "Menu" button on the remote control, Main Menu options will be
displayed on the TV screen.
2. Press "Up/Down" ( / )button to select "Others" option.
3. Press "Enter" button to confirm the selection.
4. Press "Up/Down" ( / )button to select "TV Source" option.
5. Press "Enter" button, the text of the selected option will be highlighted in RED.
6. Press "Left/Right" ( / )button to select "Antenna" or "Cable/HRC/IRC" Option.
7. Press "Menu" button on the remote control to exit main menu.
OTHERS
LANGUAGE
CHANNEL SCAN
TV SOURCE
TV SYSTEM
VIDEO 1 SEL
SPEAKER
RETURN
OTHERS
LANGUAGE
CHANNEL SCAN
TV SOURCE
TV SYSTEM
VIDEO 1 SEL
SPEAKER
RETURN
OTHERS
LANGUAGE
CHANNEL SCAN
TV SOURCE
TV SYSTEM
VIDEO 1 SEL
SPEAKER
RETURN
1./7.
2.
4.
6. 3./5.
Speaker Setting:
1. Press "Menu" button on the remote control, Main Menu options will be displayed on the TV
screen.
2. Press "Up/Down" ( / )button to select "Others" option.
3. Press "Enter" button to confirm the selection.
4. Press "Up/Down" ( / )button to select "Speaker" option.
5. Press "Enter" button, the text of the selected option will be highlighted in RED.
6. Press "Left/Right" ( / )button to select "ON/OFF " option.
7. Press "Menu" button on the remote control to exit main menu.
** Once the speaker off is set, the audio output will still active. To mute audio output, press
"MUTE" button.
CABLE
HRC
IRC
ANTENNA

24 25
1.
2.
Return:
1. Select the "Return" option under the "Audio Adjust" Menu using the "Up/Down" ( / )
button.
2. Press "Enter" button to return to the Main Menu Screen.
Reset:
1. Press "MENU" button on the remote control, main menu option will be displayed on the tv
screen.
2. Press "UP/DOWN" ( / ) button to select "RESET" option.
3. Press "ENTER" button, the text of the selected option will be highlighted in RED.
4. Press "LEFT/RIGHT" ( / ) button to reset all setting to factory setting.
OTHERS
LANGUAGE
CHANNEL SCAN
TV SOURCE
TV SYSTEM
VIDEO 1 SEL
SPEAKER
RETURN
7. ANNEX A
LCD Monitor Care & Cleaning Tips:
To avoid possible shock hazard, be sure the LCD TV is turn off and
unplugged from the main electrical outlet before cleaning.
Do not use any form of solvents on the LCD monitor.
Cleaning the LCD Monitor:
1. Use a soft, clean & dry cloth to gently wipe off the dust on the LCD monitor.
2. Use a clean cloth dampened with water to wipe off the dirt.
3. Do not exert force when cleaning the LCD monitor.
Cleaning the Enclosure:
1. Use a soft, clean & dry cloth to gently wipe off the dust on the LCD monitor.
2. Use a clean cloth dampened with water to wipe off the dirt.
3. Do not exert force when cleaning the LCD monitor.
Ɩ
SLEEP TIMER
VIDEO ADJUST
AUDIO ADJUST
CLOSED CAPTION
V-CHIP BLOCK
FORMAT
OTHERS
RESET
EXIT
MAIN MENU

8. ANNEX B
Troubleshooting:
If the unit fails to operate normally, try solving the problems using the guide
below. If the problem persists, switch off the unit and ask the dealer or
customer services officer for assistance. Do not attempt to repair the defective
unit yourself. Do not endanger yourself as high voltage is involved.
1. No Picture
a. Check that the power cord is plugged into the main socket and the power
supply is turned on.
b. Check the contrast and brightness setting.
c. Check the Antenna connection to see if it is properly connected to the
LCD-TV Input Terminal.
d. Be sure you have selected the correct source mode.
2. Snowy Picture
a. Check to see if the Antenna is correctly connected.
b. Check to see if the picture setting is correctly set.
3. Picture Flickers
a. Check that the power coming from the main socket is sufficient.
b. Check that unit is not placed too near speakers or magnetic objects.
c. Check to see that the unit setting is correctly set.
4. No Sound
a. Check that mute function is off.
b. Increase the volume.
5. Remote Control not Working.
a. Check batteries are installed correctly, replaced if necessary.
b. Aim the remote controller towards the unit remote sensor.
6. Unit will not power on w/ front Power button.
a. Check the power is connected.
b. Power indication LED on unit is red in color.
26 27
9. SPECIFICATIONS:
PRODUCT TYPE
LCD PANEL
BRIGHTNESS
RATIO
BACKLIGHT
DISPLAY ANGLE
AV INPUT/OUTPUT
OSD LANGUAGE
OPERATING VOLTAGE
REMOTE RANGE
IR TRANSMITTER
TV SPECIFICATION
2
22" 16:9 DIGITAL LCD TV
22" 16:9 LCD PANEL
450cd/m
400:1
50000HRS NORMAL OPERATION
VERHICAL:170° / HORIZONTAL:170°
S-VIDEO/COMPONENT/COMPOSITE
AV INPUT/COMPOSITE AV OUTPUT
ENGLISH
DC12V, 7A
CHANNEL 1:
2.3MHZ~2.8MHZ
EFFECTIVE ANGLE:45°
EFFECTIVE RANGE:12 FEETS
CHANNEL 2:
3.2MHZ~3.8MHZ
EFFECTIVE ANGLE:45°
EFFECTIVE RANGE:12 FEETS
15 FEETS
NTSC
1. OPERATING MANUAL
2. REMOTE CONTROL(W/BATTERY)
3. DC POWER HARNESS
4. S-VIDEO SIGNAL CABLE
5. ANTENNA SIGNAL CABLE
6. S-VIDEO TO COMPONENT VIDEO
CONVERSION CABLE
7. S-VIDEO TO COMPOSITE VIDEO
CONVERSION CABLE
ACCESSORIES(INCL)
Other manuals for JE2269
2
Table of contents
Other Jensen LCD TV manuals

Jensen
Jensen JE4208 User manual

Jensen
Jensen 15 SERIES User manual

Jensen
Jensen JE1908 User manual

Jensen
Jensen JE2423 User manual

Jensen
Jensen JE1508 User manual

Jensen
Jensen JE2369 User manual

Jensen
Jensen JE1911 User manual

Jensen
Jensen JE1909ACB User manual

Jensen
Jensen JE3708 User manual

Jensen
Jensen JE2707 User manual

Jensen
Jensen JE2043 User manual

Jensen
Jensen LCD TVS User manual

Jensen
Jensen JE3207 User manual

Jensen
Jensen JE1507 User manual

Jensen
Jensen JE2411 User manual

Jensen
Jensen JE2608WV User manual

Jensen
Jensen JE2707 User manual

Jensen
Jensen JE1510 User manual

Jensen
Jensen JE3207 User manual

Jensen
Jensen JE1909ACB User manual