manuals.online logo
Brands
  1. Home
  2. •
  3. Brands
  4. •
  5. Jikel
  6. •
  7. Baby Swing
  8. •
  9. Jikel Multifunctional Comfort 3 Datasheet

Jikel Multifunctional Comfort 3 Datasheet

Multifunctional Comfort 3
USING INSTRUCTION
IMPORTANT! KEEP FOR FUTURE REFERENCE. Please read the instruction of high chair
carefully before using and keep it for future reference. It may cause injury to the infant if
operation of chair doesnt according to the instruction!
1
Contents
1  Product List·························1
2 Assembly····························2~5
3 Use Instructions····················5~12
4 Notice································· 13
5 Cleaning and Maintenance······ 14
1 Product List
Photo Name Quantity Photo Name Quantity
Main model 1
1
1
1
1
1
1
Fixed sets
of l 1
1
1
1
1
1
Assist
model
Dinner
Plate
Front Foot
Tube Toy Bar
Hind feet
tube
Footrest
base
Left lifting
arm tube Adapter
Right lifting
arm tube
Instruction Manual
Seat
2
II Instructions for assembling the parts
WARNINGIt should be installed by adult.
1. Insert the front foot tube into the corresponding hole in the lower joint, A to A, until you hear
the "click" sound. As below picture.
“Click”
2. Insert the rear foot tube into the corresponding hole in the lower joint, B to B, until you hear
the "click" sound. As below picture.
¡°
Click¡±
3. Insert the left and right arms into the seat group on both sides, C to C, As below picture
3
4 . Make the arm align to the fixed hole, D to D, fixed in the designated position. As below
picture.
5. Assemble the leftand right arms as below picture.
D
D
4
Main Model
Assist Model
to
to
6. Disassemble the left and right arms as below picture.
Mai nModel
Assi st Model
1
use a hard thing of diameter about
4mm push the quick detachable
button to disassemble
7. Install the dinner plate on the seat group in the direction of the arrow. As shown below.
Notice: Use the high chair with dinner plate
.
8. Install the toy bar on the seat group in the direction of the arrow ,As shown below.
Notice: Use the swing with toys bar.
5
1. Speed Indicator Light
1. Speed Down
5.Volume/Music Selection
4. Music Play and Pause
2. Timer Indicator Light
2. Timer Button
1.Speed Up
6.signal Remote control
3.USB Connector
9. Put small pedal on the pedal port and then press down, installed in place. as the picture
shows.
III. Function Use
1. Function description of Control panel:
The footrest
have 3 position
to adjust
6
1) There are five gears(five lights) to adjust the swing speed, divided by "+" and "-" two keys to
choose the swing speed (as shown in the figure).
2) There are three types of time setting. Press the button once, light will be on for 8 minutes.
Press it second time, the light will be on for 15 minutes. Press it third time, the light will be on
for 30 minutes. When setting time is reached, all functions will stop. If time setting function is
not used, all using function will start working until power is off.
3) USB connector, can access USB and play USB's songs according to functional operation of
the fourth and fifth.
4) Play/pause button. Press the button once to start playing music. Press it second time to stop
playing music. The button has the same function under U-disk and APP mode.
5) Volume/next song button. After pressing music play button, press this button to play next
song( the swing has 12 8 chord songs). Press “ volume/next song” button for a while to adjust
volume. After concerning volume, release your hand. Use the same way to adjust volume
under U -disk and APP mode.
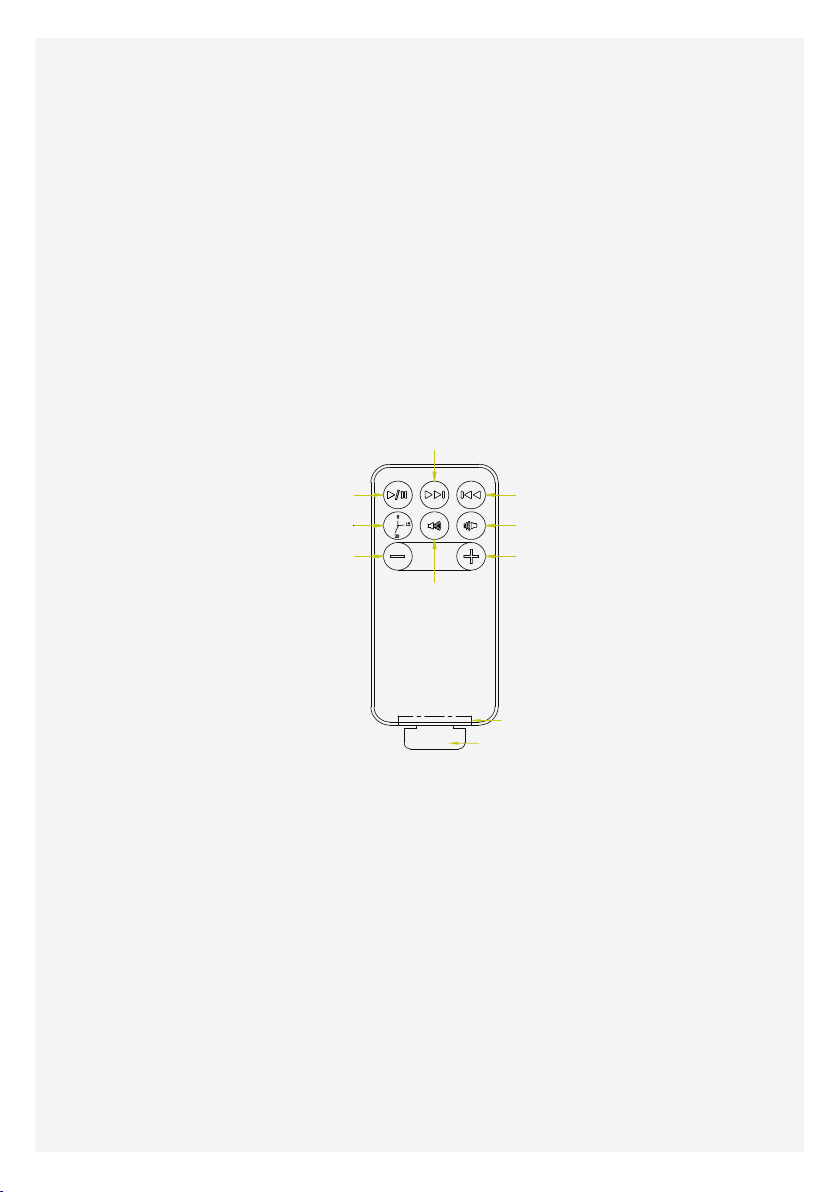
6) Remote control instructions:
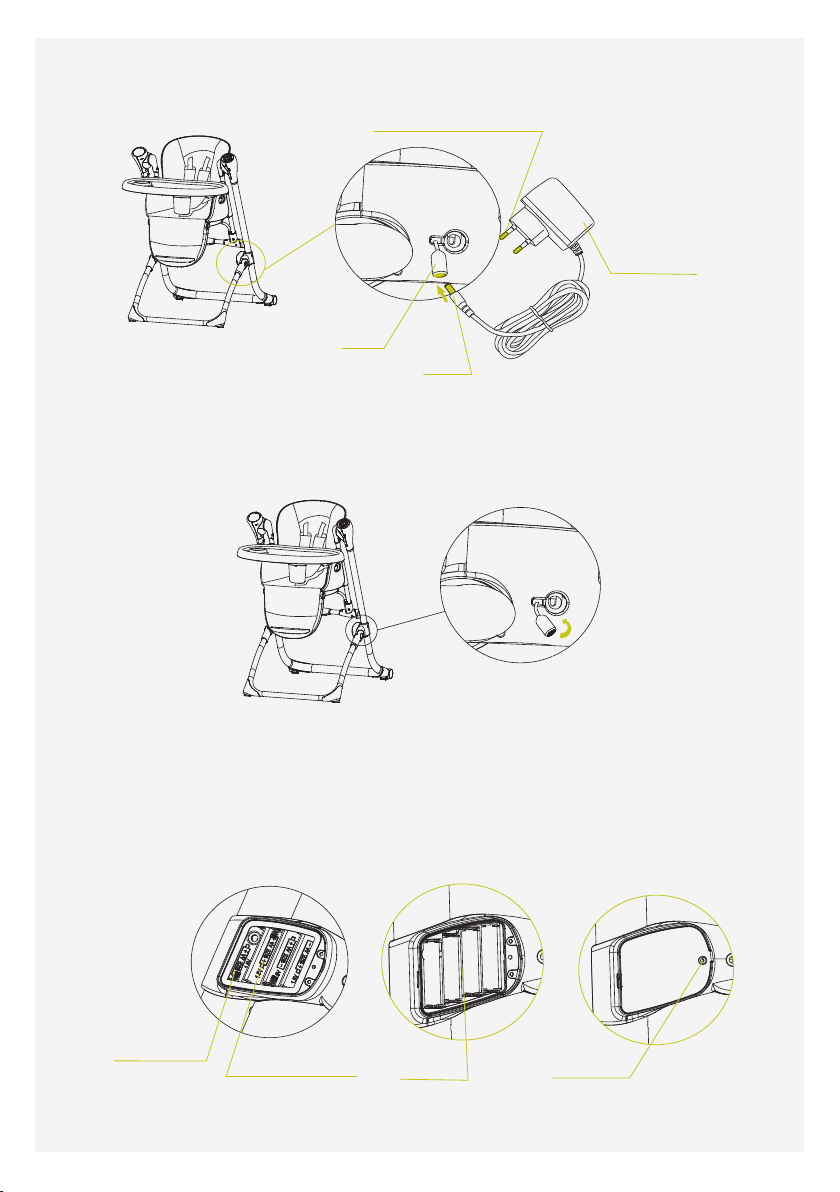
2. Adapter: if this accessory is available, please operate it as following ways.
1) As below picture shows, insert DC plug of adapter to DC receiver of main model. Insert the AC
plug into 100 -240V 50/60Hz 0.3A AC socket.
Last song button
Volume Down
Speed Up
Play/pause button
Timer button
Speed Down
Volume Up
Next song button
Battery
Plastic sheet to power off
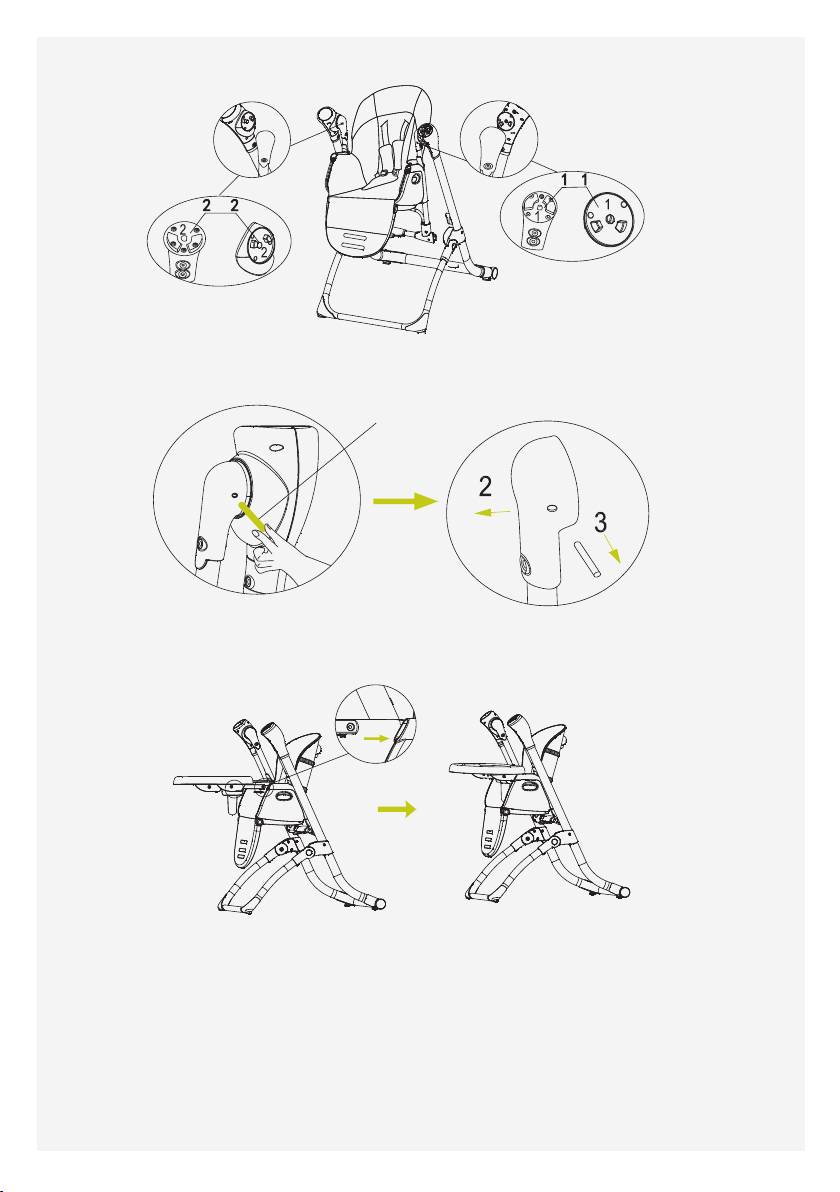
Using instruction:
1. Swing Function: 5 types of swing speed( 5 indicator light) on speed
adjust button. Press ¡°+¡±for speed up, ¡°-¡±for speed down.
2. Timer Setting: three types of time setting. Press the button once, light
will be on for 8 minutes. Press it second time, the light will be on for 15
minutes. Press it third time, the light will be on for 30 minutes. When
setting time is reached, all functions will stop. If time setting function is not
used, all using function will start working until power is off.
3.
Play/pause
button:
Press
the
button
once
to
start
playing
music.
Press
it second time to stop playing music.
4. Text song button: Press it to next song.
5. Last song button: press it to last song.
6. Battery: Remove the battery compartment and replace the battery.
7
2 When using the battery, insert the DC connector into the battery compartment hole, and
unplug the power connector when not in use for a long time to save power. As shown below.
3. This product can use 4pcs No.5 batteries on the product for power supply.
1 As shown below, the battery installation method: use a screwdriver to remove the screws on
battery cover, and then remove the battery cover, put the battery in the battery slot with correct
polarity, and then cover the battery cover and fixed. Remove the battery according to above steps.
1.
AC
plug
connect
with
100-240V
50/60HZ 0.3A AC socket
2.
Out
voltage
of
adapter,5-6V,¡ Ü8 00mA
4. DC plug
3. Power connector
4.closebatterycover,inlay
the two head screw tightly.
3.adjustbatteryto
flat position
2. put positivesideof
batteryintothesideof
battery with + mark.
1.putnegativeside of
batteryintothesideof
battery jar with spring.
WARNING!
8
Non-rechargeable batteries can't be charged;
Rechargeable batteries can only be charged under adult supervision.
Rechargeable battery should be taken out of the toys before charging.
Different types of batteries or old and new batteries cannot be mixed.
The batteries should be placed in the correct polarity.
Exhausted batteries need to be removed from the infant swing.
Power supply terminal must not short -circuit.
The infant swing shall only be used with the recommended transformer. Input voltage of
adapter is 100 -240V~50/60Hz 0.3A MAX Output voltage 5.8-6V 800mA-1A.
When using the adapter, keep out of reach of children.
Adapter used with the infant swing are to be regularly examined for damage to the cord, plug,
enclosure and other parts, and in the event of such damages, it shall not be used.
Please unplug the power and remove the battery when it is not in use for a long time. Do not
give the battery and the adapter to the baby.
4. When the seat and the arm is in lock state, the backrest only can be adjusted 2 position,
when adjust the height of chair seat to the second or above the second position, the backrest can
be adjusted to any sitting position until lying.
WARNING: When adjusting the function, please let baby leave the chair first.
5. Introductions for backrest adjustment function:
1) Backrest adjusted from the first position to the second or third position, just push up the
lowest
position
adjust
position
22
22
9
座姿
backrest by hand, no need to operate the adjustment button, as following picture, the first, the
second and the third position.
123
2) Backrest adjusted from the third position to fourth position, it must operate the adjustment
button, as following picture showed.
34
6. As shown in the figure, press the adjustment button on both sides, there are 6 different height
for adjust, when you want to adjust the height, Your hands lift the seat in balance, keep both sides
of the seat at the same height, until you hear "click"sound.
Warning! Seat adjustment button must be bounced back, if you find any side of the seat is not
fixed, loose or not work.
please fix it before use. Both sides of the seat must be fixed, keep the seat in the designated
height, otherwise there will be d angerous!
10
7. Activity tray can be adjusted to 3 position, as shown below.
8. Clean the tray, as shown below.
1
2
9. As shown, keep your hands on both sides of the footrest button at the same time and press
down to adjust up and down(4 sections).
6 position to adjust height
seat is not fixed
well par
2
1
11
半躺姿 座姿
10 . While the seat is lowest position, high chair can be converted to swing. Same step for swing
convert to high chair. As shown below .
In swing status, the seat height can't be adjusted.
WARNING! The swing rocking function must be closed when swing convert into high chair,
or it will affect the lifespan of motor. The seat height can't be adjusted up and down once it
is in swing status.
11 . In swing status, backrest can be adjusted to 2 positions.
12
12. As following picture, place the baby into seat pad, lock the safety button, and then cover the
protective bag. The length of the safety harness can be adjusted by shoulder and waist button. As
following picture, 5 point safety harness will protect your baby secure and comfortable.
1.Slide
2.Press
1.Slide
2.Press
Slide
13. When the footrest is in flat position, remove the elastic band fixed on the footrest and then the
footrest is folded and the nuse velcro sticks to fix. When put down the cloth of footrest, then
make elastic band through the foot rest, and then fasten the elastic band on the pedal pin. As
shown below.
13
12
22
14. Install the first position of the footrest, remove the elastic band fixed on the footrest and then
the footrest is folded and the nuse velcro sticks to fix. When put down the cloth of footrest, then
make elastic band through the foot rest, and then fasten the elastic band on the pedal pin. As
shown below.
15. Fold the chair, press the left and right side's button, and tread on the back foot tube, then fold
the front tube inward. As the picture shows.
16. Unfold the chair, press the left and right side's button, and tread on the back foot tube, then
flare the back foot tube.
As the picture shows
.
1
Button to fold up
2
3
tread on the
back foot tube
fold the
front tube
inward
1
2
3
flare the back
foot tube
Button to fold up
tread on the
back foot tube
14
When folding the chair or adjusting the chair function, you must let the baby leave the
chair and prohibit swing.
Notice
1. Always use this product with the seat belt!
2. To ensure that any tape is properly assembled.
3. Do not use the dining chair unless all parts are properly installed and adjusted.
4. Make sure that all locking devices are in use before using the multifunction dining chair.
5. Do not leave unattended children alone in the product!
6. The age to use the dining chair is 6-36 months.
7. The range of use swing age 0-6 months or the weight is within 9KG.
8. Children who use the high chair under 0-6 months or less 9KG are prohibit.
9. Do not use the toy stick to lift or move the chair.
10.. When the child is in this product, do not carry out functional adjustment or lift, move this
product!
11.This product is strictly prohibited at high places (such as: table, table, stairs or other high ground
from the ground), to prevent the risk of falling.
12. It is very dangerous to put this product on a non-flat surface!
13.Note the risk of suffocation: Please do not use product above soft objects, to prevent chipping
caused by suffocation (such as bed, sofa, etc.)
14. Please do not let the children stand in the multifunctional dining chair. In order to prevent falling
and haunted by a seat belt or stuck in the harness and other accidents occurred.
15. Do not let children take this product as a toy!
16. Make sure that the child leaves the product before folding the product!
17. This product can be used for a long time.
18. Please do not use this product if any parts are damaged or missing. Do not use substitutes at will,
except by replacement parts approved by the manufacturer.
19. Do not use this chair until all parts are properly assembled.
20. Keep away from fire and other strong heat sources. (Such as electric heaters near the high chair,
gas heaters, etc.)
21. Do not hang anything on the chair to prevent the stability of the chair.
22.When this product is powered on or when the power switch is pressed, wait for 3-5 seconds till
other function keys start working.
WARNING!Never machine-wash, bleach, dehydrate the products.
Care and clean
1. Seat pad: Remove from frame. Hand wash with cold water, gentle cycle.
2. Dining chair cushions removable, easy to clean.
WARNING!
WARNING!
15
3. Put the cloth cover on the back of the back seat, put the seat belt which is at the bottom of the
seat, at the bottom of back seat and at the backrest into the corresponding slot.
To be stuck, make the buckle on the cloth buckle up the buck le on the seat, make the elastic cord
through the foot pedal, and then make the elastic cord fixed on the foot pedal.
2. Basic maintenance
lock in place
No. Problems that may occur Solution
1
2
3
4
5
Suddenly stop when swinging
and playing music
Batteries are not be assembled
correctly and electricity is not
enough
No function works after
starting
Check whether polarity of batteries
are in c orrect position
Not use in long time Take out the batteries
Shaking seriously Please check whether the closing
joint is in place
Indicator light becomes weak electricity is not enough
16

Popular Baby Swing manuals by other brands

Fisher-Price T1828 user manual

Fisher-Price

Fisher-Price T1828 user manual

Monbebe SW130 user guide

Monbebe

Monbebe SW130 user guide

Fisher-Price 79636 manual

Fisher-Price

Fisher-Price 79636 manual

SoCo Swings CHARLESTON LOVESEAT WICKER Assembly instructions

SoCo Swings

SoCo Swings CHARLESTON LOVESEAT WICKER Assembly instructions

Outdoor Play 1394009 instruction manual

Outdoor Play

Outdoor Play 1394009 instruction manual

Fisher-Price BHV61 manual

Fisher-Price

Fisher-Price BHV61 manual

Fisher-Price N6020 manual

Fisher-Price

Fisher-Price N6020 manual

Fisher-Price FDH42 manual

Fisher-Price

Fisher-Price FDH42 manual

Kinderkraft FLO user manual

Kinderkraft

Kinderkraft FLO user manual

AsVIVA RedNeck GHS2 manual

AsVIVA

AsVIVA RedNeck GHS2 manual

Klarfit Miri manual

Klarfit

Klarfit Miri manual

ingenuity SimpleComfort Cassidy instructions

ingenuity

ingenuity SimpleComfort Cassidy instructions

Action Sports Folding Nursery Swing manual

Action Sports

Action Sports Folding Nursery Swing manual

Baninni STELLINO BNBS003 manual

Baninni

Baninni STELLINO BNBS003 manual

Hornbach Hangout Pod Assembly instructions

Hornbach

Hornbach Hangout Pod Assembly instructions

MACHRUS SWINGAN Two-Seater Glider manual

MACHRUS

MACHRUS SWINGAN Two-Seater Glider manual

Fisher-Price Aquarium Take-Along Swing instructions

Fisher-Price

Fisher-Price Aquarium Take-Along Swing instructions

stilum simius 3 birdnet Mounting instructions

stilum

stilum simius 3 birdnet Mounting instructions

manuals.online logo
manuals.online logoBrands
  • About & Mission
  • Contact us
  • Privacy Policy
  • Terms and Conditions

Copyright 2025 Manuals.Online. All Rights Reserved.