JL Audio MediaMaster 105 User manual

MediaMaster®l05
OWNER'S
MANUAL
MANUEL
D'UTILISATION
MANUAL
DEL PROPIETARIO
BEDIENUNGSANLEITUNG
MANUALE
DEL PROPRIETARIO
0Bl
uetoot
h" ~Radio" (l<Slr!!!~.
xm
,»
d3
ffi

FCC
COMPLIANCE STATEMENT
This device complies
with
Part
15
of
the
FCC
Rules.
Operation
is
subject
to
the
fo
l
lowing
two
conditions:
(1) this device may
not
cause harmful
interference, and (2) th
is
device
must
not
acceptanyinterference
received, including interference
that
may cause undesired operation.
These l
im
its are designed
to
provide
reasonable protection against harmful
interference in a
res
idential installation.
This
equipment
generates,
uses
and
can radiate radio frequency energy
and,
if
not
installed in accordance wi
th
the instructions, may cause harmful
interference
to
radio communications.
However, there
is
no
guarantee
that
interferencewill
not
occurin a
particular installation.
If
this
equipment
does
ca
u
se
harmful interference
to
radio or television reception,
the
user
is
encouraged
to
try
to
corr
ect
the
interference by one
or
more
of
the
following measures:
-Reorient or relocate
the
receiving antenna.
-Increase separation between
the
equipment
and
the
receiver.
-Connect
the
equipment
to
an
outlet
on
a circuit
diffe
r
ent
from
that
to
wh
i
ch
the receiver is connected.
-Consult
the
dealer
or
an experienced
radio/TV technician
for
hel
p.
Any changes or modifications
not
expressly approved by
the
par
ty responsible
for
compliance
could void
the
user's
aut
h
ority
to
operate this equipment.
2
SAFETY CONSIDERATIONS
•Only u
se
this
product
in vehicles
with
12
volt, negative-
ground
electrical
systems. This
product
is
not
certi
fi
ed
or
approved
for
use
in aircraft.
•
Mount
this
pro
d
uct
securely
to
prevent
damage
or
injuryin severe
condit
ions.
•Do
not
replace
the
power
wi
re fuse
wi
th one
of
a
different
valu
e.
Never bypass
the
fuse.
•Listen to youraudio system
at
levels
appropriate
for
operating conditions
and hearing safety.
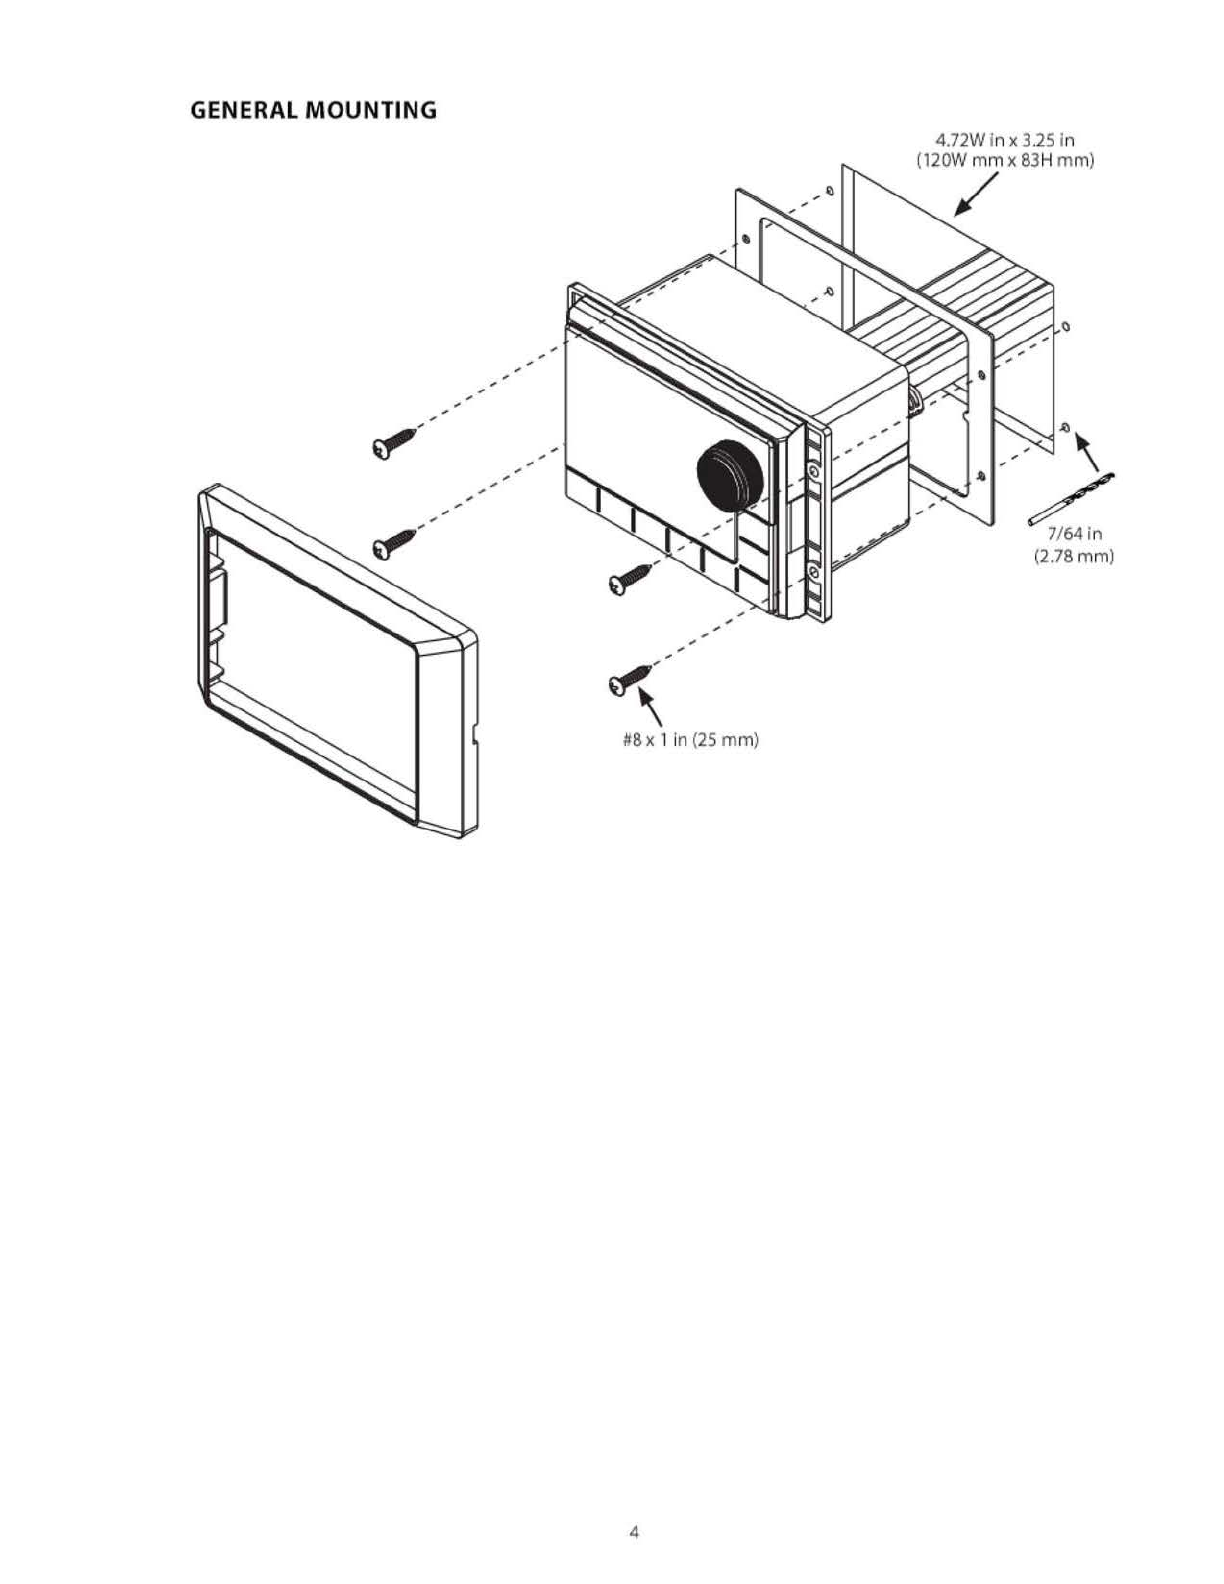
INSTALLATION CONSIDERATIONS
•Installation requi
res
appropr
iate tools
and safety equipment. Professional
installation
is
recommended.
•This
product
is
water-resistan
t.
Do
not
submerge
or
subject
to
high-pressure
water
spray.
•Before installation,
turn
off
the
audio
system and disconnect
the
bat
t
ery
system
from
the
audio system.
•Install in a dry, well-ventilated
location
that
does
not
interfere
wit
h
your factory-installed systems.
If
a
dry
environment
is
not
available,
a location
that
is
not
exposed
to
heavy splashing may be used.
•Before cutting or
dri
lling,
check
fo
r potential obstacles
behind
mounti
ng surfaces.
•Carefully route all system wiring away
moving partsand sharp edges; secure
with
cable ties
or
wire clamps and
use
grommets and
loom
whereappropriate
to
protect
from
sharp edges.

+
+
xl xl
xl xl
3
,----------
--
-- -
-----,
: I +
' '
' I
: i
' '
' '
' '
' '
' '
I :
i i +
' '
'--
----
---
------
------'
xl
#8
x 1in
(25
mm)
(x4)

GENERAL
MOUNTING
.,.
.,.
.,.
.,.
~
.,.
.,.
#Bx
1 In (25
mm
)
4
4.72Win x3.25 in
(l20W
mm
x83H
mm)
/
~,
<::
(2.78mm)

GENERAL CONNECTIONS
AM
'f
FM
-·•·
+-
AUX
I
-•n
-·•·
+-
AU
2
-••·
-·•·
•
-••■-
➔
-·•·
-·•·
-••■-
➔
-·•·
AMP
(SJ
-••·
•
-••■-
➔
-·•·
-••·
-••■-
➔
-·•·
·-
D(
2:
IP
hon S
E)
11111
I
■
-@
~-
----···-··
........
.
............
__
..
_____
_
__
~
~
SA
Fuse
:·c.·swoci
.. ..
""
. . ..
A P
5

CONTROL PANEL
MeoiaMasrer
IDS
BACIC/MENU
JLAUDIO
,,
m
SUB
0
SOURCE
►
II
0
SETTINGS
6

GENERAL CONTROL
FUNCTIONS
Control I Function
0 Source/ • Short press
to
turn
ON;
Long press
to
turn
OFF
SOURCE
Power •When on, short press to display
the
SOURC
E: Select
menu
0 Volum
e/
• Rotate to adjust vol
ume
Select • Rotate/press for navi
gat
ion and
making
se
lections
I
f)))
SUB • Short pre
ss
to
access
Subwoofer
Trim Level settings
SUB
0 Settings • Short p
res
s
to
access
the
Aud
io Zon
e:
To
ne
&
Ba
lan
ce
settin
gs
SEmNGS • L
ong
press to access
the
Sy
s
tem
Se
tting
s: Main
Menu
--
Back/
-• Short p
res
s
to
go
back
one
step
or
access source specific
menus
-
BACKJMENU
Menu
* Favorites • Short pre
ss
to
access stored presets
FAVORITES
• Long press to store a frequency
as
a preset (up
to
24)
• Short press
to
mute/
u
nmute
audio (AM/FM/SirlusXM/DAB+
/AUXl/
►
II
Mute/ AUX2) or
pa
use/resume
the
current
se
lection (
USB
1/U
SB2
/Bl
uetooth)
Pause •When the Audio Zone Levels
scree
n
is
displayed, pr
ess
to mute
all
audio
(AM/FM/
Sl
riusXM/DAB+/
AUX
1/
AUX2/USB
1/USB2/Bluetooth)
Short press to:
• Manually adjust tuner forwards (AM/FM/SlriusXM/DAB+)
•
Se
lect
the
next
track (USB1/USB2/Bluetooth)
llJii,
►
I
Forward Long press to:
•
Seek
to
the
next channel
(F
M); Skip forward ten frequency steps (AM)
• I
ni
tiate
Rap
id Channel Browsing forwa
rd
(SiriusXM)
• Fast-forward (
USB1
/
USB2)
Short press to:
• Manually adjust
tune
r backwards (AM/
FM
/
Sir
iusXM/DAB+)
•
Resta
rt track/select t
he
previous track
(USB
1/
USB2
/Bl
uetoo
th)
l+ill
Backward
Long press to:
•
Seek
to t
he
previous channel (FM); Skip backwardsten
frequency steps (AM)
• Initiate
Rap
id Channel Browsing backward
(S
iriusXM)
•
Fast
-rewind (USB1/USB2)
7

SYSTEM
MENU
SETTINGS
Q
SETT
I
NGS
• Long press to
access
the System Settings: Main Menu
0 • Rotate
to
navigate
•
Press
to make
se
lections
Setting I Function
Name this Device Create a custom name to displ
ay
on connected Bluetooth devices
and NMEA 2000 networks
Audio Zone Setup Configures each set
of
audio zone
outputs
AUX
Input
Configures
AUX
input
sensitivity:
2V
or 1V
RMS
(default)
Sensitivity
Diagnostic Displays serial number, hardwareand software version info
Display Configures display and brightness settings
Built-in alert notifies when
If
triggered,
the
unit
will enter Safe
LowVoltage Alert +1
2VDC
supply voltage drops
Mode
with
a message
to
turn the
unit
off
until
norma
l operating
below
10 volts voltage
rs
restored.
Scro
llingText Enabl
es
continuous scrolling
of
available RDS/track text info
Tuner Region Configures AM/FM tuner range/scale for aspecific region;
DAB+ replaces SiriusXM outside
of
North
America
Power-up Settings Configures display activation upon connection to power
8

AUDIO
ZONE
MENU
SETTINGS
0
SETTINGS
• L
ong
press
to
access
t
he
System Settings: Main
Menu
0 • Rotate to navigate
•
Press
to
make selections
Zone I Function I Setting 1 I Setting 2
Relative: Un
ks
the volume levels
of
Zones 2 -4 wi
th
the level
of
Zone
1.
(Llnked zones wfll
proportion-
ally
follow
Zone 1
's
volume.)
Each
zone's offset level
Is
Independently
adjustabl
e,
allowing
you
to create
a customized level controller,
specific
to
a vessel's layout.
Level Control
Mode
Absolute: Creates
an
independent
level control for selected zones,
each wi
th
its own separate
volume
level slider.
4V
RMS
Max (default)
Zl:
Zone 1 Fixed 2VRMS Max
22: Zone 2
lVRMSMax
23: Zone 3 Off
24:
Zone4
Bow,
Br
idge, Cabin, Cockpit,
Galley, Helm, Stateroom
1,
Rename Zone Stateroom
2,
Tower, Transom
Custom Name Alphanumeric
Inpu
t
Factory Default
Max
Vo
l
ume
Lim
it
Max Vol Limit
Off
{default)
Sub 1
60Hz
Sub 2
LPF
(Low
Pass
Filter)
80Hz
Sub 3
100Hz
Sub4
Sub
Off
22: Zone 2 Same
as
Zone 1
Z3:
Zone 3 Tone Control
Mode
24:
Zone4
Independent
Tone Control
9

BLUETOOTH
AUDIO
You
may wirelessly stream audio from a Bluetooth compatible device from
up
to
35
ft. away
(11
m}.
Up
to
8 devices
can
be paired to the MM105,
but
only one
streaming device
can
connect at one time.
BACK/MENU
0
Setting
Now Playing
Pair
New
Device
Connect Paired
Device
Set Primary Device
Delete a Paired
Device
Delete All Paired
Devices
I
BLUETOOTH
MENU
SETTINGS
•With Bluetooth
se
l
ec
ted
as
a source, short press
to
display the
Bluetooth: Main Menu
• Rotate
to
navigate
•
Press
to
make
se
lections
Function
Return to
the
Now
Playing Screen
Initiates Pairing
Mode
(connected devices will be disconnected)
Display
all
paired devices forconnection
Assign priori
ty
to apaired device for automatic connection
Select from paired devices for removal
Removes all
pa
ired devices from
memory
10

USB
CONNECTIONS
The
MMl0S
includes
two
ports
to
connect
with
USB
storage
class
devlces
(thumb
drive, digital audio player, etc.).
USB 1: High-speed connection
for
use
with
iPhone
111
/iPod
111
(MFi Certified)
or
USB
storage device
(1
A charging
output)
USB
2:
Full-speed
USB
storage device connection (500
mA
charging
output)
BACK/MEN
U
0
Setting
NowPlayfng
Shuffle
Repeat
Playlists
Artists
Songs
Albums
Genres
Composers
IMPORTANT
I
USB
MENU
SETTINGS
•
With
USBl
or
USB2
selected
as
a source,
short
press
to
display
the
USB
:
Main
Menu
• Rotate
to
navigate
•
Press
to
make
selections
Function
Return
to
the
Now
Playing Screen
Activate Shuffle: On
or
Off
(default)
Activate Repeat:
Al
l, Song
or
Off
(
defau
lt)
Displays Playlists
in
l
ibrary
Displ
ays
Art
ists
in
l
ibrary
Displays Songs
in
library
Displ
ays
Albums
in
library
Displ
ays
Genres
in
library
Displ
ays
Composers
in
lib
rary
• Properly secure
the
connected device beforedriving
to
prevent
damage
from
dropping
or
sudden acceleration/braking.
•Control,
functionality
and display may vary depending on
the
model and verslon
of
iPhone
111
connected.
• When connected via
USB
port
, make sure
to
unpair
or
disable the
Bluetooth connection
to
avoid possible playback conflicts.
•
If
you experienceabnormal performance during operation, disconnect
the
iPhone
111
and check its condition. Restart
your
iPhone"
if
performance does
not
improve.
•"Made
for
iPhone" means
that
an electronicaccessory
has
been designed
to
connect specifically
to
an
iPhone
111
and has been certified by the devel
oper
to
meet
Apple performance standards. Apple
is
not
responsible
for
the
operation
of
this device
or
its compliance
with
safety and regulatory standards. Please
note
that
the
use
of
thisaccessory
with
an iPhone
111
may
affect
wireless performance.
• iPhone• and all related marks and logos are trademarks
of
Apple Inc., registered in the
U.S.
and
other
countries.
11

SIRIUSXMe SATELLITE RADIO
Only
SiriusXM
IJ)
brings
you
more
of
what
you love
to
l
is
ten t
o,
all in one
place. Get over 140 channel
s,
inclu
ding
commercial-free music pl
us
the
best
sports, news, talk, comedyand
entertainment.Welcome to the
world
of
satell
it
e radi
o.
A SiriusXM Vehicle Tuner
and Subscription are required.For
more
information, visit www.siriusxm.com.
(S
iriusXM
se
rvi
ce
is only available in
th
e
co
ntin
ental USand
Ca
nada.)
A
ct
iv
at
ing Yo
ur
Siriu
sX
M S
ub
scri
pt
ion
A
ft
er installing
your
SiriusXM
Co
n
nect
tu
nerand antenna,
power
on
your
M
M1
05
and
selectSiriusXM mode.
You
should be able
to
hear
th
e
SiriusXM preview channel on Channel
1.
If
you
cannot hear
the
previ
ew
channel, please check
the
installation
i
ns
tructions
to
make su
re
your
Sir
iusXM
Connect
tuner
is properly installed.
After
you
can hear
the
preview channel,
tune
to
Channel
Oto
find t
he
Radio ID
of
your
tuner. In
add
ition,
the
Radio ID
is
located
on
the
bo
t
to
m
of
the
SiriusXM
Connect
Veh
icle Tuner and its packaging.
You
wi
ll need this
number
to
activate
yo
ur subscription. Write
the
nu
mbe
r
down
for
reference.
N
ote
:the Siri
usX
M Radio
ID
does
not
include the letters
I,
0,
Sor
F.
In
th
e USA, you
ca
n activate online or
by
ca
lling SiriusXM
Li
stener care:
• Visit
www
.siriusxm.c
om
/activate
now
•
Call
SiriusXM
Li
stener
Care
at
1-866-635-2349
For Canadian
Su
bsc
ri
pt
ions,
please co
nt
act:
• Visit
www.s
irius
xm
.ca/a
ct
iv
ate
•
Call
SiriusXM
Cus
t
omer
Care
at 1-888-539-7474
As
part
of
the activation process,
the
Siriu
sXM
satellites
wi
ll send an acti
va
t
ion
message
to
yo
ur
tune
r.When
yo
ur radio
12
detectsthat
the
tuner
has
received the
act
ivat
ion message,
your
radio
wi
ll
display: "Subscription Updated".
Once subscribed,
yo
u can
tu
ne
to
channels in
yo
ur subscription plan.
Not
e:
The activation process usually
t
akes
10
to
15 minut
es,
but
may take
up
to
an
ho
u
r.
You
r radio
wi
ll need to be
powered on and receiving the SiriusXM
signal
to
receive the
act
ivation message.
P
ar
ent
al Controls
Some SiriusXM channelscontain
matu
re
content. When
the
Parental Controls
feat
u
re
is
enab
led,
cha
nnels
with
ma
tur
e
content are restricted and
will
require a
4-dig
it lockcode to access.
En
abling Pare
nt
al
Co
ntrols
1. Pr
ess
B
ACK
/M
ENU
to
a
ccess
th
e
S
iriu
sX
M:
Main M
en
u.
2. Turn VOL/SEL to Paren
ta
l Con
tro
ls
and pr
ess
to e
nter
.
3.
Press
VO
L/
SEL
to
se
lect Lock
Ma
tu
re
Ch
annel
s.
Aft
er,
you must
ent
er
a 4-dig
it
lock code to
lo
ck
ma
tur
e cont
ent
cha
nn
els. (Parental
Co
ntrol
defau
lt
pa
ssco
de: 0000)
4. U
se
VO
L/
SEL to e
nt
er
th
e 4-digit
l
ock
code and
se
lect Save when
fi
nished.
Chang
in
g
th
e L
oc
k Code
1.Pr
ess
B
AC
K/
MENU
to access the
Si
riu
sX
M:
Mai
n Me
nu
.
2. Turn VOL/SELto Pare
nt
al Co
ntr
ols
and pr
ess
to
e
nt
er.
3. Turn
VOL
/S
EL
to Edit Lock C
ode
and
pr
ess
en
t
er.
4.
Use
VO
L/
SEL to e
nt
er
the
c
urr
e
nt
4-dig
it
lo
ck code and select
Ent
er
wh
en
fi
nished.
5. U
se
VO
L/
SE
Lto e
nt
er
th
e n
ew
lock
code and
se
lect Enter to co
nf
irm.
Make s
ur
e to save your 4-
digi
t l
ock
co
de
for
fu
tu
re
re
ference.

SIRIUSXM MAIN MENU
This allows
access
to
the SiriusXM
operational menu options. Refer
to the
tab
le below
for
available
settings and functionality.
1.
Press
BACK/MENU
to
access
the
SiriusXM:
Main
Menu.
2.
Turn VOL/SEL
to
highl
ight
one
of
the menu settings listed in the table
below
and press
to
enter.
3.
Use
VOL/SEL
to
make selections.
Setting I Function
N
ow
Playing Return
to
the
Now
Playing Screen
Browse
By
Channel V
iew
list
of
available SiriusXM channels
Browse
By
Category View list
of
available SiriusXM channels by category
My
Account ViewyourSlrlusXM accountstatus, Radio
ID
and
Reset
SiriusXM command
Pa
rental Controls Settings for access to Lock and Unlock Mature
Slr
iu
sXM
channels
Direct
Tu
ne Allows
entry
for
direct
channel selection
Album
Art
Al
bum
art
can
be
displayed for most
of
the SirlusXM music channels. When album
art
is
not
available, the Channel Default
Logo image or the SiriusXM Default Logo
image will be displayed.
13
Resetting SiriusXM Settings
A reset will resto
re
a
ll
presets and
settings, inclu
ding
parental control
s,
back
to
their factory defaults.
1.
Press
BACK/MENU
to
access
the
SiriusXM:
Main
Menu.
2.
Turn
VOL/SEL
to
My
Account
and
press
to
enter.
3.
Turn
VOL/SEL
to
Re
set SiriusXM
and press
to
enter.
4.
Use
VOL/SEL
to
select
Confirm.
Sirius,
XM
and all related marks and
l
ogos
are trademarks
of
Sirius
XM
Radio Inc. All rights reserved.

SIRIUSXM
TROUBLESHOOTING
Advisory messages mayappear
on
the
display
when
a SiriusXM-ConnectVehicle
Tuner
is
connected
to
the
MM105. Refer
to
the
table below
for
an
explanation and
suggested corrective actions.
Advisory I D I
ti
M
escr
p
on
essage
CheckAntenna
CheckTuner
No Signal
Subscription
Updated
Channel
Unavailab
le
Channel
Unsub
scrlbed
Channel Locked
The radio has detecteda fault
with
the
SirlusXM antenna.Theantenna cable may
be
either
disconnected
or
damaged.
•Verify
that
the
antenna cable
Is
connected to
the
SiriusXM ConnectVehicleTuner.
•Ins
pect
the
antennacable
for
damageandkin
ks.
Replace
the
antenna
if
the
cable
is damaged.
•SirlusXM products are available at
your
local
audio
retailer
or
onlfne
at www.shop.slriusxm.com.
The radio
Is
hav
ing
di
fficul
ty
communication
with
the
SiriusXMConnectVehicleTune
r.
The
tune
r
may
be
disconnected
or
damaged.
•Verify
that
the
SlriusXM ConnectVehicleT
une
r cable
Is
securelyconnected
to
the radio.
TheSiriusXM ConnectVehicleTuner
Is
havi
ng
diffi
cul
ty
receiving
the
SirlusXM
satellitesignal.
•Verify
that
your
vehicle/vessel is
outdoors
with
aclear view
of
t
he
sky.
•Verify
that
the
SirlusXM antenna
Is
mount
on
the
exterior.
•
Move
the
SiriusXM antenna away
from
any obstructions.
•Inspect
the
antennacable
for
damageandkinks.
•Consult
the
SirlusXM ConnectVehicle
tuner
installation manual
for
more
i
nformation
on
antennainstallation.Replace
the
antenna
if
the
cable
Is
damaged.SiriusXM products
areavailable
at
your
local
audio
retailer
or
online
at www.shop.siriusxm.com.
The radio has detecteda change
in
your
SlriusXMsubscription status.
Press
VOL
/
SEL
to
clear
the
message.
In
the
U.SA. visit www.sfriusxm.com
or
call 1-866-635-2349If you
hav
e questions
about
your
subscription.
In
Canada, visitwww.sfriusxm.ca
or
call 1-888-539-7474if
you havequestions
about
your
subscrip
ti
on.
The channel that
you
havereques
ted
is
not
a valfd SlriusXMchannel
or
the
c
hanne
l
you
were
listening
to
is
no
longer
available.You may also see this message
br
iefly
when
first
connecti
ng
a
new
SiriusXM ConnectVehicletuner.
Visit
www
sirjysxm
mm
for
more
In
formation
about
the
SirlusXM channel l
ine
up.
The channel that
you
haverequested is
not
includedin
your
SlriusXM subscrfptlon
packageof
the
channel
that
you
were
listening
to
is
no
longerin
cl
uded
In
your
SiriusXM
subscription package.
In
the
U.SA. visitwww.siriusxm.com
or
ca
II
1-866-635-2349if
you
havequestions
about
your
subscriptionpackage
or
would
like
to
subscribe
to
this
channel.
In
Canada, visitwww.sjriusxm.ca
or
call 1-877-438-9677.
The channel t
hat
you
haverequested isLocked
by
the
rad
io
Parental Control feature.
See
Parental Control
s,
page
13
for
more
Information
on
the
Parental Control feature and
how
to
access l
oc
ked channels.
14

SPECIFICATIONS
Electrical
Operati
ng
Vo
ltage 14.4VDC (l 0V-15.9V)
Operating
Te
mp
Range
-4
F
to
+
158
F(-20 C
to
+70
C)
Current
Draw/
FuseValue
1.5
A(ma
x)/
120 mA
(s
ta
nd
by) / 5 A
NMEA
2000•
LEN
l (Micro-Cconnector)
Displ
ay/
Resolution 3.5 in.T
FT
LCD
backlit /
320
x 480
Audio
Outputs
/
Inputs
Output
Channels Onestereo pair and
mono
subwoofer
RCA
plugs
per
zone
Ou
tput
Configuration Relative, Absol
ute
, Fixed
or
Off
Max
im
um
Output
Vo
ltage Relative or Absolute:4V
RM
S
Fixed:
Se
lectab
le
4VnV/1V
RMS
Output
Impedance
2500
Auxiliary I
np
ut
Channels Two stereo pairs
of
R
CA
pl
ug
s
(2
V/1V
RMS
I
npu
t
Sens
itivity)
Tuner
FM
Tuner
with
RDS
87.5
MHz
to 107.9M
Hz
(0.2 MHz step)
AM
T
un
er
530kHzto
171
0k
H
z(
1
0k
Hz step)
DAB+T
un
er 170MHz
to
230MHz
Favorites 24 presets across all tuners/bands
Bluetooth•
Profi
le
A2DP
vl.2,
AVRC
P
vl
.4
Core Specification Version
2.
1+
EDR
Codec
SBC,
Qual
comm"
aptX'~ audio
ConnectionRange Up to
35
ft /
11
m
Interface
USB
2.0
Charging
Output
U
SB
1: 1 A / U
SB2:
500
mA
Supported Aud
io
Formats MP3, MP4,
WAV
,AAC, M4A,
M4B
!P
hone
SE
(2
nd
genera
tion), iPhone11
Pro
Max,
IPhone11
Pr
o,
IPhone 11,
Apple
Co
m
patibillty
!P
hone
XS
Max,
!P
hone
XS,
iP
hone
XR,
!Ph
one
X,
IP
hone8
Plus,
!Phone 8
(functional
ity
contingent
up
on
co
mpatible
IOS
rel
ease)
Dimensions
U
nit
Wx
Hx D 5.94
ln.x
3.901n.x3.94 in.(151
mm
x 99 mm x 100
mm)
Mo
untin
g Hole W x H 4.72 In.x3.25 in.(120
mm
x
83
mm)
15

AUXILIARY CONTROL OPTIONS
Your MediaMas
ter
• includes
two
connection
typ
es
for
adding control capabilities
from
auxiliary location
s.
Refer
to
the supplied Owner's Manual
of
each controller/
type
(so
ld separatel
y)
for
specific user and installation ins
tru
c
ti
ons.
NMEA
2000
8 Connection
NMEA 2000•,
Micro-(
connector
interfaces directly
with
NMEA 20001
networks
using applicable NMEA 2000•
cables and connectors (sold separatel
y).
......
□
Jl..4L.IO(O
·
••
l
<>
- • I ·
~ l
,.
1"1!!!!'7
1~
I
••
MMR-
40
NM
EA
2000
° NetworkController
with
Fu
ll-Color
LCD
Display
Full-function, water-resistant
(IP66 rated) controller
MMR
-S
N
2K
NM
EA
2000
° Volume Controller
Water-resistant
(IPX7
rated) controller
NM
EA
2000
° MFD Control
Achieve control capabilties
from
compatible multi-function displays
(
MFD)
.NMEA 2000• functionality requires
compatibleNMEA 2000• entertainment
protocols
(PG
N) and may require a
software upgrade
of
connected MFD
devices. Refer
to
yourMFD
's
manufacturer
for
devicecompatibil
ity
info.
16
REMOTE Connection
Permits direct connection
of
MediaMaster• wired controllers (sold
separately) using accessory controller
cables and sp
litter
s(sold separately).
Add
up
to
three remotes
to
a single
MedlaMaster
•,
at
up
to
75
ft
(23 m) away.
MMR-20-
BE
Wired Remote Controller
Auxiliary, water-resistant
(IP67
rated) controller

©2021
JL
Audio, Inc. • MM105-MAN 09292021


Other manuals for MediaMaster 105
1
Table of contents
Other JL Audio Marine Audio manuals
Popular Marine Audio manuals by other brands

Nady Audio
Nady Audio ProPower PFW15 Features, instructions & technical data

Marine Audio
Marine Audio MA110 Quick reference guide

Fusion
Fusion Apollo RA770 installation instructions

Jensen
Jensen MSR2010 Installation and operation manual

Fusion
Fusion MS-RA60 Quick start manual

thomann
thomann PA15ECO MKII user manual