manuals.online logo
Brands
  1. Home
  2. •
  3. Brands
  4. •
  5. JL Audio
  6. •
  7. Speakers System
  8. •
  9. JL Audio Slampak SB-POL-RGRRZR User manual

JL Audio Slampak SB-POL-RGRRZR User manual

INSTALLATION GUIDE
for the
SB-POL-RGRRZR
2008-2011 Ranger Razor & Ranger Razor S, &
2010-2011 Ranger Razor4
Thank you for choosing a JL Audio Slampak®for your side by side sport utility sound system. With proper installation, your new
vehicle-specific enclosed subwoofer system will deliver years of listening pleasure.
We strongly recommend that you have your new Slampak®installed by your authorized JL Audio dealer. The installation
professionals employed by your dealer have the necessary tools and experience to disassemble and reassemble your vehicle
properly. Also, keep in mind that your warranty coverage extends to 2 years if your system is installed or approved by your
authorized JL Audio dealer. If you prefer to perform your own installation, please read this installation guide completely
before beginning the process.
If you choose to perform the installation yourself, it is absolutely vital that the
Slampak®be properly mounted to the vehicle according to these instructions.
Failure to mount the enclosure properly presents two problems:
1) The sub-bass performance will suffer due to the movement of the enclosure
caused by the force exerted by the woofer(s).
2) A loose enclosure presents a serious safety hazard in the event of a collision
or sudden deceleration.
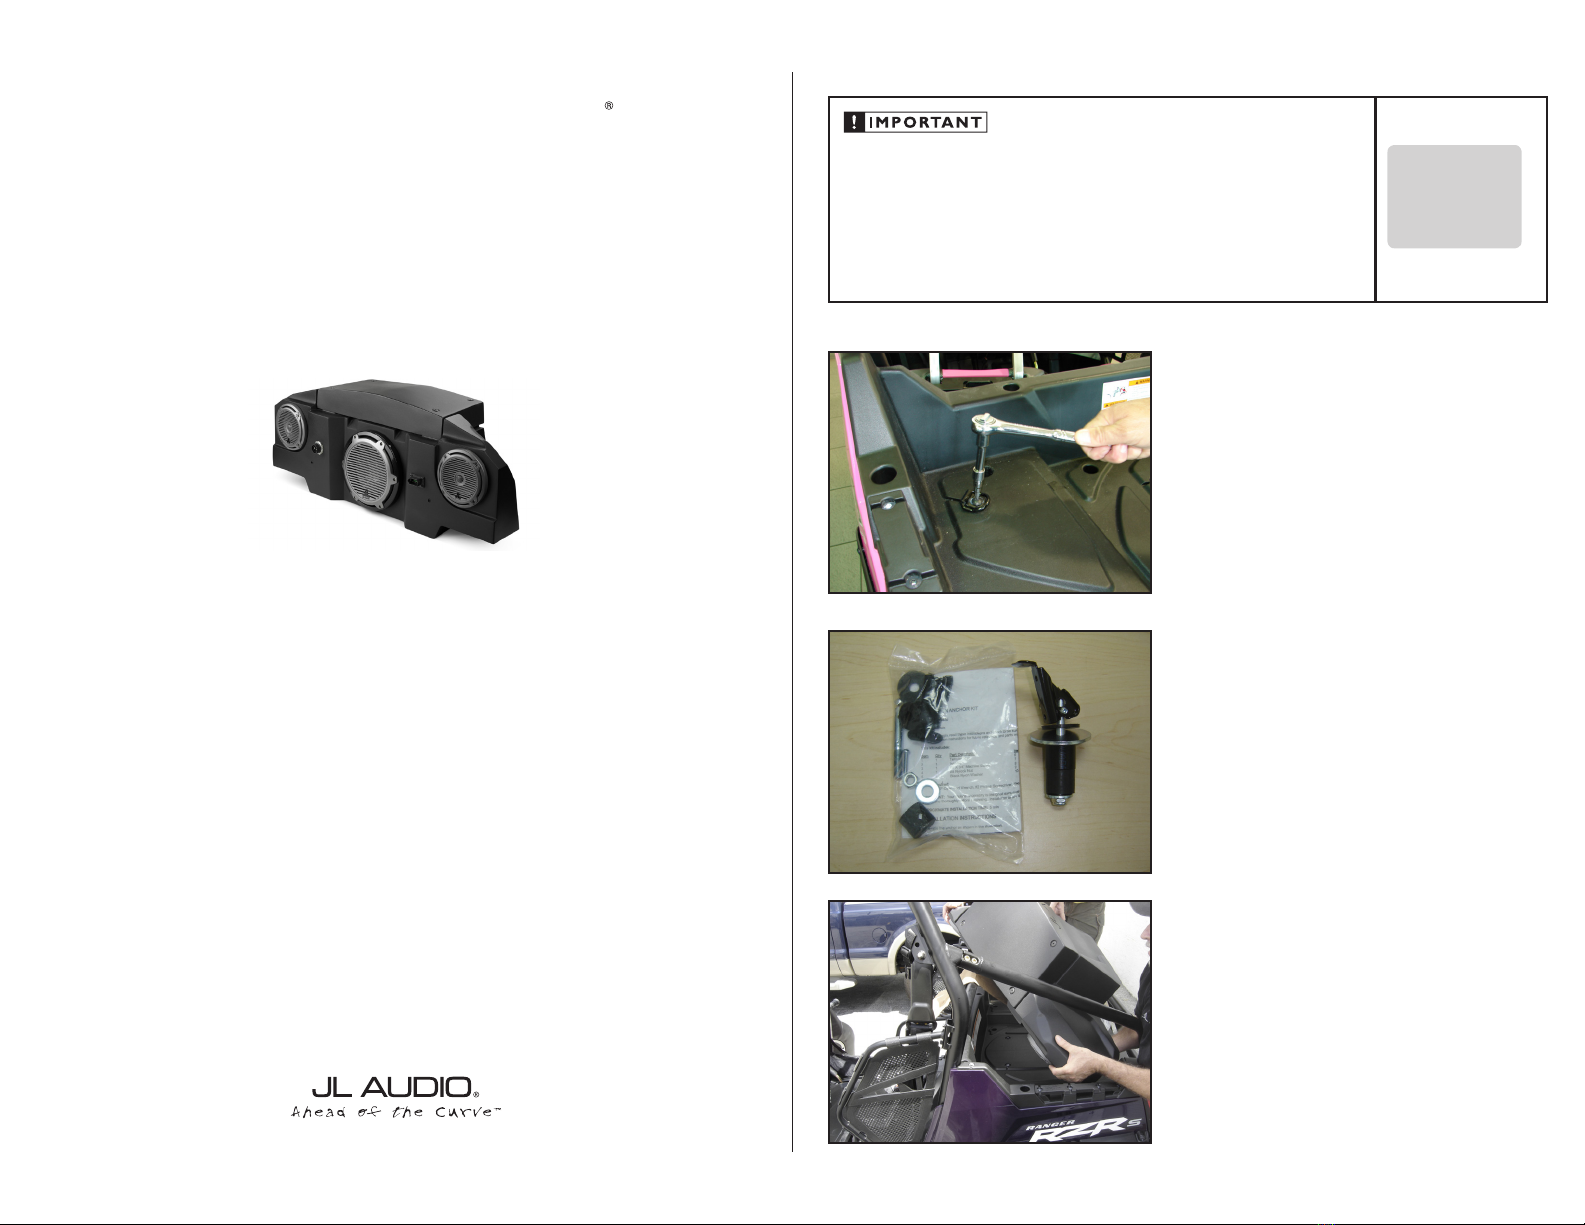
STEP 1
Unpack the Slampak®, remove both seats from the RZR If the
two folding cargo anchors are present directly behind the
seats in the bed of the RZR, remove them and replace the
bolts that held them in place.
Continued on Next Page
STEP 2
There are six Lock and Rides™, four with the short spacers
(un-assembeled in the bag) go directly in front of the
speakers and at either end of the SlamPak® the two with the
long spacers (assembeled on the right) are installed from
below, there are also locking pins that are not shown that
are available and, can be put in place through the Lock and
Rides™, to keep them in the locked positions. Make sure that
all of the hardware on each of the Lock and Rides™ is snug so
that when the arm is pushed flat, the rubber section of the
Lock and Rides™ is squeezed and expands to hold the Lock
and Rides™ in place.
STEP 3
By loading the SlamPak® onto the RZR as shown, the rear roll
cage will not need to be removed. We suggest covering the
roll cage with cardboard or something else that is thin and
will protect the paint on the roll cage and SlamPak®.
SLPK-POL-RZR800 INSTR_SKU# 94458
INSTALLATION
DIFFICULTY:
25
OUT
OF
ESTIMATED TIME:
3 HOURS
Slampak
Continued on Next Page
SLPK-POL-RZR800 INSTR_SKU# 94458
STEP 7
Once the bottom Lock And Rides™ are in place, fold down
the locking arms to secure the brackets into position then,
tighten the hardware holding the brackets to the SlamPak®.
STEP 6
This is seen from the rear wheel looking up and to the front,
notice the Lock and Ride™ inserted from below going up
into the enclosure. Rotate the Lock and Ride™ as necessary
in order to clear any obstructions. This will be done on each
side then, clamp the Lock and Ride. Once that is done, the
locking pins need to go into place to secure the Lock and
Ride™.
STEP 5
Losely bolt the brackets to the front and ends of the
SlamPak® using the included 1/4 x20 x1-1/4” Bolts, Split Lock
Washers and Flat Washers. DO NOT TIGHTEN AT THIS
TIME! Slide the enclosure into it’s approximate location.
Insert the front and, side Lock and Rides™ but DO NOT
CLAMP DOWN AT THIS TIME.
STEP 4
There are two right hand and, two left hand brackets, which
side is which will become apparent as they are lined up in
the respective mounting locations.
Page 2 • JL Audio, Inc 2019
DETAIL
DETAIL
STEP 9
Looking back from the front, run the cabling through this
access hole near the floor and, secure it as shown in the
DETAIL picture below.
STEP 8
Plug the two jacks for the included harness into the
Stealthbox®
Run the cabling to the outside of the vehicle and secure
using zip-ties as shown, make sure that there is clearence for
the seat so that when it’s in place, the cabling isn’t pinched.
(see DETAIL below).
Continued on Next Page
SLPK-POL-RZR800 INSTR_SKU# 94456
STEP 13
Looking towards the “firewall” from the drivers side front tire,
locate the hole where the OEM harness runs towards the
dash. Run the cabling along with the OEM harness.
STEP 12
As you run the cable up under the hood, take precautions
to remain close to the OEM harness securing the two har-
nesses together with zip ties as shown to ensure that there is
no slack and, that the cables avoid any moving parts of the
vehicle such as the steering components shown.
STEP 11
Remove the four screws that hold up the “belly pan” on the
Drivers side of the vehicle, secure the cabling along with the
OEM Harness along this run. When completed, re-install the
removed screws.
STEP 10
Looking down through the battery area, run the cabling
along side the large harness seen at the bottom of the
picture towards the front of the vehicle, secure the cabling as
needed to the main cable that is right next to it.
Page 2 • JL Audio, Inc 2019
STEP 14
If using a permanently mounted radio, from under the dash,
route the RCA Audio Cable (seen in DETAIL below) and the
small Blue Remote Turn-On Wire to the radio. Reference the
manual for the radio to determine the correct connection of
both wires, then go to STEP 20 .
If using a portable music source, such as an mp3 player, run
the Remote Turn-On wire to (+)12vdc switched power (either
through the ignition or, a installed switch to turn the ampli-
fier on) and continue with the following steps.
DETAIL
Pictured is the RCA Audio Cable from the Main Harness.
STEP 15
Using the XDB-MINIRCA-6 (sku#90363), connect the 1/8”
Stereo MiniPlug to RCA Cable into the RCA Audio Cable with
the supplied Barrel Connectors as shown.
STEP 16
Plug the other end of the 1/8” Stereo MiniPlug to RCA Cable
into the mp3 player, and securely mount the player as
desired.
SLPK-POL-RZR800 INSTR_SKU# 94458
STEP 21
If access to the amplifier is required, remove the four Allen
Head screws that secure the top cover. Please reference the
Amplifier settings as illustrated below, due to variances in
output from different sources, the input sensitivity settings
may need to be adjusted from these reference settings.
STEP 20
CONGRATULATIONS!
You have completed the installation for this model!
Page 4 • JL Audio, Inc 2019
All specifications are subject to change without notice. “JL Audio®” and the JL Audio logo, “Stealthbox” and the Stealthbox logo are registered
trademarks of JL Audio, Inc.“Ahead of the Curve”and its respective logo is a trademark of JL Audio, Inc.
JLA-SKU# 94456 10.01.2019 • Printed in USA • ©2019 JL Audio, Inc. • For more detailed information please visit us online at www.jlaudio.com.
(954) 443-1100
www.jlaudio.com
10369 NORTH COMMERCE PARKWAY • MIRAMAR, FLORIDA • 33025 • USA
STEP 19
Looking down at the battery, hook up the power and,
ground, (RED goes to the (+) terminal and BLACK goes to the
(-) terminal), securing the fuse block to the cabling with the
supplied zip-ties as shown.
STEP 17
Determine a desireable location to mount the Remote Level
Control, follow the instructions that come with the RLC to
mount it using the included hardware.
STEP 18
If front speakers will be used, route the Speaker Cables from
the Main Harness (shown in STEP14) to each speaker. When
running the wires from the firewall location as shown above
to each of the front speakers (for example, JL Audio MX650-
CCX-CG-TB as shown), make sure that those wires are secured
out of the way and cannot interfere with any safety or con-
trol functions of the vehicle.
NOTE: if no speakers are being used in the front, the
speaker wires discussed above need to be insulated
and secured out of the way.

Other JL Audio Speakers System manuals

JL Audio C2-600 User manual

JL Audio

JL Audio C2-600 User manual

JL Audio C5-075ct User manual

JL Audio

JL Audio C5-075ct User manual

JL Audio Steathbox SB-D-QDRAMD/10TW1 User manual

JL Audio

JL Audio Steathbox SB-D-QDRAMD/10TW1 User manual

JL Audio MX650-CCX User manual

JL Audio

JL Audio MX650-CCX User manual

JL Audio Stealthbox SB-SC-XBG1/10W1v3 User manual

JL Audio

JL Audio Stealthbox SB-SC-XBG1/10W1v3 User manual

JL Audio C2-650 User manual

JL Audio

JL Audio C2-650 User manual

JL Audio C5-400cw User manual

JL Audio

JL Audio C5-400cw User manual

JL Audio M770-ETXv2 User manual

JL Audio

JL Audio M770-ETXv2 User manual

JL Audio Stealthbox SB-S-BRZFRS/10TW3 User manual

JL Audio

JL Audio Stealthbox SB-S-BRZFRS/10TW3 User manual

JL Audio M770-CCS User manual

JL Audio

JL Audio M770-CCS User manual

JL Audio C5-525 User manual

JL Audio

JL Audio C5-525 User manual

JL Audio C2-075ct User manual

JL Audio

JL Audio C2-075ct User manual

JL Audio M650-CCX User manual

JL Audio

JL Audio M650-CCX User manual

JL Audio TR650-CSi User manual

JL Audio

JL Audio TR650-CSi User manual

JL Audio C5-252x User manual

JL Audio

JL Audio C5-252x User manual

JL Audio Evolution C3-600 User manual

JL Audio

JL Audio Evolution C3-600 User manual

JL Audio MX650-CCX User manual

JL Audio

JL Audio MX650-CCX User manual

JL Audio M880-CCX User manual

JL Audio

JL Audio M880-CCX User manual

JL Audio M770-CCS User manual

JL Audio

JL Audio M770-CCS User manual

JL Audio M880-CCX-SG (LED) User manual

JL Audio

JL Audio M880-CCX-SG (LED) User manual

Popular Speakers System manuals by other brands

Altec Lansing Duplex DTS200PI Specification sheet

Altec Lansing

Altec Lansing Duplex DTS200PI Specification sheet

LG SH3B Simple manual

LG

LG SH3B Simple manual

Hisense HS312 user manual

Hisense

Hisense HS312 user manual

Trust SP-3500X manual

Trust

Trust SP-3500X manual

DK Digital LS-400 owner's manual

DK Digital

DK Digital LS-400 owner's manual

Monacor ESP-63/ WS manual

Monacor

Monacor ESP-63/ WS manual

LG SPL5B-W owner's manual

LG

LG SPL5B-W owner's manual

Seiki SC210SBWH instruction manual

Seiki

Seiki SC210SBWH instruction manual

Bose LIFESTYLE RoomMate owner's guide

Bose

Bose LIFESTYLE RoomMate owner's guide

Sharp HT-SB350 Operation manual

Sharp

Sharp HT-SB350 Operation manual

Samsung HW-S50B Full manual

Samsung

Samsung HW-S50B Full manual

Philips FWD876 Service manual

Philips

Philips FWD876 Service manual

Bowers & Wilkins DM310 Specifications

Bowers & Wilkins

Bowers & Wilkins DM310 Specifications

Altec Lansing 620B Specifications

Altec Lansing

Altec Lansing 620B Specifications

Sony SS-CN295 Service manual

Sony

Sony SS-CN295 Service manual

Morel Maximus 602 2Way Installation instructions manual

Morel

Morel Maximus 602 2Way Installation instructions manual

Posh 528-810 Series installation guide

Posh

Posh 528-810 Series installation guide

pyle Hydra PLMRKT2A owner's manual

pyle Hydra

pyle Hydra PLMRKT2A owner's manual

manuals.online logo
manuals.online logoBrands
  • About & Mission
  • Contact us
  • Privacy Policy
  • Terms and Conditions

Copyright 2025 Manuals.Online. All Rights Reserved.