SB-T-TDCMAX/13TW5v2 INSTR_SKU# 011266
Page 4 • JL Audio, Inc 2008
STEP 19
We suggest wiring the enclosure at this point, it will be very
hard (or impossible) to access the terminal cup if the second
Stealthbox® is installed. Route the wire using a safe, secure
method to the amplifier location. Always ensure that wires
cannot be pinched or damaged along the path to the next
component.
If installing two Stealthboxes®, we suggest wiring the second
enclosure before mounting as the terminals will be much
more accessible than after the enclosure is mounted. Repeat
steps 17-19 for the second Stealthbox®.
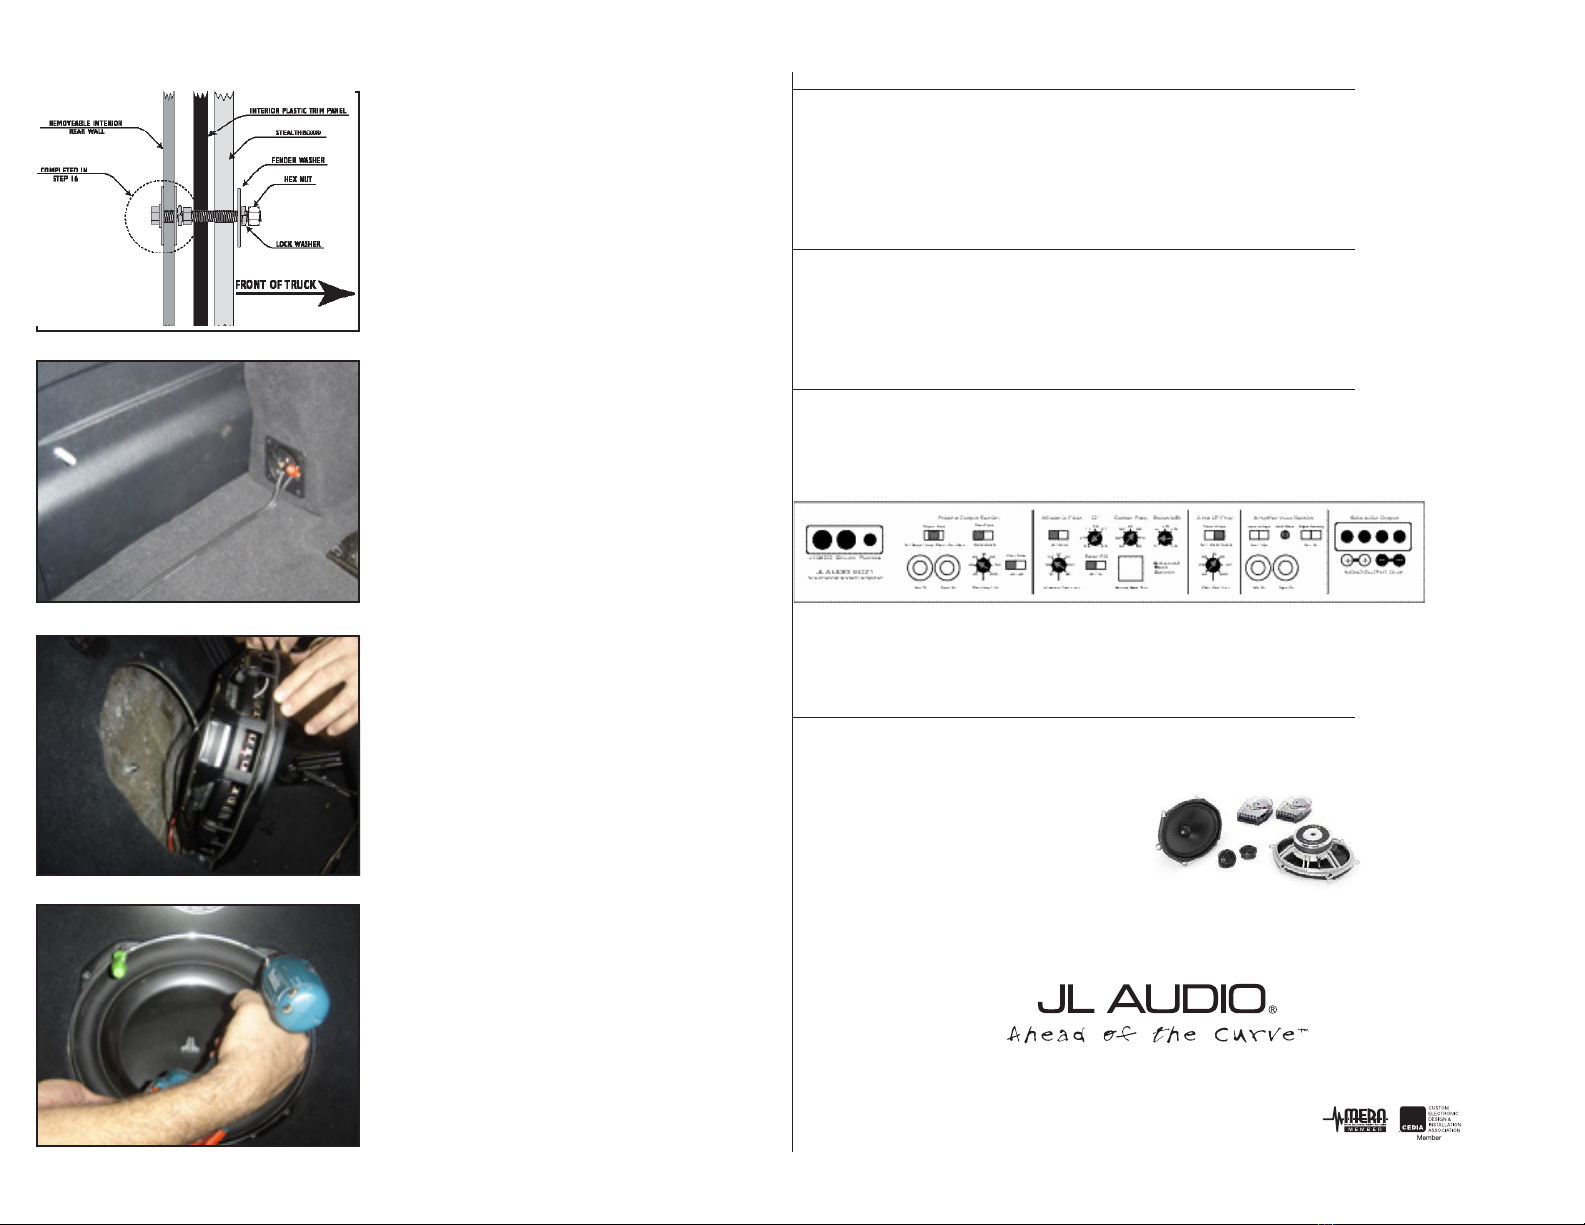
STEP 18
This is a cross-sectional drawing showing the bolt from step
13 also passing through the interior plastic trim panel and
the Stealthbox®. The bolt then holds the Stealthbox® in place
via the fender washer, split lock washer and, nut. Again, be
cautious not to overtighten the nut, it only needs to be snug.
STEP 20
Place the bottom edge of the woofer on the enclosure,
attach wires to the appropriate connectors. Lean the woofer
back into location and make sure that wires do not get
pinched either betwen the woofer and the enclosure or the
securing hardware.
STEP 21
Use a sharp pointed object to align the woofer with the
holes previously used to mount it, re-mount the woofer. Use
a “crossing “ pattern as if re-mounting a repaired flat tire. If
installing two Stealthbox ® enclosures, repeat this procedure
in both enclosures. Again, the grilles did not need to be
removed!
CONGRATULATIONS!
You have completed the installation for this model!
Enjoy your new Stealthbox®!
Please refer to the Power Recommendation section for an
amplifier recommendation and basic set-up help.
All specifications are subject to change without notice. “JL Audio®” and the JL Audio logo, “Stealthbox” and the Stealthbox logo are registered
trademarks of JL Audio, Inc.“Ahead of the Curve” and its respective logo is a trademark of JL Audio, Inc.
JLA-SKU# 011266 10.26.2015 • Printed in USA • ©2007 JL Audio, Inc. • U.S. PATENTS: #5,734,734 #5,949,898 #6,118,884 #6,229,902 #6,243,479
#6,294,959 #6,501,844 #6,496,590 #6,441,685 #5,687,247 #6,219,431 #6,625,292 #D472,891 #D480,709 Other U.S. & Foreign patents pending.
(954) 443-1100
www.jlaudio.com
10369 NORTH COMMERCE PARKWAY • MIRAMAR, FLORIDA • 33025 • USA
INCLUDED HARDWARE PER STEALTHBOX®
(1) 3/8-16 X 1 1/2" Hex Head Bolt
(3) 3/8 X 1 1/4" Fender Washer
(2) 3/8" Split Lock Washer
(2) 3/8 X 16 Hex Nut
SPECIFICATIONS
Enclosure Type: Acoustic Suspension (sealed)
Driver Type: 13T W5v2-4
Nominal Impedance: 4 ohms
Continuous Power Handling: 600 Watts
POWER RECOMMENDATION
JL Audio recommends using a high quality amplifiers such as the JL Audio 600/1v3. The 600/1v3 could be used for
one or, two Stealthboxes. The ideal amplifier for two enclosures is the HD750/1. The diagram below shows the
recommended crossover, infrasonic filter and equalizer settings for the 600/1v3 when being used to power your
Stealthbox®.
The JL Audio 600/1v3 and the HD750/1 are very versatile audio components. Please consult the owner’s manual
for even more detailed information about installing and tuning these amplifiers.
MID/HIGH FREQUENCY DRIVER FITMENT
A variety of JL Audio coaxial and component systems will fit in the factory speaker locations of your vehicle.
Dash Speaker Size / JL Audio Model: 3.5” - Front Dash
Fits JL Audio Models: TR350-CXi & C2-350x
Front Speaker Size / Location: 6”x 9” - Front Doors
Fits JL Audio Models: TR690-TXi & C2-690tx
Rear Speaker Size / Location: 6.5” - Rear Door
Fits JL Audio Models: TR650-CXi, TR650-CSi, C2-650x, C2-650,
C3-650, C5-650, C5-650x, & ZR650-CSi


 User manual")