manuals.online logo
Brands
  1. Home
  2. •
  3. Brands
  4. •
  5. JNS Aquaria
  6. •
  7. Swimming Pool Filter
  8. •
  9. JNS Aquaria Bullet-1 User manual

JNS Aquaria Bullet-1 User manual

Warranty
JNS warrants all JNS products to be free from manufacturing defects for one year
from the original purchase date when purchased through an authorized JNS retailer.
This warranty does not cover any damages caused by misuse, neglect, alterations or
improper handling / transport / maintenance / installation. Physical damages are not
covered by warranty. JNS does not cover personal injury, personal loss, or other
damages associated with the use of our products. In order to request warranty
service, please email us at [email protected]. A purchase receipt is required for
any warranty service. Products requiring warranty service must be returned to JNS.
You are responsible for the cost of shipping a warranty claim to JNS and any
damages that may occur during transit. Once a returned product has been
inspected, it will be repaired or exchanged at our discretion and returned to you.
International and/or expedited shipping are not covered under your JNS warranty.
www.jnsaquaria.com
[email protected]
Before Installation
The Bullet-1 should be well assembled when you get it, so all you need is to check if
there’s any damaged or lost parts. Then we can start to install your Bullet-1.
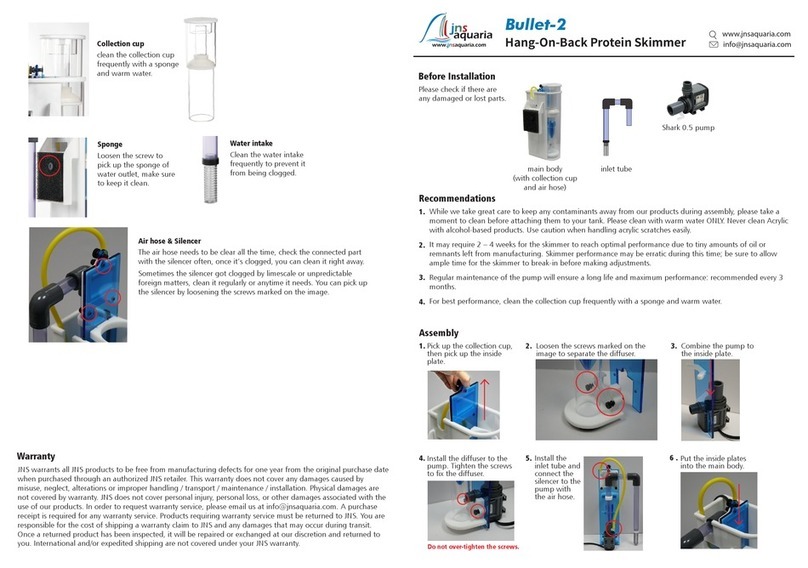
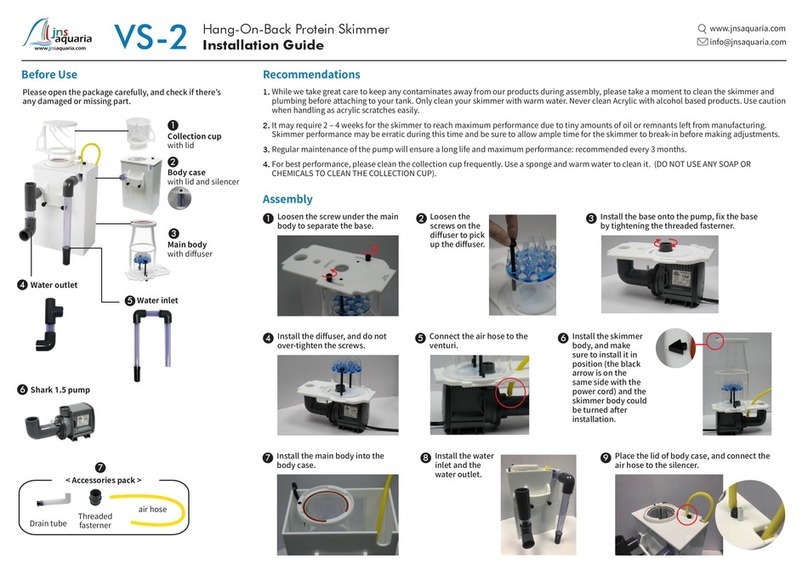
collection cup with lid
air hose
Shark Nano pump
inlet pipe
silencer
screw A
screw B
sponge
main skimmer body
Recommendations
1. While we take great care to keep any contaminants away from our products during
assembly, please take a moment to clean before attaching them to your tank. Please
clean with warm water ONLY. Never clean Acrylic with alcohol-based products. Use
caution when handling acrylic scratches easily.
2. It may require 2 – 4 weeks for the skimmer to reach optimal performance due to
tiny amounts of oil or remnants left from manufacturing. Skimmer performance may
be erratic during this time; be sure to allow ample time for the skimmer to break-in
before making adjustments.
3. Regular maintenance of the pump will ensure a long life and maximum
performance: recommended every 3 months.
4. For best performance, clean the collection cup frequently with a sponge and warm
water.
Bullet-1Hang-On-Back Protein Skimmer
Installation Guide
Loosen the screw A
to pick up the
sponge of water
outlet, make sure
to keep it clean.
Sometimes the silencer got clogged by limescale or
unpredictable foreign matters, clean it regulary or anytime
it needs. You can pick up the silencer by unscrew the parts
that marked on the image.
The air hose needs to be
clear all the time, check the
connected part with the
silencer often, once it’s
clogged, you can clean it
right away.
A
Sponge
Silencer
Air hose
outlet
To Start
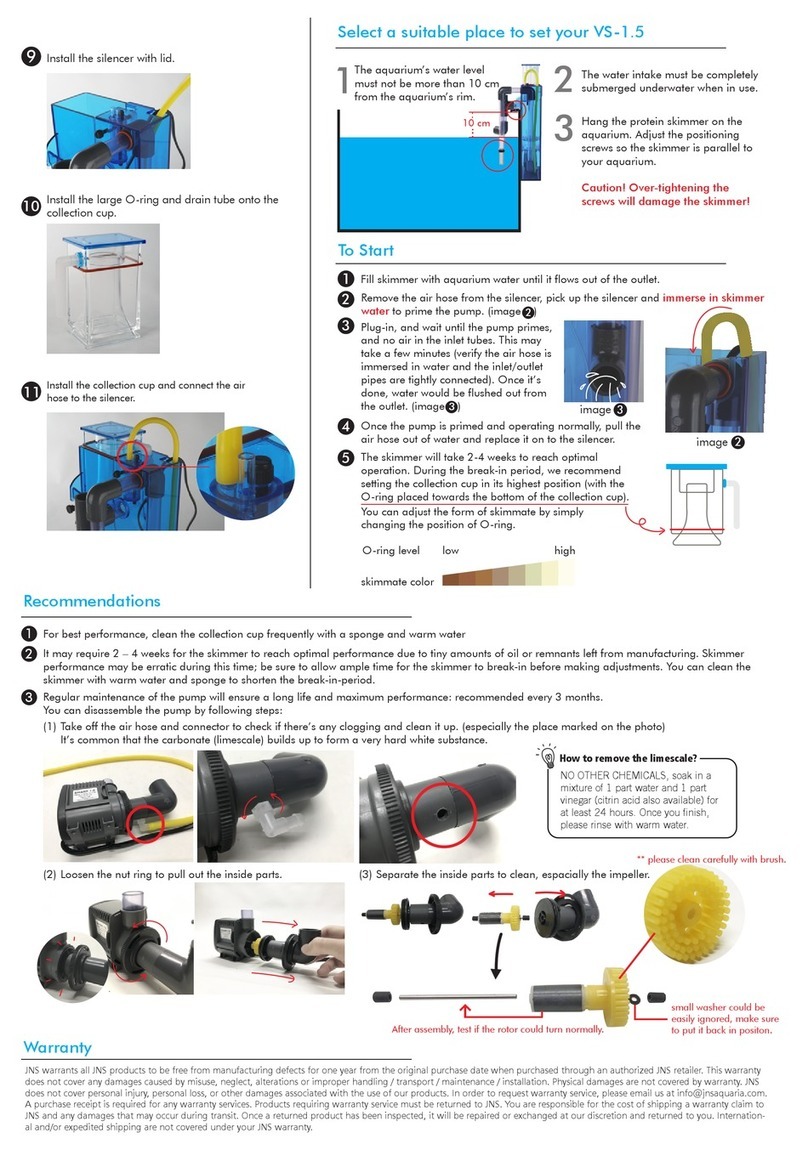
1. Fill skimmer with aquarium water until it flows out of the outlet.
Select a suitable place to set your protein skimmer
1. The aquarium’s water level must not be more than 4” from the aquarium’s rim.
2. The water intake of inlet pipe must be completely submerged underwater when in use.
3. Hang the protein skimmer on the aquarium.
Adjust the screw A, so the skimmer is parallel to your aquarium.
Caution! Over-tightening the screws will damage the skimmer! Maintenance
The skimmer will take 2-4 weeks to reach optimal operation. During the break-in
period, we recommend setting the collection cup in its highest position. Loosen the
screw Bto adjust the position of collection cup, once you finish adjustment tighten the
screw Bto make the collection cup fixed.
Regular maintenance of the pump will ensure a long life and maximum performance:
recommended every 3 months. You can disassemble the pump by following steps:
5.
recommended
water level
water level
water color
high low
When the pump operates normally. The main
chamber will fill with bubbles. Once the bubbles
reached the bottom of the collection cup, you can
start to adjust the water level according to your
preference. Loosen the screw B to adjust the
position of the collection cup. If you prefer a wetter
skimmate, you need a high water level (lower cup
position); by contrast, if you want skimmate to be
drier, just let your water level goes down(higher cup
position).
6.
(1) Pick up the inside plate. (2) Pick up the collection cup
(3) Separate the pump by pulling
it out.
Pull out the water intake
to clean, if it needs.
(4) Pull out the rotor
Water intake
Pump
clean the collection cup
frequently with a sponge
and warm water.
Collection cup
2. Remove the air hose from the silencer, immerse in skimmer water to prime the pump.
3. Plug in the pump, wait until the pump primes. This may take a few minutes.
(verify the air hose is immersed in water and the inlet pipe are tightly connected)
4. Once the pump is primed and operating normally (water flushes out from the outlet),
re-connect the air hose to the silencer.
Hold
from
here
pull
pull
How to remove the limescale?
NO OTHER CHEMICALS, soak in a mixture of 1 part water and 1
part vinegar (citrin acid also available) for at least 24 hours. Once
you finish, please rinse with warm water.

Other JNS Aquaria Swimming Pool Filter manuals

JNS Aquaria ConeS RC Series User manual

JNS Aquaria

JNS Aquaria ConeS RC Series User manual

JNS Aquaria VS-2 User manual

JNS Aquaria

JNS Aquaria VS-2 User manual

JNS Aquaria ConeS CO Series User manual
JNS Aquaria

JNS Aquaria ConeS CO Series User manual

JNS Aquaria Bullet-2 User manual

JNS Aquaria

JNS Aquaria Bullet-2 User manual

JNS Aquaria Sigma-1 User manual

JNS Aquaria

JNS Aquaria Sigma-1 User manual

JNS Aquaria ConeS CO Series User manual

JNS Aquaria

JNS Aquaria ConeS CO Series User manual

JNS Aquaria VS-1.5 User manual

JNS Aquaria

JNS Aquaria VS-1.5 User manual

JNS Aquaria BS Series User manual

JNS Aquaria

JNS Aquaria BS Series User manual

Popular Swimming Pool Filter manuals by other brands

RBF Industries CRISTAL MAGIC Pool Pilot Digital 60 Installation and operation manual

RBF Industries

RBF Industries CRISTAL MAGIC Pool Pilot Digital 60 Installation and operation manual

POLYGROUP LIMITED RP600 owner's manual

POLYGROUP LIMITED

POLYGROUP LIMITED RP600 owner's manual

Davey ChloroMatic MCS16C Installation & operating instructions

Davey

Davey ChloroMatic MCS16C Installation & operating instructions

Hayward Pool Products S180T PRO Series owner's manual

Hayward Pool Products

Hayward Pool Products S180T PRO Series owner's manual

King Technology 01-02-5510 instruction manual

King Technology

King Technology 01-02-5510 instruction manual

Pahlen 112972 user manual

Pahlen

Pahlen 112972 user manual

Astral Pool Viron eQuilibrium Salt Chlorinator Installation and operating instructions

Astral Pool

Astral Pool Viron eQuilibrium Salt Chlorinator Installation and operating instructions

Pool Systems H2flo H2F021 manual

Pool Systems

Pool Systems H2flo H2F021 manual

GroTech RO-PS-1000Int quick start guide

GroTech

GroTech RO-PS-1000Int quick start guide

Clarity CL-10 Installation,operation and maintenance instruction

Clarity

Clarity CL-10 Installation,operation and maintenance instruction

Procopi RTM Premium 610-A Installation and operating instructions

Procopi

Procopi RTM Premium 610-A Installation and operating instructions

Swimline HYDROTOOLS 8940 installation instructions

Swimline

Swimline HYDROTOOLS 8940 installation instructions

Oceanic SMC 20 manual

Oceanic

Oceanic SMC 20 manual

Hayward C-400-1540LSH owner's guide

Hayward

Hayward C-400-1540LSH owner's guide

Goldline AQL-CHEM Installation and operation manual

Goldline

Goldline AQL-CHEM Installation and operation manual

Aqua Comfort Technologies Auto-Chlor AC-4000 owner's manual

Aqua Comfort Technologies

Aqua Comfort Technologies Auto-Chlor AC-4000 owner's manual

Pentair Pool Products Filter CFW Series owner's manual
Pentair Pool Products

Pentair Pool Products Filter CFW Series owner's manual

BWT RTM HF Installation and operating instructions

BWT

BWT RTM HF Installation and operating instructions

manuals.online logo
manuals.online logoBrands
  • About & Mission
  • Contact us
  • Privacy Policy
  • Terms and Conditions

Copyright 2025 Manuals.Online. All Rights Reserved.