manuals.online logo
Brands
  1. Home
  2. •
  3. Brands
  4. •
  5. JNS Aquaria
  6. •
  7. Swimming Pool Filter
  8. •
  9. JNS Aquaria ConeS CO Series User manual

JNS Aquaria ConeS CO Series User manual

Before Use
Please open the package carefully and check for damaged or lost parts.
PARTS INCLUDED:
ConeS CO Series
In-Sump Protein Skimmer
CO-1             
             
Main body
(with silencer, air hose,
and body screws)
diffuser with skimmer base
SHARK 1.5 pump Drain tube Threaded fastener
Collection cup with lid
1.
2.
3.
4.
While we take great care to keep any contaminates away from our products during assembly,
please take a moment to clean the skimmer and plumbing before attaching to your tank. Only
clean your skimmer with warm water. Never clean Acrylic with alcohol based products. Use
caution when handling as acrylic scratches easily.
It may require 2 ‒ 4 weeks for the skimmer to reach maximum performance due to tiny amounts
of oil or remnants left from manufacturing. Skimmer performance may be erratic during this time
and be sure to allow ample time for the skimmer to break-in before making adjustments.
Regular maintenance of the pump will ensure a long life and maximum performance:
recommended every 3 months.
For best performance, please clean the collection cup frequently. Use a sponge and warm water
to clean it. (DO NOT USE ANY SOAP OR CHEMICALS TO CLEAN THE COLLECTION CUP).
Recommendations
CO-1
Footprint (mm)
Height (mm)
Pump
Filtration Rating (L)
Recommended
Water Level (mm)
Light Bioload
Heavy Bioload
160x220
500
700 L
360 L
200 - 250 mm
SHARK 1.5 (16W)
***
The pump must be completely
submerged underwater when in use
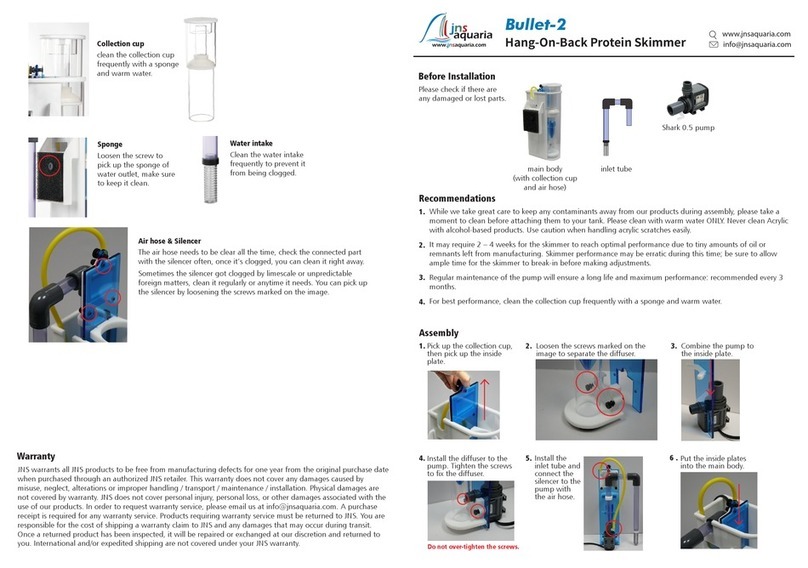
The collection cup should be cleaned frequently with a sponge and warm water.
(DO NOT USE ANY SOAP OR CHEMICALS)
Collection cup
For daily maintenance, pull out the plug
of the drain tube to let out the skimmate.
JNS warrants all JNS products to be free from manufacturing defects for one year from the original
purchase date when purchased through an authorized JNS retailer. This warranty does not cover any
damages caused by misuse, neglect, alterations or improper handling / transport / maintenance /
installation. Physical damages are not covered by warranty. JNS does not cover personal injury,
personal loss, or other damages associated with the use of our products. In order to request warranty
service, please email us at info@jnsaquaria.com. A purchase receipt is required for any warranty
services. Products requiring warranty service must be returned to JNS. You are responsible for the cost
of shipping a warranty claim to JNS and any damages that may occur during transit. Once a returned
product has been inspected, it will be repaired or exchanged at our discretion and returned to you.
International and/or expedited shipping are not covered under your JNS warranty.
Warranty
< Accessories pack >
Select a Suitable Place to Set
Please make sure that the water level is not any higher than 250 mm. Otherwise, the adjusting valve
will not function properly.
The pump must be completely submerged underwater when in use. Running the pump dry or in too
low of a water level will damage the pump.
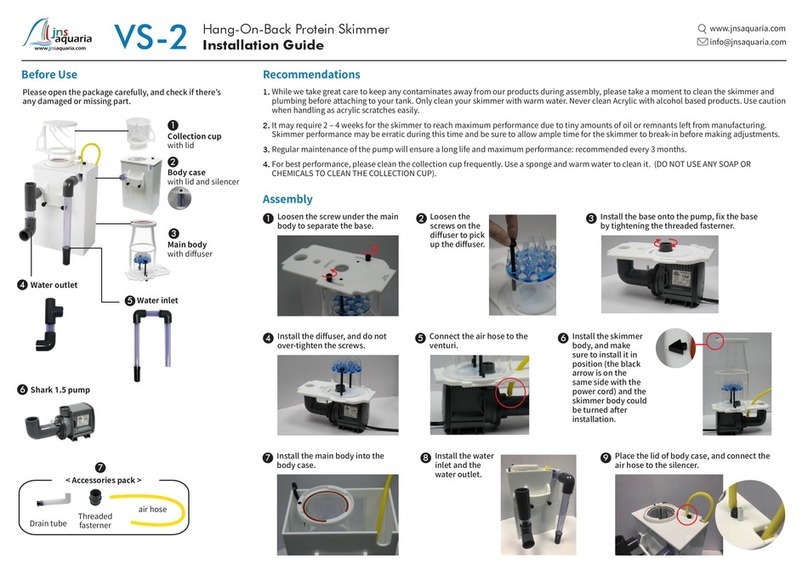
Remove the blue tapes on the diffuser.1.
1.
2.
Remove the diffuser and flip the skimmer base.2.
3. Place the pump under the skimmer base,
and tighten the threaded fastener to fix it.
4. Install the diffuser,
do not over-tighten.
5. Install the main
body, do not
over-tighten the
screws.
Install the collection cup.
7.
Connect the drain tube
to the drain port.
8.
Connect the
air hose to
the venturi.
6.
Assembly Skimmer Adjustment
Maintenance
Turning the quick-precise adjustment knob will change the water level within the skimmer body
chamber.
Turning the knob counterclockwise will open the outlet
pipe, causing the water level within the chamber to drop.
Generally, opening the valve will lead to drier skimmate
that is dark in color.
Turning the knob clockwise will close the outlet pipe,
causing the water level within the chamber to rise.
Generally,closing the valve will lead to wetter skimmate
that is light in color.
As a starting point, it is recommended
to adjust the water level within the
skimmer body to where the
collection cup meets the neck.
water outlet
open close
highlow
water outlet
water level
skimmate
color
open close
adjustment knob
openclose
Pull out the venturi,
and separate the
nut ring.
Pull out the pre-chamber Pull out the rotor the bearings should be in position
Pump
bearing *2
rotor
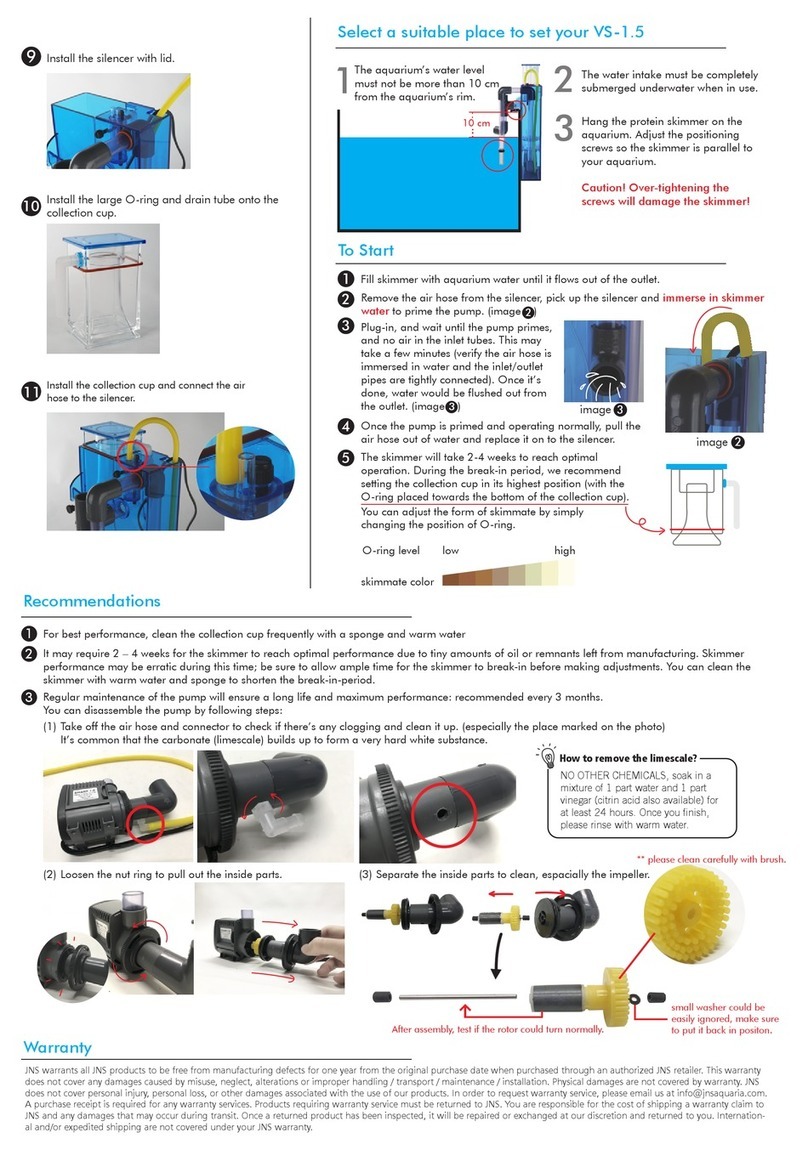
Regular maintenance of the pump will ensure a long life and maximum performance.
You can clean the pump and its components by soaking in a general citric acid solution
(citric acid:water=1:1) once every 3 months. Disassemble the pump by following steps:
The venturi should be cleaned monthly and flushed weekly, due to the air to
water interface calcium carbonate (limescale) builds up to form a very hard
white substance.
Remove the limescale by soaking in a general citric acid solution
(citric acid:water=1:1)
Venturi
venturi
hole
for
body
screw

This manual suits for next models

1

Other JNS Aquaria Swimming Pool Filter manuals

JNS Aquaria VS-2 User manual

JNS Aquaria

JNS Aquaria VS-2 User manual

JNS Aquaria ConeS CO Series User manual

JNS Aquaria

JNS Aquaria ConeS CO Series User manual

JNS Aquaria Bullet-1 User manual

JNS Aquaria

JNS Aquaria Bullet-1 User manual

JNS Aquaria BS Series User manual

JNS Aquaria

JNS Aquaria BS Series User manual

JNS Aquaria ConeS RC Series User manual

JNS Aquaria

JNS Aquaria ConeS RC Series User manual

JNS Aquaria Bullet-2 User manual

JNS Aquaria

JNS Aquaria Bullet-2 User manual

JNS Aquaria Sigma-1 User manual

JNS Aquaria

JNS Aquaria Sigma-1 User manual

JNS Aquaria VS-1.5 User manual

JNS Aquaria

JNS Aquaria VS-1.5 User manual

Popular Swimming Pool Filter manuals by other brands

Marineland 100 Quick setup guide

Marineland

Marineland 100 Quick setup guide

GRE PFAC17 instruction manual

GRE

GRE PFAC17 instruction manual

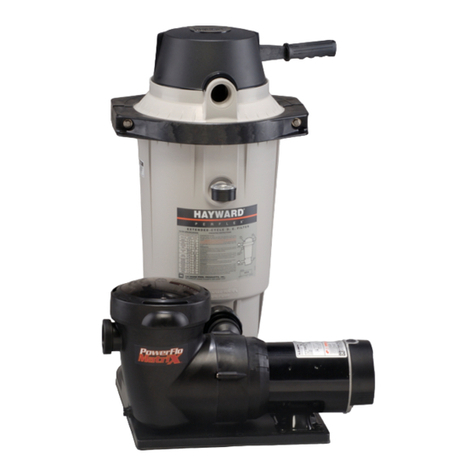
Hayward Perflex EC40C90 Series owner's manual

Hayward

Hayward Perflex EC40C90 Series owner's manual

Pentair Onga Leisuretime II owner's manual

Pentair

Pentair Onga Leisuretime II owner's manual

Bestway FLOWCLEAR 58401E owner's manual

Bestway

Bestway FLOWCLEAR 58401E owner's manual

Doughboy Generation II GEN 180 owner's guide

Doughboy

Doughboy Generation II GEN 180 owner's guide

STA-RITE System 3 owner's manual

STA-RITE

STA-RITE System 3 owner's manual

JetMAX Automatic Commercial Swimming Pool Cleaner Operator's manual

JetMAX

JetMAX Automatic Commercial Swimming Pool Cleaner Operator's manual

Viron CL Series Installation and operating instructions

Viron

Viron CL Series Installation and operating instructions

Pentair Pool Products FNS Plus datasheet

Pentair Pool Products

Pentair Pool Products FNS Plus datasheet

Zodiac Pool Systems Aquapure Ei APURE35PLGC Installation and operation manual

Zodiac Pool Systems

Zodiac Pool Systems Aquapure Ei APURE35PLGC Installation and operation manual

Pentair ADMIRAL S-20 installation guide

Pentair

Pentair ADMIRAL S-20 installation guide

Nemo NE4380 Assembly instructions

Nemo

Nemo NE4380 Assembly instructions

Pool Systems G2flo ZEN quick start guide

Pool Systems

Pool Systems G2flo ZEN quick start guide

Evolution evoclear TRIM Series Installation and operation manual

Evolution

Evolution evoclear TRIM Series Installation and operation manual

AQUAMAXX ConeS RC-2 user manual

AQUAMAXX

AQUAMAXX ConeS RC-2 user manual

Astral Pool ATLAS 36596 manual

Astral Pool

Astral Pool ATLAS 36596 manual

Blue Wave NA3424 Installation and operating instruction

Blue Wave

Blue Wave NA3424 Installation and operating instruction

manuals.online logo
manuals.online logoBrands
  • About & Mission
  • Contact us
  • Privacy Policy
  • Terms and Conditions

Copyright 2025 Manuals.Online. All Rights Reserved.