manuals.online logo
Brands
  1. Home
  2. •
  3. Brands
  4. •
  5. JNS Aquaria
  6. •
  7. Swimming Pool Filter
  8. •
  9. JNS Aquaria Sigma-1 User manual

JNS Aquaria Sigma-1 User manual

Before installation and operation
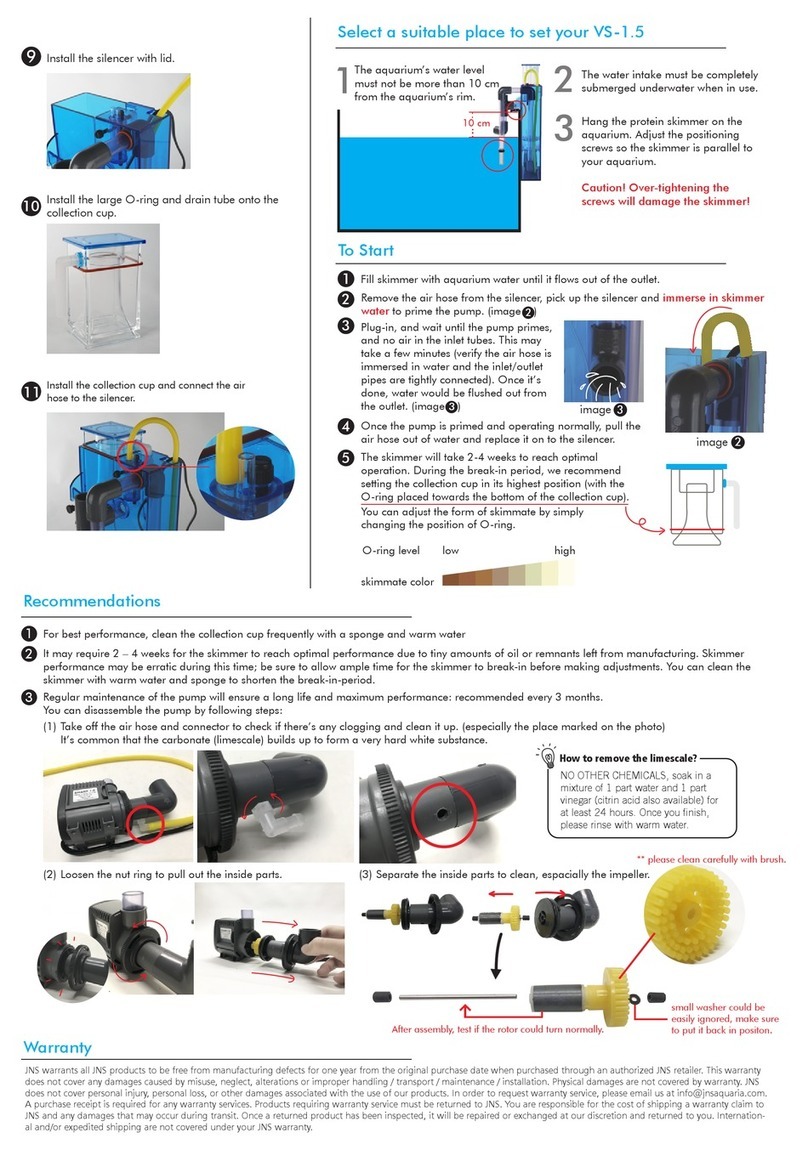
Select a suitable place to set your Sigma Media Reactor
Please open the package carefully and check if there’s any damaged or lost parts.
Main media reactor body with Lid and base bracket
Filter sponge *2
Sicce Syncra pump *1
Sucker *3
Verify now that your sump has adequate space for the media reactor. Be sure that the
media reactor can sit flat and that it is not touching the sides of the sump, any baffles or
any plumbing. This will ensure the quietest performance from your media reactor.
The pump must be completely submerged underwater when in use.
WARRANTY
JNS warrants all JNS products to be free from manufacturing defects for one year from the original purchase
date when purchased through an authorized JNS retailer. This warranty does not cover any damages caused
by misuse, neglect, alterations, or improper handling / transport / maintenance / installation. Physical damages
are not covered by the warranty. JNS does not cover personal injury, personal loss, or other damages
associated with the use of our products. In order to request warranty service, please email us at
[email protected]. A purchase receipt is required for any warranty service. Products requiring warranty
service must be returned to JNS. You are responsible for the cost of shipping a warranty claim to JNS and any
damages that may occur during transit. Once a returned product has been inspected, it will be repaired or
exchanged at our discretion and returned to you. International and/or expedited shipping are not covered
under your JNS warranty.
Maintenance
Sigma-1 / Sigma-2
Media Reactor
Recommendations
While we take great care to keep any contaminants away from our products during
assembly, please take a moment to clean with warm water ONLY. Never clean Acrylic with
alcohol-based products. Use caution when handling acrylic scratches easily.
The reactor should be cleaned out every time that the media is replaced ensuring that there
is no media below the bottom plate.
Regular maintenance of the pump will ensure a long life and maximum performance.
1
1
2
2
3 4
3
3
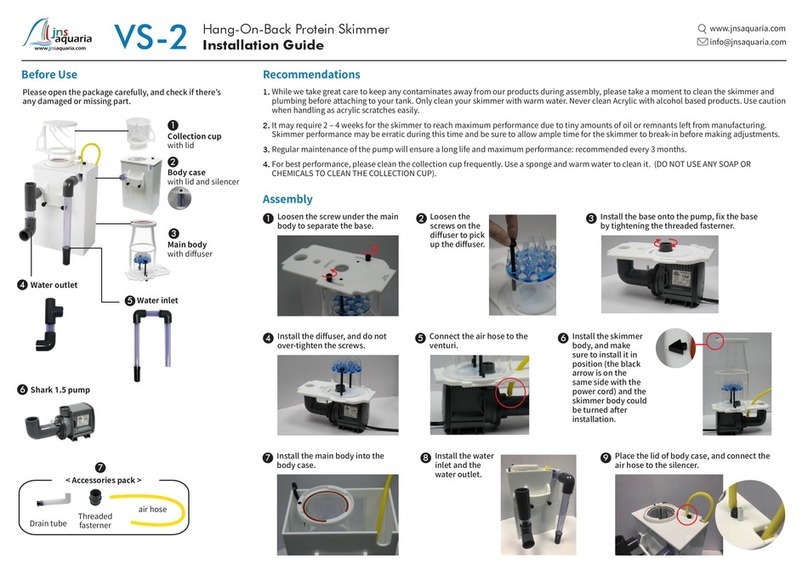
Parts included:
2.
1.
Regular maintenance of the pump will ensure long life and maximum performance: recommended every 3
months. You can disassemble the pump to clean by following steps:
(1)
(1) (2)
Press the on both side of the pump and pull out the cover. Take off the inside cover.
PULL TO OPEN
(2) Pull out the inside parts
(Make sure to put back in position)
The rotor could be
disassembled.
Pull out the pump from the bottom.
Separate the cover from the pump.
Pull out the rotor.
Sigma-1
Sigma-2
1.
2.
3.
How to remove the limescale?
NO OTHER CHEMICALS, soak
in a mixture of 1 part water and
1 part vinegar (citrin acid also
available) for at least 24 hours.
Once you finish, please rinse
with warm water.
www.
jns
aquaria.com
[email protected]
OPEN
To separate the body
chamber and the base
bracket, hold the body
chamber and base bracket
carefully and turn
counterclockwise
until the is
beyond the blue triangle.
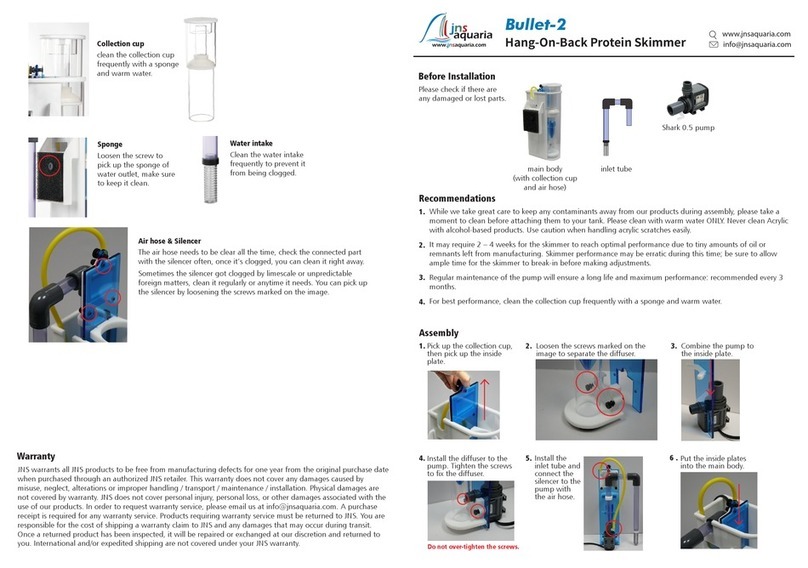
Assembly
To open the lid,
loosen the thumb
screws. Turn the lid
counterclockwise to
release.
(Biopellets do not require the two black sponges,
this step could be skipped)
Put the filter sponge into the body chamber, make
sure the sponge is in the bottom of the reactor, and
attached completely to the bottom plate, or the
media may leak past it when filling.
Insert the upper filter sponge and place the lid.
Follow the direction to tighten.
Do not over-tighten.
Install the body chamber onto the base.
Pour your media into the body chamber. For media designed to be fully fluidized, the reactor should be
filled no more than two-thirds full to allow the media room to move around. With heavy or fine media, you
may need to add less. Please check with manufacturer’s instruction for proper amount of media needed for
your specific set up.
Sigma-1 –500 ml Maximum Volume Capacity
Sigma-2 –1000 ml Maximum Volume Capacity
High
Low
outset
close
2.
1.
3.
4.
5.
7.
8.
蓋子旁邊加箭頭
open
Connect the water outlet of the pump to the base bracket.
1. Plug in the pump.
2. Different media needs the different flow rate. Please adjust your flow rate by turning the body chamber.
Some filter media should be held in suspense at all times, but some media
(such as phosphate control products) is not designed to be aggressively
fluidized in a reactor – please read the instructions on your media carefully.
If the filter media collects at the top sponge, the flow rate is too high. If
you cannot detect any motion in the filter media, the flow rate is too low.
To Start
3.
[Sigma-2] Tighten the screw.[Sigma-1]
6. Install the suckers into the base.
fix!

This manual suits for next models

1

Other JNS Aquaria Swimming Pool Filter manuals

JNS Aquaria ConeS CO Series User manual

JNS Aquaria

JNS Aquaria ConeS CO Series User manual

JNS Aquaria Bullet-2 User manual

JNS Aquaria

JNS Aquaria Bullet-2 User manual

JNS Aquaria VS-1.5 User manual

JNS Aquaria

JNS Aquaria VS-1.5 User manual

JNS Aquaria ConeS RC Series User manual

JNS Aquaria

JNS Aquaria ConeS RC Series User manual

JNS Aquaria Bullet-1 User manual

JNS Aquaria

JNS Aquaria Bullet-1 User manual

JNS Aquaria ConeS CO Series User manual

JNS Aquaria

JNS Aquaria ConeS CO Series User manual

JNS Aquaria BS Series User manual

JNS Aquaria

JNS Aquaria BS Series User manual

JNS Aquaria VS-2 User manual

JNS Aquaria

JNS Aquaria VS-2 User manual

Popular Swimming Pool Filter manuals by other brands

Hayward Pool Products S210S owner's manual

Hayward Pool Products

Hayward Pool Products S210S owner's manual

GRE FS300 Installation and maintenance manual

GRE

GRE FS300 Installation and maintenance manual

Rainbow Pool Products Waterco SP5000 operating instructions

Rainbow Pool Products

Rainbow Pool Products Waterco SP5000 operating instructions

Summer Fun SF-130 Installation and maintenance manual

Summer Fun

Summer Fun SF-130 Installation and maintenance manual

Pool Technologie Minisalt Series Instructions for use

Pool Technologie

Pool Technologie Minisalt Series Instructions for use

ChlorKing NEXGEN50 Installation, operation and maintenance manual

ChlorKing

ChlorKing NEXGEN50 Installation, operation and maintenance manual

Evoqua BLU-SENTINEL SE Short operating instructions

Evoqua

Evoqua BLU-SENTINEL SE Short operating instructions

BIO-LAB CANADA Mineral Springs Pool Pilot Soft Touch 840C Installation and operation manual

BIO-LAB CANADA

BIO-LAB CANADA Mineral Springs Pool Pilot Soft Touch 840C Installation and operation manual

Hayward OmniPL HLXPROUPG installation manual

Hayward

Hayward OmniPL HLXPROUPG installation manual

BWT P-GFI 400 Installation and operating instructions

BWT

BWT P-GFI 400 Installation and operating instructions

Hayward ProGrid DE2420 owner's manual

Hayward

Hayward ProGrid DE2420 owner's manual

Gemas GSC 101 Installation & user manual

Gemas

Gemas GSC 101 Installation & user manual

Hayward Pro-Grid owner's manual

Hayward

Hayward Pro-Grid owner's manual

SOLAR-BREEZE Intelligent Robotic Solar Powered Pool... quick start guide

SOLAR-BREEZE

SOLAR-BREEZE Intelligent Robotic Solar Powered Pool... quick start guide

D-D The Aquarium Solution D-Deltec AP Series instructions

D-D The Aquarium Solution

D-D The Aquarium Solution D-Deltec AP Series instructions

Clearpond Eco installation instructions

Clearpond

Clearpond Eco installation instructions

AquaEuroUSA 135 quick start guide

AquaEuroUSA

AquaEuroUSA 135 quick start guide

Intex 128652GS owner's manual

Intex

Intex 128652GS owner's manual

manuals.online logo
manuals.online logoBrands
  • About & Mission
  • Contact us
  • Privacy Policy
  • Terms and Conditions

Copyright 2025 Manuals.Online. All Rights Reserved.