John Mills BREAD MASTER Product information sheet

BREAD MASTER
Instruction and guarantee manual
XBM138
1 YEAR GUARANTEE

CONTENTS
1
2
3
4
5
•
•
•
•
•
•
6
•
•
•
•
•
•
•
•
7
8
9
10
11
12
Description of the machine
General safety instructions - please read thoroughly before use
Special safety instructions for this machine
Using the machine for the first time
Functions and operations
Degree of browning
Start / Stop button
On / Off button
Delay function
Keeping the bread warm
Warning display
The programmes
Basic
Quick
French
Rapid
Whole wheat
Cake
Dough
Bake
Inserting and removing the baking tray
Baking of loaves
Cleaning and storage
Guarantee
Trouble shooting (possible problems and solutions)
Suggested recipes
1

D
A
CH
EF
B
G
2
1 Description of the machine
A Kneading hook D Lid
B Ventilation slits E Baking tin handle
C Baking area F Baking tin
G Control panel
H Housing

2
•
•
•
•
•
•
•
•
•
•
•
•
•
•
3
•
•
•
•
4
General safety Instructions
Before commissioning this machine please read the instruction manual carefully.
Please keep these instructions, the sales receipt and, if possible the packaging.
The machine is intended exclusively for private and not commercial use.
Always remove the plug from the socket whenever the machine is not in use and when attaching accessory
parts, cleaning or whenever there is a power failure. Remove the plug not the cable.
Do not leave children unsupervised close to the appliance. Always make sure that children cannot reach the
machine or any loose cables.
Test the machine and the cable regularly for damage. If any damage is found the machine should not be used.
Do not attempt to repair the machine. Consult an expert.
For safety reasons, a broken or damaged mains lead may only be replaced by an equivalent lead from the
manufacturer or similarly qualified person.
Keep the machine and the cable away from heat, direct sunlight, moisture, and sharp edges.
Use only the original accessories.
Do not use the machine outdoors.
Under no circumstances must the device be placed in water or other liquid. Do not use the machine with wet or
moist hands.
Should the machine become moist or wet, remove the mains plug from the socket immediately. Do not reach into
the water.
Use the machine only for the intended purpose.
Special safety instructions for this machine
Do not touch any hot elements. Use the handles or knobs provided and oven gloves if necessary.
Do not touch any of the moving or spinning parts of the machine.
Keep a safe distance from other objects.
Do not cover the machine and do not put anything on it.
Using the machine for the first time
Rinse the baking tin and the rest of the equipment. Do not use sharp objects and do not scour. The baking tin
has a non-stick coating. Grease the baking tin and bake empty for 10 minutes. Clean once more and place the
kneading hook on the axle in the baking area.
Electrical connection
The machine must only be connected to a correctly installed 230V 50 Hz safety socket.
A signal is heard “3:00” appears shortly after on the LCD display and the colon between the 3 and 00 remains lit
and does not flash.
The machine is now ready to operate and is automatically set to program “1”.
3

5 Functions and Operations
PROGRAMME
This is used to select the baking programme. Each time it is pressed (accompanied by a short signal) the
programme changes. The current programme appears on the display.
DEGREE OF BROWNING
This is used to select a light, medium or dark colour for the crust.
START / STOP button
This starts and stops or finishes the selected baking programme.
START: In order to start a programme, press for approximately 1 second. A short signal is heard and two dots in
the time display begin to flash and the programme begins.
STOP: In order to stop the programme, press the button for approximately 3 seconds until a signal confirms that
the programme has been switched off.
ON / OFF
Two dots flashing: programme is switched on
Two dots continuously lit: programme is switched off
DELAY
You may delay the baking and completion time by programming the machine.
At first enter the baking method and the degree of browning.
“arrow pointing upwards” = + 10 minutes
“arrow pointing downwards” = - 10 minutes.
The time which appears on the clock after it switches on automatically is the remaining baking time. The
maximum time delay is 13 hours.
EXAMPLE:
It is 8.30 pm and you require the bread to be ready at 7.00 o’clock the following morning.
i.e. 10 hours and 30 minutes later.
Press the “arrow pointing upwards” until 10.30 appears as the time between “now” (8.30pm) and the time that the
bread should be ready - a delay of 10 hours and 30 minutes.
Note: When using the “time delay” option do not use any easily perishable ingredients such as eggs, fresh milk etc.
KEEPING THE BREAD WARM
Your bread is kept warm for 60 minutes after baking. If you want to take the bread out, switch the programme off
with the START/STOP button.
WARNING DISPLAY
If the display shows “H:HH” after you have pressed START, the temperature inside is still too high. Press STOP,
open the lid and let the machine cool down for 10 to 20 minutes.
4

6
A
B
C
D
E
F
G
H
A
B
C
D
E
F
G
H
The programmes
BASIC
QUICK
FRENCH
RAPID
WHOLE WHEAT
CAKE
DOUGH
BAKE
The BREAD MASTER features 8 programme buttons, which can be selected by pressing the programme button.
When connecting the Bread Master, the display shows:
The present time 3.00 = 3 hours
You can enjoy using the following programmes:
BASIC
For preparation of white bread and mixed bread. This programme is used the most frequently. The Bread Master
kneads the dough three times. After the second kneading the Bread Maker will beep. The beep announces that
additional ingredients may be added. The programme requires 3 hours in total.
QUICK
For preparation of white bread and mixed bread. The Bread Master kneads the dough twice and beeps during
the second kneading process in order to add other ingredients. The process of rising of the dough is shortened,
so loaves require less time but will be smaller. The programme requires 2 hours and 20 minutes.
FRENCH
For preparation of French white bread, the Bread Master kneads twice, with longer rising times and bakes longer
so that the bread has a thicker crust. The programme takes 3 hours and 50 minutes.
RAPID
For baking puff pastry and cakes. The Bread Master stirs once and then bakes the dough. The programme takes
1 hour and 50 minutes.
WHOLE WHEAT BREAD
For the preparation of whole wheat bread with sour dough and yeast. The Bread Master kneads twice and the
dough rises and bakes for a longer period. We recommend that you select the dark colour setting to arrive at a
crunchy crust. This programme requires 3 hours and 40 minutes.
CAKE
For the preparation of sweet yeast pastry. The Bread Master kneads the dough twice and the programme takes 2
hours and 50 minutes.
DOUGH
For the preparation of different types of dough which are only formed in the Bread Master for ultimate baking in a
conventional oven. The pan is not heated so it is not necessary to select a crust colour. The programme takes 1
hour and 30 minutes. This programme is also suitable for jam making.
BAKE
A bake only programme for extra cooking of all recipes. If the operating time has ended, the Bread Master starts
the “keep warm” function for one hour for all programmes with the exception of DOUGH.
5

7
8
A
B
C
D
E
F
G
H
I
J
K
9
A
B
C
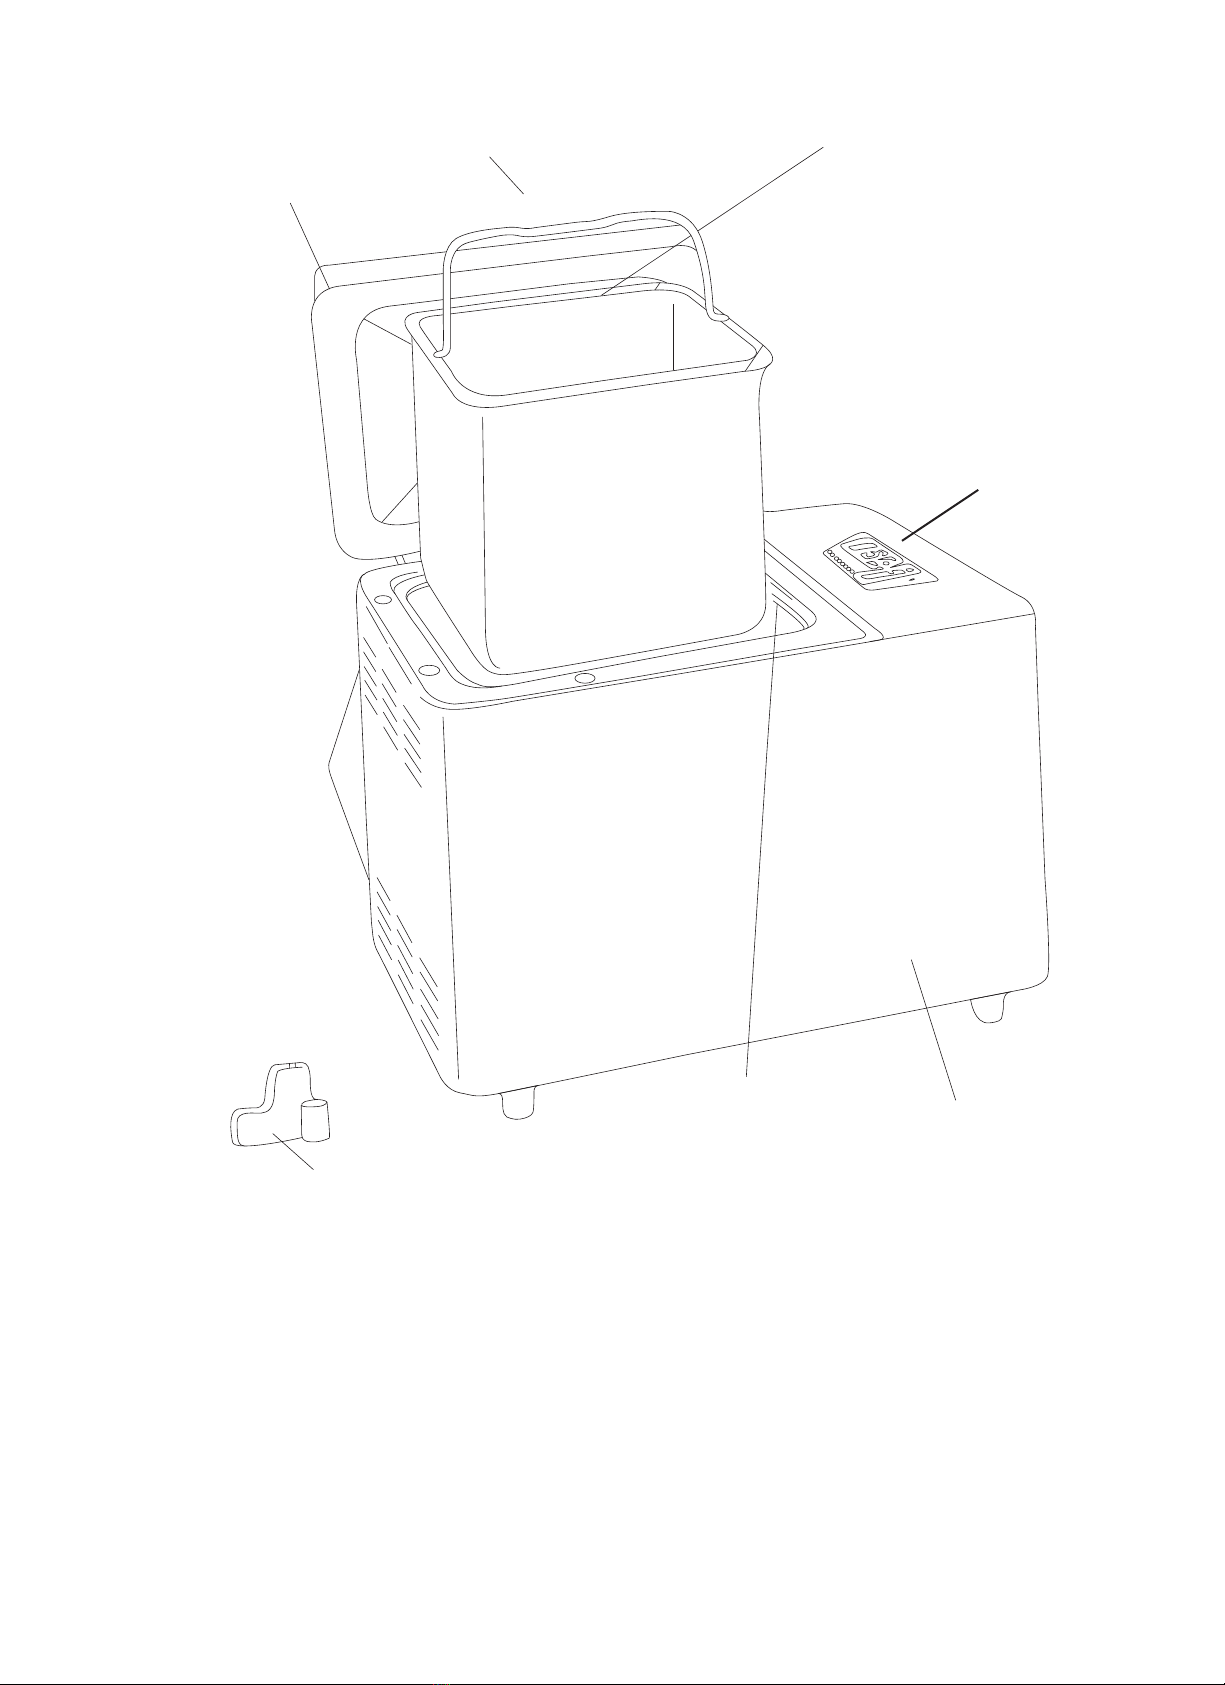
Inserting and Removing of the Baking Tin
Insertion: Insert the baking tin by turning slightly to the left (approximately 10 degrees), pressing lightly and then
turning to the right until straight and fixed in position.
Removal: Turn the baking tin approximately 10 degrees to the left and lift carefully. NB the tin will be very hot.
Baking of Loaves
Remove the baking tin.
Place the kneading hook on the shaft.
Place the ingredients in the baking in.
All ingredients, including the liquid ingredients, should be at room temperature.
Keep to the order in the recipe
Add the yeast AS THE LAST INGREDIENT: Sprinkle sugar and salt around the outside of the rest of the mixture.
Place the yeast in a small hollow in the flour.
Place the baking tin in the machine.
Close the lid.
Connect the machine to the mains: See starting the machine for the first time/electrical connection.
Select the baking programme and degree of browning.
Set the time delay if required.
Press the START button, “:” flashes.
If the machine is set to NORMAL, WHOLEMEAL, WHITE BREAD and EXPRESS, signals will be heard during
the second kneading process. These inform you when fruits/or nuts may be added. It is possible that steam may
escape through the ventilation slits in the lid during baking. This is normal.
Finishing Off:
At the end of the baking programme 8 beeps are head and the machine switches automatically to “keep warm”
for one hour. If you wish to remove the bread during this period, stop the “keep warm” programme with the
“START/STOP” button. Open the lid and take out the baking tin.
IT IS ESSENTIAL TO USE AN OVEN GLOVE OR SIMILAR PROTECTION AS THE BAKING TIN IS HOT.
Turn the tin over and shake it lightly until the bread comes out. If the kneading hook is still in the bead, loosen it
with a knife of similar object. Let the bread cool down.
Remove the mains lead from the socket.
Cleaning and Storage
Disconnect the machine from the mains and let it cool down before you start to clean it.
BakingTin: Rub inside and outside with a damp cloth. Do not use any sharp or abrasive agents.
Kneading Hook: Clean by rinsing. If the kneading coil is difficult to remove from the axle, soak the baking tin in
water beforehand.
Lid and Window: The lid can be removed for cleaning. Clean the lid and machine inside and outside with a
slightly damp cloth.
This appliance conforms to CE directives for radio interference suppression and low-voltage safety and has been
built to meet current safety requirements. Specifications are subject to technical changes without prior notice.
6

10
A
B
C
D
E
Guarantee
This product is unconditionally guaranteed for 12 months against all defects of workmanship and materials.
Please keep the retailer’s receipt as proof of purchase. If a fault occurs within 12 months of purchase, please
inform John Mills Ltd (address at the back of this booklet and on the packaging). You will be asked to return the
product in secure packaging at JML’s expense, along with the receipt. The faulty appliance will be repaired or
replaced subject to the exclusions set out below. If the item is replaced during the 12 month guarantee period,
the new guarantee will be calculated from original date of purchase.
In order for the guarantee to be valid, the appliance must have been used in accordance with the instruction
booklet supplied. JML will not be liable to replace or repair the item under the terms of the guarantee should the
following have occurred:
The fault has been caused or can be attributed to misuse, negligent misuse or use in a way contrary to the
instruction booklet.
A fault has been caused by power surges or damage in transit.
The product has been used on a voltage supply not specified in the instruction booklet.
Repairs have been attempted by a person other than our service staff.
The product has been used for non-domestic or hire purposes.
This guarantee does not cover claims for consequential loss or damage. It does not confer any rights other than
those set out above. Faulty appliances will be repaired or replaced free of charge if these are attributable to faulty
material or manufacture. JML are not liable to carry out any type of servicing work under the guarantee. This
guarantee does not affect your statutory rights.
11
A
B
C
D
E
F
G
H
I
Trouble Shooting
If the results are not as expected there may be a simple explanation. Check the points below to determine the fault:
Check that all the ingredients have been added.
Check that the ingredients have been accurately measured.
Always use fresh ingredients.
Check that the yeast has not been activated before the programme starts.
Check that the correct programme has been used.
In humid environments, reduce the liquid quantity a little. Do not overfill the appliance.
Check that the appliance has not been interrupted during operation or that the lid has been opened.
Always remove the bread from the appliance within/or at the end of the “keep warm” period; leave on a rack to
cool. The guide below will help you with specific problems
7

11 Trouble Shooting continued
FAULT
Bread rises too much
Bread does not rise
Or has sunk in the Middle
Heavy, lumpy bread
Open, moist/too porous Bread
REASON
Too much yeast added.
Too much flour or incorrect type
of flour.
Not enough salt.
None/not enough yeast.
Yeast is too old.
Yeast has been activated before
programme has started refer to
time.
Water/liquid is too hot.
Lid has been opened during the
programme.
Too much liquid.
Not enough yeast.
Too much flour.
Too much fruit.
Old ingredients.
Too much water/liquid.
No salt.
CORRECTION
Use accurate measures.
Check that all ingredients
have been added and these are
of the correct type.
Use accurate measures.
Use fresh ingredients.
Take care that yeast does not
come in contact with liquid
before starting.
In high humidity use a little
liquid.
Use accurate measures.
Use fresh ingredients.
Use accurate measures.
In high humidity use a little
less liquid.
12 Suggested recipes
NOTE; the recipes below include dry yeast. If you wish to use fresh yeast, substitute with the equivalent amount.
1/2 teaspoon of dried yeast = 2 1/2 fresh yeast.
1 teaspoon of dried yeast = 5g of fresh yeast
1 1/2 teaspoons of dried yeast = 7 1/2 fresh yeast
2 teaspoons of dried yeast = 10g fresh yeast
WHITE BREAD (use the basic or quick programme)
3 1/3 cups (845ml) strong fine plain white flour
1 tablespoon (15ml) vegetable cooking oil
2 teaspoons (10ml) dry yeast
1 teaspoon (5ml) salt
1 teaspoon (5ml) white sugar
1 1/3 cups (325ml) cool water (approx.20 degrees C)
WHOLEMEAL BREAD (use the wholemeal programme)
3 1/3 cups (845ml) wholemeal flour
1 tablespoon (15ml) vegetable cooking oil
3 teaspoons (15ml) dry yeast
1 teaspoon (5ml) salt
1 teaspoon (5ml) white sugar
1 1/3 cups (325ml) cool water (approx. 20 degrees C) 8

12 Suggested recipes continued
WHOLEMEAL “LIGHT” BREAD (use the wholemeal programme)
2 1/4 cups (564 ml) wholemeal flour
1 1/8 cups (280 ml) strong fine plain white flour
1 tablespoon (15ml) vegetable cooking oil
3 teaspoons (15ml) dry yeast
1 teaspoon (5ml) salt
1 teaspoon (5ml) white sugar
1 1/3 cups (325ml) cool water (approximately 20 degrees C)
This recipe gives a lighter tasting loaf and uses both wholemeal and white flour.
GRANARY BREAD (use the basic or quick programme)
3 1/3 cups (845ml) granary flour
1 tablespoon (15ml) vegetable cooking oil
2 teaspoon (10ml) dry yeast
1 teaspoon (5ml) salt
1 teaspoon (5ml) white sugar
1 1/3 cups (325ml) cool water (approx. 20 degrees C)
This will make a granary loaf of approximately 750g.
MALT BREAD (use basic programme)
1 2/3 cups (425 ml) strong fine plain white flour
1 1/2 teaspoons (7.5ml) dry yeast
1 1/2 tablespoons (22ml) black treacle
1 1/2 tablespoons (22ml) malt extract
1/2 teaspoon (2.5ml) raisins (or any dried fruit)
2/3 cups (175 ml) cool water (approx. 20 degrees C)
Malt loaf is quite sticky and therefore you may need to use a wooden implement to remove the loaf from the pan.
BRIOCHE (use the cake programme)
1 2/3 cups (425 ml) strong fine plain white flour
2 medium eggs, beaten
2 teaspoons (10ml) dried yeast
1/2 teaspoon (5ml) salt
1-1/2tablespoons cool water (approx. 20 degrees C)
TOMATO BREAD (use the basic or quick programme)
3 1/3 cups (845 ml) strong fine plain white flour
2 tablespoons (30ml) olive oil
1/2 teaspoon (2.5ml) salt
30g sun dried tomatoes
1 cup (260ml) cool water (approx. 20 degrees C)
Firstly soak the tomatoes in a small amount of hot water for 15 minutes.
Drain (keep the water) and chop tomatoes into pieces. You can either add the chopped tomatoes at the
beginning of the programme (this will give a blended flavour to the final loaf) or you can add them mid-cycle (this
will result in pieces of tomato in the finished loaf. Use the water from soaking (made up to 260ml) to give more
flavour to the bread.
9

Bread Master
Model No:
XBM138
Power Supply:
230V50Hz
Power Consumption: 700W
Loaf size: 750g
8 programs
John Mills Limited
JML House
Regis Road
London
NW5 3EG
Tel: 020 7691 3800
Fax: 020 7691 3801
Email: [email protected]
www.jmldirect.com
Guarantee
This product is unconditionally
guaranteed for one year
against all defects of
workmanship and materials.
This guarantee does not
affect your statutory rights.
This manual suits for next models
1
Table of contents