jokab safety Knox User manual

Jokab Safety AB Varlabergsvägen 11, S-434 39, Sweden
www.jokabsafety.com
Original instructions
Knox
Safety lock

Knox_Manual_(English)_v1B www.jokabsafety.com
2010-10-01
2
Table of Contents
1Introduction.............................................................................................................................. 3
Scope .................................................................................................................................................. 3
Audience ............................................................................................................................................. 3
Prerequisites ....................................................................................................................................... 3
Special notes....................................................................................................................................... 3
2Overview................................................................................................................................... 4
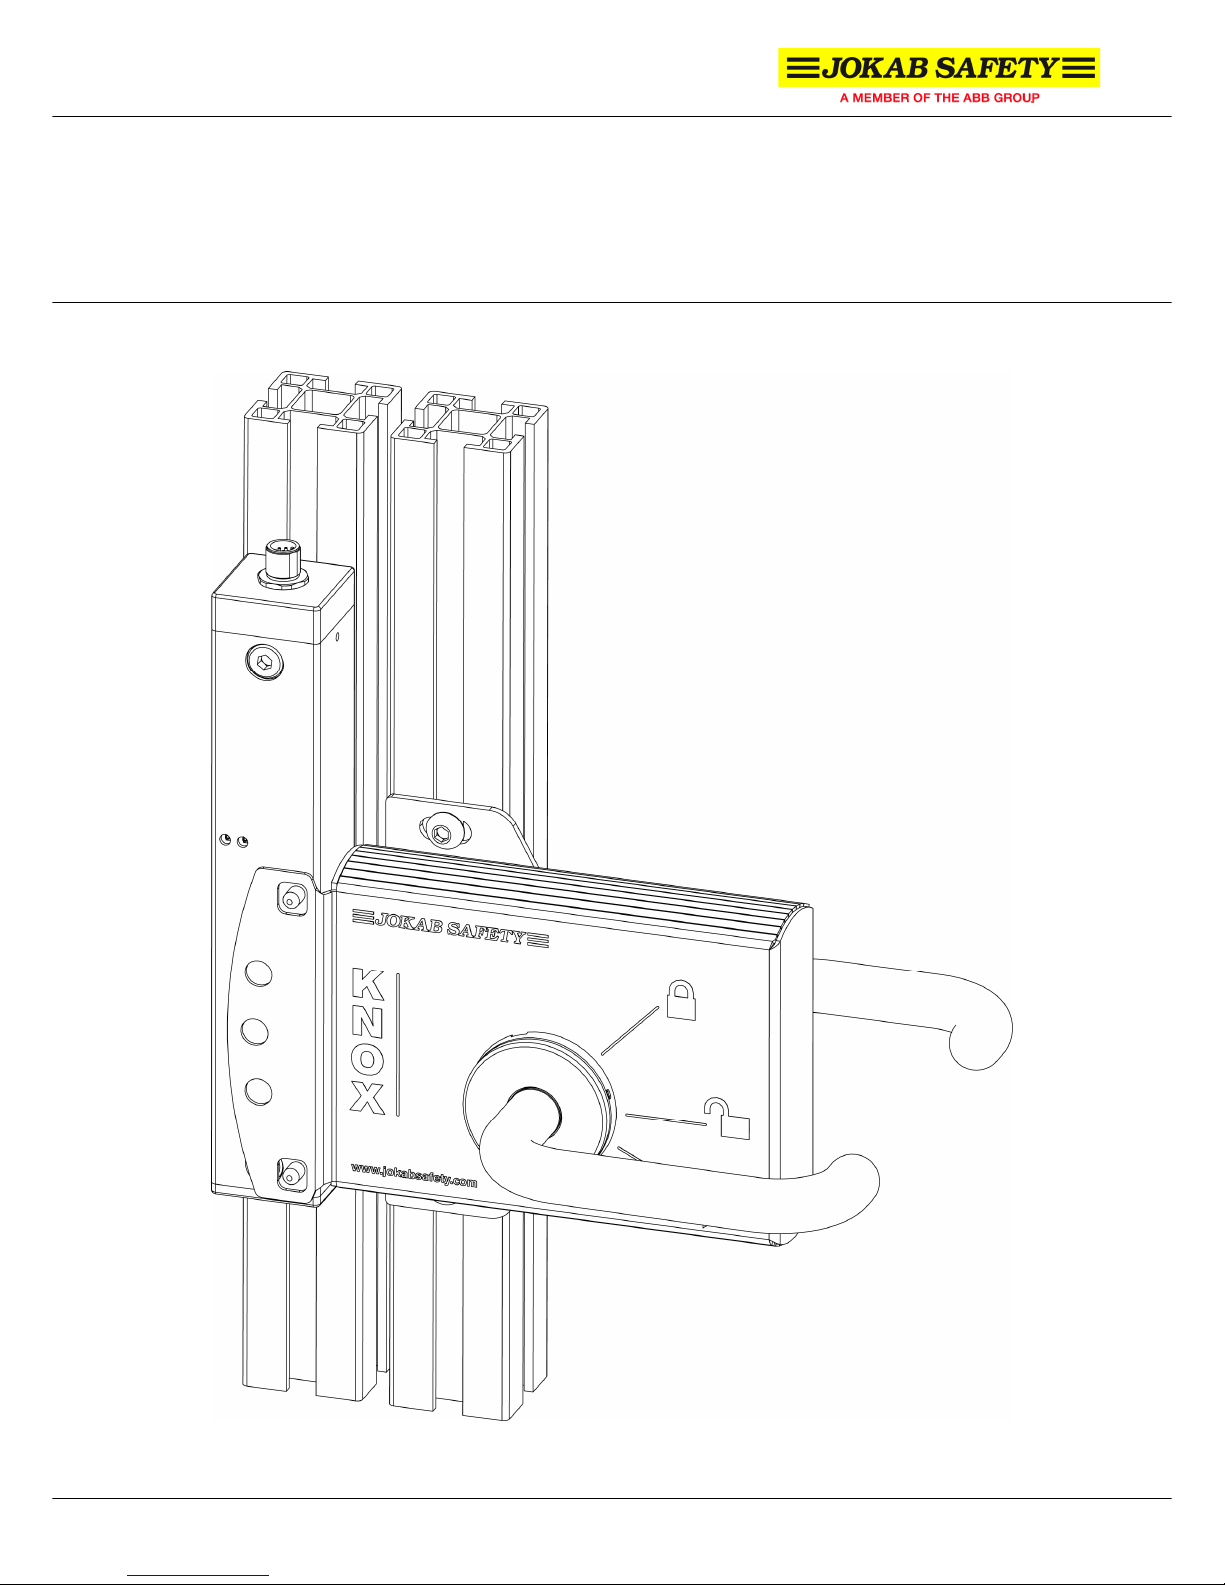
General description ............................................................................................................................. 4
Safety regulations ............................................................................................................................... 4
Function description ............................................................................................................................ 5
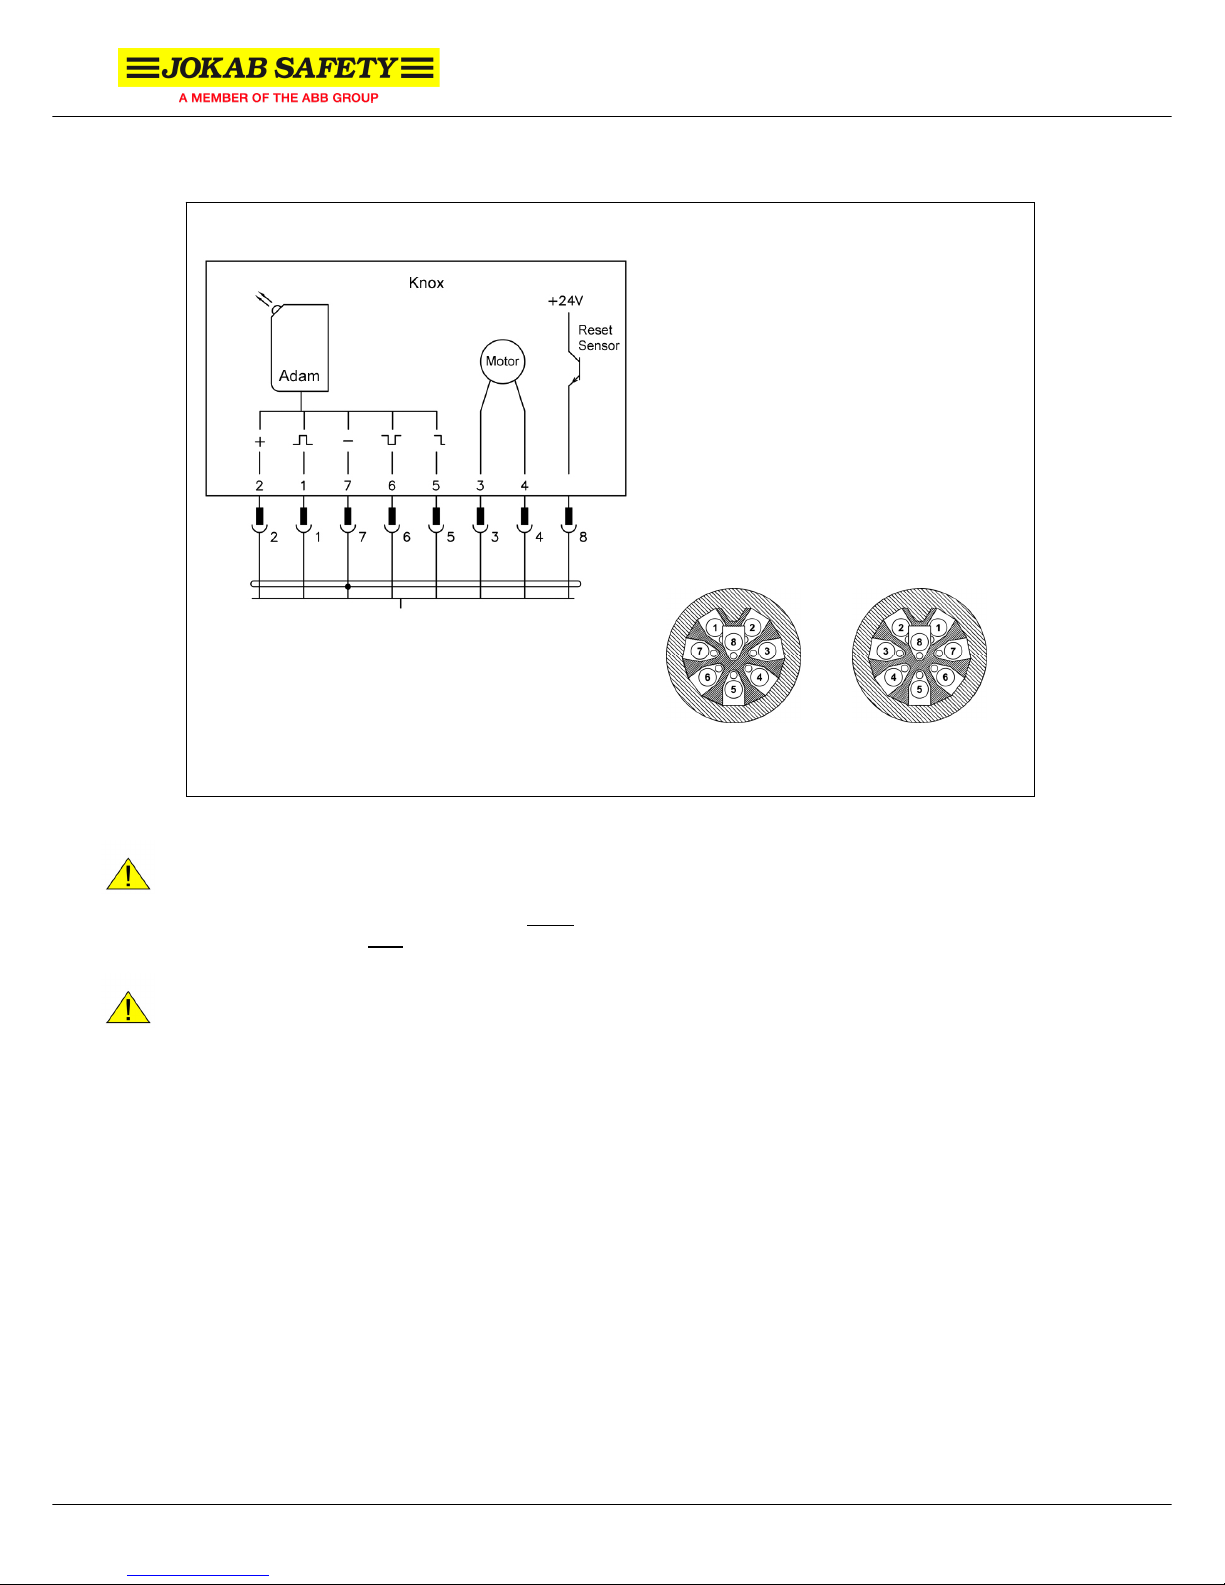
3Connections............................................................................................................................. 6
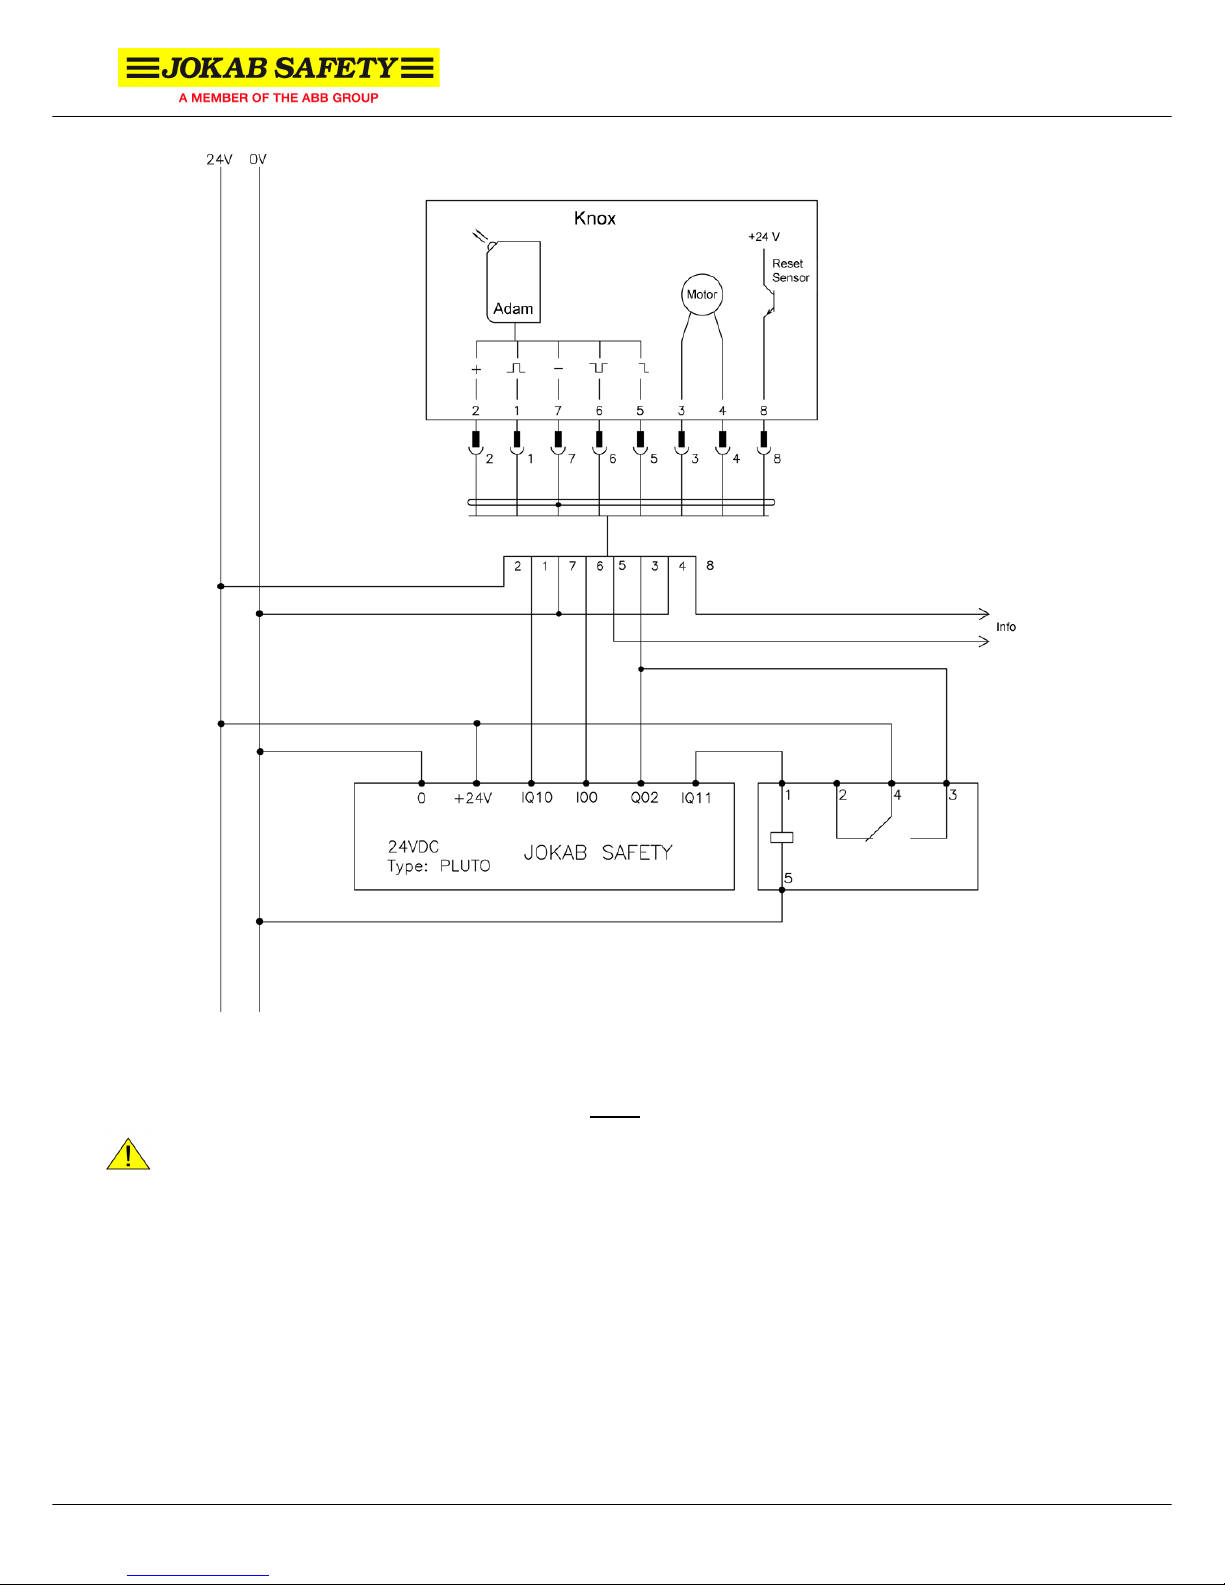
Connection examples.......................................................................................................................... 7
4Installation and maintenance ................................................................................................. 9
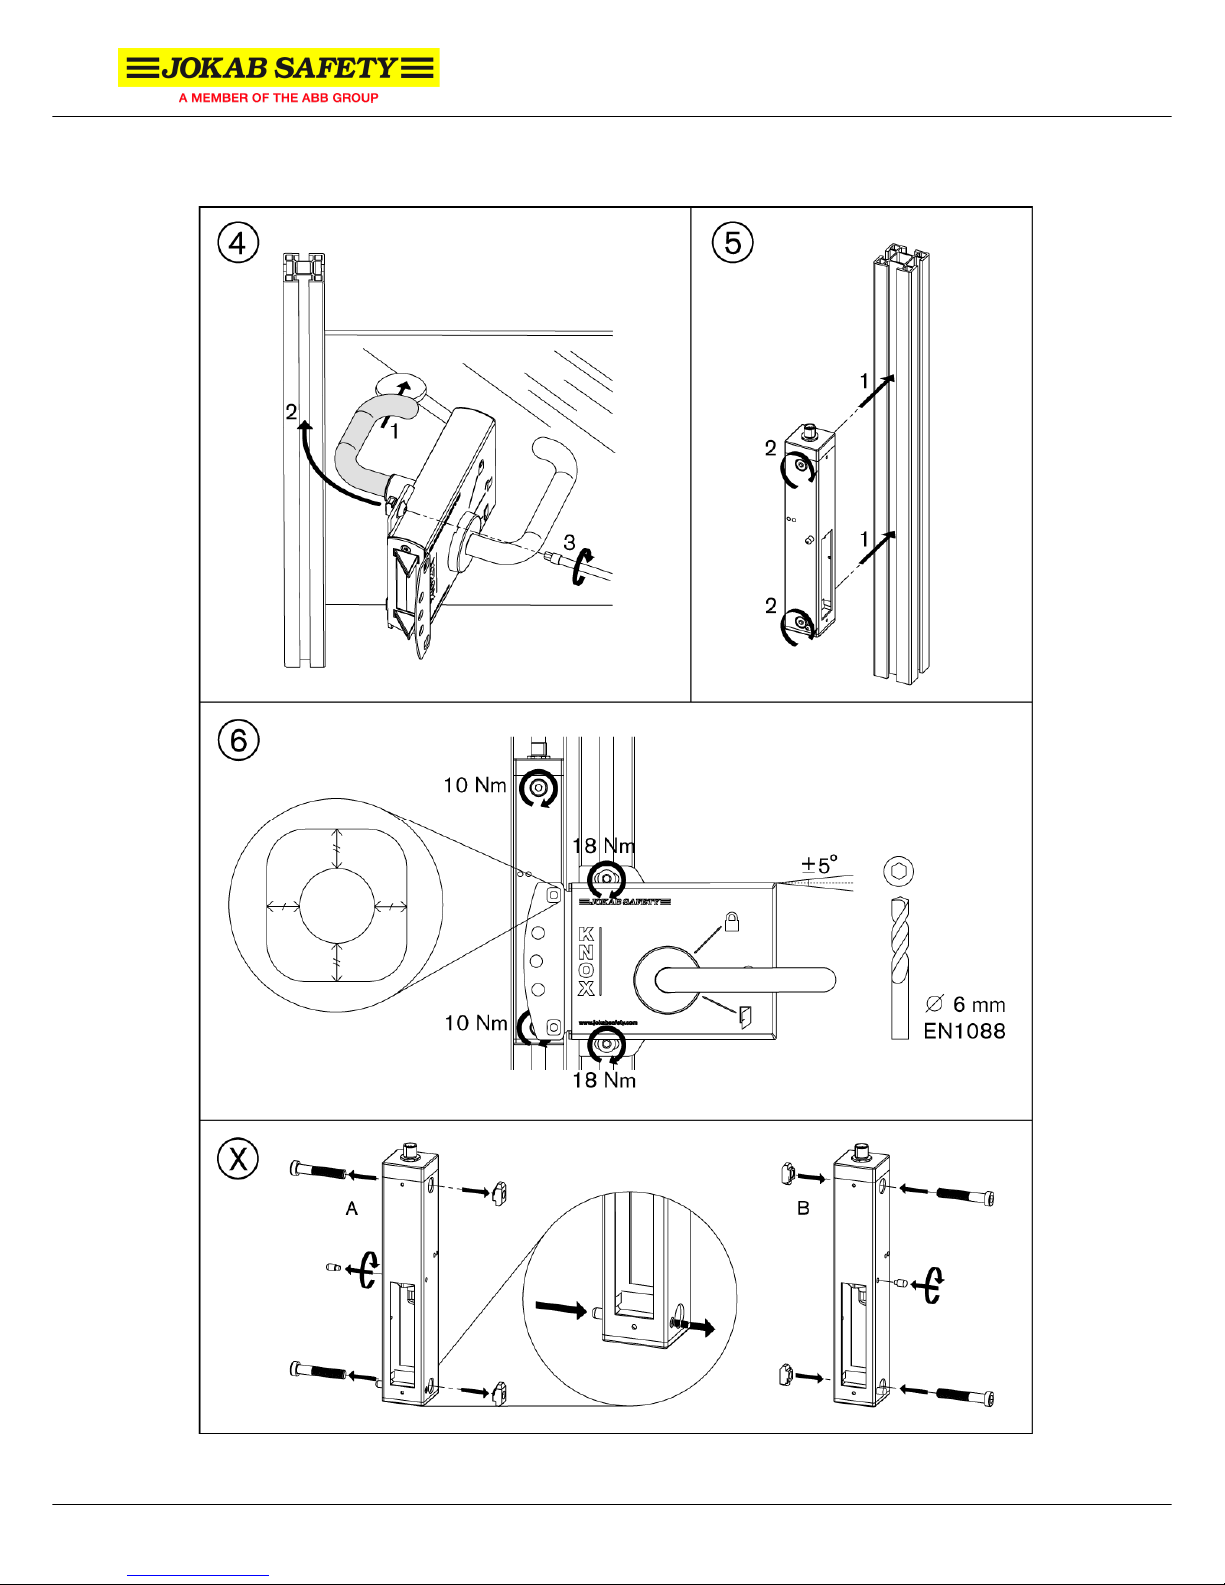
Assembly instructions ....................................................................................................................... 11
Installation precautions ..................................................................................................................... 11
Maintenance...................................................................................................................................... 11
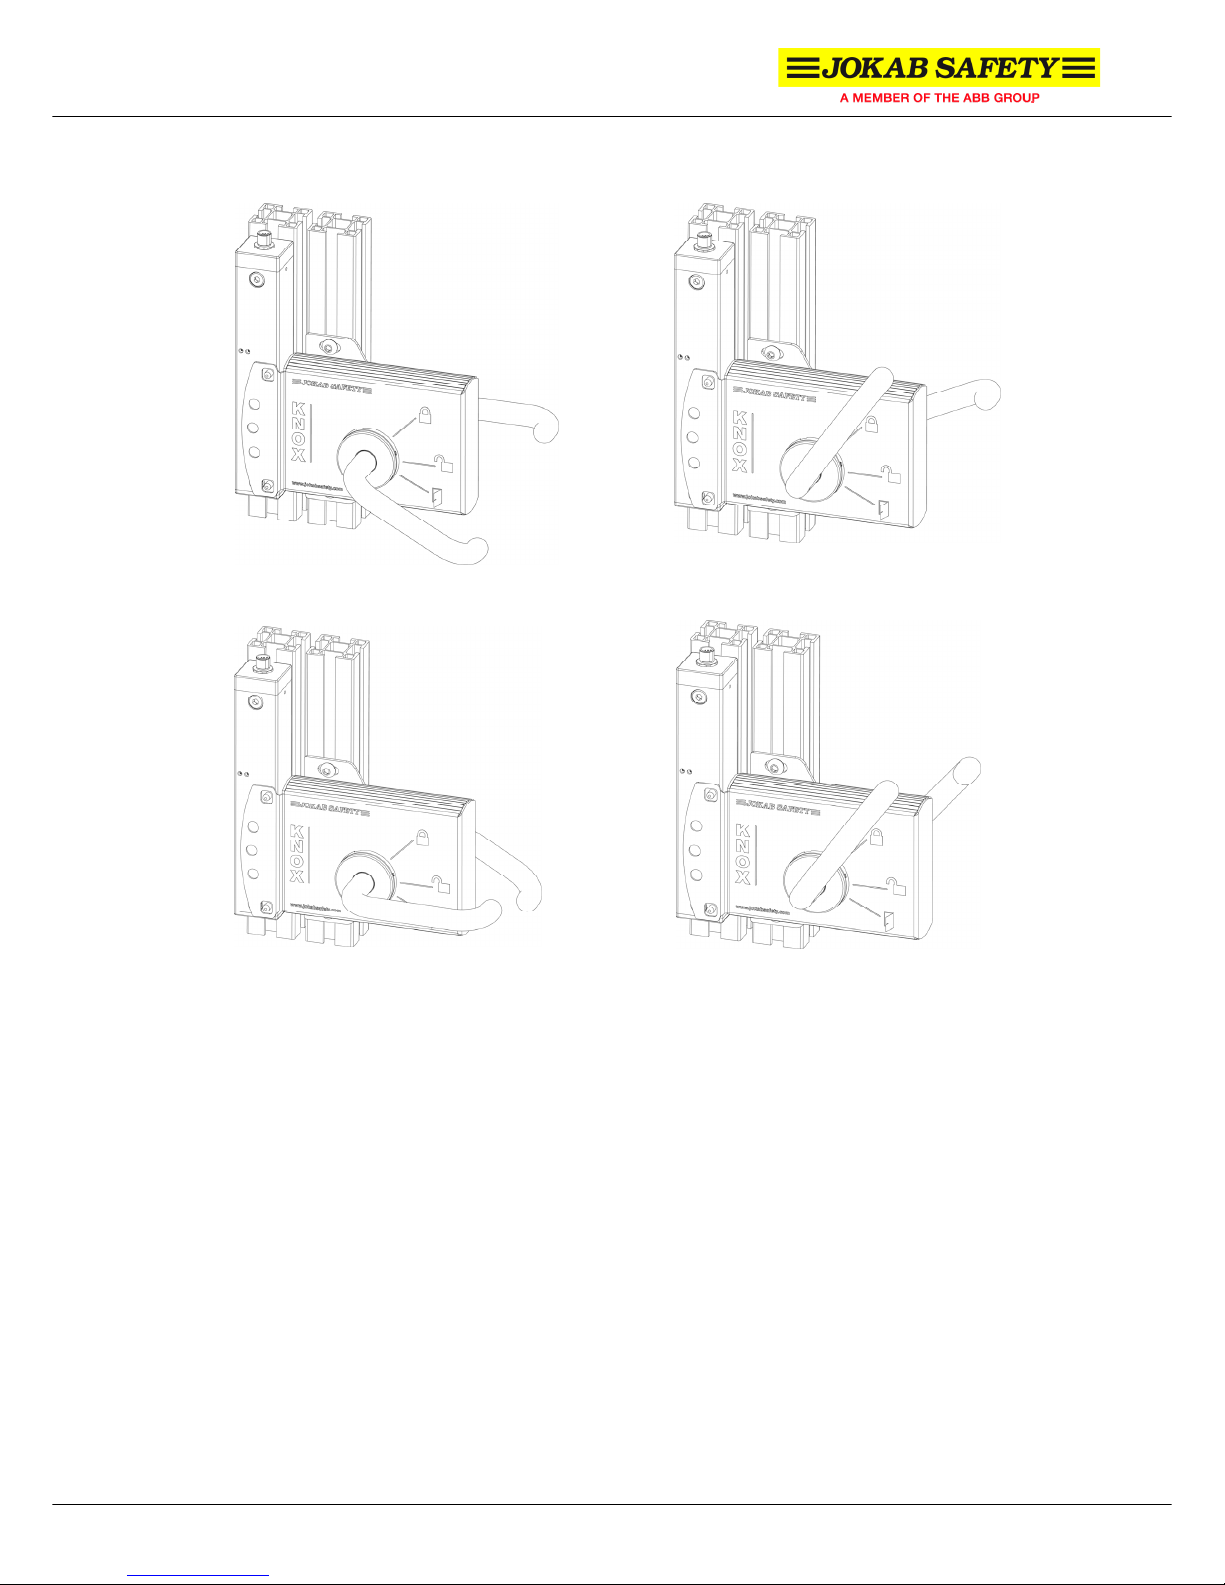
5Operation................................................................................................................................ 12
LED indication ................................................................................................................................... 12
6Model overview...................................................................................................................... 13
Accessories ....................................................................................................................................... 14
7Technical data........................................................................................................................ 15
Dimensions........................................................................................................................................ 16
CAD model........................................................................................................................................ 17
8EC Declaration of conformity ............................................................................................... 18

Knox_Manual_(English)_v1B www.jokabsafety.com
2010-10-01
3
1 Introduction
Scope
The purpose of these instructions is to describe the safety lock Knox and to provide the necessary
information required for assembly, installation, checks and adjustments after installation, and
maintenance. The instructions also include information necessary to connect Knox to a safety circuit.
Note that Knox can be connected to both Vital and Pluto, but specific connection examples are left out
of these instructions and can be found at www.jokabsafety.com or in the Safety Handbook.
Audience
This document is intended for authorized installation personnel.
Prerequisites
It is assumed that the reader of this document has knowledge of the following:
•Basic knowledge of Jokab Safety products.
•Knowledge of safety devices and safety locks.
•Knowledge of machine safety.
Special notes
Pay attention to the following special notes in the document:
Warning!
Danger of severe personal injury!
An instruction or procedure which, if not carried out correctly, may result in
injury to the technician or other personnel.
Caution!
Danger of damage to the equipment!
An instruction or procedure which, if not carried out correctly, may damage the
equipment.
NB: Notes are used to provide important or explanatory information.

Knox_Manual_(English)_v1B www.jokabsafety.com
2010-10-01
4
2 Overview
General description
Knox is a double lock that complies with the highest safety level (two lock cylinders with monitored
positions) that can be used both as a safety and process lock. The locking function is electronically
controlled and is bi-stable, i.e. it retains its position (unlocked/locked) in the event of a power failure.
The handles operate as they would on a normal door apart from the exterior handle also having a
reset function reducing the need for an extra reset button for this device, and an interior handle that
can be used for emergency opening. Its design and durability mean that it is ideal for harsh
environments as the sensors in the lock are non-contact and the lock is manufactured of stainless
steel. Shielded cable is recommended between this unit and the rest of the safety circuits.
Safety regulations
Warning!
Carefully read through this entire manual before using the device.
The devices shall be installed by a trained electrician following the Safety regulations, standards and
the Machine directive.
Failure to comply with instructions, operation that is not in accordance with the use prescribed in these
instructions, improper installation or handling of the device can affect the safety of people and the
plant.
For installation and prescribed use of the product, the special notes in the instructions must be
carefully observed and the technical standards relevant to the application must be considered.
In case of failure to comply with the instructions or standards, especially when tampering with and/or
modifying the product, any liability is excluded.

Knox_Manual_(English)_v1B www.jokabsafety.com
2010-10-01
5
Function description
•“Open”: Door open, outer handle pressed down and emergency handle in horizontal position.
•“Reset, openable”: The safety device is reset but the door is unlocked and can be opened
from either side. Outer handle in upward position and emergency handle turned upwards
slightly from the horizontal position.
•“Emergency opened”: Door emergency opened. The door can always be opened from the
unsafe side. The door unlocks and the safety circuit is opened when the emergency handle is
pressed down, independent of the outer handle position.
•“Operational mode”: Door is locked and reset, closing the safety circuit (i.e. allowing a
process to start). Both handles in upward position. The door can only be opened from the
unsafe side (using the emergency handle) causing the process to stop.
Reset, openable
Emergency opened Operational mode; locked and reset
(emergency opening only)
Opened

Knox_Manual_(English)_v1B www.jokabsafety.com
2010-10-01
6
3 Connections
Caution! All cable colours according to Jokab Safety standard cable.
Warning! Knox has an information output able to indicate if the door is locked or not. There is also a
built-in Eden sensor which also has an information output for indication. All information channel
outputs are non-safe and must therefore never be used to control a safety application. To control a
safety application the safe dynamic signals from Eden must be used to determine if a door is locked or
not.
Warning! The system must be connected using a fuse of max 6A.
8-pole M12-connector:
(1) White: Dynamic input signal
(2) Brown: +24 VDC
(3) Green: Lock
(4) Yellow: Lock inverse
(5) Grey: Information Locked
(6) Pink: Dynamic output signal
(7) Blue: 0 VDC
(8) Red: Information Reset
M12 8-pole female
seen from cable side
M12 8-pole male
seen from cable side

Knox_Manual_(English)_v1B www.jokabsafety.com
2010-10-01
7
Connection examples
Connection example: Signal for unlocking from other safety system
NB: The system will lock Knox if there is no signal for unlocking.
NB: Vital 1 is used to monitor the locking
Warning! System must be connected using fuse of max 6 A.
Warning! Signal for unlocking must be a safe signal from system in the same enclosure.

Knox_Manual_(English)_v1B www.jokabsafety.com
2010-10-01
8
Connection example: Knox with locking on a relay
Caution! Output from Pluto Q02 and IQ11 must never be set at the same time.
Warning! System must be connected using fuse of max 6 A.
More connection examples can be found at www.jokabsafety.com or in the Safety Handbook.

Knox_Manual_(English)_v1B www.jokabsafety.com
2010-10-01
9
4 Installation and maintenance

Knox_Manual_(English)_v1B www.jokabsafety.com
2010-10-01
10

Knox_Manual_(English)_v1B www.jokabsafety.com
2010-10-01
11
Assembly instructions
1) Component overview.
2) Attach and fasten the emergency handle on the back of the door part. Prepare the door part
for mounting on Jokab Safety Quick-Guard system by lightly attaching the mounting nut and
screw according to figure 2.
3) The type of door determines what step to take.
a. If the door surface is completely covered, a hole needs to be drilled for the emergency
handle. The centre of the hole should be 60 mm from the Quick-Guard aluminium
profile (or 104 mm from the edge of the door). The diameter of the hole should be 45-
60 mm.
b. If Knox is to be mounted on a net door, an extra PC plate (article number 20-106-00)
can be placed on the net to prevent the door from being opened from the outside or
reset from the inside (e.g. by using a screwdriver to push the handle, refer to risk
analysis to determine necessity). A larger grid hole might be necessary to get the
emergency handle through the net, see figure 3b.
4) Pass the emergency handle through the hole to the back of the door. Fit the mounting nut to
the Quick-Guard profile. Fasten the mounting screws lightly to still be able to adjust position.
5) Perform step X) if necessary. Mount the Knox frame part according to figure 5. Make sure that
the M12-connector is facing upwards.
6) Adjust horizontal and vertical position. Make sure the guiding pins on the frame part are
centred in the control holes on the door part. Fasten the mounting screws with the twisting
moment according to figure 6 (10 Nm for the frame part mounting screws and 18 Nm for the
door part mounting screws). To comply with safety standard EN 1088 the socket head cap
must be drilled if a fitting hex key is accessible to operators.
X) At delivery, the frame part is adapted for use with a door part for a right hung outward opened
door, or a left hung inward opened door. If necessary, the frame part can be adjusted to fit the
opposite type of door, i.e. a left hung outward opened door or a right hung inward opened
door. To achieve this, unscrew the upper guiding pin and screw it back in the threaded hole on
the opposite side. The lower guiding pin is pushed to the opposite side until the guiding pins
are of equal length.
Installation precautions
Warning! Follow the below instructions carefully to avoid personal injury or damage to the device.
•Knox must be protected from excess current by a fuse of max 6A.
•Knox shall always be mounted with the locking bolts aligned horizontally.
•Never use Knox where the ambient temperature goes below +5° C since icing can disrupt the
functions.
•All the safety functions must be tested before starting up the system.
Maintenance
The opening of the frame part should be cleaned regularly.
Warning! The safety functions and the mechanics shall be tested regularly, at least once every year
to confirm that all the safety functions are working properly (EN 62061:2005).
Warning! In case of breakdown or damage to the product, contact Jokab Safety. Do not try to repair
Knox since it may accidentally cause permanent damage to the product, impairing the safety of the
device which in turn could lead to serious injury to personnel.

Knox_Manual_(English)_v1B www.jokabsafety.com
2010-10-01
12
5 Operation
Locking:
1. Remove any padlock in place.
2. Close the door.
3. Pull the handle upwards to reset the safety device. How the door should be locked is then
determined in the PLC-program (e.g. automatically when the handle is pulled upward or if it
should wait for some other signal).
4. The emergency handle goes to its upward position and the LED towards the edge of the frame
part lights green when the door is locked.
Unlocking:
1. Wait until the safety monitor acknowledges that the unsafe process has stopped. How the
door should be unlocked is determined in the PLC-program. The emergency handle releases
from its upper position when the door is unlocked.
2. Press the handle downwards.
3. Open the door.
4. If any work is to be carried out inside the unsafe area, a padlock can be put in place to make
sure the door cannot be locked and the unsafe process is allowed to start.
Emergency exit:
1. Press the red emergency handle down (the process will be stopped).
2. Open the door.
Caution! Never try to force the lock as it can cause permanent damage to the product. Knox is by
design equipped with a break pin on the inside of the handle shaft to make sure it breaks before any
safety critical part is damaged.
LED indication
LED Indication Description
Green Locked (and reset)
Green-Red (flash) Locked, no dynamic signal in
LED 1
(towards edge of frame part)
Red Unlocked
Green Reset
Green-Pause-Green (flash) Reset (dirt indication)
Red Not reset
LED 2
(towards middle of frame part)
Red-Pause-Red (flash) Not reset (dirt indication)

Knox_Manual_(English)_v1B www.jokabsafety.com
2010-10-01
13
6 Model overview
A complete Knox contains one door part and one frame part.
Type Article number Description
Knox 1A-R 20-105-00 Door part for right hung outward opened door
Knox 1A-L 20-105-01 Door part for left hung outward opened door
Knox 1B-R 20-105-02 Door part for right hung inward opened door
Knox 1B-L 20-105-03 Door part for left hung inward opened door
Knox 1E-R 20-105-08 Door part with manual unlocking, outward opened right hung
door
Knox 1E-L 20-105-09 Door part with manual unlocking, outward opened left hung door
Knox 2A 20-105-20 Frame part
The definition of right and left hung, as well as outwards and inwards opened doors are based on an
operator standing on the safe side of the door, facing the door. If the hinges of the door are on the
right hand side of the operator the door is right hung, and left hung if the hinges of the door are on the
left hand side. The door opens inward if it opens toward the unsafe side, away from the operator. If the
door is opened towards the operator and the safe side, it opens outward.

Knox_Manual_(English)_v1B www.jokabsafety.com
2010-10-01
14
Accessories
Type Article number Description
Accessory 20-106-00 PC plate for net door mounting
Accessory 20-106-01 Extension of handle shaft for thick door
Accessory 20-106-02 Rebuilding frame for door part, from left to right hung outward
opened door
Accessory 20-106-03 Rebuilding frame for door part, from right to left hung outward
opened door
Accessory 20-106-04 Rebuilding frame for door part, from left to right hung inward
opened door
Accessory 20-106-05 Rebuilding frame for door part, from right to left hung inward
opened door
Tina 12A 20-054-18 Distribution block for two Knox
Rebuilding frame for door part, from left
to right hung outward opened door.
Article number: 20-106-02
Rebuilding frame for door part, from right
to left hung outward opened door.
Article number: 20-106-03
Rebuilding frame for door part, from left
to right hung inward opened door.
Article number: 20-106-04
Rebuilding frame for door part, from right
to left hung inward opened door.
Article number: 20-106-05
PC plate for net door
mounting.
Article number: 20-106-00

Knox_Manual_(English)_v1B www.jokabsafety.com
2010-10-01
15
7 Technical data
Manufacturer
Address JOKAB SAFETY AB
Varlabergsvägen 11
S-434 39 Kungsbacka
Sweden
Power supply
Operating voltage 24 VDC ± 10 % at +20° C ambient temperature
24 VDC + 10 %, - 0% at +5° C ambient temperature
Power consumption Electronics: 70 mA (in locked position)
Lock/lock inverse: 135 mA (when locking/unlocking)
Total max: 150 mA
Information output: Max 10 mA
Time delay t (in/out Eden) t < 60 µs
General
Protection class IP65
Ambient temperature +5…+55°C
Size See drawing
Holding force
(in opening direction)
Unlocked: 5,000 N (10,000 N ultimate breaking strength)
Locked: 5,000 N (10,000 N ultimate breaking strength)
Lock function S/M – unlocked and locked with voltage
Weight Approx 3.5 kg
Material Stainless steel
Colour Silver
Connector M12 8-pole male
Mechanical life 105cycles
EMC EN 62061:2005, Annex E
Vibration resistance in 3 directions
(according to IEC 60068-2-6)
10-59 Hz, 0.7 mm P-P
59-500 Hz, 5 g
10 sweep cycles, 1 oct/min
Shock resistance in 3 directions
(according to IEC 60068-2-27)
15 g, 11 ms half sine
± 3 shocks
Warning
Knox locks mechanically. Forcing the lock may damage Knox permanently.
Safety / Harmonized standards
Approved standards European Machinery Directive 2006/42/EG
EN ISO 12100-1:2003, EN ISO 12100-2:2003,
EN ISO 13849-1:2008, EN 1088
EN ISO 13849-1 Performance level: Pl e, Category 4, MTTFd: 150 years
Certifications

Knox_Manual_(English)_v1B www.jokabsafety.com
2010-10-01
16
Dimensions
NB: All measurements in millimetres.
Knox dimensions
Knox mounting holes

Knox_Manual_(English)_v1B www.jokabsafety.com
2010-10-01
17
CAD model
Complete CAD models are available through the webpage
1) Visit www.jokabsafety.com.
2) Choose language English in the menu at the top of the page.
3) In the menu to the left, choose Products.
4) A list of products is now shown. Choose 3D CAD files. This will open a new window called “Jokab
Safety AB – SolidComponents”.
5) In the new window there is a menu to the left, showing different product categories. Knox belongs
to the category Sensors/switches, find it in the list and click it. If the language changed in the
new window, click the corresponding flag at the top of the page to choose language again
(Swedish, English or German available).
6) Choose Knox in the list now shown.
7) Choose a preferred format in the scroll down list next to ”CAD-format” (SolidWorks, ProE, Sat,
Step, Parasolid, Iges, Dwg, Dxf).
8) Click the save icon in front of the desired product (”Knox Door”, ”Knox Frame”, etc).
9) The product will now be added to the list of downloads. Click the save icon again in the new list to
start the download.

Knox_Manual_(English)_v1B www.jokabsafety.com
2010-10-01
18
8 EC Declaration of conformity
EC Declaration of conformity
(according to 2006/42/EC, Annex 2A)
We JOKAB SAFETY AB
Boplatsgatan 3
SE-213 76 Malmö
Sweden
declare that the safety components of JOKAB SAFETY manufacture
with type designations and safety functions as listed below, is in
conformity with the Directives
2006/42/EC
2006/95/EC
2004/108/EC
Person authorised to compile
the technical file
Mats Linger
JOKAB Safety AB
Varlabergsgatan 11
SE-434 39 Kungsbacka
Sweden
Product
Non-contact safety sensor
including locking function
Knox
Used harmonized standards EN ISO 12100-1,-2, EN 954-1, EN ISO 13849-1, EN 1088, EN 60204-1,
EN 61000-6-4, EN 61000-6-2
Torgny Olsson
Vice MD
Malmö 2010-03-24
Mats Linger
MD
Kungsbacka 2010-03-24
JOKAB SAFETY AB Varlabergsvägen 11, S-434 39 Kungsbacka, Sweden
www.jokabsafety.com
Table of contents
Popular Door Lock manuals by other brands

ZKTeco
ZKTeco LH7000 installation guide

Assa Abloy
Assa Abloy PEMKO 3495 manual

Buster+Punch
Buster+Punch TUBULAR LATCH instruction manual

Austral Lock
Austral Lock ELEGANCE PUSH2GO ILLUSTRATED FITTING INSTRUCTIONS

Kaba Mas
Kaba Mas LA GARD BASIC Series Manager Programming

Iseo
Iseo Zero1 Aries Smart installation guide