Jolife LUCAS User manual

100057-00 F, VALID FROM CO J2256
Chest Compression System
Instructions for Use
US version

2
Important user
information
All users must read and fully understand the entire Instructions for
Use before operating LUCAS™ Chest Compression System.
The Instructions for Use should always be easily accessible to the
users of LUCAS.
Always follow local and/or international guidelines for CPR when
using LUCAS.
The use of other medical equipment or drugs in conjunction with
external chest compressions may reduce the effect of
compressions. Always consult the instructions for use for other
equipment or drugs to check that they are appropriate to use in
conjunction with the treatment and compressions being
performed with LUCAS.
When LUCAS is used on a non intubated patient the device can
safely be stopped to allow intermittent manual ventilation. Switch
off the device by turning the ON/OFF knob to the Lock position,
ventilate and turn the ON/OFF knob back to the Active
position again. See Section 1.5 on page 7 for information about the
ON/OFF knob positions.
REQUIRED SKILLS
JOLIFE AB strongly recommends that LUCAS Chest Compression
System is only used by persons with basic medical skills
such as:
First responders, ambulance personnel, nurses, physicians or
medical staffs, who have:
•completed a CPR course according to the American Heart
Association or equivalent, AND
•received training in how to use LUCAS
LUCAS can only be bought by or on the order of a licensed medical
practitioner.
TRADEMARKS
LUCASTM is a trademark of JOLIFE AB.
DECLARATION OF CONFORMITY
LUCAS Chest Compression System complies with the
requirements of the European Medical Device 93/42/EEC. It is
marked with the CE-symbol:
LUCAS Chest Compression System, Instructions for Use
ENGLISH (US)
Art. No. 100057-00 F, Valid from CO J2256
© Copyright JOLIFE AB 2007. All rights reserved.
MANUFACTURER, MAIN OFFICE
JOLIFE AB
Scheelev. 17
SE-223 70 LUND
Sweden
Tel: +46 46 286 50 00
www.jolife.com
www.lucas-cpr.com
DISTRIBUTOR, USA
Medtronic Emergency Response Systems
11811 Willows Road NE
P.O. Box 97006
Redmond, WA 98073-9706 USA
Tel: 425.867.4000
Fax: 425.867.4121
www.medtronic-ers.com

100057-00 F, ©JOLIFE AB 2007 3
LUCASTM CHEST COMPRESSION SYSTEM INSTRUCTIONS FOR USE
Table of Contents
IMPORTANT USER INFORMATION.......................................................................................... 2
1I
NTRODUCTION..............................................................................................................5
1.1 INTENDED USE ...............................................................................................................................5
1.2 CONTRAINDICATIONS..................................................................................................................5
1.3 LUCAS CHEST COMPRESSION SYSTEM...................................................................................5
1.4 LUCAS COMPONENTS .............................................................................................................. 6
1.5 ON/OFF-KNOB, POSITIONS ......................................................................................................7
1.6 DESCRIPTION................................................................................................................................8
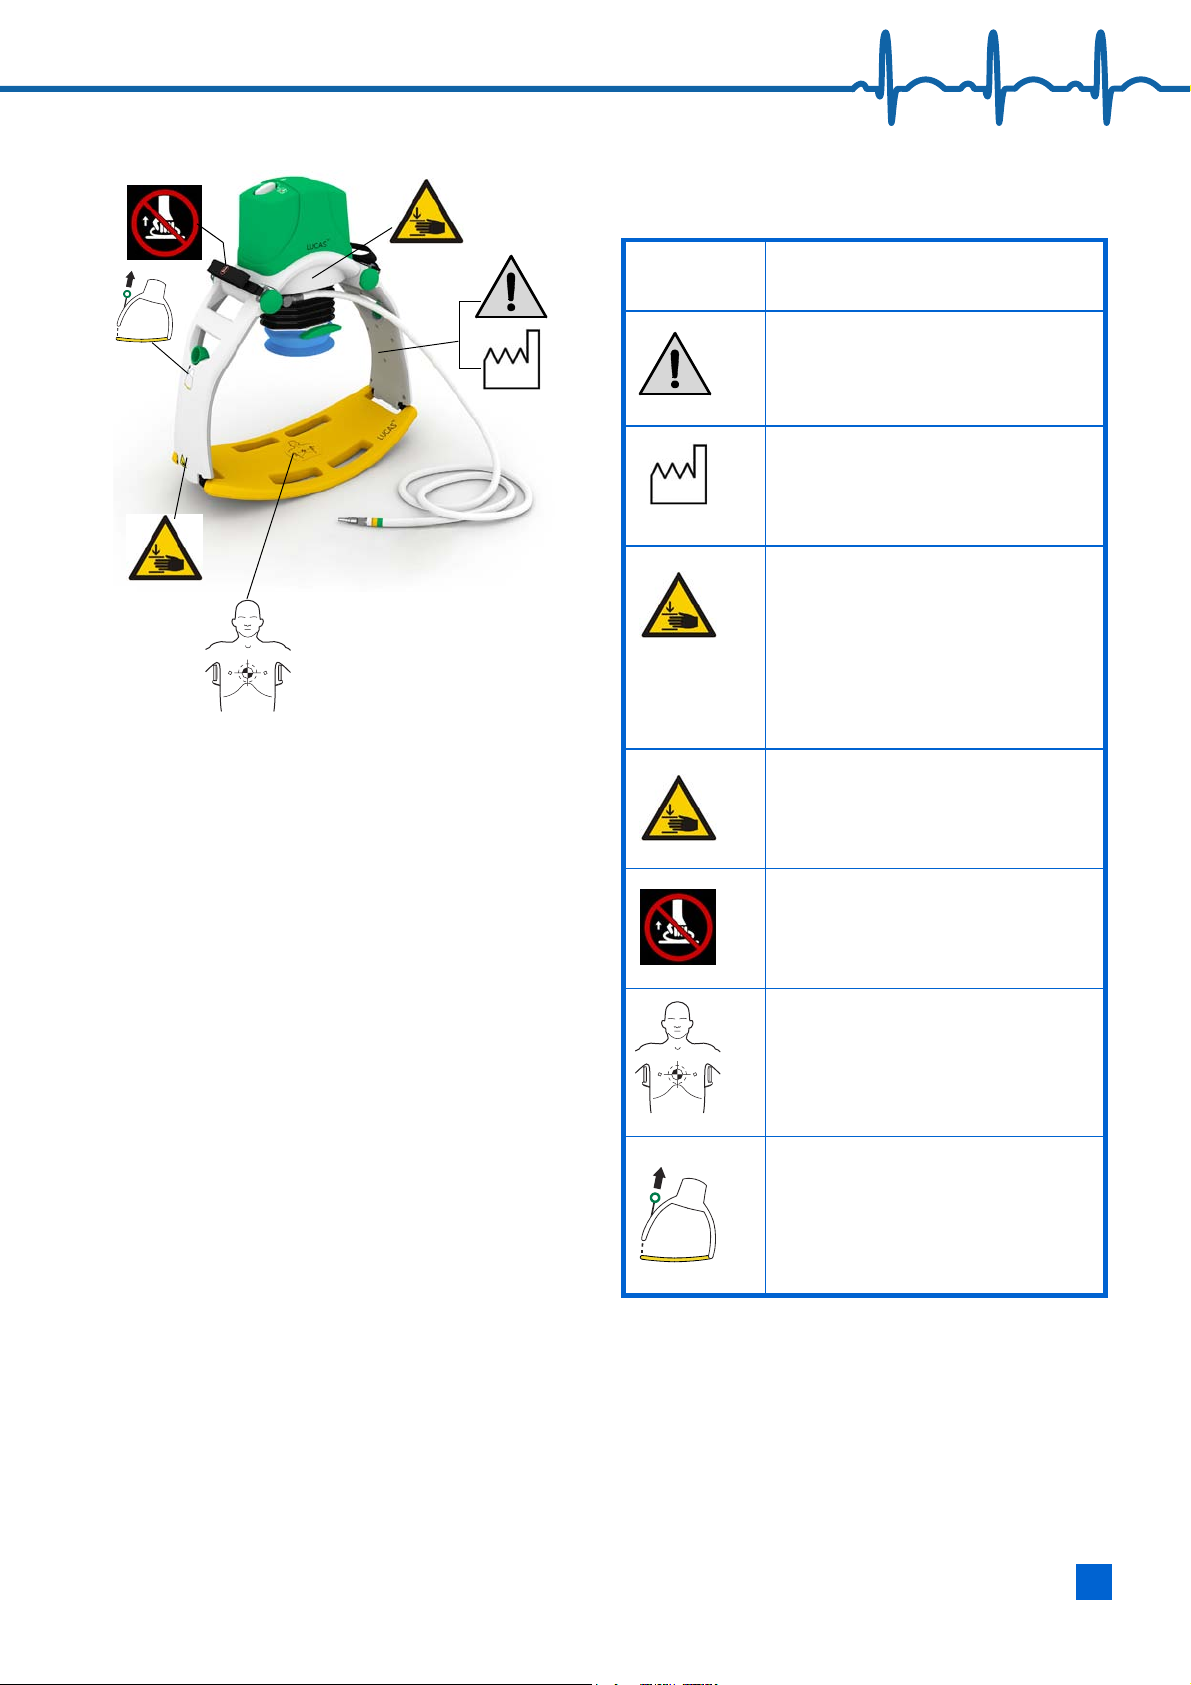
1.7 SYMBOLS ON THE DEVICE........................................................................................................... 9
1.8 DELIVERED ITEMS ........................................................................................................................10
1.9 THE LUCAS TEAM.....................................................................................................................10
1.10 BACKGROUND ..............................................................................................................................11
1.11 CHEST COMPRESSIONS USING LUCAS....................................................................................11
1.12 SIDE EFFECTS................................................................................................................................11
2WARNINGS AND PRECAUTIONS.................................................................................12
2.1 ASSEMBLY....................................................................................................................................12
2.2 USING LUCAS CHEST COMPRESSION SYSTEM ....................................................................12
2.3 CONNECTION TO AIR SUPPLY...................................................................................................13
2.4 ADJUSTING LUCAS TO THE PATIENT .....................................................................................13
2.5 HANDLING LUCAS CHEST COMPRESSION SYSTEM ............................................................13
3USING LUCAS ............................................................................................................14
3.1 ARRIVAL AT THE PATIENT.........................................................................................................14
3.2 UNPACKING AND CONNECTING THE AIR .................................................................................14
3.3 ASSEMBLY....................................................................................................................................16
3.4 ADJUSTMENT ...............................................................................................................................17
3.5 OPERATING LUCAS CHEST COMPRESSION SYSTEM ..........................................................18
3.6 DEFIBRILLATION ..........................................................................................................................19
3.7 TRANSPORTING THE PATIENT...................................................................................................19
3.8 CHANGING AIR SOURCES...........................................................................................................21
3.9 REMOVING LUCAS FROM THE PATIENT................................................................................22
4CARE AFTER USE......................................................................................................... 22
4.1 CLEANING ROUTINES.................................................................................................................22
4.2 ROUTINE CHECKS.......................................................................................................................23
4.3 STORAGE .................................................................................................................................... 23
4.4 SERVICE ....................................................................................................................................... 23
5PACKING AWAY THE DEVICE ..................................................................................... 24
6T
ECHNICAL SPECIFICATION....................................................................................... 25
APPENDIX A ......................................................................................................................... 28
WEEKLY CHECK AND CHECK AFTER USE, LUCAS............................................................................28

4100057-00 F, ©JOLIFE AB 2007
LUCASTM CHEST COMPRESSION SYSTEM, INSTRUCTIONS FOR USE
APPENDIX B - LUCAS STABILIZATION STRAP................................................................ 29
INSTRUCTIONS FOR USE .....................................................................................................................29
1INTRODUCTION...........................................................................................................30
1.1 OVERVIEW .................................................................................................................................. 30
1.2 CONTRAINDICATIONS...............................................................................................................30
1.3 ASSOCIATED DOCUMENTATION ............................................................................................. 30
1.4 LUCAS STABILIZATION STRAP.............................................................................................. 30
1.5 DESCRIPTION.............................................................................................................................. 30
1.6 THE LUCAS TEAM..................................................................................................................... 31
2PREPARING LUCAS STABILIZATION STRAP FOR USE............................................ 32
3W
ARNINGS AND PRECAUTIONS ................................................................................32
3.1 USING LUCAS STABILIZATION STRAP ................................................................................. 32
4USING LUCAS STABILIZATION STRAP ................................................................... 33
4.1 INTRODUCTION...........................................................................................................................33
4.2 ATTACHING LUCAS STABILIZATION STRAP........................................................................33
5CARE AFTER USE......................................................................................................... 35
5.1 CLEANING ROUTINES ................................................................................................................ 35
5.2 ROUTINE CHECKS....................................................................................................................... 35
5.3 STORAGE .................................................................................................................................... 35
6PACKING AWAY THE STABILIZATION STRAP.......................................................... 36
7T
ECHNICAL SPECIFICATION ....................................................................................... 36
APPENDIX C.......................................................................................................................... 37
WEEKLY CHECK AND CHECK AFTER USE, LUCAS STABILIZATION STRAP .................................. 37

100057-00 F, ©JOLIFE AB 2007 5
LUCASTM CHEST COMPRESSION SYSTEM, INSTRUCTIONS FOR USE
1 Introduction
1.1 INTENDED USE
LUCAS Chest Compression System is to be used for
performing external cardiac compressions on adult
patients who have acute circulatory arrest defined
as absence of spontaneous breathing and pulse, and
loss of consciousness.
LUCAS must only be used in cases where manual
chest compression would be used. LUCAS is only
intended for temporary use.
1.2 CONTRAINDICATIONS
Do NOT use LUCAS Chest Compression System in
the following cases:
•Too small adult patient: The suction cup is not
being completely compressed when it is lowered
as far as possible.
•Too large patient: The support legs of LUCAS
cannot be locked to the back plate without
compressing the patient.
•Patient is a child.
•Patient with traumatic injury (wounds resulting
from sudden physical injury or violence).
•Pregnant patients. The woman has to lie 10–15°
to one side to prevent vena cava syndrome
(impaired venous return to the heart as the
uterus compresses the inferior vena cava).
•If there is no indication that chest compression
is likely to help the patient.
1.3 LUCAS CHEST COMPRESSION SYSTEM
LUCAS is a portable device for external cardiac
compressions. It is stored and easily carried in a
backpack, giving the user free hands until the
device is needed.
The components of LUCAS are shown in the
illustration in Section 1.4.

6100057-00 F, ©JOLIFE AB 2007
LUCASTM CHEST COMPRESSION SYSTEM, INSTRUCTIONS FOR USE
w
r
t
y
u
o
q
e
a
s
f
d
i
g
h
1. ON/OFF Knob
2. Hood
3. Patient strap
4. Release ring
5. Support leg
6. Claw lock
7. Back plate
8. Hose attachment
9. Bellows
10. Suction cup
11. Height adjustment handle
12. Air hose
13. LUCAS unique connector
14. Pressure pad
15. Upper part
1.4 LUCAS COMPONENTS

100057-00 F, ©JOLIFE AB 2007 7
LUCASTM CHEST COMPRESSION SYSTEM, INSTRUCTIONS FOR USE
1. Adjust: The suction cup
can be adjusted to fit the
patient, using the height
adjustment handles.
2. Lock: The compression
mechanism is locked.
This is used during
defibrillation and when
moving the patient.
3. Active: This is the
operating position. When
LUCAS Chest
Compression System is
connected to an air supply of
specified capacity, it performs
compressions at a rate of about
100 per minute.
1.5 ON/OFF-KNOB,
POSITIONS

8100057-00 F, ©JOLIFE AB 2007
LUCASTM CHEST COMPRESSION SYSTEM, INSTRUCTIONS FOR USE
u
h
t
j
1.6 DESCRIPTION
1.6.1 MAIN PARTS
LUCAS consists of an upper part (h) and a back
plate (u). The back plate is placed underneath the
patient to form a support for the external chest
compressions.
The upper part contains a pneumatically driven
piston rod, which acts on the patient’s chest via a
pressure pad. The pressure pad is surrounded by a
suction cup.
The support legs (t) of the upper part are fastened
to the back plate prior to starting compressions.
1.6.2 CONNECTION TO AIR SUPPLY
LUCAS is powered by compressed air from a wall
outlet or a cylinder. See Section 6 for specification
of air sources.
The air hose is permanently mounted on LUCAS,
and has a unique male connector at the open end.
A suitable pressure regulator is delivered with
LUCAS.
LUCAS requires no electrical supply and has no
conducting parts on the outside, except the hose
attachment, the claw lock bar, and the upper
attachment of the bellows.
1.6.3 LUCAS STABILIZATION STRAP
LUCAS Stabilization Strap (j) is an accessory
which is attached to LUCAS to prevent downward
movement of LUCAS during operation. Please see
Appendix B for instructions for use of LUCAS
Stabilization Strap.

100057-00 F, ©JOLIFE AB 2007 9
LUCASTM CHEST COMPRESSION SYSTEM, INSTRUCTIONS FOR USE
1.7 SYMBOLS ON THE DEVICE
Symbol/
Location
Meaning
Caution – see instructions for use. All
users must read the entire Instructions
for Use before operating LUCAS Chest
Compression System.
Year of manufacture.
WARNING – Crushing hazard. The
pressure pad and suction cup are drawn
into the bellows with high force when
LUCAS is connected to an air supply.
Keep all body parts away from the
suction cup, the bellows and the height
adjustment handles when connecting
the air hose, and during operation.
WARNING – Crushing hazard. Keep
your fingers away from the claw locks
when attaching the upper part to the
back plate.
Caution – Do not lift by the straps.
The straps are only intended for
securing the patient’s arms to LUCAS.
Place the suction cup immediately above
the end of the sternum, as indicated in
the figure. The suction cup should be
centred over the sternum.
Pull up the release rings to release the
support legs from the back plate.

10 100057-00 F, ©JOLIFE AB 2007
LUCASTM CHEST COMPRESSION SYSTEM, INSTRUCTIONS FOR USE
q
1.8 DELIVERED ITEMS
Before using LUCAS Chest Compression System,
make sure that the following items are delivered:
1. LUCAS in carrying bag together with
Instructions for Use.
2. Pressure regulator.
3. LUCAS Stabilization Strap (packed in carrying
bag).
1.9 THE LUCAS TEAM
It is strongly recommended that qualified
personnel work in teams of two. This enables one
person to perform cardiopulmonary resuscitation
(CPR) while the other person unpacks LUCAS
Chest Compression System.
The Instructions for Use will refer to “The LUCAS
team” (Figure q), consisting of two people who
have the required skills stated on page 2 .

100057-00 F, ©JOLIFE AB 2007 11
LUCASTM CHEST COMPRESSION SYSTEM, INSTRUCTIONS FOR USE
1.10 BACKGROUND
The single most common cause of death in western
society is cardiovascular disease either on its own
or as a contributory factor.
There is only a short space of time after the heart
stops during which it is possible to reverse the
situation and restore spontaneous circulation.
If the heart is not started quickly, the two most
important organs, the heart and brain, will be
damaged by the lack of oxygen.
Effective chest compressions can restore
circulation to a level, which may be sufficient to
prevent heart and brain damage during a short
period of time.
For optimal results the compressions should be
performed in such a way that the rib cage is held
down for approximately half of the time, and
subsequently released for the remaining half of the
time1.
It is very difficult to perform manual chest
compressions effectively, even for experienced CPR
practitioners, and especially in a vehicle, moving
ambulance, during transport or when there is no
firm surface under the patient23.
1 American Heart Association Guidelines for Cardiopulmonary
Resuscitation and Emergency Cardiovascular Care.
Circulation 2005;112: 24, Supplement; December 13, 2005.
2 Hightower D, Thomas SH, Stone CK et al. Decay in Quality of Closed-
Chest Compressions Over Time.
Ann Emerg Med 1995;26:300-303.
3 Sunde K, Wik L, Steen P A: Quality of Mechanical, manual Standard and
active compression-decompression CPR on the arrest site and during
transport in a manikin model. Resuscitation 1997;34:235-242.
1.11 CHEST COMPRESSIONS USING LUCAS
In situations where it is possible to use LUCAS
Chest Compression System, many of the problems
with manual chest compressions can be
eliminated.
LUCAS works by pressing down very quickly on the
rib cage and holding it down for 50% of the period/
cycle.
When following normal routines for CPR, the use of
LUCAS has the following advantages over manual
chest compression:
•The device maintains consistent chest
compression over a long period of time.
•One person becomes free to provide other care.
•It is possible and safer for the user to give
effective chest compression even in a moving
vehicle.
1.12 SIDE EFFECTS
Bruising and soreness of the chest is common
during use of LUCAS External Cardiac Compressor.
The International Liaison Committee on
Resuscitation (ILCOR) states the following side
effects of CPR4:
•Rib fractures and other injuries are common but
acceptable consequences of CPR given the
alternative of death from cardiac arrest.
•After resuscitation, all patients should be
reassessed and re-evaluated for resuscitation-
related injuries.
4 2005 International Concensus on Cardiopulmonary Resuscitation and
Emergency Cardiovascular Care Science with Treatment
Recommendations. Resuscitation 2005;67:195.

12 100057-00 F, ©JOLIFE AB 2007
LUCASTM CHEST COMPRESSION SYSTEM, INSTRUCTIONS FOR USE
2 Warnings and
precautions
Important
This section contains safety information. All users
must read this section before using LUCAS Chest
Compression System and observe the safety
information at all times during use.
Sections 2.1 to 2.5 summarize warnings and
precautions during assembly and use of LUCAS
Chest Compression System.
Additional hazards are described in relevant
sections of the Instructions for Use. All users must
observe the safety information in Warnings and
Cautions during use of LUCAS Chest Compression
System.
2.1 ASSEMBLY
WARNING – LETHAL PINCH HAZARD
If the air is connected during the assembly
procedure, and the ON/OFF-knob is in the Active
position, the compressions may seriously injure the
patient or create conditions leading to death of the
patient.
Always follow the described sequence of air
connection and assembly.
Caution - Keep hose and connectors clean
The mechanical parts of LUCAS may be damaged if
sand or soil enters the air hose, resulting in reduced
performance.
Always keep the hose and connectors clean, do not
leave these parts on the ground.
2.2 USING LUCAS CHEST COMPRESSION
SYSTEM
WARNING – IMPROPER USE
Improper use of the device can cause serious injury
to the patient and ineffective chest compressions.
JOLIFE AB strongly recommends that the equipment
only be used by personnel who have undertaken
training in use and handling of LUCAS Chest
Compression System.
Other personnel may assist those with the
necessary training in using LUCAS.
WARNING – DEVICE STATUS
If your LUCAS unit does not appear as in the
illustration in Section 1.4, or if the device does not
function in the same way as in training, or according
to specification:
Discontinue use and continue with manual chest
compressions.
WARNING – MALFUNCTION
If there is air leakage, interruption in compressions
or insufficient compressions, if the frequency is
wrong, or there is jarring, or there is something else
that cannot be classified as normal running:
Disconnect the air hose immediately, turn the ON/
OFF knob to Adjust and remove the device. Start
manual chest compressions.
WARNING – SUCTION CUP SLIDING ON GEL
If there is gel on the patient’s chest (e.g. from
ultrasound examination), the position of the suction
cup may change during use.
Remove any gel left before applying the suction cup.
WARNING – PATIENT INJURY OR DEATH
Do not leave the patient or device unattended while
LUCAS Chest Compression System is active.

100057-00 F, ©JOLIFE AB 2007 13
LUCASTM CHEST COMPRESSION SYSTEM, INSTRUCTIONS FOR USE
2.3 CONNECTION TO AIR SUPPLY
WARNING – INTERRUPTING AIR SUPPLY TO
LIFE SUPPORT DEVICES
If other life support equipment is disconnected from
the air supply, serious injury or death may result.
Never remove attachments to air outlets without
first checking that this will not put a patient at risk.
WARNING – EMPTY AIR SUPPLY
When the air in the cylinder runs out, the pressure
falls and compressions delivered by LUCAS lose
force.
Immediately start manual chest compressions and
ensure that the air cylinder is exchanged. Always
change air cylinder if the pressure gauge is on red.
2.4 ADJUSTING LUCAS TO THE PATIENT
WARNING – INCORRECT HEIGHT
ADJUSTMENT
If the suction cup presses down too hard or too
lightly on the rib cage, the patient’s circulation will
be compromised.
Turn the ON/OFF knob to Adjust and adjust the
height of the suction cup immediately.
WARNING – INCORRECT POSITION
If the suction cup is not positioned correctly in
relation to the sternum, there is an increased risk of
damage to the rib cage and internal organs. In
addition, the patient’s circulation will be
compromised.
Make sure that the suction cup is positioned
according to instructions in Section 3.4 before
starting compressions.
If the position changes during operation,
immediately turn the ON/OFF knob to Adjust and
adjust the position of the suction cup.
2.5 HANDLING LUCAS CHEST COMPRESSION
SYSTEM
WARNING – CRUSHING HAZARD
Avoid placing your hands or other body parts on, or
below the suction cup, when LUCAS is active.
WARNING – CRUSHING HAZARD
Keep your fingers away from the claw locks,
particularly when lifting the patient from the floor to
the stretcher with LUCAS in position.

14 100057-00 F, ©JOLIFE AB 2007
LUCASTM CHEST COMPRESSION SYSTEM, INSTRUCTIONS FOR USE
w
e
r
3 Using LUCAS
LUCAS Chest Compression System should be used
to treat patients following the same routines as for
manual CPR.
This section describes the use of LUCAS. It is
divided into nine steps:
1. Arrival at the patient
2. Unpacking and connecting the air
3. Assembly
4. Adjustment
5. Operating
6. Defibrillation
7. Transporting the patient
8. Changing air sources
9. Removing LUCAS from the patient
3.1 ARRIVAL AT THE PATIENT
Upon arrival at the patient, confirm cardiac arrest
by determining level of consciousness, breathing
and pulse (Figure w).
If the patient has suffered a cardiac arrest,
commence cardiopulmonary resuscitation (CPR)
with the LUCAS team immediately.
If CPR is already being carried out when you arrive,
assist as required. Do not interrupt CPR.
3.2 UNPACKING AND CONNECTING THE AIR
On arrival, one of the LUCAS team members should
immediately start to unpack and connect LUCAS
Chest Compression System.
3.2.1 UNPACKING LUCAS
1. Place the bag on the floor/ground with the
straps downwards and the top opposite you
(Figure r).
2. Take hold of the straps on the side of the cover
and open up the cover so that the entire bag
unfolds (Figure r).

100057-00 F, ©JOLIFE AB 2007 15
LUCASTM CHEST COMPRESSION SYSTEM, INSTRUCTIONS FOR USE
3.2.2 CONNECTING THE AIR
WARNING – INTERRUPTING AIR SUPPLY TO
LIFE SUPPORT DEVICES
If other life support equipment is disconnected from
the air supply, serious injury or death may result.
Never remove attachments to air outlets without
first checking that this will not put a patient at risk.
WARNING – CRUSHING HAZARD
The suction cup is drawn into the bellows with high
force when the air hose is connected.
Keep all body parts away from the suction cup, the
bellows and the height adjustment handles when
connecting the air hose.
1. Confirm that the ON/OFF knob is in the
Adjust position.
2. If not already connected, attach the air hose to
the connector.
3. Attach the connector to a wall outlet or to a
portable air cylinder.
4. If using a pressure regulator, open the air valve.

16 100057-00 F, ©JOLIFE AB 2007
LUCASTM CHEST COMPRESSION SYSTEM, INSTRUCTIONS FOR USE
t
y
u
i
3.3 ASSEMBLY
WARNING – LETHAL PINCH HAZARD
If the air is connected during the assembly
procedure, and the ON/OFF-knob is in the Active
position, the compressions may seriously injure the
patient or create conditions leading to death of the
patient.
Always follow the described sequence of air
connection and assembly.
1. Take the back plate out of the bag and approach
the patient (Figure t).
2. Instruct those carrying out CPR to interrupt
chest compression.
3. Work in a pair, one person on each side of the
patient.
4. Take hold of the patient’s arms. One of the
LUCAS team should support the patient’s head.
5. Lift up the patient’s upper body and lay the
back plate below the armpits. Ensure that the
patient’s arms are outside the back plate
(Figure y).
6. Continue manual chest compressions.
7. Take the upper part of LUCAS out of the bag.
Lift it out by holding on to the handles of the
support legs. Ensure that the support legs have
reached their outer position (Figure u).
8. Pull up once on the release rings to check that
the claw locks are open.
9. Interrupt manual chest compression.
10. Place the upper part of LUCAS over the
patient’s chest so that the claw locks of the
support legs will engage with the back plate
(Figure i).
11. Start by pressing on the support leg nearest to
you and then the one on the other side so the
support legs lock against the back plate.
12. Check by pulling upwards, that both support
legs have locked against the back plate.

100057-00 F, ©JOLIFE AB 2007 17
LUCASTM CHEST COMPRESSION SYSTEM, INSTRUCTIONS FOR USE
3.4 ADJUSTMENT
3.4.1 INTRODUCTION
To achieve effective compressions, it is very
important that the suction cup is positioned
correctly on the patient (Figure o).
The lower edge of the suction cup should be
positioned immediately above the end of the
sternum. The suction cup should be centred over
the sternum (Figure a).
3.4.2 ADJUSTMENT PROCEDURE
WARNING – MINIMUM PATIENT SIZE
If the suction cup cannot be completely compressed
and lowered enough to make the pressure pad touch
the patient's chest, the patient is too small for
LUCAS to be used.
Continue manual compressions.
To adjust the position of LUCAS:
1. Set the ON/OFF knob to Adjust .
2. Lower the suction cup with the height-
adjustment handles until the pressure pad
inside the suction cup touches the patient’s
chest without compressing the chest
(Figure s).
If there is a distance between the pressure pad
inside the suction cup and the sternum, LUCAS
cannot be used on the patient(Figure d).
Note: By simultaneously holding up the outer
rim of the suction cup you will more easily see or
feel when the pressure pad touches the chest.
3. If the suction cup is not correctly positioned in
relation to the patient, adjust the position of
LUCAS by pulling on the support legs
(Figure f). The person assembling the device
determines whether the position is correct.
o
a
>0 mm
s
d
f

18 100057-00 F, ©JOLIFE AB 2007
LUCASTM CHEST COMPRESSION SYSTEM, INSTRUCTIONS FOR USE
ACTIVE
LOCK
g
3.5 OPERATING LUCAS CHEST COMPRESSION
SYSTEM
3.5.1 STARTING COMPRESSIONS
When the position of the suction cup is correctly
adjusted according to Section 3.4, LUCAS can be
switched on:
1. Turn the ON/OFF knob to Active . LUCAS
will now give chest compressions.
WARNING – PATIENT INJURY OR DEATH
Do not leave the patient or device unattended while
LUCAS is active.
2. Check that the device is working as it should
regarding frequency and compression.
3. When you want to stop chest compressions,
turn the ON/OFF knob to the Lock position,
without changing the respective positions of
the patient and device.
3.5.2 APPLYING LUCAS STABILIZATION STRAP
When LUCAS is applied to the patient and
performing compressions under the supervision of
one person of the LUCAS team, attach the
Stabilization Strap to LUCAS (Figure g). For
detailed instructions, please refer to Appendix B.

100057-00 F, ©JOLIFE AB 2007 19
LUCASTM CHEST COMPRESSION SYSTEM, INSTRUCTIONS FOR USE
3.6 DEFIBRILLATION
WARNING – INCORRECT ECG ANALYSIS
Compressions interfere with ECG analysis.
Switch off LUCAS before ECG analysis. Make the
interruption as short as possible
WARNING – INADEQUATE COMPRESSION
Patient’s movements may change adjustment of
suction cup.
Verify position of suction cup after defibrillation,
re-adjust if necessary.
Note: Self-adhesive electrodes should be used during
defibrillation as these make it easier to work with
LUCAS. Position the defibrillator electrodes and
wires so they are not under the suction cup; if
electrodes are already on the patient, you may need
to apply new electrodes.
Defibrillation can be performed when LUCAS is
applied to the patient (Figure h).
1. Apply electrodes and perform the defibrillation
according to manufacturer’s instruction for the
defibrillator.
2. After defibrillation or analysis of the outcome
verify the position of the suction cup and re-
adjust if necessary.
3.7 TRANSPORTING THE PATIENT
3.7.1 SECURING THE PATIENT’SARMS
The patient’s arms can be fixed to the device during
transport, using the straps on the support legs
(Figure j). This makes it easier to move the
patient, especially if not in a hospital environment.
WARNING – BLOCKED INTRAVENOUS
CATHETER
Do not tighten the patient strap/straps if drugs are
administered to the patient via an intravenous
catheter.
Caution – Do not lift by the straps
The straps are only intended for securing the
patient’s arms to LUCAS.
Apply the straps tightly enough to secure the arms,
but do not overtighten as this may reduce blood
circulation to the patient’s hands.
h
j

20 100057-00 F, ©JOLIFE AB 2007
LUCASTM CHEST COMPRESSION SYSTEM, INSTRUCTIONS FOR USE
kLOCK
l
3.7.2 LIFTING THE PATIENT
At least three people should lift the patient and
LUCAS – one should support the patient’s head and
there should be one person on each side.
Plan carefully before lifting the patient. Consider
which equipment needs to be moved and where to
place the stretcher.
Those at the side should lift with one hand beneath
the claw locks of the back plate. The other hand
should be used to lift the patient’s belt, trouser or
under the thigh.
Use appropriate lifting technique to avoid injuries
when lifting the patient (Figure k).
WARNING – CRUSHING HAZARD
Do not insert your fingers in the claw locks.
To lift a patient:
1. Secure the patient’s arms with the straps on the
support legs.
2. Turn the ON/OFF knob to Lock , to pause
compressions while lifting the patient, for
example when:
– lifting to a stretcher
– moving from one stretcher to another
3. When the patient has been placed on the
stretcher (or other surface), verify correct
position of the suction cup on the patient.
4. Turn the ON/OFF knob to Active .
Once the patient is placed on the stretcher, LUCAS
may be in active state during all horizontal lifts and
movements.
3.7.3 MOVING HORIZONTALLY
When the situation absolutely demands that the
patient be moved while undergoing chest
compression, the patient’s chest should be
horizontal throughout the entire movement
(Figure l).
Other manuals for LUCAS
1
Table of contents
Other Jolife Medical Equipment manuals
Popular Medical Equipment manuals by other brands

ADC
ADC Advantage 2200 Directions for use

human care
human care FL180 user manual

Coviden
Coviden Puritan Bennett 800 Series Operator and technical reference manual

Thuasne
Thuasne Schulter-Fix Basic Instructions for use

Satelec
Satelec Mini LED Autofocus user manual

Dräger
Dräger CVP 5220 Instructions for use

medi
medi Lumbamed basic Instructions for use

Invivo
Invivo GI EcologiX ECOGI001 instructions

Perdelle
Perdelle Swan Assembly instructions

Chemyx
Chemyx Fusion 100 user manual

otometrics
otometrics Bio-Logic NavPRO ONE quick start guide

Direct Healthcare Group
Direct Healthcare Group Dyna-Form Mercury Advance user manual