JONARD TOOLS FC-500 User manual

FC-500
FIBER CLEAVER INSTRUCTION MANUAL
3. Gently push the Sliding Block to the back of the unit only once to cleave the fiber.
4. Open the Cover Plate and Fiber Clamp and remove the cleaved fiber. Do not allow the face of
the fiber to contact any surface.
5. Close the Cover Plate, Fiber Clamp, and Fiber Trash Can. If the Trash Can is full, dispose of the
contents carefully by tipping them into a separate fiber disposal container.
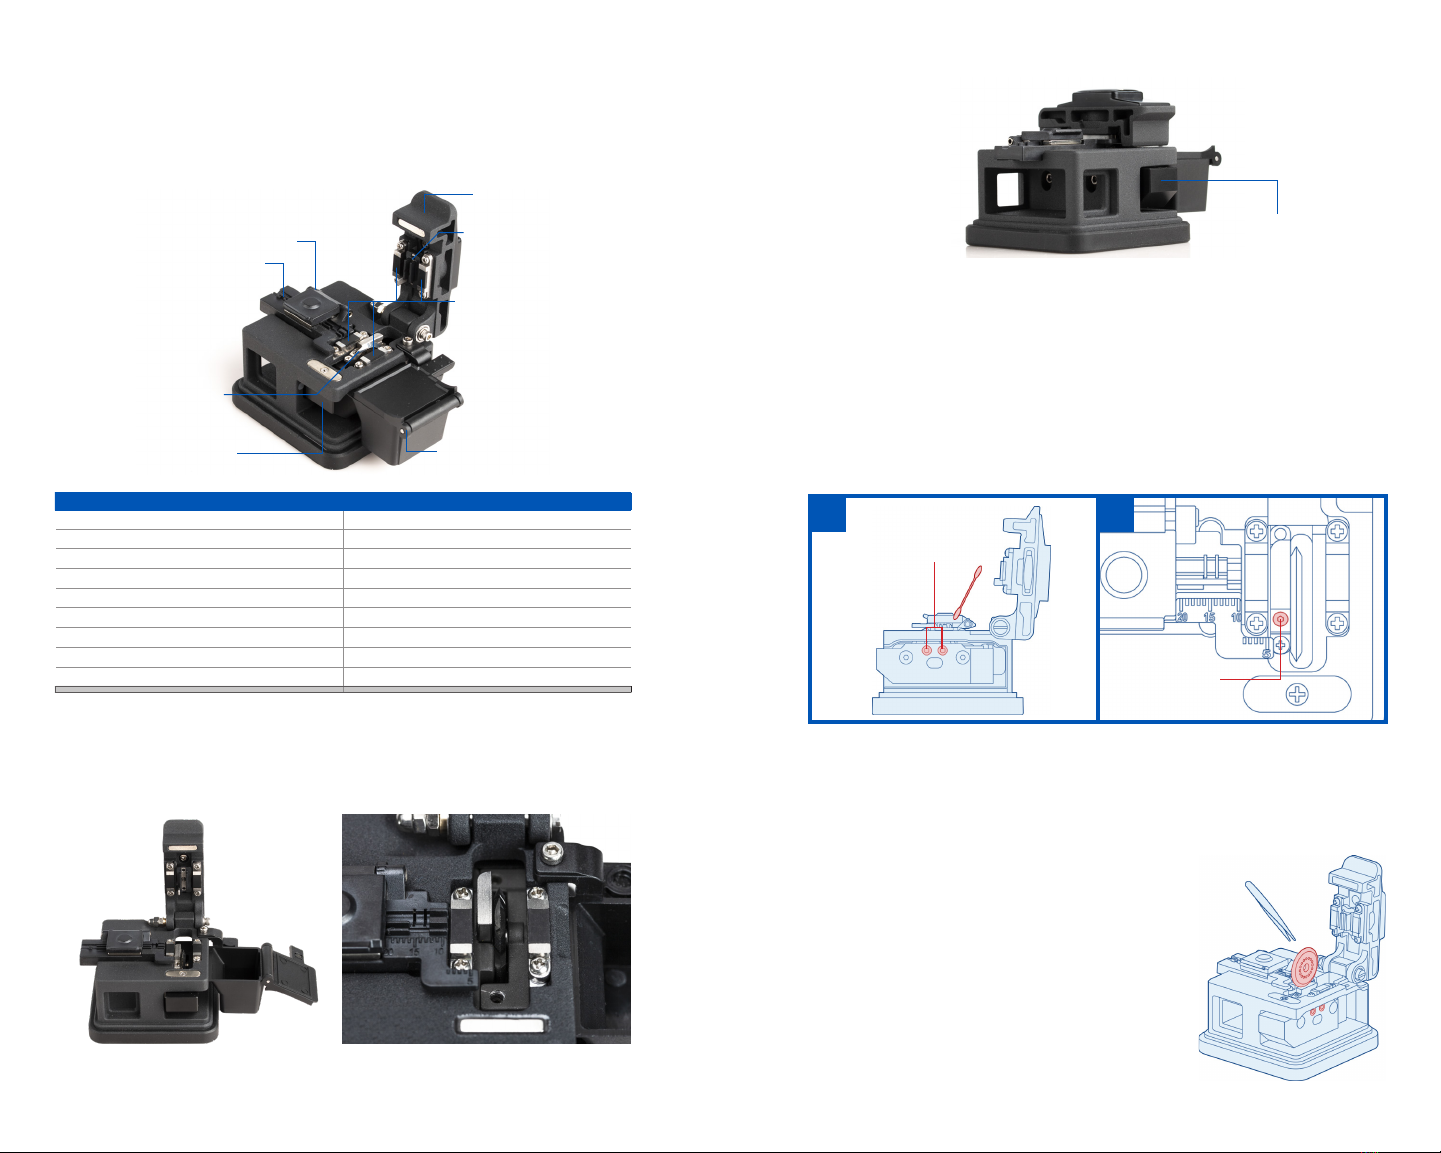
BLADE HEIGHT ADJUSTMENT INSTRUCTIONS
1. Loosen the Blade Fixing Screws in figure A;
2. Slightly adjust the Blade Adjustment Screw in figure B. Turn the screw clockwise to lower the
blade and counterclockwise to raise the blade.
3. Put bare fiber into the fixture, lower the cover plate, push the block back and forth to see if the
blade grazes the fiber. If not, adjust the blade until it does and re-tighten the screws.
BLADE ROTATION INSTRUCTIONS
1. Loosen the Blade Fixing Screws using the included 2.0 mm hex key.
2. Rotate the blade to a new position.
TIP: Adjust the blade height according to the method of the Blade Height Adjustment.
BLADE REPLACEMENT INSTRUCTIONS
1. Loosen the Blade Fixing Screws and use plastic tweezers
to remove the old blade, then replace the old blade with a
new blade.
2. Adjust the blade height according to the method of the
Blade Height Adjustment instructions.
NOTE:
1. There are 16 cutting points indicated on the blade. Please clean
the blade and fiber fixture when the blade can’t be used. If it still
doesn’t work, the cutting point of the blade is completely worn,
and the position of the blade will need to be adjusted.
2. Do not rotate the blade directly by hand; Do not use metal tools
(such as tweezers, etc.) to turn the blade; If using metal tools, the
possibility of blade damage is very high, cotton swabs are recommended.
Push
OPERATING INSTRUCTIONS
Before You Start - Make sure the fiber trash can is open and the Sliding Block is pushed forward.
1. Open the Fiber Clamp and Cover Plate and put bare fiber (≥18mm or ≥0.7”) into the Fiber
Holder. Align the stripped jacket of the fiber with the ruler to cleave to specific lengths of fiber.
2. Position the fiber so that it is past the Cleaving Blade. Then, close the Fiber Clamp and Cover
Plate to hold the fiber in place. Ensure the fiber is straight and even before cleaving.
Product Model FC-500
Includes 1.5mm & 2.0mm hex keys
Optical Fiber Cladding Diameter 125μm
Fiber Coating Diameter 0.25-0.9mm
Coated Outer Diameter Single core
The length of bare fiber required before optical fiber cutting Fiber cutting length ≥18mm (≥0.7”)
Fiber Cutting Length 5-20mm
Fiber Cutting Angle ≤0.8°
Blade Life 48000 uses (3,000 per position)
Fiber Holder
Fiber Clamp
Cover Plate
Blade Block
Fiber Trash Can
Sliding Block
Cleaving Blade
Fiber Grips
SAFETY & CONTENTS
Please read this instruction manual carefully before operation of this tool and save it for future
reference. Store the FC-500 in a dry and dust-free environment. Do not store or use the FC-500 in
high temperature places. Do not use excess force when using the fiber cleaver. Regularly clean any
dirt on the Fiber Clamp with alcohol. Do not use acetone or another corrosive solvent when cleaning
the Fiber Clamp. Consistently clean the fiber box and ensure no dust or oil dirties the slot.
AB
Blade Fixing Screws
Blade Adjustment Screw


