Jorvet Combo V24T User manual

Combo V24T Centrifuge
Instruction Manual
P. 770.270.1394 F. 770.270.2389 865 Marathon Parkway Lawrenceville GA 30046
Before Operating
This symbol refers to hazards that may be encountered when using this product.
CAUTION means that damage to product or environment could occur
WARNING means that injury or contamination could occur
Jorgensen Laboratories instruments have a one (1) year limited warranty. This warranty is not valid on normal wear and tear,
cosmetic damages caused by chemicals, solvents, and/or cleaning solutions, as well as acts of God.
Please register your product online at: www.LWScientific.com/warranty_form.
Important: Warranty information must be completed within 30 days of purchase.
Remove the centrifuge from the shipping container and inspect for any possible shipping damage. If the centrifuge
appears to be damaged, please contact your distributor immediately.
Open the lid by pressing on the front center of the lid until it clicks (to close, press down again until it clicks).
The screw and washer in the motor shaft are for shipping only. Please remove and use the Thumbscrew for all normal opera-
tion.
Now, install rotor as seen on the next page.
WARNING: Ensure the rotor is securely fixed to the rotor shaft. Failure to properly secure rotor could lead to personal
injury or damage to the centrifuge.
1
2
B
A
Lid
Main Power Switch
Display Power
Start / Stop
Rotor Select
Speed
Time
Short Spin
Select
Descrease Value
Increase Value
Start
Stop
time
speed
Short
Spin
Rotor
select
P. 800.525.5614 F. 970.663.5042 1450 Van Buren Ave Loveland Co 80538 USA

Place the centrifuge on a sturdy, level surface. Verify that there are no loose objects or packing material in the tube
chamber. DO NOT PLUG UNIT IN.
Select a rotor and slide it down over the motor shaft, ensuring that the slot in the bottom of the rotor lines up with cross
pin on the motor shaft. The shaft should be lubricated with a fine layer of common grease every few months for easy
rotor changes.
Test Tube and Microtube Rotors: After seating the rotor properly on the motor shaft cross pin, tighten the chrome thumb-
screw down on the rotor. Do not over-tighten.
Microhematocrit Rotor: Place the cover plate onto the rotor by sliding it down over the center shaft.
WARNING: The rotor cover plate is not threaded and will not hold the rotor in place during operation.
Next, tighten the chrome thumbscrew down onto the rotor. Do not over-tighten.
Verify that the main power switch is in the “OFF” position and plug the AC power cord into the appropriate approved and
properly grounded AC outlet. Next, turn the main power switch on, then press the front panel POWER button. The display
should illuminate.
DO NOT INSERT TUBES AT THIS TIME: Ensure that the Rotor Select is in the correct position: LOW SPEED for test tube rotors
(1,000-4,000 rpms) or HIGH SPEED for microhematocrit and microtube rotors (12,000 rpms).
To change speeds, press and hold the ROTOR SELECT button for three seconds.
WARNING: Spinning the 12 or 24-place test tube rotor at high speeds (above 4,000 rpm) can cause tube breakage and
centrifuge damage.
SPEED and TIME can only be adjusted when the lid is closed and locked.
To set the speed, press the SPEED button once, then use the UP/DOWN arrows to select 1,000 rpm, for an initial test run. Press
the SPEED button again to lock the speed.
To set the time, press the TIME button once to flash seconds, and use left arrow to flash minutes. Use the UP/DOWN arrows to
choose 1:00 minute for the initial test run. Press the TIME button again to lock the time.
Start the unit by pressing the START/STOP button. The unit should come up to speed with a smooth sound and little or no vibra-
tion. If there is excessive vibration or noise, shut off the unit immediately, check the troubleshooting tips, and contact
Jorgensen Laboratories if not resolved.
Spin only balanced loads. Make sure that tubes are placed opposite each other. Proper sample balancing will improve
sample separation and will extend the life of the centrifuge. Out of balance loads may damage the centrifuge.
Support your tubes: Tubes must always be supported from the bottom and never hanging by their caps. Use the large tube
sleeves for larger tubes and the small sleeve inserts for smaller tubes. Rubber tube cushions are also available from Jorgensen
Laboratories for supporting short tubes in the large tube sleeves.
Ready for operation: Load your tubes and set time and speed. When spinning the 24 -place microhematocrit rotor, keep the
speed set at 12,000rpm for rapid and complete separations in 3 minutes.
WARNING: Ensure the rotor is securely fixed to the rotor shaft. Failure to properly secure rotor could lead to personal
injury or damage to the centrifuge.
WARNING: Be sure the thumbscrew is tightened before each centrifugation cycle.
3
4
5
6
7
8
9
Selecting and Changing Rotors
A
B
C
D
NOTE: Please ensure that the black rubber rotor
gasket is positioned around the rim of the rotor such
that the capillary tubes are pushing into the rubber
while spinning. The rubber gasket is not affixed to the
rotor to allow for cleaning and re-positioning of the
gasket to prolong gasket life.
10
High speed
Pcv/microtube rotors
Low Speed
Test Tube Rotors
Rotor
select
P. 800.525.5614 F. 970.663.5042 1450 Van Buren Ave Loveland Co 80538 USA

Spring
Braided Wire
Carbon Bar
Length
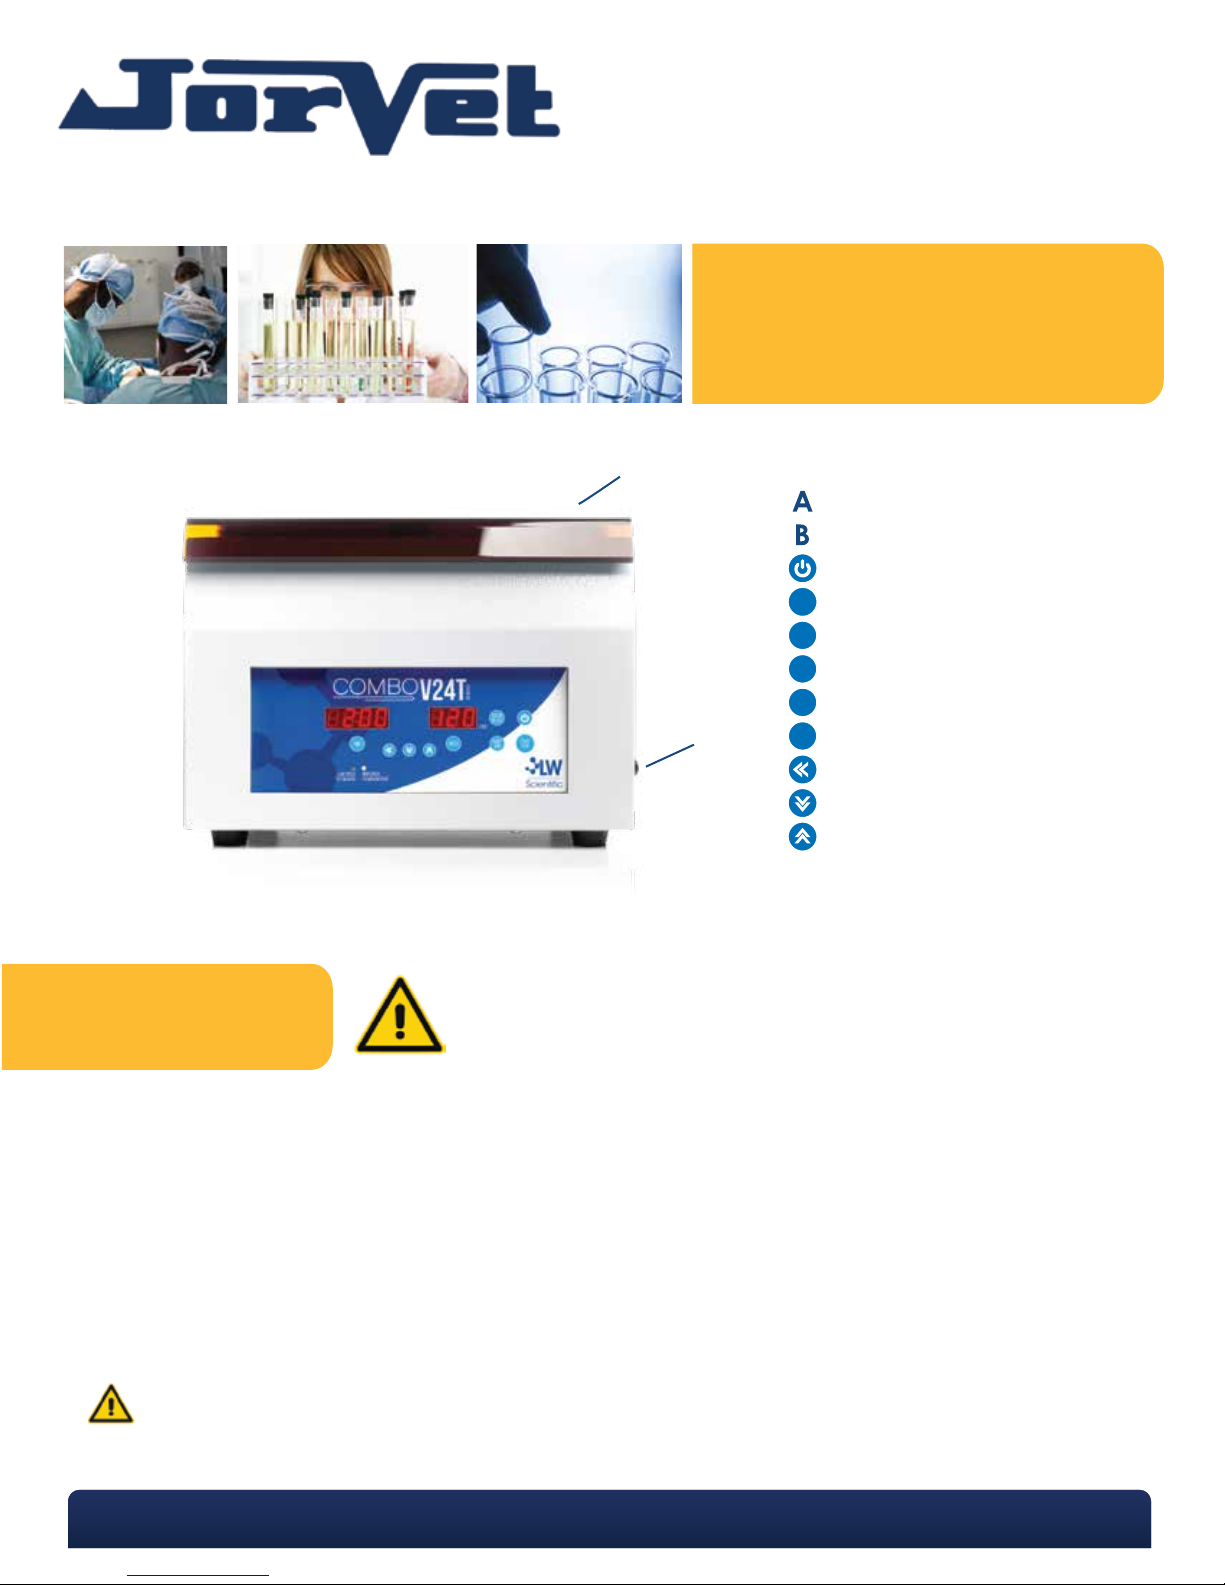
Reading Microhematocrits
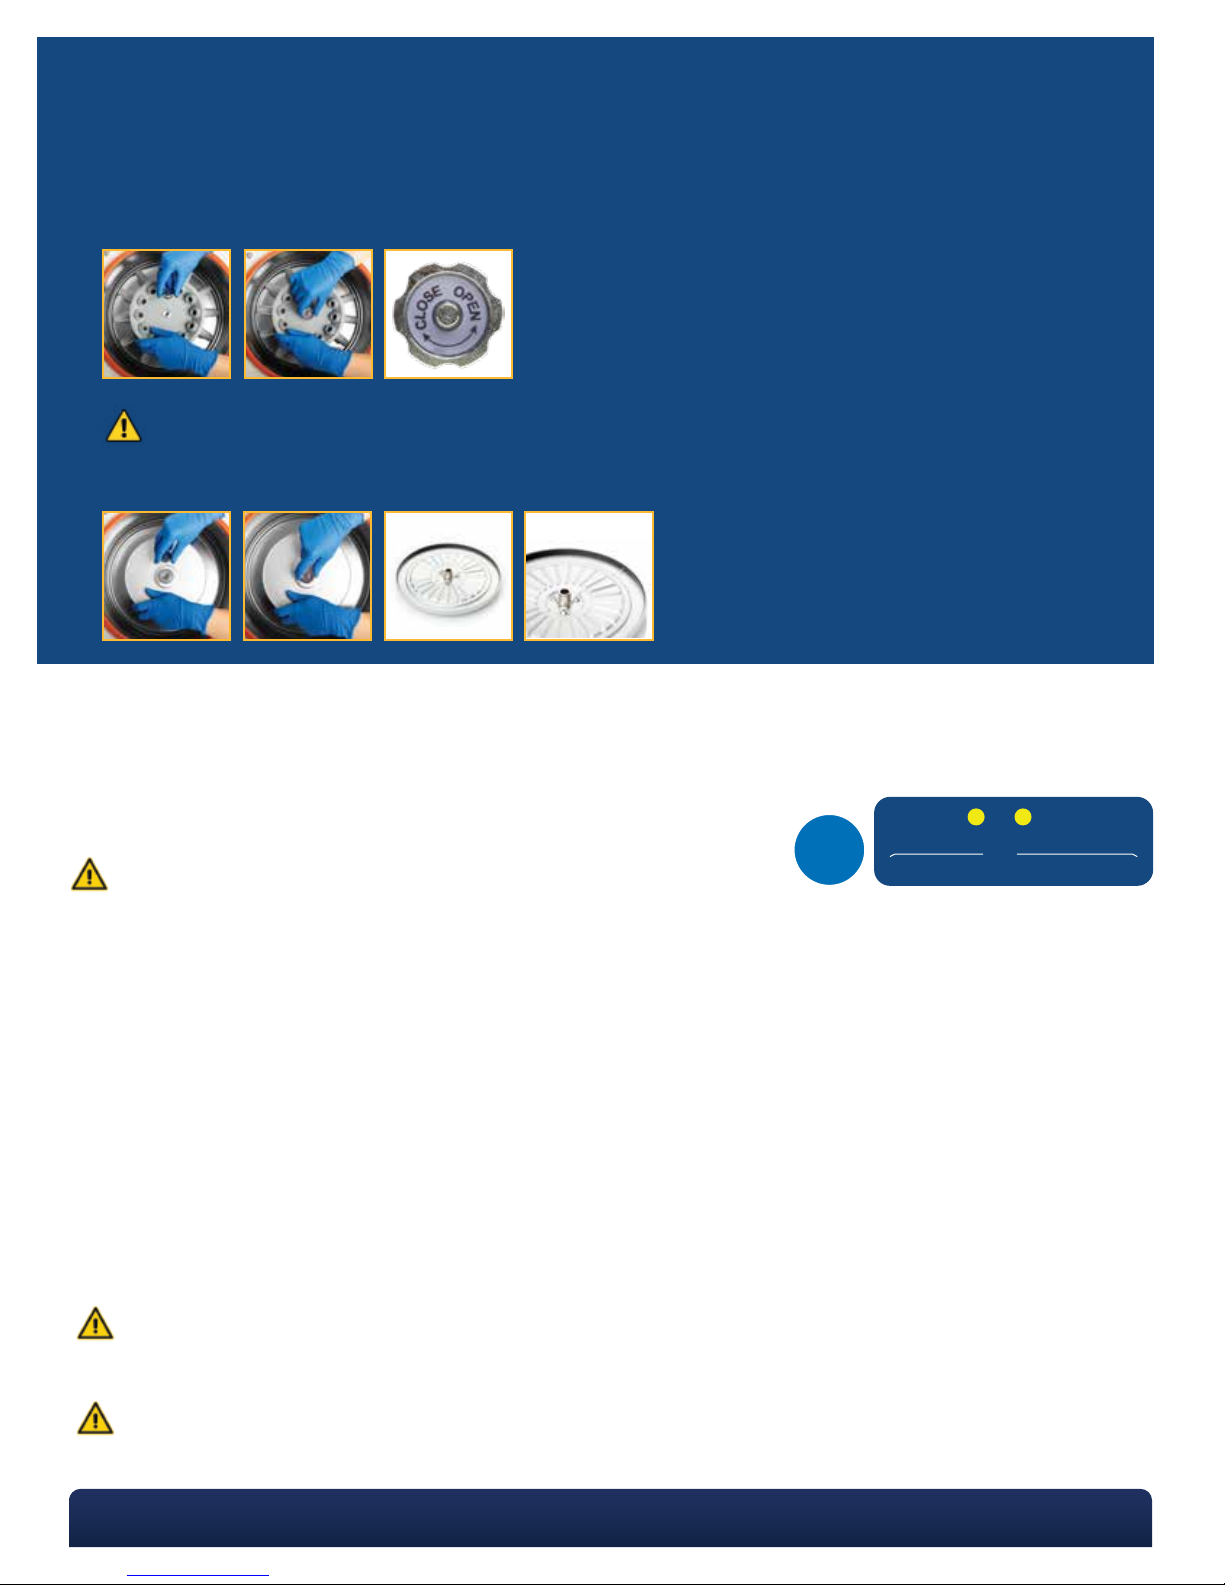
After the rotor has stopped, remove the cover plate by unscrewing the chrome thumbscrew and lifting the cover plate
straight up.
Place the reader disc over the hematocrit tubes, and adjust the disc until the 0% line is lined up with the bottom of the fluid
in the tube to be read.
While keeping the 0% line positioned at the bottom of the fluid, turn the disc until the 100% line aligns with the top of the
fluid.
Read the separation line in the middle for your microhematocrit results.
1
2
3
4
If you purchased a microhematocrit rotor, it includes a Reader Disc, which allows the tubes to be read directly from the rotor.
Care, Maintenance, Trouble-Shooting
Use only quality test tubes. Lower-quality plastic or glass tubes may fracture and release their contents into the tube cham-
ber.
Never force a tube into the tube shields. Some plastic conical test tubes are too large and should not be used.
Never hang a tube by its cap. Always make sure the tubes are supported by the bottom of the shield, or with a rubber cush-
ion.
Use only 75mm capillary tubes with the 24-place microhematocrit rotor.
Clean the inside of the centrifuge regularly. Always unplug electrical power before cleaning. Whenever there is a tube
breakage or a spill, it is recommended that the inside of the centrifuge be cleaned, and if possible, disinfected (do not
immerse the electrical components in any liquid).
Motor and electrical maintenance: The Combo V24T utilizes a brushed motor, which includes bearings that are permanent-
ly lubricated. Likewise, the electrical components were designed for high reliability and should not need regular service,
other than brush replacement. However, if repairs or brushes should be needed, please contact Jorgensen Laboratories.
If the centrifuge will no longer maintain speed, inspect and/or replace the brushes. The life of the brushes depends upon
several factors (speed, load, duty cycle, etc.). To ensure optimum performance, we recommend you check the motor
brushes every 6 months. This will help you recognize your typical wear pattern and ensure the motor brushes are serviced
properly.
When new, the carbon bar of the motor brushes measures approximately 1/2” in length (see image below). The brushes
wear and should be replaced when the carbon bar reaches 1/4” in length. Operating your centrifuge with a carbon bar
that has worn beyond this point can damage the centrifuge motor.
When inspecting/replacing brushes, we recommend you blow out the motor/brush area with canned air. Excessive dust,
dirt, and hair can interrupt the brush contact and decrease performance.
1
2
3
4
5
6
7
8If you have difficulty removing your rotor, you may have light oxidation on the motor shaft. To correct this we recommend
a clean—polish—clean procedure. Clean the motor shaft with alcohol. Polish it with 400-grit or finer sandpaper. Clean the
shaft again. Then, apply a small amount of household grease to the motor shaft. Do NOT use oil or spray lubricants such as
WD-40.
To prevent the reoccurrence of oxidation on the motor shaft, we recommend servicing it approximately once per week by
cleaning with alcohol and reapplying household grease. This should alleviate the issue.
Display comes on - Will not spin: Check to make certain the lid safety switch (near the back right hinge) is engaged. With
the power on and the timer set, depress the button with your finger. If the rotor spins, turn the safety switch button count-
er-clockwise to raise the height and allow it to contact the lid when it is closed.
No light - Not spinning: Confirm that your power source is working. Check the 6.3 amp fuse and replace if the filament is
broken. Speed slows down or stops...the brushes may need to be replaced on the motor after 1000 +/- hours of use if speeds
have decreased. Contact Jorgensen Laboratories to purchase new brushes (part #CMP-BRSH-PR77).
Because of the safety issues with high g-forces in a centrifuge, it is recommended that rotors be inspected every 6 months
for corrosion and fatigue. If there is any indication of wear, the rotor should be removed from service. Contact Jorgensen
Laboratories for return instructions, so the rotor can be evaluated by an Jorgensen Laboratories technician for repair or
replacement. It is also recommended that after 2 years of service rotors and tube shields* be returned to Jorgensen Labo-
ratories for inspection. Following these procedures will ensure safety of lab personnel as well as extend the life of the centri-
fuge.
NOTE: Plastic tube shields should be replaced at least once a year. Tube shields should be inspected once a month for wear
or damage. Tubes that are being used in high volume applications should be replaced every three months or sooner.
9

Speed Calibration
Your Combo V24T was pre-calibrated before it was shipped from Jorgensen Laboratories. If future calibration is needed, the
following procedure requires a hand-held tachometer and should only be performed by a qualified technician or the Jorgensen
Laboratories Service & Repair department. The bottom plate must be removed to access the calibration rheaostats.
With the Rotor Select on the front of the unit on high, the speed to 12,000 rpm, and a Microhematocrit rotor in place,
adjust the Vr-h rheostat on the circuit board up to 12000 RPMs.
With the Rotor Select on the front of the unit on low, the speed set to 4,000 rpm, and a tube rotor with tube shields in place,
adjust the VR-I rheostat on the circuit board up to 4,000 rpm.
1
2
Brush Replacement
Unplug the centrifuge, and turn it on its side.
Remove the feet and all Phillips head screws holding the metal base plate in place.
Using a flat head screwdriver, remove the two black caps on the bottom part of the motor.
Using your fingers, pull the brush out of the recessed hole that the black caps were removed from. The brushes consist of
springs with a graphite bar on them.
Place the new brushes in the recessed hole, and replace the black caps. Be careful not to overtighten. Black caps could
break. (See image).
Replace the metal plate and the feet.
Your Combo V24T is now ready to use.
1
2
3
4
5
6
7
Specifications
Max. Speed (HIGH):
Max. Speed (LOW):
Max. Volume:
Input Voltage:
Fuse:
Height:
Width:
Depth:
Weight:
12,000 RPM (+/- 600)
4,000 RPM (+/- 200)
24 3ml to 15ml test tubes
24 75mm capillary tubes
24 2ml microtubes
110v (220v available)
6.3 amp / 250 volt
8.7 inches
10.6 inches
12.5 inches
15.8 lbs.
WARNING: Failure to secure rotor or rotor lid could lead to personal injury or damage to the centrifuge.
CAUTION: If corrosion, scratches, or other abnormalities are found on rotor or tube shields, discontinue use and contact
our service center.
MKT-7.5.3-L-239.001 | Rev 0
Recommended Fluid Speeds & Times:
Blood (Serum) 4,000 rpms 7 to 10 minutes
Urine 1,700 rpms 5 to 10 minutes
Fecals 1,500 rpms 6 minutes
Microhematocrits 12,000 rpms 3 minutes
RPM
500
1,000
1,400
1,700
2,000
2,500
3,000
3,500
4,000
12,000
12,000
G-Force (RCF)
38
153
300
443
613
957
1,378
1,876
2,451
12,9000
14,500
Test Tube Rotor
Microtube Rotor
Microhematocrit Rotor
P. 800.525.5614 F. 970.663.5042 1450 Van Buren Ave Loveland Co 80538 USA
Other Jorvet Laboratory Equipment manuals
Popular Laboratory Equipment manuals by other brands

Witeg
Witeg WiseStir HS-A operating manual

Ameson
Ameson MINI AIR EASi 2 Handbook

Thermo Scientific
Thermo Scientific NanoDrop Lite Plus user guide

Coorstek Sensors
Coorstek Sensors Pegasor AQ Indoor user manual

All American
All American 75X Series operating instructions

Benchmark Scientific
Benchmark Scientific TC9639 user manual

BioLAB
BioLAB BCMI-505 Operation manual

VWR
VWR Mini Shaker instruction manual

CPAC
CPAC RapidHeat RH-N95 Operation manual

ThermoFisher Scientific
ThermoFisher Scientific Invitrogen HulaMixer 15920D user guide

Endress+Hauser
Endress+Hauser Liquiport 2010 CSP44 operating instructions

Thermo Scientific
Thermo Scientific Thermo Scientific HyPerforma DS 300 user guide