JOSEF DAVIDSSONS Viking 30 User manual

1

2
Dear Viking-customer,
Congratulations on your excellent choice of
Viking 30, Sweden’s most sold wood-burning cooker.
Your new Viking 30 with its timeless design is an efficient source
of heat with more and 100 years of experience and history to
rely upon. It is equipped with the latest techniques of
combustion to provide a maximum of heating capacity and a
minimum of environmental impact.
We rest assured that you will enjoy many warm and good days
with your Viking 30.
Please study these instructions carefully before starting the
installation and before lighting a fire for the first time.
Table of contents
General information 3
Instructions for use & Lighting instructions 4-5
Technical data 6
Installation distances 7
Convection, Air of combustion &
Fresh air connection 8
Exploded diagram/List of Spare Parts No 1 9
Exploded diagram/List of Spare Parts No 2 10
Assembly instructions for replacement of
Vermiculite bricks and the rear iron 11
Environment approval certificate, No 0386/04 12
Trouble shooting for solving combustion problems 13
Guarantee certificate 14
Contact us 15

3
In order to make the most out of your stove, please see to it that it is:
1. Properly installed
2. Properly fired
3. Properly maintained
Preparations
Manufacturer’s declaration
This product has been manufactured in
accordance with the documents that
constitute the basis for product certification
wherein the installation- and maintenance
instructions are integrated.
General information
VIKING 30 is manufactured of sturdy cast
iron. The fireplace is covered with vermiculite
bricks. There is an air gap left between the
vermiculite cover and the sturdy cast iron side
walls. The oval holes in the vermiculite bricks
ensure good ventilation and prevent the side
walls from being overheated. Thanks to the
heat storing materials, the heat retention lasts
for hours after the fire has gone out. The
fireplace door is provided with a window
made of hardened ceramic glass, through
which you have a good view of the fire. The
tight doors and the supply of specific air to
the fireplace provide for a maximum of
heating effect and a minimum of wood
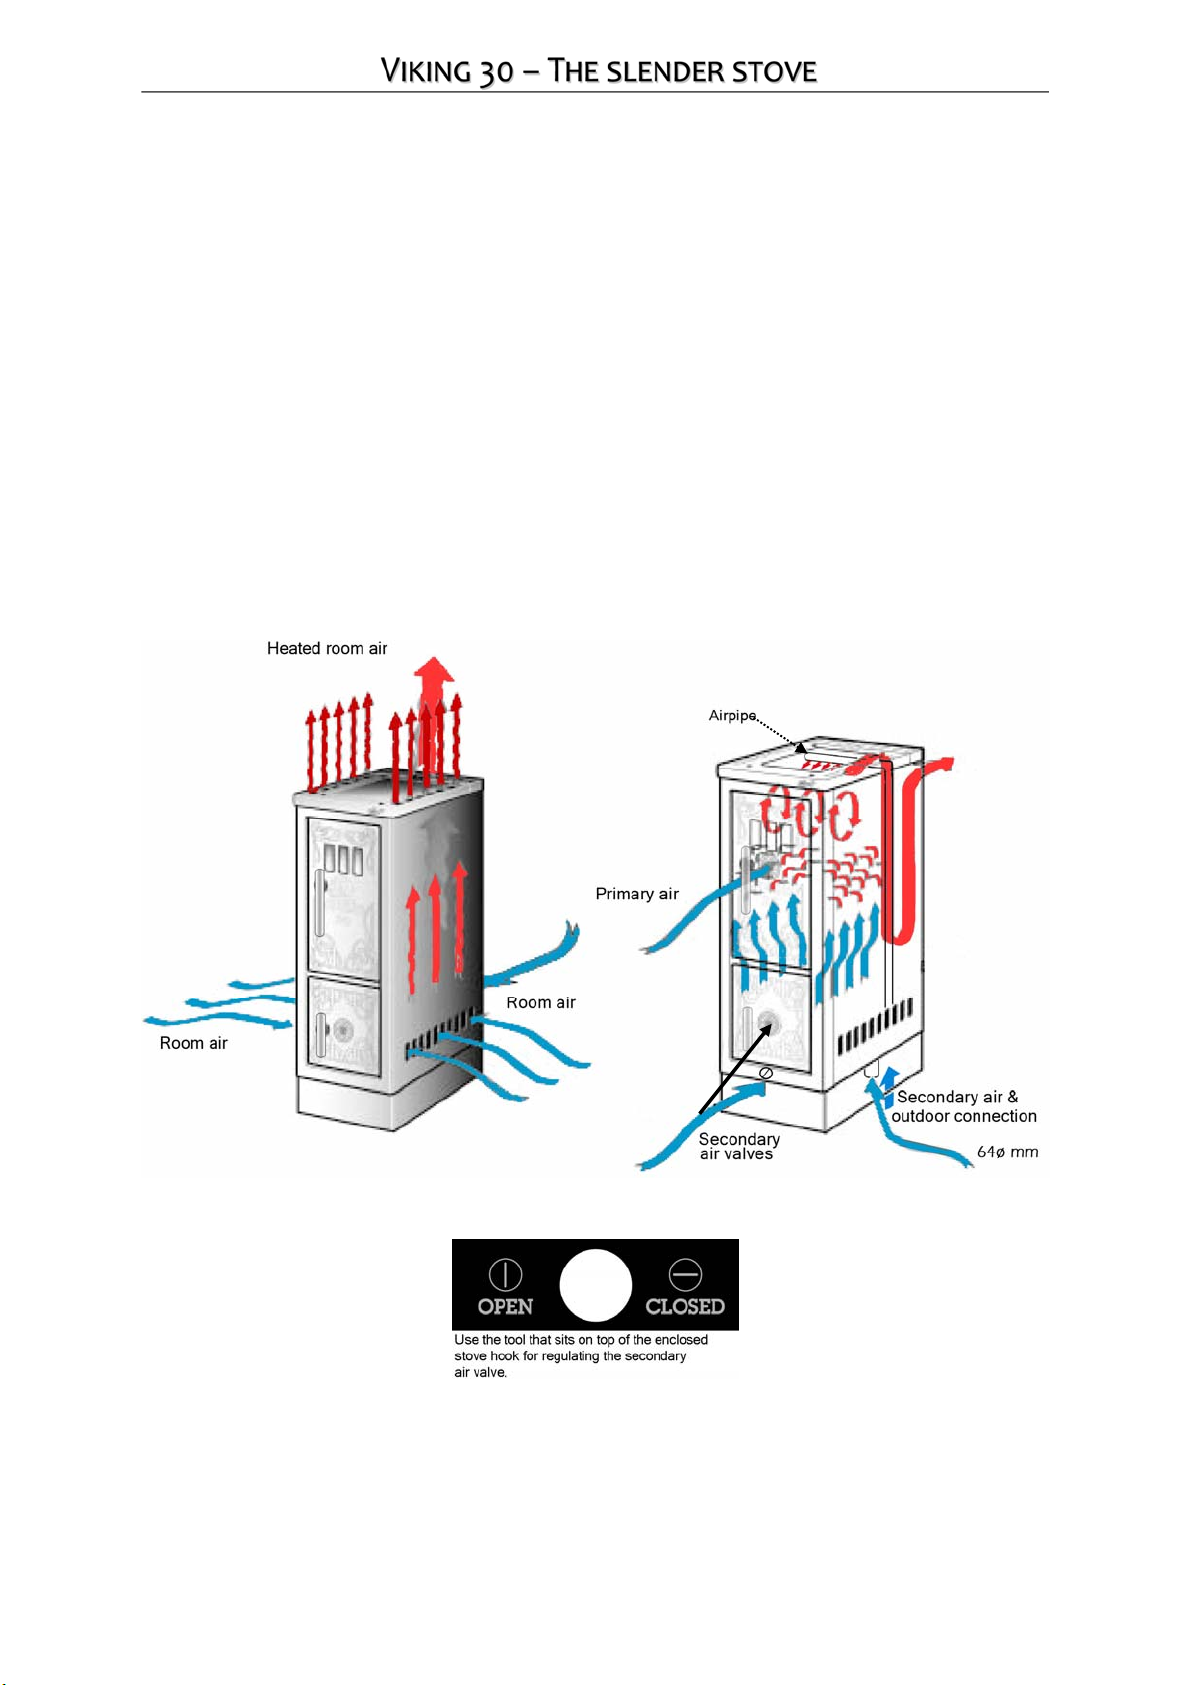
consumption. Secondary air is being added
to the fire through the holes in the
vermiculite side walls. By keeping the fireplace
door slightly open during the lighting
process, primary air is being added to the fire.
Viking 30 is equipped a removable cooking
plate. and with a fresh air inlet, handled with
a screw at the front below the bottom door.
It may be necessary for you to apply for
building permission from your local planning
authority before installing a stove or erecting
a chimney. Check with your planning
authority which regulations apply.
Before the stove is used, it must be inspected
by an authorized chimney sweep or relevant
authority to verify that the installation is
proper made according to the installation
instructions and that the connection to the
chimney is tight.
This inspection must be carried out before
using the stove disrespectable of if it refers to
a connection to an existing or to a new
chimney. Please read the installation
instructions thoroughly before starting the
installation work.
Chimney
The diameter of the chimney flue must be
minimum 125mm, and have a
recommended shortest length of minimum
3,5m, measured from the connection point at
the stove. The stove designed for rear
connection comes with a flue connection
tube to be connected to the brick-lined
chimney using mortar. Apply the enclosed
stove cement inside the flue connection and
also inside the stainless adaptor tube. Then
press the adaptor tube on to the connection
tube of the stove. The stove is now ready to
be connected to the brick-lined chimney.
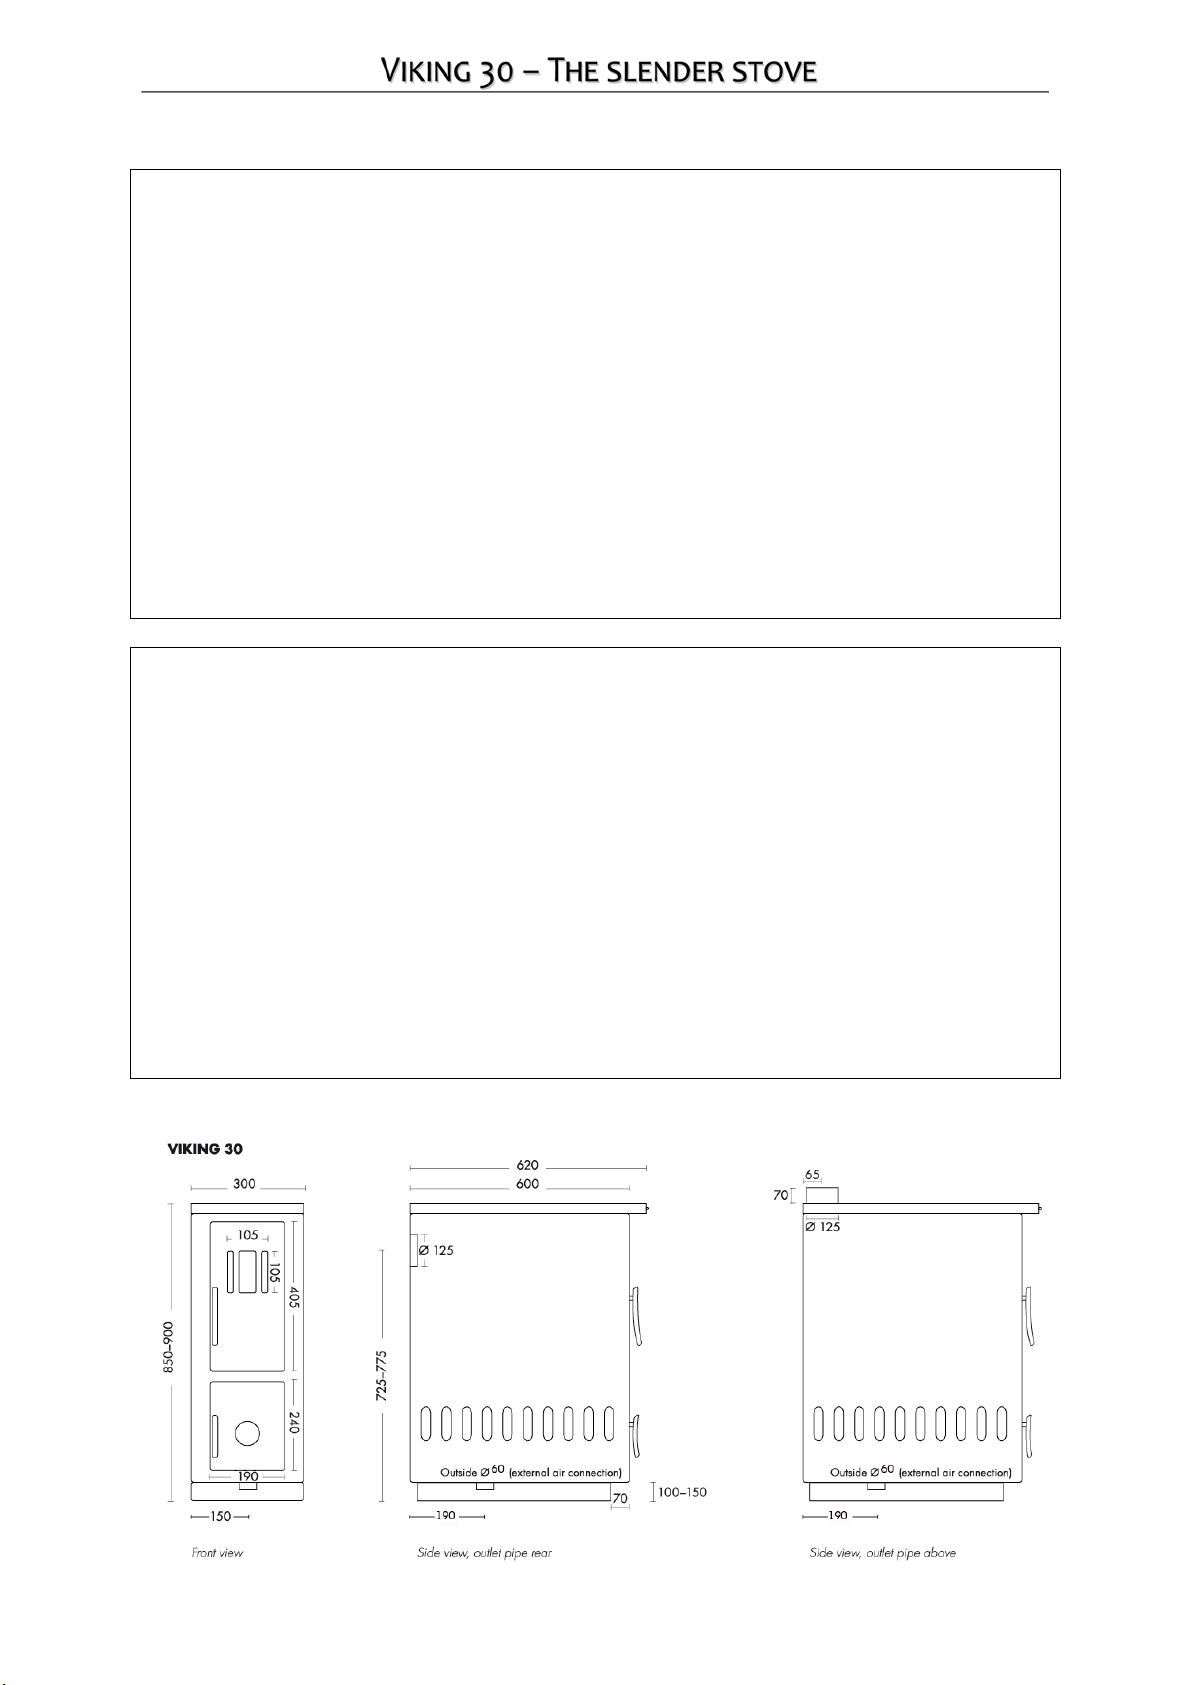
Distance to the wall
Please see the enclosed drawing on page 6.
Structural support
Normally, a kitchen stove and a (light-weight)
chimney can be located on standard
wooden floor joists in a single-family house.
Viking 30 is approved to be installed without
a floor plate underneath the stove itself, as
the base plate of Viking 30 forms a part of the
floor plate. The floor plate in front of the stove
must fit tight to the base/bottom part of the
stove and must cover a minimum of 30 cm in
front of the doors and a minimum of 10 cm
of each side. Floor plates are available as
accessories.
Air of combustion
The air consumed for the combustion,
approximately 10-20m³ per hour, is
considered to be negligible. In houses with
mechanical ventilation and in good isolated
houses, however, it is recommended to place
the stove close to a valve placed in an
external wall. The combustion air can also be
supplied from outside by connecting fresh air
supply on the rear side of the stove.
Please study these instructions carefully
before starting to use your stove and
remember that the installation has to be
approved by the chimney sweep before you
are allowed to use the stove.

4
Instructions for use and Lighting instructions
When lighting the fire in your new Viking 30 for the first couple of times, it is recommended to heat
cautiously. The heat-resisting paint will be more durable (it may produce a distinctive smell at the
beginning).
NB! The stove must not be used as a combustion furnace. Other kind of fuel than what is
recommended must not be used!
Fuel
The best heating value is achieved from chopped birch wood (generally from hardwood) that
burns smoother than softwood. If you burn oak- or beech wood or another kind of wood with a
high heating value you have to mix in some other kind of wood or you will risk to harm your
fireplace. Peat pellets are also suitable.
The wood must be dry, with a moisture content of about 15-20%, and have the right size with a
length of about 340 – 360mm and a diameter of 50 – 80mm. For a normal fire-burning a quantity
of about 2 kg/wood an hour would be appropriate. The stoking amount should not exceed 1,9kg.
Lighting
If the chimney is cold and the draught is poor, you can try lighting some newspapers/fire starting
cubes on top of the rear iron(number 15 on the exploded diagram, page 9) inside the fireplace.
Also, if the stove is new or not used for a time the, flue gas half(number 17 on the exploded
diagram, page 10) can be removed for a short period of time(Removing the flue gas half is only
possible when the stove designed for rear connection).
NB! Using the stove without the flue gas half will increase the flue gas temperature sturdily
How to start a fire:
Stoke No.1:
1. Place 3-4 pieces of smaller wood logs at the bottom of the fireplace. Put some newspapers
or preferably fire starting cubes (do not soot) on the top of the logs. Then place another 6-7
logs on top but see to it that the maximum quantity does not exceed 2.0 kg.
2. Keep the fireplace door slightly open and set the screw beneath the bottom door in
vertical position (open).
3. After about 5-6 minutes, close the primary air supply (the fireplace door) and let it lean just 2
mm.
4. Set the screw beneath the bottom door (secondary air supply) in the proper position to let
the fire burn with a yellowish flame.
Stoke No.2:
5. Use the poker to distribute the glowing embers over the grates.
6. Stoke with 2 logs weighing about 1.9 kg
7. Keep the fireplace door slightly open to let the logs catch the fire and then close the door.
8. Set the screw beneath the bottom door in its vertical position (open).
9. After about 5-6 minutes reduce the opening of the primary air supply (the sliding air valve
in the ash-pan) to about 1 mm and then after about further 2 minutes totally choke the
primary air supply.
10. Set the screw beneath the bottom door (secondary air) in the proper position to let the fire
burn with a yellowish flame.
Stoking the fire
Open the fireplace door slowly to avoid smoke to come out in the room. Then repeat the steps 5-
10 from chapter ”Lighting”.
NB! Never stoke with logs as long as there is a good fire in the wood stove.

5
Maintenance instructions
At the cleaning procedure, special attention must be paid to the underside of the cooking plate.
Shake and clean the grates from ashes regularly. Clean the top and the front of the stove by using a
brass brush or a Scotsbrite sponge. It is to be carried out when the stove is cold. Then apply the
enclosed stove blacking by using a sponge. After the blacking has dried, the stove can be polished
to have a bright finish.
NB! Should salted water boil over, this could cause corrosion which can make the top of the stove
rusty and porous. In this case the guarantee is void.
Good to know
When you light a fire for the first time, a distinctive smell may be produced. This smell comes
from oily coatings and from the paint. This smell will disappear once the wood stove has
been used for a couple of times.
Check at regular intervals the sealing strips at the doors. Replace when necessary.
Keep the fireplace, all air intakes and flue pipes clean. If you frequently light a fire, it may be
appropriate to have the chimney swept also in between the regular visits of the chimney
sweep.
After having fired the stove for some time there might be a deposit of soot on the glass
door. Your dealer has the proper agents to remove it.
If deposits of soot catch fire or if there is a risk that they will do so, close the combustion air
intake and the doors. If necessary, contact the fire brigade to put out the fire. After a soot or
chimney fire, the chimney should always be inspected by a chimney sweep.

6
Technical data
Triple values 8,3g/sek , 277°C , 10-12 Pa
Weight Kg 150
Size Height mm 850-900
Widthmm 300
Depthmm 600
Stove hob Width mm 300
Fireplace dimensions Height mm 300
Widthmm 190
Depthmm 390
Fireplace opening Height 175
Widthmm 150
Flue connection options Rear & top
See enclosed dimension sketches
Structure
Combustion chamber Cast iron/Vermiculite
Sheet metal cover DC01 2 mm SS 1142-32
Colour Thermal black
Glass Hardened ceramic glass, Withstands 700°
Approved to be connected to a chimney with
½ stones thickness (350°).
Option
Black Door handles
Floor plate, Black enamelled Dimensions in mm D:400, B500
Damper, Stainless, mechanical, bypasses the long flue gases and speeds up the draught in
the chimney/fireplace (only for rear connected Viking 30, retrofitable)
Detailed dimension print (mm)

7

8
This is how your Viking 30 works.
Convection air
In addition to the heat radiation, the
Viking 30 is equipped with convection
heating technique. This means that the
fresh ambient air is being sucked in
through the sides of the stove, gets
efficiently heated, and then pressed out
through the oval holes on the stove hob.
The result is that heated air flows out in
the room, the sides of the stove become
less heated and the stove heats a larger
area.
Air of combustion & Fresh air
Primary air is being supplied by keeping
the fireplace door slightly open during
the lighting and stoking processes.
Secondary air is being supplied through
the swivel air valve of the bottom door
and through the fresh air inlet placed
underneath Viking 30. The secondary air
is being heated in the stove and then
finds it way to the fire through the holes
in the vermiculite bricks in the fireplace.

9
List of Spare Parts No 1

10

11
Assembly instructions:
change of vermiculite bricks and rear iron.
NB! Never unscrew the stove hob/top part If you do so, the
guarantee becomes invalid.

12

13
Trouble Shooting
Problem
Reason How to solve the problem
Poor draught.
The connection to the brick
-
lined
chimney is not properly tightened.
A
sk the chimney sweep
to check that the
connection between stove and chimney is quite
tight.
The flue tube is full of soot or the Viking
Turbo is full of soot (the flue gas box
which prolongs the way of the flue gas
through the stove).
Clean flue tube and fireplace. Remove the soot
from the Turbo device.
The chimney is blocked, e.g. a bird nest
or like.
The chimney is too short or the cross-
sectional area is too large.
Contact the chimney sweep or your dealer for
further guidance.
The smoke turning device (the rear iron)
may be in wrong position.
Shake the rear iron with your hand to get it in its
proper position.
Negative pressure in the room.
Open a window or fix an external wall valve close
to the stove.
Moisture content is too high in
the
wood or the wood is too cold.
Only dry wood with a maximum moisture
content of 20 % is to be used. Keep the wood
indoors for 24 hours to adapt to the ambient
temperature before lighting it.
Too strong
draught.
If oven dried wood is being used, it
requires less air supply then normal
wood fuel.
Reduce the air supply by adjusting the swivel air
valve and the air valve on top of the stove.
The door seals are worn out.
Check the seal strips. If necessary, replace.
The chimney is too long.
Contact the chimney sweep or your dealer for
further guidance.
Soot deposit on
the glass in the
door
The moisture content of the wood is
too high.
Only dry wood with a maximum moisture
content of 20% is to be used.
The Fresh air valve (secondary air)
is too
closed.
Open the valve
to supply more air for the
combustion.
Glass turns white
Poor combustion. Follow the instructions for proper lighting in this
manual.
Incorrect firing (Use of waste wood,
chipboard, pressure-impregnated,
laminated plastic, Plywood or similar)
A
lways use clean and dry wood.
Smoke comes out
in the room when
opening the door
Pressure equalizing in the fireplace.
Open the air
-
valve about 1 minute before you
open the door – try always to open the door
slowly.
Poor chimney draugh
t
. Check that the height of the chimney. It may be
too short relatively to the required minimum
draught for the stove.
The door was opened when there is still
a fire burning in the fireplace.
Only open the door when the wood has turned
to glowing embers.
White smoke The combustion temperature is too low.
Increase the air supply by opening the swivel air
valve and the air valve on top of the stove.
The wood is too damp and contains
water vapour.
A
lways use clean and dry wood.
Black or greyish
black smoke
Insufficient combustion.
Increase the air supply by opening the swivel air
valve and the air valve on top of the stove..
Difficulties in starting the fire in most cases are the result of using wood with
too high humidity content, too poor draught or untight chimney connections.
There is a damper, mechanical, which bypasses the long flue gases and speeds up the
draught in the chimney/fireplace (retrofitable). Available as optional extra.

14

15
Contact us at:
Telephone: +46 371-200 01
Fax: +46 371-210 01
www.j-davidssons.se
J Davidssons Eftr. AB Phone E-mail FK-nr Swift
Box 42 +46 (0)371 -200 01 Info@j-davidssons .se SE556194 -085801 NDEASESS
330 21 Reftele Fax Homepage Bank IBAN SE 77
Sweden +46 (0)371 -210 01 www.j-davidssons.se Nordea
3000 0000 0421
7130 0651
Table of contents
Other JOSEF DAVIDSSONS Cooker manuals
Popular Cooker manuals by other brands

Parkinson Cowan
Parkinson Cowan SIG 500 Owner's handbook

Zanussi Electrolux
Zanussi Electrolux ZCG 7550 Instruction booklet

Dometic
Dometic CU333 Installation use and service manual

Bartscher
Bartscher IK3342 manual

Range Master
Range Master Nexus SE 110 Induction user guide

BLACK DECKER
BLACK DECKER RCP516 use and care manual