Josoo Electric Appliance ZS-B145 User manual

Built in & Free standing wine cooler
Model: ZS-B145

●Wine Cooler Package Contents
1pc Instruction Manual
4pcs Standard Shelves
● Important Safety Instructions
WARNING: To reduce the risk of fire, electric shock or personal injury,
unplug or disconnect the appliance from the power supply before
servicing.
Read all instructions before using the wine cooler.
DANGER: Risk of child becoming trapped in new wine cooler, old wine
cooler/refrigeration unit, or large boxes. Junked or abandoned appliances,
boxes and other containers are still dangerous, even if they will just in the
garage for a few days.
Never allow children to operate, play with, crawl inside the appliance.
Never clean appliance parts with flammable fluids. The fumes can create a
fire hazard or explosion.
Do not store in the vicinity of any other appliance. Do not store near
gasoline or any other flammable vapors. The fumes can create a fire
hazard or explosion.
●Proper Disposal
An empty cooler is an extremely dangerous attraction to children. If you are
getting rid of your old cooler, pls follow the instructions in the Child Entrapment
Warning.
●Child Entrapment Warning
Risk of child entrapment. Before you throw away your old cooler or freezer:
1. Take of the doors.
2. Leave the shelves in place so that children may not easily climb inside.
●Before Using Your Wine Cooler

Remove the exterior and interior packaging.
Before connecting the wine cooler to power source, let it stand upright for
approximately 2 hours. This will reduce the possibility of a malfunction in
the cooling system from handling during transportation.
Clean the interior surface with lukewarm water using a soft cloth.
●Product structure
①Cabinet
②Glass door
③handle
④Shelf
⑤Control display
⑥Metal cover
⑦Adjustable leg
⑧Refrigeration position

⑨Cold air circulation position
⑩LED light
●Handle Installation
①Open the door seal near the handle mounting hole
②Take out the crosshead screw in the accessory bag and insert it into the
reserved handle mounting hole in the door sealing groove of the door body.
③Align the mounting hole on the handle with the screw, tighten the screw
with a Phillips screwdriver, and fix the handle. Note that the upper and lower
fixing holes of the handle need to be tightened with screws.
④After checking that there is no looseness of the handle after installation,
install the pulled out door seal back into the door seal groove, and arrange it
evenly.
●Reversible door

Change the door opening direction: This product can change the door opening
direction according to the actual installation needs. The door hinge of the
product is on the right side. If you need to change the door direction, please
follow the steps below.
1. Tilt the product back to a certain angle, and use a Phillips screwdriver to
remove the two screws (1) that fix and adjust the lower hinge (3). see picture 1
2 . Then grasp the door body (5), and slowly move the lower right door hinge (2)
from the upper right door hinge (4) to the lower front. Place it carefully on a
protective cushion. See picture 2
3 Remove the upper right door hinge (4) and the lower right door hinge (2)

from the box, pack and store them for later use. See figure 3
4. Install the upper left door hinge (7) and the lower left door hinge (8) in the
box accessory bag at the corresponding position on the left side of the box
body (6). See picture 4
5 . Finally, turn the door back 180 degrees, install it in the reverse order of
removing the door, adjust and level the door, and complete the replacement of
the door opening direction.
●HOW TO BUILT IN
●Operation For Temperature
Temperature Range: 5-12℃, 12-20℃
41-54℉, 54-68℉

Operation Panel
The setting should be operate in the control panel.
1. Functions of each key in the operation panel.
①light switch key
Touch this button to control the LED light switch ON/ OFF.
②℃/℉Switch key
Touch this button to control switch ℃/℉
③Temperature setting key
The temperature setting must be pressed first to set. Press the temperature
setting button once, the upper room temperature display digital tube flashes,
indicating that the upper room temperature can be changed by pressing the
temperature setting up or down button to change the upper room temperature
setting; press it again, the lower room temperature display digital tube Flashing
(the upper room temperature display digital tube stops flashing), indicating that
the lower room temperature can be changed by pressing the temperature
setting up or down button to change the lower room temperature setting;
pressing this button again, the upper room and lower room temperature
display The nixie tube stops flashing and resumes to display the temperature
in the upper and lower chambers respectively. When the upper room or lower
room temperature is set, and no button is pressed, it will automatically return to
the status of displaying the temperature in the upper room and the lower room
respectively after 5 seconds.
④Upper zone temperature setting / temperature display
The LED display will show the upper zone setting temperature when “flash”;
Display will show the temperature for the actual temperature of the cabinet
when normal.

⑤
Temperature measurement unit display
⑥Lower zone temperature setting / temperature display
The LED display will show the lower zone setting temperature when “flash”;
Display will show the temperature for the actual temperature of the cabinet
when normal.
⑦Set temperature up key.
When the upper zone temperature setting / temperature display or the lower
zone temperature setting / temperature display is flashing, press this key to
change the set temperature of the upper or lower zone. Press it, the
temperature will rise by 1℃or 1℉, until the highest temperature setting in the
box;
⑧Set temperature down key.
When the upper zone temperature setting / temperature display or the lower
zone temperature setting / temperature display is flashing, press this key to
change the set temperature of the upper or lower zone. Press it, the
temperature will be down by 1℃or 1℉, until the lowest temperature setting in
the box
⑨Power
To control the appliance turn on/off. To turn off the appliance, touch the
button and hold for at least 5 seconds. Press again, turn on the
appliance. The LED readout will show the original temperature set previously
when restart the appliance or reconnect after power cuts .
⑩Child lock
Press and for 3 seconds, all buttons will be locked. Unlocked if
press the two buttons for 3 seconds again.
2. There is automatic storage memory when power off in this wine cooler, that
means the setting temperature is memorized automatically even in power off,
so the setting temperature is the same as last setting when the wine cooler is

running again.
3. Defrosting
The unit defrosts automatically.
The evaporator behind the rear wall of the unit defrosts automatically. The
condensate collects in the drainage channel behind the rear wall of the unit,
and flows through the drainage hole into the drip tray by the compressor where
it evaporates. When the wine cooler run for some time, the wine cooler will
enter to defrosting, the compressor stop running and the fan will keep running.
The temperature will up to about 5℃when defrosting, then keep on running
normally; It takes more time for the temperature to come up to 5℃when the
setting temperature is low(for example the setting temperature is -2℃), and
there are full of wines in the cabinet, and this is not a breakdown.
Points Of Intentions
1. The vent grill outside the cabinet is the heat dissipation way of cooling
system in wine cooler, please prevent anything from covering or blocking, or it
will make the wine cooler overheating and cause damage to product.
2. Please prevent blocking cooling fan, or it will make the temperature too high
or uneven in the cabinet.
3. Please close the door tightly, it will cause the refrigerating inefficiency,
overflow in the cabinet, or unnormal temperature once the door is not closed
tightly for a long time.
4. Please shut off the power, and open the door to let the cabinet dry enough if
you don’t use the wine cooler for a long time.
5. This product is not suitable for areas with an altitude of 2000 meters.
●Product Parameters
1. Voltage: 220-240V~ / 50Hz
2. Rated power: 65W
3. Climate type: ST/SN/N
4. Net capacity:129L
5. Rated current: 0.7A
6. Foaming: cyclopentane
7. Refrigerant: R600a/32g
8. Product size ( WxDxH) : 595mm x 575mm x 820mm
●Layout And Storage
Your cabinet was designed to store a maximum number of bottles securely.
We recommend that you observe the below tips to optimize loading.
Remove tape from shelves once unit is stable and ready for storage.

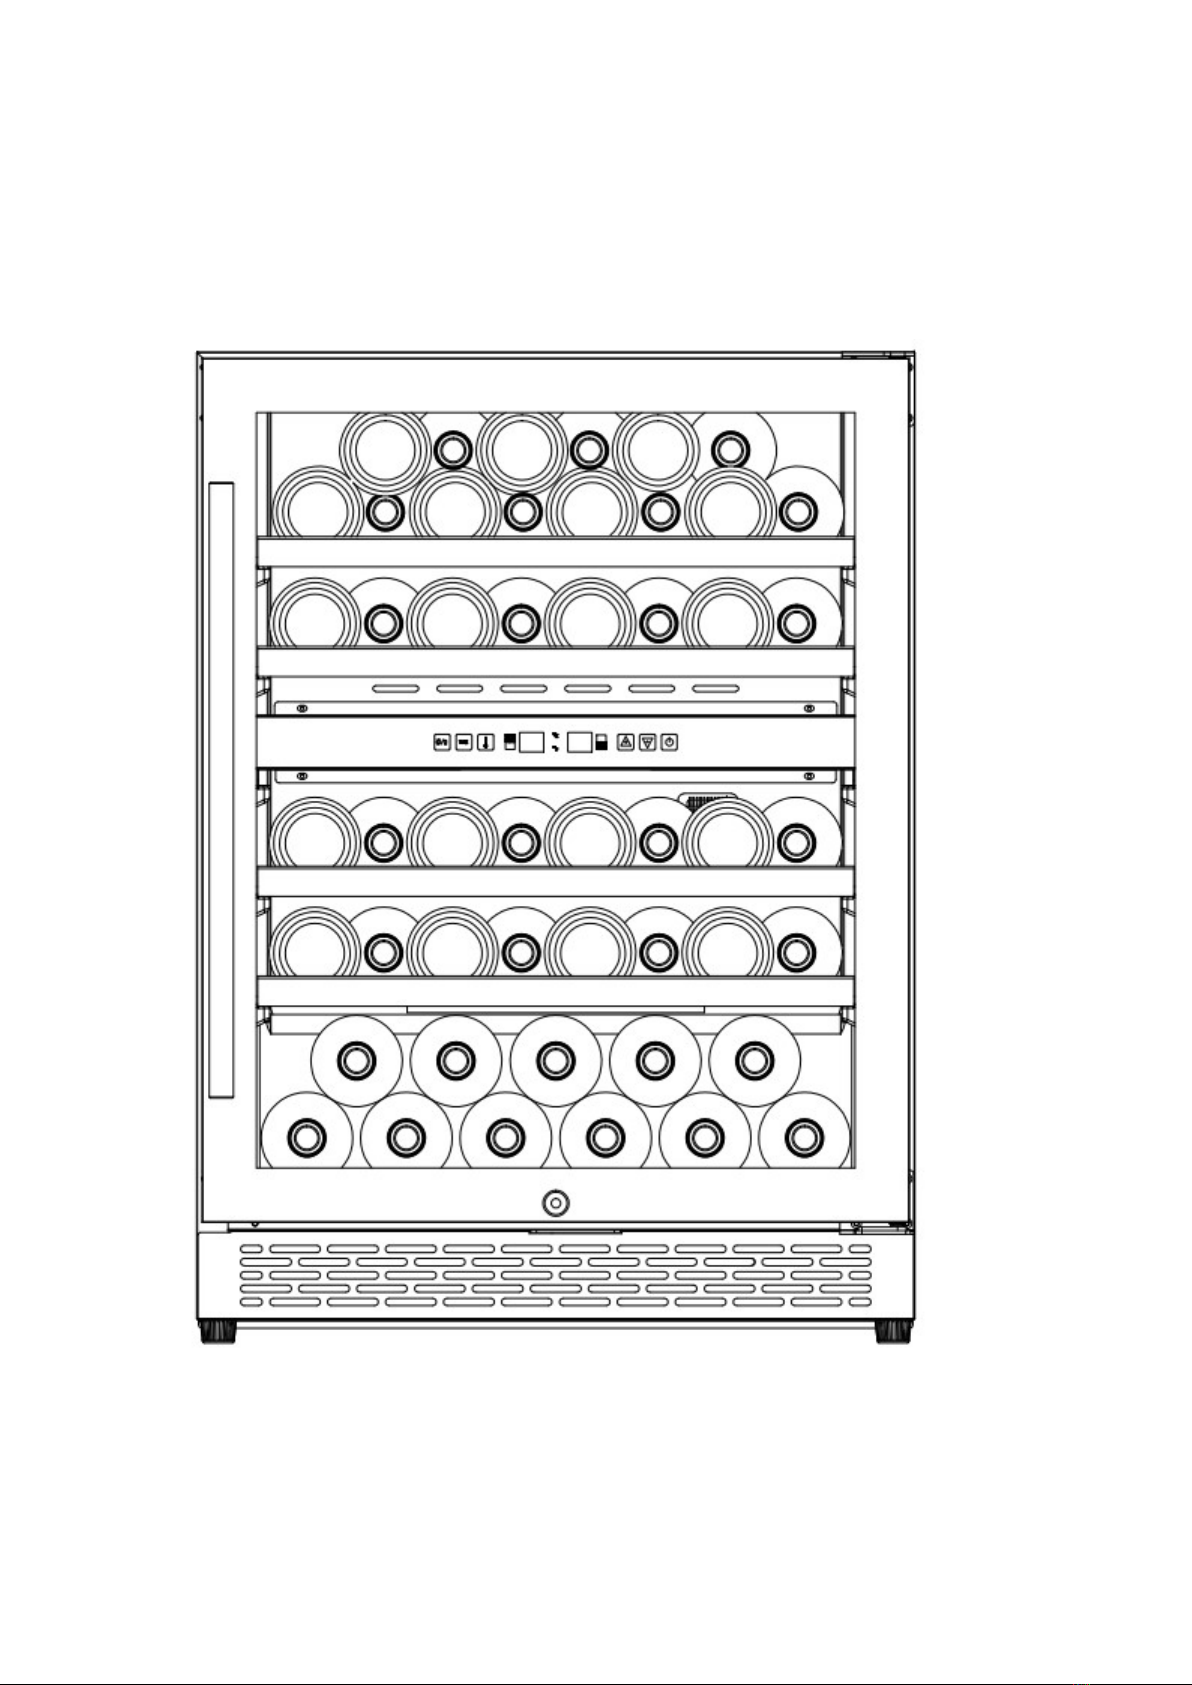
Disperse the bottles evenly to avoid concentrating weight in one place.
Bottles must not touch either the back of the cabinet.
Make sure that the bottles are not all grouped together either at the top or
bottom of the cabinet.
Only pull out one shelf at a time. Never attempt to pull more than one.
Maximum weight capacity per shelf is 55lbs
You can crease your wine cooler storage capacity by removing shelves and
stacking bottles on top of one another. Do not stack more than 3 rows of
bottles per shelf.
●Care Maintenance
Cleaning your wine cooler
Turn off the power, unplug the appliance, and remove all items including
shelves and rack.
Wash the inside surfaces with a warm water and baking soda solution. The
solution should be about 2 tablespoons of baking soda to a pint of water.
Wash the shelves with a mild detergent solution.
Wring excess water out of the sponge or cloth when cleaning any area of
the controls.
Wash the outside cabinet with warm water and mild liquid detergent. Rinse
well and wipe dry with a clean soft cloth.
Power Failure
Most power failures are corrected within a few hours should not affect the
temperature of your appliance if you minimize the number of times the door
is opened. If the power is going to be off for a longer period of time, you
need to take to take other measures to protect your contents.
If the unit is unplugged, loses power,or is turned off you must wait 3to 5
minutes before restarting. Attempting to restart the wine cooler before this
time has elapsed may prevent the wine cooler from starting..
Vacation Time
Short holidays: You may leave the Wine Cooler powered on and
unattended for absences of less than three weeks.
Long absences: If the appliance will not be used for several months,
remove all items, turn off the appliance and unplug. Clean and dry the
interior thoroughly. To prevent odour and mold growth, leave the door open
slightly : blocking it open if necessary.
Moving Your Wine Cooler

Remove all items.
Securely tape down all loose items ( shelves) inside your appliance.
Turn the adjustable leg up to the base to avoid damage.
Tape the door shut.
Be sure the appliance stays secure in the upright position during
transportation. Also protect outside of appliance with a blanket, or similar
item.
Energy Saving Tips
The Wine Cooler should be located in the coolest area of the room, away
from heat producing appliances, and out of the direct sunlight.
Ensure that the unit is adequately ventilated. Never cover air vents.
Only open the door for as long as necessary.
●Troubleshooting Guide
Problems with Your Wine Cooler
Many common issues with your wine cooler can be solved very easily. Try the
troubleshooting tips below should you experience any problems.
PROBLEM POSSIBLE CAUSE
Wine Cooler does not
operate.
Not plugged in.
The appliance is turned off.
The circuit breaker tripped or a blown fuse.
Wine Cooler is not cold
enough.
Check the temperature control setting.
External environment may require a higher
setting.
The door is opened too often.
The door is not closed completely.
The door gasket does not seal properly
Turns on and off frequently The room temperature is hotter than normal.
A large amount of contents has been added to
the Wine Cooler.
The door is open too often
The door is not closed completely.
The temperature control is not set correctly.
The door gasket does not seal properly.
The light does not work. Not plugged in.
The circuit breaker tripped or a blown fuse.
The light switch is “OFF”.
Vibrations Check to assure that the Wine Cooler is level.

The door will not close
properly.
The Wine Cooler is not level.
The door was reversed and not properly
installed.
The gasket is dirty.
The shelves are out of position.
The Wine Cooler seems to
make too much noise
The rattling noise may come from the flow of
the refrigerant, which is normal. As each cycle
ends, you may hear gurgling sounds caused
by the flow of refrigerant in your Wine Cooler.
Contraction and expansion of the inside walls
may cause popping and crackling noises.
The Wine Cooler is not level.
Sensor Trouble shooting
Fault situation Reason Solution
Fault code E1 short circuit
Please contact customer service
before returing to our service center
for inspection/repair.
Fault code E0 open circuit
Please contact customer service
before returing to our service center
for inspection/repair
Fault code E5 Communication failure
display
Please contact customer service
before returing to our service center
for inspection/repair
●Warranty
This product has been manufactured by Zhongshan Josoo Electric Appliance
Co.,Ltd.
The warranty does not apply to damage resulting from abuse, accident, natural
disaster, loss of electrical power to the product for any reason, alteration,
outdoor use, improper installation, and improper operation, repair or service of
the product by anyone other than an authorized by us, service agency or
representative.
Table of contents
Other Josoo Electric Appliance Kitchen Appliance manuals