Jotagas JEP19 User manual

INSTRUCTION MANUAL
MODE D’EMPLOI
MANUAL DE INSTRUCCIONES
MOTORCYCLES & E-BIKES
SAFETY INFORMATION

JEB19 SAFETY INFORMATION Ed.: 2019-R0
2
This user documentation contains WARNINGS, CAUTIONS and INFORMATION on the safe
use of the product. Refer to the definitions below.
WARNINGS
WARNINGS indicates dangerous situations that, if not avoided, could
result in death or serious injury. It is very important not to proceed until
you fulfill and understand all the established conditions.
CAUTION
CAUTION Indicates dangerous situations that, if not avoided, may
cause minor or moderate injuries. It is very important not to proceed
until you fulfill and understand all the established conditions.
INFORMATION
INFORMATION indicates instructions which must be followed to
avoid damage to your bike or other equipment.
READ CAREFULLY THE CONTENT OF THIS MANUAL
FAILURE TO COMPLY WITH THE INSTRUCTIONS IN THIS MANUAL CAN RESULT IN AN INCORRECT
OPERATION OF THE BICYCLE THAT MAY HAVE AS A CONSEQUENCE AN ACCIDENT OF SERIOUS
PERSONAL INJURY
THE USE OF THE BICYCLE WILL BE LIMITED TO THE TYPE OF SERVICE INDICATED BY THE MANUFACTURER.
IMPROPER USE OR DRIVING MAY ENDANGER ITS INTEGRITY OR THAT OF THIRD PARTIES ALWAYS USE AN
APPROVED PROTECTIVE HELMET
WEAR SUITABLE CLOTHING FOR RIDING A BIKE
IN STRETCHES OF LOW VISIBILITY OR WITH INSUFFICIENT NATURAL ILLUMINATION USE LIGHTS AND
REFLECTIVE BANDS
DO NOT EXCEED THE PERMISSIBLE TOTAL WEIGHT OF THE BIKE
THE MODIFICATION OF THE FRAME, SUSPENSION, ENGINE, BATTERY OR SOME OTHER COMPONENT, IN
ADDITION TO THE HIGH RISK THAT CAUSES SAFETY, IT LEAVES THE WARRANTY OUT OF SERVICE
THE MECHANICAL OR ELECTRONIC HANDLING OF ANY COMPONENT OF THE BICYCLE WILL EXEMPT ANY
RESPONSIBILITY TO JTG BIKES

JEB19 SAFETY INFORMATION Ed.: 2019-R0
3
INDEX
1. General information 4
2. Bike parts 6
3. Technical characteristics of the bicycle 7
4. Adjustments, revision and maintenance 9
5. Screen and motor settings 17
6. Preparations for use 21
7. Maintenance program 23
8. User safety 25
9. Tips and recommendations 28
10. Battery charge 30
11. Manufacturer’s guarantee 31
12. Declaration of conformity of the manufacturer 33

JEB19 SAFETY INFORMATION Ed.: 2019-R0
4
1. GENERAL INFORMATION
MANUFACTURER INFORMATION
We wish to greet you and thank you for choosing the JEPAGAS brand e-montanbike
JEP19.
This User’s Manual contains all the necessary information for the correct use of the
bicycle and its maintenance. If you follow the instructions in this manual, you can use
the vehicle safely and guarantee its reliability, obtaining the maximum performance from
the bicycle.
Read this Manual carefully before getting on the bicycle, and keep it in a safe place for
future reference. If you have any questions about it, ask your JOTAGAS distributor.
The parents or guardians responsible for minors who use the bicycle must pay special
attention to the contents of this Manual as well as the use of the bicycle. The continuous
evolution of the JOTAGAS bicycles to offer its customers a product with higher performance
and the best materials, may involve a change in some of the components of the bicycle
without prior notice to its Customers. However, the traceability of the bicycle and its
original components is guaranteed by its serial number indicated on the manufacturer’s
plate.
For more information about our products, we provide you with our data:
Requirement Content
Name and address of the manufacturer OFF ROAD SOLUTIONS SL
17162 BESCANÓ-Girona (Spain)
Tel.: 0034 679 92 83 61
www.jotagas.com
Technical service JOTAGAS
17162 BESCANÓ-Girona (Spain)
Tel.: 0034 679 92 83 61
www.jotagas.com
Place and date of the EC declaration BESCANÓ-Girona (Spain)
04/07/2018

JEB19 SAFETY INFORMATION Ed.: 2019-R0
5
CONFORMITY WITH THE CE
This product complies with RD 339/2014 and the European Directive that are
mentioned in the table through compliance with the corresponding harmonized
standards. JOTAGAS has a copy of this declaration of compliance that is attached in
this manual.
Directive Title
2001/95/CE Directive on general product safety
INTERNATIONAL HARMONIZED STANDARDS
UNE - EN 15194 + A1:2012
UNE - EN ISO 4210 parts 1 - 9:2014 - 2015
SIZE AND MAXIMUM WEIGHT AUTHORIZED
Model Size WHEEL PMA (kg)
JEB19
M27.5” 100
L 100
M29” 100
L 100

JEB19 SAFETY INFORMATION Ed.: 2019-R0
6
2. BIKE PARTS
1 Frame 21 Back brake
2 Front fork 22 Pneumatic
3 Swingarm 23 Rim
4 Suspension rod 24 Radio
5 Rear shock absorber 25 Bushing
6 Seat 26 Fastener
7 Seatpost 27 Electric motor
8 Seat block 28 Batery
9 Power meter 29 Screen
10 Handlebar 30 Charger
11 Brake lever
12 Gear shift control
13 Game direction
14 Plate
15 Connecting rod
16 Pedal
17 Cassette
18 Chain
19 Rear derailleur
20 Front brake

JEB19 SAFETY INFORMATION Ed.: 2019-R0
7
3. BIKE TECHNICAL CHARACTERISTICS
New design
Nuevo diseño
High quality components
Componentes de alta calidad
Service
Servicio

JEB19 SAFETY INFORMATION Ed.: 2019-R0
8
Brand
Jotagas
Frame Aluminio /
Aluminium
Rims 27,5”
29”
Marca Chasis Llantas
Model
JEB19
Front suspension 180 mm - Oil /
Air Control
Front tire 27,5” x 2.50
29” x 2.50
Modelo Suspensión
delantera
Neumático
delantero
Power 250 W
(Adjustable
9 s.)
Shock absorber 165 mm - Oil /
Air Control
Rear tire 27,5” x 2.50
29” x 2.50
Potencia Amortiguador
trasero
Neumático
trasero
Engine Brushless
36 V
Transmission Por cadena /
Chain
Handlebar
Variable section
Motor Transmisión Manillar
Batery
626 W
Secondary
transmission 11 Speeds
Seat Comfort / Hight
comfort
Batería Transmisión
secundaria Sillín
Display
Multifuntion
Front brake
Hydraulic - system
Seatpost Regulable /
Adjustable
Display Freno delantero Tija sillín
Charge time
5 - 6 H
Rear brake
Hydraulic - system
Pedals Aluminio /
Aluminium
Tiempo carga Freno trasero Pedales
Range
100 Kmts
Front brake disc
Disc 203 mm
Wheel base
1.210 mm
Autonomía Disco freno
delantero
Distancia entre
ejes
Max. Speed
25 Kmts / h
Rear brake disc
Disc 180 mm
Weight
26 Kg
Vel. Máxima Disco freno
trasero Peso

JEB19 SAFETY INFORMATION Ed.: 2019-R0
9
4. ADJUSTMENTS, REVISION AND MAINTENANCE
In order to avoid injuries, accidents, and optimize the physical effort in the use of the bicycle,
it is very important that you strictly follow the indications that we detail in the points that we
indicate below.
SEAT HEIGHT ADJUSTMENT
The height of the seat will be obtained indirectly by a simple calculation.
With the clamping flange of the tight tube seat and the trim seat in a horizontal position.
Measure the distance from the center of the seat to the center of the bottom bracket
screw.
Multiply the measure obtained by the coefficient 0,885. The result will correspond to the
maximum recommended height of the seat.
It is very important for your safety that you check that the mark
indicating the maximum height of the seatpost does not exceed the
chassis housing. If this happens it is very possible that the size of the
box is not appropriate for your height.
FIXING THE SEAT AND YOUR SEATPOST
Make sure that both the clamping flange of the seatpost and the seat
clamp to the seatpost are tight, and that there is no radial, axial or
rotational movement of the seatpost or seat.
HANDLEBAR ADJUSTMENT
The measurement on the handlebar will be made on the axis of the handles.
The values indicated in the table are intended to adjust the handlebar in a comfortable
position that prevents pain or injury:
Seat height Difference in height with the handlebar
65 - 68 cm 5 - 6 cm
69 - 72 cm 6 - 7 cm
73 - 76 cm 7 - 8 cm
77 - 79 cm 8 - 9 cm
80 - 82 cm 9 - 10 cm

JEB19 SAFETY INFORMATION Ed.: 2019-R0
10
HANDLEBAR ALIGNMENT WITH THE FRONT WHEEL
Check the absence of play in the union between the power and the handlebar, and the
steering axle and the power, trying to move it with respect to the front wheel blocking
the wheel with both legs.
Check that all screws are tightened with the tightening torques indicated in the table in
this manual.
FRONT SUSPENSION ADJUSTMENT
The front suspension, manufactured by JOTAGAS, is equipped with an inverted fork oil
pneumatic, adjustable in load and preload, and with hydraulic expansion regulation.
Preload
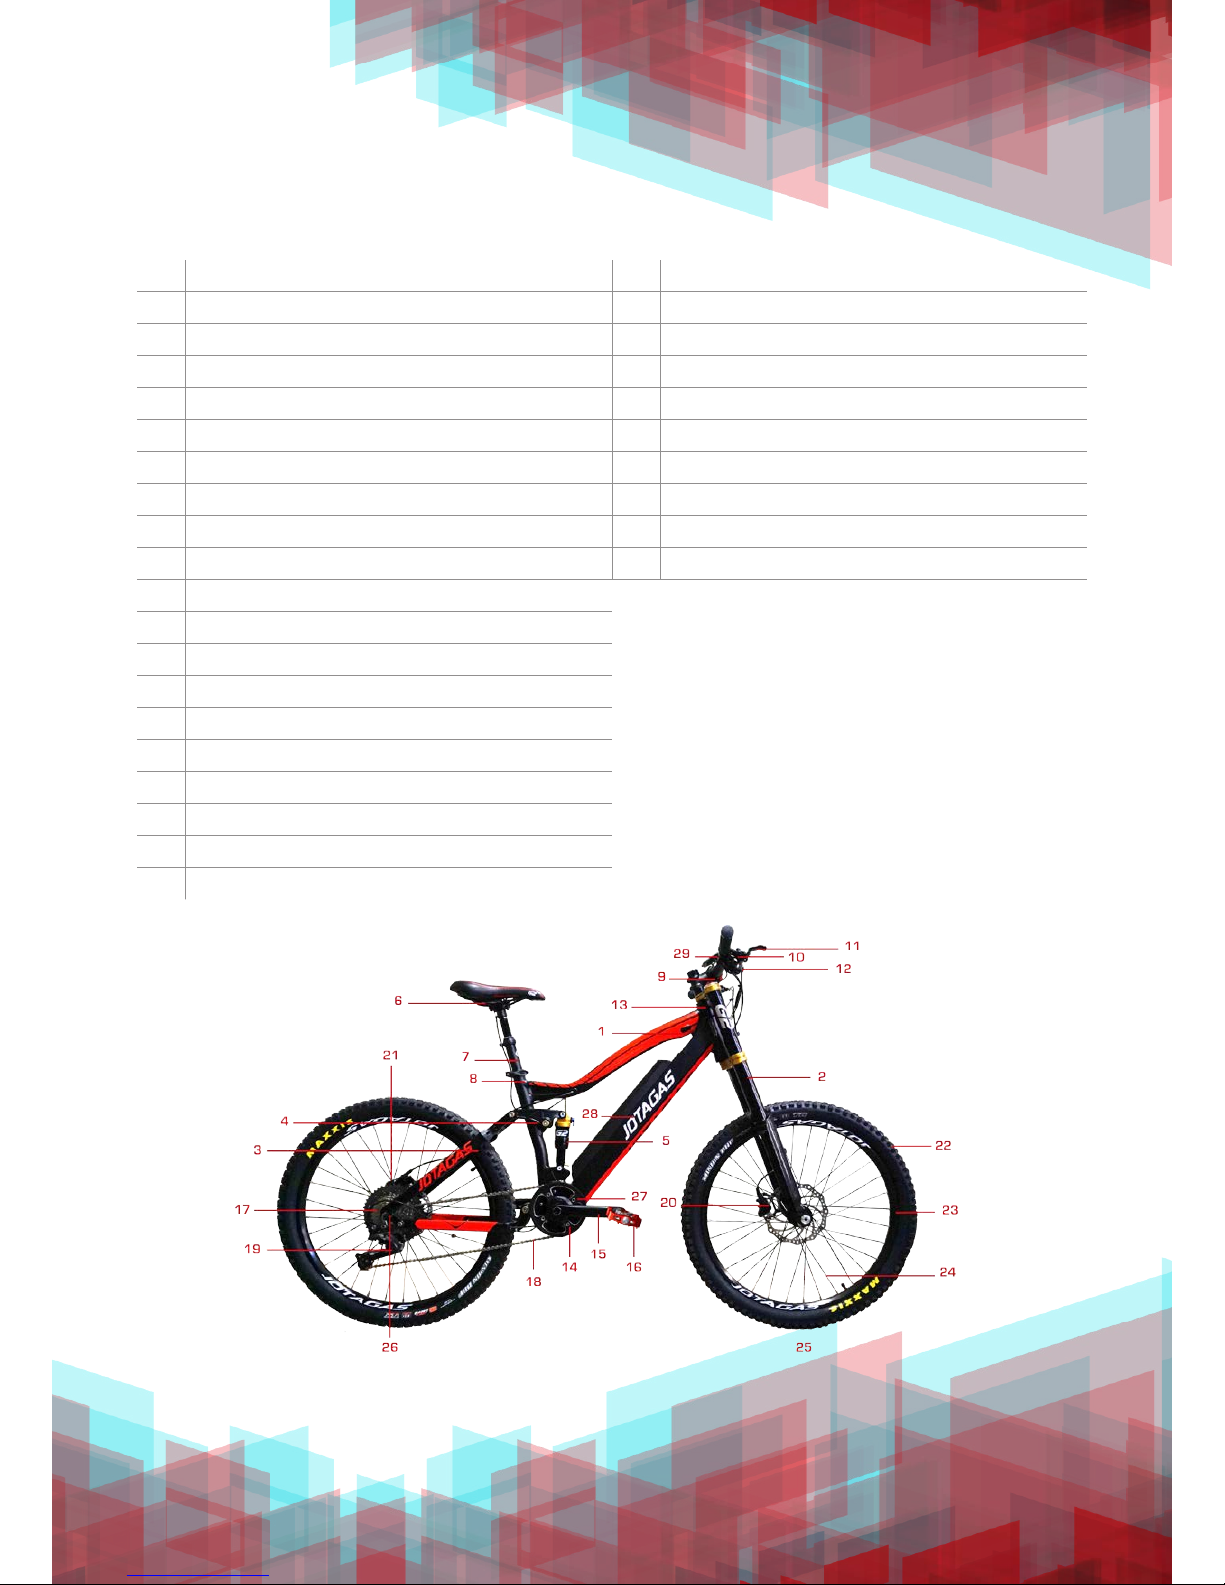
The adjustment of the fork preload is carried out by the rotary knob located on the
upper part of the left side tube. Blue color control.
Turning the knob clockwise increases the preload of the suspension.
The preload of the front suspension allows to adjust the static travel of the front
suspension under the weight of the user and to avoid the loss of efficiency of the
suspension due to excess preload. The recommended value is between 12 and 30
mm.
Note that the preload must be readjusted according to the ground type and that in
courses with uniform terrain a higher preload reduces the user’s pedaling effort.
The fork is also equipped with a gas chamber in the damping system. The maximum
load pressure must never exceed 13 bar. The value of this pressure affects the
hardness of the suspension and will slightly modify the preload. We recommend a
value between 4 and 8 bar.
To determine the correct preload, it must be taken into account that in
no case should the front suspension stop at its end of travel.
Hydraulic
The regulation of the hydraulics is located in the upper part of the right tube of the
fork. Red color control.
Turning the knob clockwise decreases the speed of return of the suspension, closing
the hydraulic passage.

JEB19 SAFETY INFORMATION Ed.: 2019-R0
11
REAR SUSPENSION REGULATION
The rear suspension, is equipped with a swingarm and a central shock absorber
pneumatic, adjustable in load and preload, and with hydraulic regulation.
Preload
The regulation of the shock preload is made by combining the pressures of the upper
chamber, of the main pressure and of the lower chamber, of negative pressure.
Taking into account that the increase of the pressure in the upper chamber will
increase the hardness of the shock absorber. And that the increase in pressure in
the lower chamber increases the preload of the shock absorber.
Thepressurevariationsofbothchambersmustalwaysbecombined.Therecommended
reference values are the following:
User weight (kg) Upper chamber (bar) Lower chamber (bar)
50 6,2 3,5
60 7,2 3,5
70 8,3 3,8
80 9,3 4,5
90 10,3 4,8
100 11,4 5,2
To determine the correct pressure settings, it must be taken into
account that in no case should the rear shock absorber stop at its
end of travel.
Hydraulic
The regulation of the hydraulics is endow of a double control, located in the upper
part of the shock absorber.
The blue knob has three positions; open, medium and blocking. This command is of
macro-regulation. The blocking position is only used when the user is driving through
terrain without irregularities.
The red knob only acts in the intermediate position. Turning the knob clockwise
decreases the speed of return of the suspension, closing the hydraulic passage.

JEB19 SAFETY INFORMATION Ed.: 2019-R0
12
In order to determine the correct hydraulic settings, the type of
terrain on which it circulates must be taken into account.
TYPE OF TRANSMISSION
The electric motor of the JEB19 bicycle is located on the bottom bracket axis. So it
shares all the elements of the transmission with the action of the pedals.
The transmission of the bicycle is constituted by; the pedals (assisted by an electric
motor of 250W), plate and cranks, Chain and a cassette of sproket equipped with a
change (rear derailleur).
QUICK VERIFICATION OF THE TRANSMISSION AND PEDALIER AXIS
With a correct adjustment of the change, this will act with precision, without jumps and
in absence of noises.
At least once a month, check that the sproket and the chain are clean and well greased.
All the links of the chain must pivot well, without jumps over the sproket and without
squeaks. Also, no link must be deformed or dented.
Lift the rear wheel and make it turn. If you hear a strange noise or the sproket stop just
drop them, they may need to be repaired or replaced.
Every three months inspect your pedals. Make sure that these are tight to the connecting
cranks. Do not confuse the location of the pedals. The right pedal is marked on its axis
with the letter R. Screw the axle clockwise and the left pedal in the opposite direction.
To check the absence of the bearings of the pedals, move the cranks in vertical and
horizontal direction. In case of detecting movement, take the bicycle to your distributor
for review.
Check the connecting crank every three months and check the tightening torque of the
screws and the rigidity of the merge.
PLATE VERIFICATION ADJUSTMENT
- Turn the plate until the connecting cranks are parallel to the seatpost.
- Put one hand on the crank and another on the seatpost; try to move the crank
towards and against the seatpost, if it is loose this needs to be checked by your
authorized dealer.

JEB19 SAFETY INFORMATION Ed.: 2019-R0
13
- If you turn the plate you notice that it is loose or if you hear a strange sound in the
motor bearings; These will need to be checked by your authorized dealer.
- Clean the plate and inspect it for damage. If any tooth is twisted or worn, the plate
should be replaced by your authorized dealer.
Check the chain every three months for any signs of wear. Each complete link of a chain
measures one inch (25.4mm). If twelve links in the chain measure more than 30.8 cm,
the chain must be replaced. The life of the chain is associated with the use made of the
bicycle. With a good maintenance, the chain usually lasts between 1500 and 2500 km.
In extreme service and with environments of dust, stones or mud, the life of the chain
can be substantially reduced. To change the chain you need special tools and knowledge
so you should go to your authorized dealer.
TRANSMISSION ADJUSTMENT
For your safety. Do not attempt to make any adjustments to the elements of the
transmission. The adjustment of the transmission set consisting of sproket, chain, plate
and pedals must be made by your authorized dealer, since it requires specific tools and
knowledge.
TRANSMISSION LUBRICATION AND CLEANING
Once a month, clean and lubricate the sproket and the chain. Always put a cloth behind
the chain to prevent oil from falling on the rest of the bicycle. Once lubricated the chain
clean the excess oil with a dry cloth.
To clean the sprockets, use only commercial specific products to the cleaning of bicycle
chains. If not indicated by the manufacturer, protect the swingarm and the frame of the
possible projections of the degreasing agent that can damage the surface treatment of
the frame and the swingarm. In the sproket and change use a brush.
Once a year lubricate the bearings of the pedal, the mechanism of the automatic pedals
and the part of the pedals that is screwed to the connecting cranks. Some bearings are
sealed, not needing lubrication. Lubrication of the bearings requires specific tools and
knowledge, and must be carried out by the authorized distributor.
In spite of not being recommended by JOTAGAS. In sports and competition, it is common
to clean bicycles with water under pressure. In these cases the lubrication should be
carried out after each wash. And always by an authorized dealer.
Note: the left (L) and right (R) pedal have a stamp stamped on the corner indicating
which side they belong to.

JEB19 SAFETY INFORMATION Ed.: 2019-R0
14
Always use high performance lubricants with Teflon additives specific to bicycle
transmissions, and compatible with the decorative elements of the frame and swingarm,
which are usually indicated on the labels as compatible with carbon frames.
DIRECTION LUBRICATION
Do not attempt to grease the steering bearings. The lubrication of the direction must be
done by your authorized dealer, it requires specific tools and knowledge.
REAR CHANGE REGULATION
This operation should only be carried out if you have adequate tools and the necessary
knowledge and practice. Otherwise, go to an authorized dealer.
- Regulation of the speed change path: It has two adjustment screws for the inner
and outer limits of the route. Turn the two screws so that the chain does not leave
its axial path. The change roller is aligned with the smallest sproket and the largest
sproket.
- Speed change adjustment: Place the gear change control in the second indication.
- Turn the adjusting screw of the cable tension until a perfect adjustment is achieved
on the second sproket.
- Check that the change acts correctly on all the cassette sprockets.
GEAR CHANGES USE
To avoid any mechanical problem (chain or change damage, pedaling noise, etc.), follow
these recommendations:
- Select the correct speed by changing just before the start of the climb or the
obstacle.
- When you intend to change speed, keep pedaling normally but without forcing, by
operating the shift lever until the chain is seated correctly on the sproket and the
selected plate.
- Avoid changing speed in full force, even if synchronized systems allow it in a hurry. It
is preferable to overexert or get off the bike.

JEB19 SAFETY INFORMATION Ed.: 2019-R0
15
TRANSMISSION ELEMENTS TIGHTENING PAIRS
Component Par (Nm)
Front wheel axle nuts 8 - 10
Stem screw 8 - 10
Connecting rod screw 25 - 50
Pedals 33 - 55
Brake caliper bolt 8 - 10
Screw brake discs 10 - 12
Brake lever screw 2 - 4
The tightening of the other components requires specific tools and knowledge and
must be carried out by your authorized distributor.
The indicated tightening torques are those that we recommend both in re-tightening
and after dismantling. In this last case it is very important to clean and degrease the
threads, and the screws.
BRAKES ADJUSTMENT
The JEB19 bicycle is equipped with hydraulic brakes. The adjustment of the brakes
must be done by your authorized dealer, since it requires specific tools and knowledge.
Improper handling of the brakes by the user can cause an accident
with serious physical consequences.
LOADING BATTERY OF THE ELECTRICAL TRACTION
1. Verify that the local network is compatible with the electrical characteristics of
the charger.
Network voltage AC 100 V - 240 V
Frequency 47 Hz - 63 Hz
Consumption 1,8 A
2. Remove the battery from its housing on the bicycle.
3. Insert the connector of the charger to the battery, and then the connector of
the plug of the socket.

JEB19 SAFETY INFORMATION Ed.: 2019-R0
16
BATTERY CHARGE SECURITY
The caring for the battery is vital not only for your own safety, but also for maximizing
the life of the battery. Critical situations such as this fire or an explosion can occur if the
recommended instructions are not followed.
- Make sure the charger connector is dry and securely connected to the battery
connector.
- Carry out the load in ventilated premises. Do not cover the battery or charger while
charging the battery, or near flammable components. The ambient temperature
should not exceed 40 ° C.
- Keep the battery away from water to avoid short circuits.
- Only use the charger supplied with the battery.
- Do not manipulate or modify anything of the battery.
- Do not expose the battery near fire or extreme temperatures.
- Avoid hits or strong impacts.
- Once the battery has been charged, first remove the connector from the mains
socket, and then the battery connector. It is not recommended that the charger
connector be connected to the network when the charging process has finished.
- Stop the operation of the battery charge immediately in case of detecting the smell
of burning, and contact your authorized dealer.
- The battery and charger should be stored out of the reach of children.
- To regulate the use of the electric bicycle with long distances, it is advisable to
recharge the battery before each departure and to its maximum energy capacity.
- Occasional use: On short and continuous trips the battery should be charged at least
once a week. If the bicycle is not used, it must be charged every 3 months.
The manufacturer can not be held responsible for the damage that can
be done to the battery when it is charged for misuse by the user.

JEB19 SAFETY INFORMATION Ed.: 2019-R0
17
5. SCREEN AND ENGINE ADJUSTMENTS
DISPLAY
Aluminum alloy
Aleación de aluminio
Toughened glass
Vidrio Templado
Black matte
Negro mate

JEB19 SAFETY INFORMATION Ed.: 2019-R0
18
1 Battery indicator
2 Speed indicator
3 Pedal assistance
4 Km traveled
5 Upload speed
6 Slow down
7 Button on and off the display
Actions by pressing and holding the button
5 Press and hold to turn on the display light
6 Press and hold for “walk”
6+7 Press and hold to delete Km Trip A y B

JEB19 SAFETY INFORMATION Ed.: 2019-R0
19
BATTERY
Aluminum alloy
Aleación de aluminio
Toughened glass
Vidrio Templado
Black matte
Negro mate

JEB19 SAFETY INFORMATION Ed.: 2019-R0
20
Battery charging method
Fuse
Shock absorber
Suspension
Seat adjustment
Closed Semi-open Open
Compression regulation Rebound regulation
Table of contents
Popular Scooter manuals by other brands

SEA BEYOND INT’L
SEA BEYOND INT’L T-REX User manual book

Royal Alloy
Royal Alloy Grand Tourer GT125 Operation manual

Insportline
Insportline IN S2351 user manual

Sunrise Medical
Sunrise Medical Sterling Midi owner's manual

Renault
Renault Renault Sport Leader R.S. user manual

kikkaride
kikkaride DUSTY Instructions for use