Joycare JC-1321 User manual

1
MISURATORE DI PRESSIONE DA BRACCIO
ISTRUZIONI PER L’USO
Vi ringraziamo per aver scelto il nostro prodotto. Ci auguriamo che possiate utilizzarlo con il massimo
vantaggio.
INFORMAZIONI IMPORTANTI
NORMALE FLUTTUAZIONE DELLA PRESSIONE SANGUIGNA
Ogni tipo di attività sica, eccitazione, stress, alimentazione, bere, postura del corpo e tante altre
attività o altri fattori (compresa la misurazione della pressione sanguigna) inuenzano il valore della
pressione sanguigna. Per questo motivo, è piuttosto dicile ottenere letture identiche della pressione
sanguigna.
La pressione sanguigna uttua continuamente, notte e giorno. Il valore più alto si registra abitualmente
duranteilgiorno equello piùbasso amezzanotte,Abitualmente,il valore comincia aaumentareintorno
alle 3:00 e raggiunge il livello massimo durante il giorno, quando la maggior parte delle persone è
attiva e sveglia.
Sulla base delle informazioni sopra riportate, si consiglia di eettuare la misurazione della pressione
sanguigna circa alla stessa ora ogni giorno. Misurazioni troppo frequenti possono essere dannose in
quanto alterano la circolazione del sangue; si prega di rilassarsi per un minuto/un minuto e mezzo tra
le misurazioni per permettere la ripresa della circolazione sanguigna nel braccio. È molto raro ottenere
valori di pressione sanguigna identici ogni volta.
I
JC-1321 (KD-558)

2
3
INDICE E INDICATORI DISPLAY
1Tasto MEM
2Tasto START
3Vano batterie
4 Display LCD
5 Manicotto
6 Indicatore batteria scarica
7 Pressione sistolica
8 Pressione diastolica/display pulsazioni (alternante)
9 Display data/orario (alternante)
10 Indicatore memoria
11 Simbolo battito cardiaco irregolare
12 Indicatore classicazione livello pressione sanguigna
13 Indicatore“Pronto per il gonaggio”
USO PREVISTO
Lo sgnomanometro completamente automatico è previsto per uso domestico.
Si tratta di un sistema per la misurazione della pressione sanguigna diastolica e sistolica e il rapporto
impulsi di un singolo individuo adulto con una tecnica non invasiva in cui un manicotto gonabile viene
avvolto intorno al braccio. La circonferenza del manicotto è limitata a 22 cm - 30 cm
CONTROINDICAZIONI
Il presente sgnomanometro elettronico non è adatto a persone con seria aritmia.
DESCRIZIONE APPARECCHIO
Sulla base della metodologia oscillometrica e del sensore di pressione integrato in silice, pressione
sanguigna e rapporto impulsi possono essere misurati automaticamente e in modo non invasivo. Il
display LCD mostra pressione sanguigna e rapporto impulsi. Le più recenti misurazioni 2 x 60 possono
essere memorizzate nella memoria con data e orario. Il monitor può mostrare anche la lettura media
delle ultime tre misurazioni.
Lo sgnomanometro elettronico corrisponde agli standard sotto riportati: IEC 60601-1:2005/EN
60601-1:2006/AC:2010 (Attrezzatura elettrica medica -- Parte 1: Requisiti generali per sicurezza di
base e prestazioni essenziali), IEC60601-1-2:2007/EN 60601-1- 2:2007 /AC:2010 (Attrezzatura elettrica
medica -- Parti 1-2: Requisiti generali per la sicurezza di base e le prestazioni essenziali – Standard
collaterale: Compatibilità elettromagnetica – Requisiti e test), IEC 80601-2-30: 2009+Cor.2010/EN
80601-2-30:2010 (Attrezzatura medica elettrica –Parti 2-30: Requisiti particolari per la sicurezza di
base e le prestazioni essenziali di sgmomanometri automatizzati non invasivi) EN 1060-1: 1995 +
A1: 2002 + A2: 2009 (Sgnomanometri non invasivi - Parte 1: Requisiti generali), EN 1060-3: 1997 +
A1: 2005 + A2: 2009 (Sgnomanometri non invasivi - Parte 3: requisiti supplementari per sistemi di
misurazione pressione sanguigna elettromeccanici).
SPECIFICHE
1. Descrizione prodotto: misuratore di pressione sanguigna
2. Modello: JC-1321 (KD-558)
3. Classicazione: alimentato interamente, parte applicata tipo BF, IPX0, No AP o APG, funzionamento
continuo
4. Misure apparecchio: Ca. 138 mm x 48 mm x 98 mm
5. Circonferenza manicotto: 22 cm- 30 cm

2
3
6. Peso: Circa. 211 g (batterie e manicotto esclusi)
7. Metodo di misurazione: metodo oscillometrico, gonaggio e misurazioni automatici
8. Memorie: 2 utenti x 60 misurazioni con data e ora
9. Alimentazione: Batterie: 4 x 1,5V tipo AA
10. Range di misurazione:
Pressione manicotto: 0 - 300 mm Hg
Sistolica: 60 - 260 mm Hg
Diastolica: 40 - 199 mm Hg
Rapporto impulsi: 40 - 180 battiti/minuto
11. Accuratezza:
Pressione: ± 3 mm Hg
Rapporto impulsi: ± 5 %
12.Temperatura ambiente per funzionamento: da +10 °C a +40 °C (da 50 °F a 104 °F)
13. Umidità ambientale per funzionamento: ≤ 90 % RH
14.Temperatura ambientale per magazzinaggio e trasporto: da -20 ° a +55 °C (da -4 ° a 131 °F)
15. Umidità ambientale per magazzinaggio e trasporto: ≤ 90 % RH
16. Pressione ambientale: da 80 kPa a 105 kPa
17. Durata batteria: circa 500 misurazioni
18. Elenco di tutti i componenti appartenenti al sistema di misurazione pressione, compresi gli
accessori: pompa, valvola, LCD, manicotto, sensore
Nota: Le presenti speciche sono soggette a modiche senza preavviso.
INFORMAZIONI
1.Leggeretutte le informazioni nella guida per il funzionamentoela letteraturacontenutanellascatola
prima di mettere in funzione l’apparecchio.
2. Rimanere fermi, calmi e riposarsi per 5 minuti prima di eettuare la misurazione della pressione
sanguigna.
3. Collocare il manicotto allo stesso livello del cuore.
4. Durante la misurazione, non parlare e non muovere corpo e braccio.
5. Eettuare la misurazione sempre sullo stesso braccio.
6. Rilassarsi per almeno 1 minuto/1,5 minuti tra le misurazioni per permettere che si riattivi la
circolazione sanguigna nel braccio. Un sovragonaggio prolungato (pressione del manicotto eccedente
300 mm Hg o al di sopra di 15 mm Hg per più di 3 minuti) del dispositivo può provocare ecchimosi sul
braccio.
7. Consultare il medico in caso di dubbi riguardo a quanto segue:
1) Applicazione del manicotto sopra aree contuse o inammate;
2) Applicazione del manicotto su arti con accesso o terapia intravascolare o in presenza di
shunt arteriovenoso (A-V);
3) Applicazione del manicotto su un braccio a lato di una mastectomia;
4) Utilizzo simultaneo di più attrezzature mediche di monitoraggio sullo stesso arto;
5) Necessità di controllare la circolazione sanguigna dell’utente.
8. Questo sgnomanometro elettronico è destinato a adulti e non deve mai essere utilizzato
per neonati o bambini piccoli. Rivolgersi al medico o altro personale sanitario prima di utilizzare il
dispositivo su bambini più grandi.
9. Non utilizzare il dispositivo su un veicolo in movimento per evitare misurazioni errate.
10. Le misurazioni della pressione sanguigna determinate da questo monitor equivalgono a quelle
ottenute da un osservatore addestrato con il metodo di auscultazione polsino/ stetoscopio, entro i limiti

4
5
prescritti dall’American National Standard Institute per gli sgmomanometri elettronici e automatici.
11. Se viene rilevato un battito cardiaco irregolare (IHB) dovuto a comune aritmia durante la
misurazione della pressione sanguigna, viene visualizzato il simbolo . In queste condizioni, lo
sgmomanometro può continuare a funzionare, ma i risultati possono non essere accurati; si consiglia
di rivolgersi al medico per una misurazione accurata.
Sono 2 le condizioni in cui verrà visualizzato il segnale IHB:
1) Il coeciente di variazione (CV) degli impulsi è > 25 %.
2) La deviazione del periodo impulso seguente è ≥ 0,14 s, e il numero di questo tipo di impulsi
è superiore al 53 % del numero totale degli impulsi misurati.
12. Non utilizzare un manicotto diverso da quello fornito dal produttore per evitare incompatibilità
biocompatibile e conseguenti errori di misurazione.
13. Il monitor potrebbe non rispondere alle speciche prestazioni o mettere a repentaglio la
sicurezza se viene conservato o utilizzato al di fuori dei limiti di temperatura e umidità indicati nelle
speciche.
14. Non condividere il manicotto con persone contagiose per evitare infezioni crociate.
15. Questa attrezzatura é stata testata ed é risultata rispondente ai limiti per dispositivi digitali di classe
B, vedi parte 15 della Normativa FCC. Questi limiti sono stati posti allo scopo di fornire una ragionevole
protezione dalle interferenze fastidiose in una installazione residenziale. La presente attrezzatura
genera, utilizza e può irradiare energia a radiofrequenza e, se non installata e utilizzata come indicato
nelle istruzioni, può causare fastidiose interferenze alle comunicazioni radio. Non viene comunque
fornita garanzia riguardo all’insorgenza di interferenze in installazioni particolari. Se la presente
attrezzatura genera interferenze pericolose alla ricezione radiotelevisiva, eventualmente determinate
dall’accensione e spegnimento dell’apparecchio, si consiglia l’utente di provare a ridurre le interferenze
adottando una o più delle seguenti misure:
- Riorientare o spostare l’antenna ricevente.
- Aumentare la distanza tra attrezzatura e ricevitore.
- Collegare l’apparecchio a un’uscita su un circuito diverso da quello a cui é collegato il ricevitore.
- Consultare il rivenditore o un tecnico radiotelevisivo esperto.
16. Il monitor per la misurazione della pressione sanguigna è vericato con metodo di auscultazione,
Si consiglia di controllare l’allegato B di ANSI/AAMI SP-10:2002+A1:2003+A2:2006 per particolari del
metodo di verica all’occorrenza.
NOTE:
Non dimenticare: auto-misurazione signica controllo, non diagnosi o trattamento. I valori insoliti
devono essere sempre discussi con il proprio medico. In nessuna circostanza si devono modicare i
dosaggi di qualsiasi farmaco prescritto dal proprio medico.
SETTAGGIO E PROCEDURE DI FUNZIONAMENTO
1. CARICAMENTO BATTERIA
a. Aprire il coperchio della batteria sulla parte posteriore del monitor.
b. Caricare quattro batterie di tipo“AA”rispettando la polarità.
c. Chiudere il coperchio batterie.
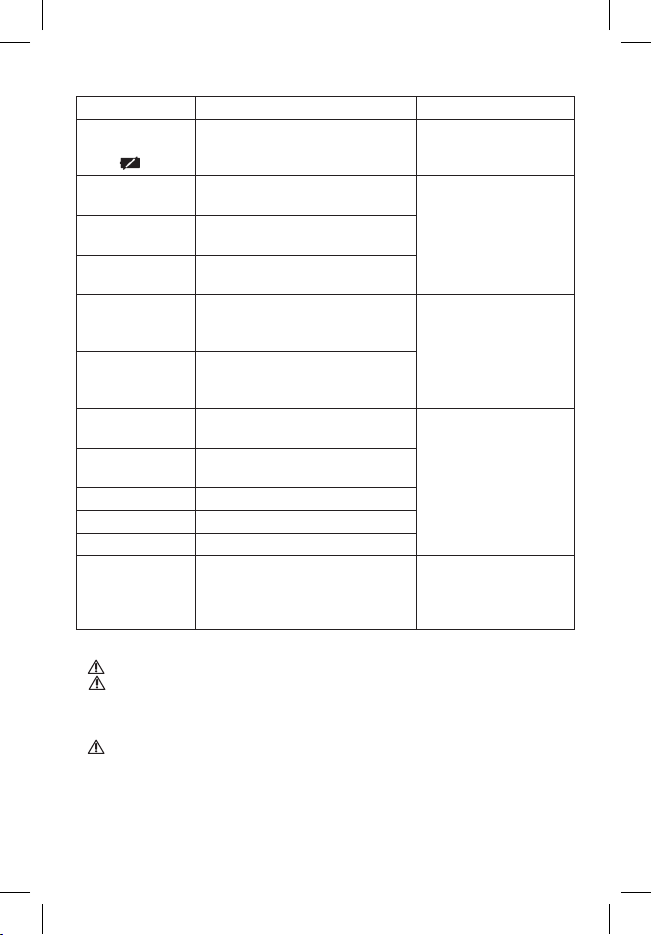
Quando l’LCD mostra il simbolo batteria , sostituire tutte le batterie. Non è possibile utilizzare
batterie ricaricabili per questo monitor. Rimuovere le batterie se il monitor non verrà usato per un mese
o più per evitare danni ingenti dovuti a perdite dalle batterie.
Evitare il contatto del liquidi delle batterie con gli occhi. Se il liquido viene in contatto con gli occhi,
risciacquarli immediatamente con abbondante acqua pulita e contattare un medico.

4
5
Il monitor, le batterie e il manicotto devono essere smaltiti secondo la normativa locale al
termine della vita utile.
2. REGOLAZIONE ORARIO E DATA
a. Una volta installata la batteria o spento il monitor, si attiva la modalità Orario e l’LCD mostrerà
alternativamente orario e data.Vedere Fig. 2 & 2-1.
2 2.1 2.2
b. Quando il monitor si trova in modalità Orario, premere il tasto “START” e il tasto “MEM”
simultaneamente; si sente un bip e il mese lampeggia per primo. Vedere Fig. 2-2. Premere
ripetutamente il tasto“START”lampeggiano uno dopo l’altro giorno, ora e minuti. Quando lampeggia
un numero, premere il tasto“MEM”per aumentare il numero,Tenere premuto il tasto“MEM”, il numero
aumenta rapidamente.
c .È possibile disattivare il monitor premendo il tasto “START” quando lampeggiano i minuti, quindi
vengono confermati orario e data.
d. Il monitor si spegne automaticamente dopo un minuto di non funzionamento, mentre orario e data
restano immutati.
e. Dopo aver sostituito le batterie, impostare nuovamente orario e data.
3. COLLEGAMENTO DEL MANICOTTO AL MONITOR
Inserire il connettore del manicotto alla spina nella parte sinistra
del monitor. Controllare che il connettore sia completamente inserito
per evitare perdite d’aria durante la misurazione della pressione sanguigna.
Non comprimere o restringere il tubo di collegamento durante
la misurazione, per non causare errore di gonaggio o lesioni gravi a seguito della pressione all’interno
del manicotto.
4. APPLICAZIONE DEL MANICOTTO
a. Se richiesto, tirare l’estremità del manicotto attraverso l’occhiello
(il manicotto è imballato in questo modo).
b. Collocare il manicotto intorno a un braccio privo di indumenti,
1 o 2 cm al di sopra del gomito.
c. Mentre si è seduti, collocare la mano con il palmo rivolto verso l’alto
su una supercie come un tavolo o un oggetto simile. Collocare il tubo
dell’aria al centro del braccio in linea con il dito medio.
d. Serrare il manicotto e chiudere i fermi inVelcro. Il manicotto deve essere
collocato in modo da essere proprio confortevole intorno al braccio.
Deve essere possibile inserire un dito tra braccio e manicotto.
Nota:
Fare riferimento alla gamma circonferenze manicotto in “SPECIFICHE” per l’utilizzo del manicotto
corretto.
1. Eettuare la misurazione sempre sullo stesso braccio.
2. Non spostare braccio, corpo o monitor e non spostare il tubo in gomma durante la misurazione.
3. Restare calmi e tranquilli per 5 minuti prima di eettuare la misurazione della pressione sanguigna.

6
7
4. Tenere sempre il manicotto pulito. Se si sporca staccarlo dal monitor e lavarlo a mano in detergente
neutro e risciacquarlo accuratamente in acqua fredda. Non asciugare mai il manicotto in asciugatrice né
stirarlo. Lavare il manicotto ogni 200 misurazioni.
5. POSTURA DEL CORPO DURANTE LA MISURAZIONE
Eettuare la misurazione rimanendo comodamente seduti
a. Rimanere seduti con i piedi sul pavimento senza incrociare le gambe.
b. Rivolgere il palmo verso l’alto di fronte a voi su una supercie piana
come un tavolo.
c. La parte centrale del manicotto dovrebbe trovarsi a livello dell’atrio destro del cuore.
Misurazione da sdraiati
a. Sdraiarsi supini.
b. Collocare il braccio lungo il anco con il palmo rivolto verso l’alto.
c. Collocare il manicotto allo stesso livello del cuore.
6. LETTURA DELLA MISURAZIONE DELLA PRESSIONE SANGUIGNA
a. Dopo aver applicato il manicotto e con il corpo in posizione comoda premere il tasto“START”. Si sente
un bip e vengono visualizzati tutti i caratteri display per l’autodiagnosi. Vedere Fig. 6. Contattare il
centro assistenza se manca un segmento.
b. A questo punto il numero dell’utente ”U1”o“U2”lampeggia. L’apparecchio è in grado di memorizzare
idati didue utenti:60 rilevazioniper ogniutente.U 1 (utente1)- U2(utente2).Vedere Fig.6-1. Premere
il tasto “MEM”per andare all’altro utente. Vedere Fig. 6-2. Confermare la selezione premendo il tasto
“START”. L’utente attuale viene confermato automaticamente dopo 5 secondi di non funzionamento.
6 6.1 6.2
c. Dopo aver selezionato l’utente il monitor comincia a cercare la pressione zero.Vedere Fig. 6-3.
d. Il monitor gona il manicotto nché non vi è suciente pressione per eettuare una misurazione.
A questo punto il monitor rilascia lentamente aria dal manicotto ed eettua la misurazione. Inne
vengono calcolati pressione sanguigna e rapporto impulsi e essi vengono mostrati separatamente sul
display LCD. Lampeggia il simbolo di battito cardiaco irregolare (se presente). Vedere Fig. 6-4 & 6-5. Il
risultato viene immediatamente memorizzato.
6.3 6.4 6.5
e.Dopo la misurazione il monitor si spegne automaticamente dopo un minuto di non funzionamento. È
inoltre possibile premere il tasto“START”per spegnere manualmente il monitor.
f. Durante la misurazione premere il tasto“START”per spegnere manualmente il monitor.
Nota: Consultare un professionista paramedico per l’interpretazione delle misurazioni di pressione.
7. VISUALIZZAZIONE DEI RISULTATI MEMORIZZATI
L’apparecchio è in grado di memorizzare i dati di due utenti: 60 rilevazioni per ogni utente. U 1 (utente

6
7
1)- U2 (utente 2). Dopo ogni misurazione, il Misuratore di Pressione JOYCARE, salva in memoria tutti i
dati della rilevazione dell’utente U1 o U2.
a. Al termine della misurazione, è possibile rivedere la misurazioni nella banca memoria attuale
premendo il tasto “MEM”. A questo punto l’LCD mostra la quantità di risultati nella banca attuale.
Vedere Fig. 7
7 7.1 7.2
b. È inoltre possibile premere il tasto “MEM”in modalità Orologio per mostrare i risultati memorizzati
in questa banca. Vedere Fig. 7-1. Premere il tasto “START” per passare all’altra banca. Vedere Fig.
7-2. Confermare la selezione premendo il tasto “MEM”. La banca attuale sarà inoltre confermata
automaticamente dopo 5 secondi di non funzionamento.
c. Dopo aver selezionato la banca memoria, l’LCD mostrerà il valore medio degli ultimi tre risultati nella
banca. Vedere Fig. 7-3 & 7-4. Se non sono memorizzati risultati, l’LCD mostra i valori come illustrato
nella gura Fig. 7-5.
7.3 7.4 7.5
d. Quando il valore medio viene visualizzato e si preme il tasto “MEM” viene visualizzato il risultato
più recente. Vedere Fig. 7-6. Vengono quindi visualizzati separatamente pressione sanguigna e
pulsazioni. È possibile che lampeggi il simbolo di battito cardiaco irregolare. Vedere Fig. 7-7 & 7-8.
Premere nuovamente il tasto “MEM” per visualizzare il risultato seguente. Vedere Fig. 7-9. In questo
modo, premendo ripetutamente il tasto “MEM” vengono visualizzati i rispettivi risultati misurati
precedentemente.
7.6 7.7 7.8 7.9
e. Quando vengono visualizzati i risultati memorizzati il monitor si spegne automaticamente dopo
1 minuto di non funzionamento. È inoltre possibile premere il tasto “START” per spegnere il monitor
manualmente.
8. CANCELLAZIONE DELLE MISURAZIONI DALLA MEMORIA
Quando viene visualizzato un risultato (a parte la lettura media degli ultimi tre
8
risultati) e si tiene premuto il tasto“MEM”per tre secondi, tutti i risultati nella
banca memoria vengono cancellati dopo tre bip. L’LCD visualizza Fig. 8;
premendo il tasto“MEM”o“START”si spegne il monitor.
9. ACCERTAMENTO DI PRESSIONE SANGUIGNA ALTA PER ADULTI
Leseguentilinee guide perl’accertamentodipressione sanguigna altanegli adulti(indipendentemente
da età e sesso) sono state stabilite dall’Organizzazione Mondiale della Sanità (WHO). Si prenda nota del
fatto che altri fattori (come diabete, obesità, fumo ecc.) devono essere anch’essi presi in considerazione.
Rivolgersi al proprio medico per un accertamento accurato e non cambiare mai la terapia su propria
iniziativa.

8
9
Classicazione pressione sanguigna per adulti
Class. Pressione sanguigna SIS (mm HG) DIA (mm HG)
Ottimale < 120 <80
Normale 120-129 80-84
Alta-normale 130-139 85-89
Ipertensione livello 1 140-159 90-99
Ipertensione livello 2 160-176 100-109
Ipertensione livello 3 ≥180 ≥110
Denizione e classicazione dei valori di pressione sanguigna secondo WHO/ISH
10. RICERCA DEI GUASTI (1)
Problema Situazione/Causa Intervento
Il display LCD mostra
risultati anomali
La posizione del manicotto
non era corretta oppure
il manicotto non è stato
correttamente serrato
Applicare correttamente il manicotto
e riprovare
Postura del corpo non
corretta durante la
misurazione.
Rivedere la sezione“POSTURA DEL
CORPO DURANTE LA MISURAZIONE”
delle istruzioni e riprovare.
Parla, muove braccio o corpo,
è adirato, eccitato o nervoso
durante la misurazione
Riprovare quando il soggetto è calmo,
non parla e non si muove durante la
misurazione.
Battito cardiaco irregolare
(aritmia) Lo sgmomanometro elettronico con è
adatto a persone con seria aritmia.

8
9
11. RICERCA DEI GUASTI (2)
Problema Situazione/Causa Intervento
L’LCD mostra il
simbolo di batteria
scarica Batteria scarica Sostituire le batterie
L’LCD mostra“Er 0” Il sistema pressione è instabile prima
della misurazione.
Applicare il manicotto
correttamente e riprovare.
L’LCD mostra“Er 1” Errore rilevamento pressione
sistolica
L’LCD mostra“Er 2” Errore rilevamento pressione
diastolica
L’LCD mostra“Er 3” Sistema pneumatico bloccato
o manicotto troppo stretto durante il
gonaggio Applicare il manicotto
correttamente e riprovare.
L’LCD mostra“Er 4” Perdita nel sistema pneumatico
o manicotto allentato durante il
gonaggio
L’LCD mostra“Er 5” Pressione manicotto superiore
a 300 mm Hg Eettuare nuovamente
la misurazione dopo 5
minuti Se il monitor è ancora
anomalo, contattare il centro
di assistenza autorizzato.
L’LCD mostra“Er 6” Più di 3 minuti con pressione
manicotto superiore a 15 mm Hg
L’LCD mostra“Er 7” Errore accesso EEPROM
L’LCD mostra“Er 8” Errore controllo parametro apparecchio
L’LCD mostra“Er A” Errore parametro sensore pressione
Nessun risposta
quando si preme un
tasto o si caricano le
batterie.
Funzionamento non corretto o forte
interferenza elettromagnetica. Rimuovere le batterie per 5
minuti e reinserirle.
MANUTENZIONE
1. Non far cadere il monitor né sottoporlo a forti urti.
2. Evitare alte temperature e la luce diretta del sole. Non immergere il monitor in acqua per non
danneggiarlo.
3. Se il monitor è stato conservato a una temperatura vicina al punto di congelamento, farlo arrivare a
temperatura ambiente prima di utilizzarlo.
4. Non cercare di smontare il monitor.
5. Se non si utilizza il monitor per periodi prolungati rimuovere le batterie.
6. Si consiglia di controllare il funzionamento dell’apparecchio ogni due anni o dopo eventuali
riparazioni. Contattare il centro assistenza.
7. Pulire il monitor con un panno morbido oppure un panno inumidito con acqua e ben strizzato, alcol
diluito o soluzione saponata diluita.

10
11
8. Nessun componente del monitor può essere sottoposta a assistenza da parte dell’utente. Verranno
forniti i diagrammi circuiti. gli elenchi componenti, le descrizioni, le istruzioni di taratura o altre
informazioni che possono essere di aiuto al personale tecnico qualicato dell’utente per la riparazione
delle parti o delle attrezzature ritenute riparabili.
9. Il monitor può mantenere le caratteristiche di sicurezza e prestazioni per un minimo di 10.000
misurazioni o tre anni e il manicotto può mantenere le caratteristiche prestazioni per un minimo di
1.000 misurazioni.
10. Si consiglia di disinfettare il manicotto due volte alla settimana all’occorrenza (ad es. in ospedale o
in clinica). Pulire la parte interna (quella a contatto con la pelle) del manicotto con un panno inumidito
con alcool etilico (75-90%) ben strizzato e lasciar asciugare il manicotto all’aria.
SPIEGAZIONE DEI SIMBOLI SULL‘APPARECCHIO
Simbolo ”LEGGERE LA GUIDA FUNZIONAMENTO”. (Colore di sfondo del simbolo: blu. Colore della
graca interna: bianco)
Simbolo“AVVISO”
Simbolo“PARTI APPLICATE TIPO BF”(il manicotto è parte applicata tipo BF)
Simbolo “PROTEZIONE AMBIENTE” – I prodotti elettrici esausti non devono essere gettati
insieme ai riuti domestici. Riciclare dove possibile. Rivolgersi all’autorità locale o al
rivenditore per i consigli riguardanti il riciclaggio.
Simbolo“PRODUTTORE”
Simbolo“DATA DI PRODUZIONE”
Simbolo“RAPPRESENTANTE IN EUROPEA”
Simbolo“NUMERO DI SERIE”
Simbolo“TENERE ALL’ASCIUTTO”
0197JC-1321 (KD-558) è conforme alla direttiva europea 93/42/CEE concernente i
dispositivi medici, quindi a tutte le normative europee applicabili.
MADE IN CHINA -Importato e distribuito a marchio JOYCARE, da JOYCARE S.p.A. socio unico, Via Fabio
Massimo,45 Roma- Italy
Manufacture: ANDON HEALTH CO., LTD. Add: No. 3 JinPing Street, Ya An Road, Nankai District,
Tianjin 300190, China.
Lotus Global Co., Ltd. - 1 Four Seasons Terrace West Drayton, Middlesex, London, UB7
9GG,United Kingdom -Tel: +0044-20-75868010 Fax: +0044-20-79006187

10
11
SMALTIMENTO DEL PRODOTTO L’apparecchio, incluse le sue parti removibili e accessori, al
termine della vita utile non deve essere smaltito insieme ai riuti urbani ma in conformità alla
direttiva europea 2002/96/EC. Dovendo essere trattato separatamente dai riuti domestici,
deve essere conferito in un centro di raccolta dierenziata per apparecchiature elettriche ed
elettroniche oppure riconsegnato al rivenditore al momento dell’acquisto di una nuova apparecchiatura
equivalente. In caso di trasgressione sono previste severe sanzioni. Le batterie utilizzate da questo
apparecchio, alla ne della loro vita utile, vanno smaltite negli appositi raccoglitori.
Tutte le indicazioni e i disegni si basano sulle ultime informazioni disponibili al momento della stampa
del manuale e possono essere soggette a variazioni.
GB
AUTOMATIC ARM BLOOD PRESSURE MONITOR
USER MANUAL
Thank you for choosing our product. We hope you will enjoy using the appliance.
IMPORTANT INFORMATION
NORMAL BLOOD PRESSURE FLUCTUATION
All physical activity, excitement, stress, eating, drinking, smoking, body posture and many other
activities or factors (including taking a blood pressure measurement) will inuence blood pressure
value. Because of this, it is mostly unusual to obtain identical multiple blood pressure readings.
Blood pressure uctuates continually ----- day and night. The highest value usually appears in the
daytime and the lowest one usually at midnight.Typically, the value begins to increase at around 3:00
AM, and reaches to highest level in the daytime while most people are awake and active.
Considering the above information, it is recommended that you measure your blood pressure at
approximately the same time each day.
Too frequent measurements may cause injury due to blood ow interference, please always relax a
minimum of 1 to 1.5 minutes between measurements to allow the blood circulation in your arm to
recover. It is rare that you obtain identical blood pressure readings each time.
CONTENTS AND DISPLAY INDICATORS
1 Button MEM
2 Button START
3 Battery compartment
4 LCD display
5 Cu
6 Low battery indicator
7 Systolic pressure
8 Diastolic pressure / pulse rate display (alternating)
9 Date /Time display (alternating)
10 Memory indicator
11 Irregular heartbeat symbol
12 Blood pressure level classication Indicator
13“Ready to inate”indicator

12
13
INTENDED USE
The fully automatic electronic sphygmomanometer is for use at home. It is a non-invasive blood
pressure measurement system intended to measure the diastolic and systolic blood pressures and pulse
rate of an adult individual by using a non invasive technique in which an inatable cu is wrapped
around the upper arm.The cu circumference is limited to 22 cm - 30 cm.
CONTRAINDICATION
ItisinappropriateforpeoplewithseriousarrhythmiatousethisElectronicSphygmomanometer.
PRODUCT DESCRIPTION
Based on Oscillometric methodology and silicon integrated pressure sensor, blood pressure and pulse
rate can be measured automatically and non-invasively. The LCD display will show blood pressure and
pulserate.Themost recent2x60measurementscan bestoredin the memory withdateand time stamp.
The monitor can also show the average reading of the last three measurements.
The Electronic Sphygmomanometers corresponds to the below standards: IEC 60601- 1:2005/EN
60601-1:2006/AC:2010 (Medical electrical equipment -- Part 1: General requirements for basic safety
and essential performance), IEC60601-1-2:2007/EN 60601-1-2:2007 /AC:2010 (Medical electrical
equipment -- Part 1-2: General requirements for basic safety and essential performance - Collateral
standard: Electromagnetic compatibility – Requirements and tests), IEC 80601-2- 30:2009+Cor.2010/
EN 80601-2-30:2010 (Medical electrical equipment –Part 2-30: Particular requirements for the basic
safety and essential performance of automated non-invasive sphygmomanometers) EN 1060-1:
1995 + A1: 2002 + A2: 2009 (Non-invasive sphygmomanometers - Part 1: General requirements), EN
1060-3: 1997 + A1: 2005 + A2: 2009 (Non-invasive sphygmomanometers - Part 3: Supplementary
requirements for electro-mechanical blood pressure measuring systems).
SPECIFICATIONS
1. Product name: Blood Pressure Monitor
2. Model: JC-1321 (KD-558)
3. Classication: Internally powered,Type BF applied part, IPX0, No AP or APG, Continuous operation
4. Device size: Ca. 138 mm x 48 mm x 98 mm
5. Cu circumference: 22 cm-30 cm
6.Weight: Approx. 211 g (batteries and cu excluded)
7. Measuring method: Oscillometric method, automatic ination and measurement
8. Memory volume: 2 users x 60 measurements with time and date stamp
9. Power source: Batteries: 4 x 1.5V type AA
10. Measurement range:
Cu pressure: 0 – 300 mm Hg
Systolic: 60 – 260 mm Hg
Diastolic: 40 – 199 mm Hg
Pulse rate: 40 – 180 beats/minute
11. Accuracy:
Pressure: 3 mm Hg
Pulse rate: 5 %
12. Environmental temperature for operation: +10 °C to +40 °C (50 °F to 104 °F)
13. Environmental humidity for operation: ≤ 90 % RH
14. Environmental temperature for storage and transport: -20 ° to 55 °C (-4 ° to 131 °F)
15. Environmental humidity for storage and transport: ≤ 90 % RH
16. Environmental pressure: 80 kPa to 105 kPa

12
13
17. Battery life: Approx 500 measurements
18. A list of all components belonging to the pressure measuring system, including accessories: Pump,
valve, LCD, cu, sensor
Note:These specications are subject to change without notice.
NOTICES
1.Read all of the information inthe operationguide andany other literatureinthe boxbeforeoperating
the unit.
2. Stay still, calm and rest for 5 minutes before blood pressure measurement.
3.The cu should be placed at the same level as your heart.
4. During measurement, neither speak nor move your body and arm.
5. Measuring on same arm each time.
6. Please always relax at least 1 or 1.5 minutes between measurements to allow the blood circulation in
your arm to recover. Prolonged over-ination (cu pressure exceed 300 mm Hg or maintained above 15
mm Hg for longer than 3 minutes) of the bladder may cause ecchymoma of your arm.
7. Consult your physician if you have any doubt about below cases:
1)The application of the cu over a wound or inammation diseases;
2)The application of the cu on any limb where intravascular access or therapy, or an arterio-
venous (A-V) shunt, is present;
3)The application of the cu on the arm on the side of a mastectomy;
4) Simultaneously used with other monitoring medical equipments on the same limb;
5) Need to check the blood circulation of the user.
8. This Electronic Sphygmomanometer is designed for adults and should never be used for infants or
young children. Consult your physician or other health care professionals before use on older children.
9. Do not use this unit in a moving vehicle; this may result in erroneous measurement.
10. Blood pressure measurements determined by this monitor are equivalent to those obtained by a
trained observer using the cu/stethoscope auscultation method, within the limits prescribed by the
American National Standard Institute, Electronic or automated sphygmomanometers.
11. If an irregular heartbeat (IHB) from common arrhythmias is detected in the procedure of blood
pressure measurement, this sign will be displayed. Under this condition, the Electronic
Sphygmomanometers can keep function, but the results may not be accurate, it’s suggested that you
consult with your physician for accurate assessment.
There are 2 conditions under which the signal of IHB will be displayed:
1)The coecient of variation (CV) of the pulses is > 25 %.
2) The deviation of the following pulse period is ≥ 0.14 s, and the number of such pulses
amounts to more than 53 % of the total number of measured pulses.
12. Please do not use the cu other than supplied by the manufacturer, otherwise it may bring
biocompatible hazard and might result in measurement error.
13. The monitor might not meet its performance specications or cause a safety hazard if stored or
used outside the temperature and humidity ranges specied in the specications.
14. Please do not share the cu with other contagious persons to avoid cross-infection.
15. This equipment has been tested and found to comply with the limits for a Class B digital device,
pursuant to part 15 of the FCC Rules.These limits are designed to provide reasonable protection against
harmful interference in a residential installation. This equipment generates uses and can radiate radio
frequency energy and, if not installed and used in accordance with the instructions, may cause harmful
interference to radio communications. However, there is no guarantee that interference will not occur
in a particular installation. If this equipment does cause harmful interference to radio or television

14
15
reception, which can be determined by turning the equipment o and on, the user is encouraged to try
to correct the interference by one or more of the following measures:
- Reorient or relocate the receiving antenna.
- Increase the distance between the equipment and the receiver.
- Connect the device to an outlet on a circuit dierent from that to which the receiver is connected.
- Consult the dealer or an experienced radio/TV technician for help.
16. This blood pressure monitor is veried by auscultatory method. It is recommended that you check
annex B of ANSI/AAMI SP-10:2002+A1:2003+A2:2006 for details of verication method if you need.
NOTE: Do not forget: while self-measurement represents control, it does not constitute a proper
diagnosis or treatment. Any unusual values should always be discussed with your doctor.
SETUP AND OPERATING PROCEDURES
1. BATTERY LOADING
a. Open battery cover at the back of the monitor.
b. Load four batteries of the type“AA”. Please pay attention to polarity.
c. Close the battery cover.
When the LCD shows the battery symbol , replace all batteries with new ones.
Rechargeable batteries are not suitable for this monitor.
Remove the batteries if the monitor will not be used for a month or more to avoid relevant damage of
battery leakage.
Do not let battery uidget intoyoureyes.If itshould getin youreyes,immediatelyrinse with plenty
of clean water and contact a physician.
The monitor, the batteries and the cu, must be disposed of according to local regulations at
the end of their usage.
2. CLOCK AND DATE ADJUSTMENT
a. Once you install the battery or turn o the monitor, it will enter Clock Mode, and LCD will display time
and date by turns. See Fig. 2 and 2-1.
2 2.1 2.2
b.WhilethemonitorisinClockMode,pressingthe“START”buttonandthe“MEM”buttonsimultaneously;
a beep is heard and the month will ash rst. See Fig. 2-2. Press the button “START” repeatedly; the
day, the hour and the minute will ash in turn. While a number is ashing, press the button“MEM”to
increase the number. Hold the button“MEM”depressed, the number will increase rapidly.
c.You can turn o the monitor by pressing the“START”button when the minutes are ashing, then the
time and the date are conrmed.
d. The monitor will turn o automatically after 1 minute of no operation; with the time and date
unchanged.
e. After replacing the batteries, you should set the time and the date again.

14
15
3. CONNECTING THE CUFF TO THE MONITOR
Insert the cu tubing connector into the socket in the left side of the
monitor. Make certain that the connector is completely inserted to avoid
air leakage during blood pressure measurements.
Avoid compression or restriction of the connection tubing during
measurement, as this may cause an ination error or harmful injury due to continuous cu pressure.
4. APPLYING THE CUFF
a. If required, pull the cu end through the medal loop (the cu is packaged
like this already).
b. Place the cu around a bare arm 1 to 2 cm above the elbow joint.
c.While sitting, place your hand with the palm facing up onto a at surface
like a table or similar. Position the air tube in the middle of your arm in line
with your middle nger
d.Tighten the cu and close theVelcro fastener.The cu should t
comfortably, yet snugly around your arm.You should be able to insert
one nger between your arm and the cu.
Note:
Please refer to the cuff circumference range in “SPECIFICATIONS” to make sure that the appropriate cuff is used.
1. Measuring on same arm each time.
2. Do not move your arm, body, or the monitor and do not move the rubber tube during measurement.
3. Stay quiet, calm for 5 minutes before blood pressure measurement.
4. Please keep the cu clean. If the cu becomes dirty, remove it from the monitor and clear it by hand
in a mild detergent, then rinse it thoroughly in cold water. Never dry the cu in clothes dryer or iron it.
Clean the cu after the usage of every 200 times is recommended.
5. BODY POSTURE DURING MEASUREMENT
Sitting Comfortably Measurement
a. Be seated with your feet at on the oor, and don’t cross your legs.
b. Place palm upside in front of you on a at surface such as table.
c.The middle of the cu should be at the level of the right atrium of the heart.
Lying Down Measurement
a. Lie on your back.
b. Place your arm straight along your side with your palm upside.
c.The cu should be placed at the same level as your heart.
6. TAKING YOUR BLOOD PRESSURE READING
a. After applying the cu and with your body in a comfortable position, press the “START” button. A
beep is heard and all display characters are shown for self test. See Fig. 6. Please contact the service
centre if a segment is missing.
b. Then the current user number is shown (U1 or U2) is ashing. See Fig. 6-1. Press the“MEM”button
to change to the other user. See Fig. 6-2. Conrm your selection by pressing the “START”button. The
current bank will also be conrmed automatically after 5 seconds with no operation.
6 6.1 6.2

16
17
c. After selecting the memory user, the monitor starts to seek zero pressure. See Fig. 6-3.
d.Themonitor inatesthe cuuntil sucientpressurehas builtup fora measurement.Then themonitor
slowly releases air from the cu and carries out the measurement. Finally the blood pressure and pulse
rate will be calculated and displayed on the LCD screen separately. Irregular heartbeat symbol (if any)
will blink. See Fig. 6-4 & 6-5.The result will be automatically stored in the current memory bank.
6.3 6.4 6.5
e. After measurement, the monitor will turn o automatically after 1 minute of no operation. You can
also press the“START”button to turn o the monitor manually.
f. During measurement, you can press the“START”button to turn o the monitor manually.
Note: Please consult a health care professional for interpretation of pressure measurements.
7. DISPLAYING STORED RESULTS
This device is capable of memorizing data for two users: up to 60 readings for each user. U1 (user 1) - U2
(user 2) After each reading, the JOYCARE blood pressure monitor stores in memory all data from user 1
or 2 depending on the initial setting.
a. After the measuring, you can review the measurements in the current memory bank by pressing the
button“MEM”. Now the LCD displays the amount of the results in the current bank. See Fig. 7.
7 7.1 7.2
b. You can also press the“MEM”button in Clock Mode to display the stored results.The current memory
bank will ash and the amount of results in this bank will be displayed. See Fig. 7-1. Press the“START”
button to change to the other bank. See Fig. 7-2. Conrm your selection by pressing the“MEM”button.
The current bank will also be conrmed automatically after 5 seconds with no operation.
c. After selecting the memory bank, the LCD will display the average value of the last three results in
this bank. See Fig. 7-3 & 7-4. If no results are stored, the LCD will show dashes as shown in Fig. 7-5.
7.3 7.4 7.5
d. When the average is displayed and you press the “MEM” button, the most recent result will be
displayed. See Fig. 7-6.Then the blood pressure and the pulse rate will be shown individually. Possibly
the irregular heartbeat symbol may ash. See Fig. 7-7 & 7-8. Press the“MEM”button again to display
the next result. See Fig. 7-9. In this way, repeatedly pressing the“MEM”button displays the respective
results measured previously.
7.6 7.7 7.8 7.9

16
17
e. When displaying the stored results, the monitor will turn o automatically after 1 minute of no
operation.You can also press the“START”button to turn o the monitor manually.
8. DELETING MEASUREMENTS FROM THE MEMORY
8
When any result (except average reading of the last three results) is displayed and
you keeping pressing the“MEM”button for three seconds, all results in the current
memory bank will be deleted after three“beeps”.The LCD will show Fig. 8;
pressing the“MEM”or the“START”button will turn o the monitor.
9. ASSESSING HIGH BLOOD PRESSURE FOR ADULTS
The following guidelines for assessing high blood pressure (without regard to age or gender) have been
established by the World Health Organization (WHO). Please note that other factors (e.g. diabetes,
obesity, smoking, etc.) also must be taken into consideration. Consult with your physician for accurate
assessment, and never change your treatment by yourself.
Blood pressure classication for adults
Blood pressure classification SYS (mm HG) DIA (mm HG)
Optimal < 120 <80
Normal 120-129 80-84
high - normal 130-139 85-89
Hypertension level 1 140-159 90-99
Hypertension level 2 160-176 100-109
Hypertension level 23 ≥180 ≥110
Denition and classication of the blood pressure values according to WHO/ISH
10. TROUBLESHOOTING (1)
Problem Possible cause Solution
LCD Display shows
abnormal result The cu position was not
correct or it was not properly
tightened Apply the cu correctly and try again

18
19
Problem Possible cause Solution
LCD Display shows
abnormal result
Body posture was not correct
during testing
Review the section“BODY POSTURE
DURING MEASUREMENT”section of the
instruction and try again.
Speaking, arm or body
movement, angry, excited or
nervous during testing
Re-test when calm and without
speaking or moving during the test
Irregular heartbeat
(arrhythmia)
It is inappropriate for people with
serious arrhythmia to use this Electronic
Sphygmomanometer.
11. TROUBLESHOOTING (2)
Problem Possible cause Solution
LCD shows low
battery symbol Low battery Low battery
LCD shows“Er 0” Pressure system is unstable before
measurement
Don’t move and try again.
LCD shows“Er 1” Fail to detect systolic pressure
LCD shows“Er 2” Fail to detect diastolic pressure
LCD shows“Er 3” Pneumatic system blocked or cu is too
tight during ination Apply the cu correctly and
try again
LCD shows“Er 4” Pneumatic system leakage or cu is too
loose during ination
LCD shows“Er 5” Cu pressure above 300 mm Hg
Measure again after ve mi-
nutes. If the monitor is still
abnormal, please contact the
local distributor
LCD shows“Er 6” More than 3 minutes with cu pressure
above 15 mm Hg
LCD shows“Er 7” EEPROM accessing error
LCD shows“Er 8” Device parameter checking error
LCD shows“Er A” Pressure sensor parameter error
No response when
you press a button or
load batteries.
Incorrect operation or strong electroma-
gnetic interference.
Take out batteries for ve
minutes, and then reinstall
all batteries.

18
19
MAINTENANCE
1. Do not drop this monitor nor subject it to strong impacts.
2. Avoid high temperatures and direct sunlight. Do not immerse the monitor in water as this will
result in damage to the monitor.
3. If this monitor was stored at a temperature near the freezing point, allow it to come to room
temperature before use.
4. Do not attempt to disassemble this monitor.
5. If you do not use the monitor for a long time, please remove the batteries.
6. It is recommended the performance should be checked every 2 years or after repair. Please contact
the service centre.
7. Clean the monitor with a dry, soft cloth or a soft cloth squeezed well after moistened with water,
diluted disinfectant alcohol, or diluted soap suds.
8. No component in the monitor can be serviced by the user.The circuit diagrams, component part lists,
descriptions, calibration instructions, or other information which will assist the user’s appropriately
qualied technical personnel to repair those parts of equipment which are designated repairably can
be supplied.
9. The monitor can maintain the safety and performance characteristics for a minimum of 10,000
measurements or three years, and the cu can maintain the performance characteristics for a minimum
of 1000 measurements.
10. It is recommended that the cu should be disinfected 2 times every week if needed (for example,
in a hospital or in a clinic). Wipe the inner side (the side that contacts skin) of the cu with a soft cloth
moistened with ethyl alcohol (75-90%) and squeezed, then dry the cu by airing.
EXPLANATION OF SYMBOLS ON UNIT
Symbol for”THE OPERATION GUIDE MUST BE READ”. (The sign background colour: blue. The sign
graphical symbol: white)
Symbol for“WARNING”
Symbol for“TYPE BF APPLIED PARTS”(the cu is a type BF applied part)
Symbol for“ENVIRONMENT PROTECTION”- Waste electrical products should not be disposed of
with household waste. Please recycle where facilities exist.
Check with your local Authority or retailer for recycling advice.
Symbol for“MANUFACTURER”
Symbol for“DATE OF MANUFACTURE”
Symbol for“EUROPEAN REPRESENTATION”
Symbol for“SERIAL NUMBER”
Symbol for“KEEP DRY”
0197JC-1321 (KD-558) has been manufactured in compliance with the European
directives 93/42ECC 0197

20
21
MADE IN CHINA Imported and distributed by JOYCARE brand, by JOYCARE S.p.A. socio unico, Via Fabio
Massimo, 45 Roma- Italy
Manufacture: ANDON HEALTH CO., LTD. Add: No. 3 JinPing Street, Ya An Road, Nankai District,
Tianjin 300190, China.
Lotus Global Co., Ltd. 1 Four Seasons Terrace West Drayton, Middlesex, London, UB7
9GG,United KingdomTel: +0044-20-75868010 Fax: +0044-20-79006187
DISPOSALThe device (including its removable parts and accessories) must not be disposed of
together with municipal waste at the end of its life, but in compliance with European Directive
2002/96/EC. Since it must be handled separately from household waste, either carry it to a
separately-collected waste disposal centre for electrical and electronic appliances or give it
back to the retailer on purchasing a new device with the same purpose. Any infringement will be
severely prosecuted.The batteries used in this device must be disposed of in the special bins at the end
of their life.
All the instructions and drawings are based on the latest information available at the time of going to
print and may be subject to change.
F
MESUREUR DE PRESSION AUTOMATIQUE PAR LE BRAS
MODE D’EMPLOI
Merci d’avoir choisi notre produit. Nous espérons que vous aimerez utiliser cet appareil.
INFORMATION IMPORTANTE
FLUCTUATION NORMALE DE LA PRESSION SANGUINE
Toutes les activités physiques, l’excitation, le stress, le fait de manger, de boire, de fumer, la posture
et de nombreux autres facteurs (y compris mesurer la pression artérielle) inuenceront la valeur
de la pression artérielle. En raison de cela, il est inhabituel d’obtenir de relevés de pression artériels
identiques plusieurs fois.
La pression artérielle uctue continuellement, le jour et la nuit. La plus grande valeur apparait pendant
le jour et la plus basse la nuit. Habituellement, la valeur commence à diminuer vers 15h et elle atteint
son niveau le plus élevé pendant la journée, lorsque les gens sont le plus actifs et le plus éveillés.
Tenant compte de l’information ci-dessus, il est recommandé de mesurer votre pression artérielle à
la même heure chaque jour. Des mesures trop fréquentes peuvent causer des blessures en raison des
interférences au débit de sang, veuillez vous détendre pendant un minimum de 1 ou 1,5 minute entre
les mesures pour permettre à la circulation sanguine de votre bras de revenir. Il est rare d’obtenir des
pressions artérielles identiques à chaque fois.
CONTENU ET INDICATIONS DE L’ÉCRAN
1 Bouton MEM
2 Bouton START (démarrer)
3 Compartiment à pile
This manual suits for next models
1
Table of contents
Languages:
Other Joycare Blood Pressure Monitor manuals