05 - Italiano -
4.3 Altre misurazioni
È possibile usare FIDATI anche per rilevare la temperatura di oggetti, cibi
liquidi e superfici, da 1 a 55°C. Ad esempio:
1. la temperatura del biberon (fig. 7), della pappa, del bagnetto, avendo
l’accortezza di mescolare bene i liquidi prima di effettuare la misurazione (in
caso di liquidi o alimenti caldi, eseguite la rilevazione velocemente per evitare
la formazione di condensa sulla guida d’onda e attendete 30 minuti prima di
effettuare altre misurazioni);
2. la temperatura in corrispondenza di ferite, infiammazioni, cicatrici (per uso
medico);
3. la temperatura ambiente puntando il termometro contro un muro o un mobile
(vedete anche par. #5).
Procedete come per una misurazione sulla fronte (par. #4.1) ma premendo
il pulsante “casetta” ; la proiezione apparirà sulla superficie e si accenderà la
luce spia del pulsante “casetta”.
Al termine della misurazione, la proiezione del valore di temperatura rimarrà
visibile per circa 12 secondi. Durante questo tempo, se avete difficoltà nel
leggere il valore di temperatura perchè la superficie di misurazione è trasparente
(acqua del bagnetto, biberon o vino) oppure troppo scura o irregolare
(minestrina), una volta rilasciato il pulsante potete indirizzare la proiezione su
un'altra superficie chiara ed opaca. Non è più necessario rispettare la distanza
corretta dalla superficie: in questo caso, il termometro non sta più misurando
ma sta solo proiettando il valore di temperatura che ha già rilevato.
5. FUNZIONE TEMPERATURA AMBIENTE e MEMORIA
Il pulsante “Mem” consente di visualizzare la temperatura ambiente e di
richiamare i valori delle ultime 9 misurazioni (funzione memoria).
•Puntate il termometro contro una qualunque superficie chiara e uniforme.
•premete una sola volta il pulsante “Mem”: vedrete proiettata la lettera “A”
(Ambiente) alternata con il valore di temperatura ambiente, e si accenderà la spia
del pulsante “Mem”.
•Premendo di nuovo il pulsante “Mem” verranno proiettatati, alternati, il numero
1 e il valore dell’ultima rilevazione, e si accenderà la spia del pulsante utilizzato
per quella misurazione (“faccina” o “casetta”). Premendo ancora il pulsante “Mem”
prima che la sua spia si spenga, verranno proiettatati, alternati, il numero 2 e il
valore della penultima rilevazione, con l'accensione della spia del pulsante utilizzato
per quella misurazione, e così via.
06 - Italiano -
6. CALIBRAZIONE alla TEMPERATURA AMBIENTE
Se, premendo il pulsante “faccina” , vedrete proiettato il simbolo
(”CAL”), significa che il termometro deve stabilizzarsi (vedi par. #2.1.2).
In questo caso, il termometro non permette di effettuare la misurazione, che
potrebbe dare un risultato non corretto, ma attiva un sistema di stabilizzazione
rapida automatica (AQCS).
Avete due possibilità:
1. Attendete circa 5 minuti, senza toccare il termometro, perché il processo
di AQCS sia completato automaticamente; oppure
2. Effettuate la calibrazione rapida manuale MQCS (Manual Quick
Calibration System):
•premete contemporaneamente i pulsanti “faccina” e “casetta”
(fig. 8) come suggerito dal lampeggio delle spie relative; la spia del pulsante
“casetta” lampeggerà;
•entro 10 secondi, puntate il termometro contro una parete interna (non
perimetrale) o un armadio avente temperatura costante e in un punto
compreso tra 80 e 150 cm dal pavimento, e premete il pulsante
“casetta” (fig. 9);
•quando siete alla distanza corretta (cioè quando la temperatura è proiettata
tra i due punti, fig. 4) rilasciate il pulsante: la proiezione lampeggerà
lentamente indicando la temperatura dell’ambiente.
Per essere sicuri che questa temperatura sia verosimile, evitate di puntare il
termometro contro pareti esterne, finestre, fonti di calore o freddo (caloriferi,
condizionatori, lampade, computer, superfici a contatto con il corpo umano, ecc).
Il termometro è ora pronto per eseguire una misurazione e manterrà la calibrazione
per 15 minuti. L’MQCS è possibile solo quando la temperatura ambiente è
compresa tra 16 e 40°C.
Potete effettuare la stabilizzazione manuale MQCS anche senza che sia
il termometro a suggerirla, in caso vi dobbiate spostare tra locali con
temperature diverse.
7. SOSTITUZIONE BATTERIE
•
Premete con il pollice nella piccola nicchia ovale posta sul retro
dell’apparecchio e fate scorrere lo sportello batterie come illustrato in fig. 10.
•Togliete lo sportello batterie.
•Asportate le vecchie batterie e gettatele negli appositi contenitori.
•Inserite 2 nuove batterie tipo AAA - LR03 (ministilo), preferibilmente alcaline,
prestando attenzione alla posizione indicata nelle rispettive sedi.
•Richiudete lo sportello facendolo scorrere in senso inverso a quello di apertura
Dopo il cambio delle batterie, lasciate stabilizzare il termometro per 20 minuti
prima di effettuare una misurazione oppure eseguite l’MQCS (par. #6).
•Togliete le batterie se prevedete di non usare il termometro per lungo tempo.
Vengono proiettati il
codice “E.1” e il
simbolo “bAt” ( ),
oppure la proiezione
non si accende.
Rimuovete
immediatamente le batterie
e sostituitele quando
necessario (leggete il par.
#7).
Le batterie sono
completamente
scariche.
Procuratevi le batterie per
sostituirle quando
comparirà il simbolo “E.1”
(vedete sotto).
Il simbolo “bAt” ( ) si alterna al
valore di temperatura.
Le batterie si stanno
scaricando ma è ancora
possibile eseguire un
buon numero di
misurazioni.
VISUALIZZAZIONE e DESCRIZIONE PROBLEMA SOLUZIONE
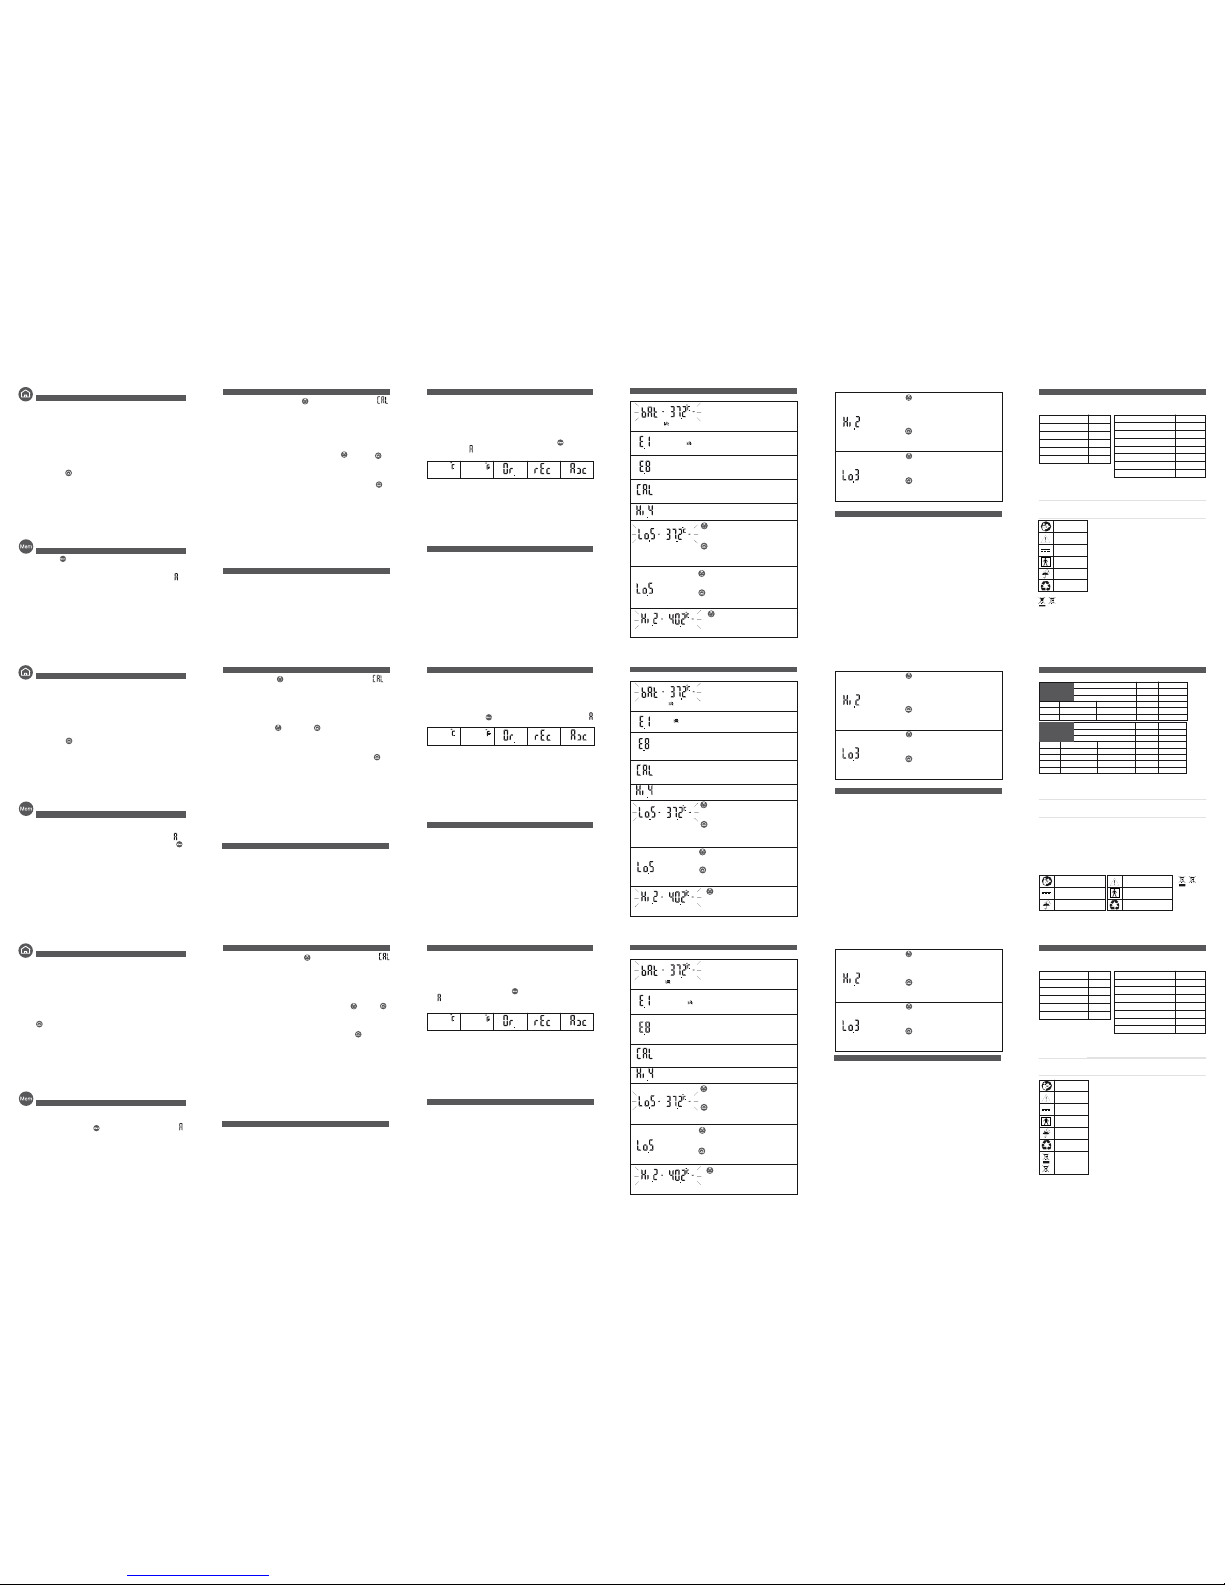
10. SIGNIFICATO DEI MESSAGGI
Il valore visualizzato si alterna a “Hi.2”.
Consultate un medico.
Se hai usato il pulsante
“faccina”: presenza di
febbre molto alta
(oltre 40°C).
Viene proiettatoil
codice “Hi.4”.
Temperatura ambiente
troppo alta (oltre 40°C).
Spostatevi in un luogo
più fresco.
Viene proiettatoil
codice“Lo.5”.
Se hai usato il pulsante
“faccina”: temperatura
ambiente troppo bassa
(inferiore a 10°C).
Spostatevi in un
ambiente più caldo.
08 - Italiano -
Se hai usato il pulsante
“casetta”: temperatura
ambiente troppo bassa
(inferiore a 5°C)
Se hai usato il
pulsante “casetta”:
temperatura
ambiente compresa
tra 5 e 15.9°C.
Viene proiettatoil codice “Lo.5”
alternato al valore di temperatura.
La misurazione è possibile
ma la precisione non è
garantita.
Se hai usato il pulsante
“faccina”: temperatura
ambiente compresa tra
10 e 15.9°C.
11. EVENTUALI PROBLEMI E SOLUZIONI
1. La proiezione non si accende:
- le batterie sono completamente scariche oppure sono state inserite
erroneamente; sostituitele o reinseritele correttamente (par. #7).
2. La temperatura proiettata non è compresa tra i due punti:
- la distanza non è corretta; spostate il termometro avanti o indietro fino a
quando la proiezione della temperatura sarà visibile tra i due punti (fig. 5).
3. La proiezione della temperatura è poco visibile:
- la luce ambiente è troppo elevata o le batterie si stanno scaricando; fate
ombra al soggetto o sotituite la batterie.
4. Il sensore (fig. 1) è danneggiato o è penetrata acqua nel termometro:
- contattate immediatamente l’Assistenza al Numero Verde 800-930321.
5. La temperatura rilevata dal termometro appare troppo bassa:
- verificate che siano rispettate le condizioni previste nelle avvertenze (par. #2);
- verificate che il sensore (fig. 1) non sia sporco o danneggiato, in tal caso pulite
come indicato al par. #9 o contattate l’assistenza;
- verificate che il termometro sia perpendicolare alla fronte (fig. 2).
6. La temperatura rilevata dal termometro appare troppo alta:
- verificate che siano rispettate le avvertenze (par. #2).
7. Il termometro appare bloccato (ad esempio uno o più led rimangono accesi per
oltre 2 minuti):
- resettate il termometro togliendo e rimettendo le batterie.
Se hai usato il pulsante
“casetta”: la temperatura
della superficie rilevata è
al di sotto dei limiti
operativi (<1°C).
Non è possibile rilevare
la temperatura.
La proiezione mostra
“CAL” e le spie dei
pulsanti “faccina e
“casetta” lampeggiano.
Il termometro non è
stabilizzato. Il simbolo
“CAL” e le spie
lampeggianti suggeriscono
di effettuare l’MQCS.
Eseguite l’MQCS
(leggeteil par. #6).
Viene proiettatoil
codice“E.8”.
Il termometro è stato
mosso prima del lampeg-
gio delle luci, oppure si
è in presenza di forti
campi elettromagnetici.
Attendete il lampeggio delle
luci prima di muovere il ter-
mometro; assicuratevi che
non ci siano telefoni cellulari
o cordless nelle vicinanze.
09 - Italiano -
Se hai usato il pulsante
“casetta”: la temperatura
rilevata è al di sopra dei
limiti operativi
dell’apparecchio (>55°C).
Non è possibile
rilevare
la temperatura.
Viene proiettatoil
codice “Hi.2”.
Se hai usato il pulsante
“faccina”: la temperatura
rilevata è al di sopra dei
limiti operativi
dell’apparecchio con
questo pulsante
(>42,5°C).
Assicuratevi chesia
stato utilizzato
il pulsante corretto
per ciò chedovete
misurare.
Viene proiettato il
codice “Lo.3”.
Se hai usato il pulsante
“faccina”: temperatura
della fronte
apparentemente troppo
bassa (<34,0°C).
Verificate che il sensore
non sia sporco o
che il soggetto non
provenga da un ambiente
con bassatemperatura.
VISUALIZZAZIONE e DESCRIZIONE PROBLEMA SOLUZIONE
10 - Italiano -
Alimentazione: 2 batterie tipo AAA (LR03) alcaline da 1,5 V (non incluse)
Autonomia con batterie di qualità: oltre 1 anno o oltre 10.000 rilevazioni (secondo l’uso).
Dimensioni: mm 94,5 x 43,5 x 21,5
Peso: gr. 60 - (batterie comprese)
12. CARATTERISTICHE TECNICHE
FIDATI Termometro infrarosso a distanza
Distanza dal soggetto: circa 6 cm, stabilita mediante sistema di puntamento ottico.
Conservare inun luogo asciuttoe pulito, preferibilmentead una temperatura compresa
tra +16 e +40°C. Non conservare a una temperatura inferiore a -18°C e superiore
a +70°C.
Durata di vita prevista del dispositivo: 10 anni.
FIDATI è un dispositivo medicodi classe IIa (secondo la direttiva93/42/CEE e s.m.i.),
appartenentealla famiglia di Thermofocuse VisioFocus. Il suo sistema dimisurazione
è stato testato in ospedali e cliniche private e studi medici. Gli studi clinici sono
disponibili su richiesta al fabbricante.
Termometro infrarosso conforme ai requisiti stabiliti dalla norma ASTM
(E1965-98:2009) e alle norme CEI EN 60601-1 e 60601-1-2. Apparecchio con
sorgente elettrica interna, previsto per uso continuo.
Tecnimed srl, P.le Cocchi, 12 - 21040 Vedano Olona (VA) - Italia assume piena
responsabilità della conformità di questo prodotto alle norme di riferimento.
I led di VisioFocusemettono esigue radiazioni luminose in conformitàalla IEC 62471.
Leggere le istruzioni
per l’uso
Apparecchio previsto
per uso continuo
Tenere lontano
dall’acqua
ATTENZIONE:
leggere le avvertenze
Materiale riciclabile
Parte applicata
tipo BF
Ai sensi dell’art. 13 del Decreto Legislativo 25 luglio 2005, n. 151 “Attuazione delle Direttive 2002/95/CE,
2002/96/CEe 2003/108/CE,relativealla riduzionedell’usodi sostanzepericolosenelle apparecchiatureelettriche
ed elettroniche,nonché allo smaltimento deirifiuti” e ai sensidell’art. 22 delD. Lgs. 20 novembre
2008, n. 188: il simbolo del cassonetto barrato indica che il prodotto alla fine della propria vita utile deve essere raccolto
separatamente dagli altri rifiuti, cosìcome le pile esauste. L’utente dovrà, pertanto, conferire l’apparecchiaturagiunta a
fine vita agli idonei centri di raccolta differenziatadei rifiuti elettronici ed elettrotecnici. L’adeguata raccolta differenziata
per l’avvio successivo dell’apparecchiatura dimessa e delle pileesauste al riciclaggio, al trattamento eallo smaltimento
ambientalmente compatibile contribuisce ad evitare possibili effetti negativi sull’ambiente e sulla salute e favorisce il
reimpiego e/o riciclo dei materiali di cui è composta l’apparecchiatura. Losmaltimento abusivo del prodotto da parte
dell’utente comporta l’applicazione delle sanzioni amministrative previste dalla normativa vigente.
Intervallo di misura
Intervallo di temperatura
ambiente
Risoluzione
Precisione da 34,0 a 35,9°C
Precisione da 36,0 a 39,0°C
Precisione da 39,1 a 42,5°C
34,0/42,5°C
16/40°C (1)
0,1
+/-0,3°C
+/-0,2°C (2)
+/-0,3°C
Intervallo di misura
Intervallo di temperatura ambiente
Risoluzione
Precisione da 1,0 a 19,9°C
Precisione da 20,0 a 35,9°C
Precisione da 36,0 a 39,0°C
Precisione da 39,1 a 42,5°C
Precisione da 42,6 a 55,0°C
1,0/55,0°C
16/40°C (1)
0,1
+/-1,0°C
+/-0,3°C
+/-0,2°C
+/-0,3°C
+/-1,0°C
Misurazioni sulla fronte Altre misurazioni
(2) Il pulsante “faccina” è in grado di lavorare anche in ambienticon
temperatura compresa tra10 e 16 °C, mentre il pulsante “casetta”
può lavorare anche in ambienti con temperatura compresa tra 5
e 16°C. In entrambi i casi, la precisione e il range operativo non
sono garantiti e il valore letto viene alternato a "Lo.5".
(1) Il grado di accuratezza richiesto dalle norme
ASTM E1965-98-2009 per i termometri infrarosso
per temperature tra 37 e 39°C è di +/-0,2°C,
mentre per i termometri a mercurio ed elettronici
le norme ASTM E667-86 e E1112-86 prevedono
una precisione di +/- 0,1°C per temperature tra
37 e 39°C.
07 - Italiano -
8. COME CAMBIARE le IMPOSTAZIONI da CELSIUS (°C) a
FAHRENHEIT (°F), da ASCELLARE a ORALE o RETTALE e viceversa
A seconda del paese dove viene venduto, ilvostro termometro è uscito dalla fabbrica
con le impostazioni in:
- gradi Centigradi (°C) o gradi Fahrenheit (°F);
- riferimento ascellare (“Ax”), orale (“Or.”) o “rettale (“rEc”), o temperatura interna.
Se necessario, è possibile modificare le impostazioni procedendo come segue:
•a termometro spento, puntate il termometro contro una qualunque superficie
chiara e uniforme.
• Premete e tenete premuto (senza rilasciarlo) il pulsante “Mem” ; la proiezione
mostrerà la lettera e dopo circa 8 secondi (sempre mantenendo il pulsante
“Mem” premuto) cambierà mostrando in sequenza le impostazioni possibili:
•Quando compare l’impostazione desiderata, rilasciate il pulsante.
È possibile cambiare solo un’impostazione alla volta.
Se il termometro è prodotto con la sola impostazione della temperatura interna,
è possibile modificare solo le impostazioni °C/°F.
La misurazione della temperatura corporea va effettuata sempre al centro
della fronte (par. #4.1) o sulla palpebra (par. #4.2) indipendentemente
dall’impostazione: i riferimenti ascellare, orale o rettale forniscono infatti un
valore della temperatura frontale approssimativamente paragonabile alla
temperatura ascellare, del cavo orale o rettale rispettivamente (vedere par. #3).
9. PULIZIA
PULIZIA DEL SENSORE: il sensore (fig. 1) è un’area molto delicata del termometro
e deve essere mantenuto pulito. Si raccomanda quindi di conservare il
termometro in un luogo pulito e asciutto, al riparo dalla polvere. Se, tuttavia,
fosse necessario pulire il sensore per rimuovere eventuale polvere o altro
sporco, usate un bastoncino di cotone leggermente inumidito con alcool.
Assicuratevi di asportare tutto lo sporco evitando di accumularne sul sensore.
Non utilizzate altri oggetti o liquidi che potrebbero facilmente graffiare o
danneggiare la superficie della lente o del sensore. Durante questa operazione
assicuratevi che eventuale liquido in eccesso non penetri tra iltermometro e il
sensore.
PULIZIA DEL CORPO DEL TERMOMETRO: usate un panno morbido
leggermente inumidito con acqua e sapone ed eventualmente ripassate con
un disinfettante.
NON USARE il termometro per almeno 30 minuti dopo la sua pulizia.
05 - English -
4.3 Other readings
FIDATI can also be used to read the temperature of objects, food, liquids and
other surfaces in the 1-55°C (33.8-131°F) temperature range. For example:
1. temperature of a baby's feeding bottle (fig. 7), food, bath, etc. In this case,
mix the liquid well before taking the reading. With hot liquids or foods, take
the reading quickly to prevent condensation from forming on the lens and wait
30 min. before taking another reading;
2. room temperature, by pointing the thermometer against a wall or a piece
of furniture (see also par. #5);
3. temperature of a wound, inflammation, scar (for medical use).
Procee d as you would do for a forehead reading (par. #4.1), but press
the “hom e” button ; the projection will appear on the surface and the
light of the “home” button will turn itself on.
After the measurement, the projection of the temperature value will remain
visible for about 12 seconds, During this time, should you find it difficult to
see the temperature value, (as in the case of transparent, too dark or irregular
surfaces, such as bathwater, wine, soup) then, once released the button, you
may address the projection on another light and opaque surface. You will not
need to respect the correct distance from the surface: indeed in this case, the
thermometer is not taking a temperature, but only projecting the temperature
value that has already been detected.
5. MEMORY FUNCTION and AMBIENT TEMPERATURE
The “Mem” button lets you see the ambient temperature and call up the last 9
temperature readings (memory function).
- Aim the device at any uniform and clear surface.
- Press once the “Mem” button: the projection will show the letter “A” ,
(Ambient) alternating with the ambient temperature value, and the light of the
“Mem” button will turn itself on.
- Pressing again the “Mem” button, the projection will show the number 1 in
alternation to the last temperature taken. The light of the button which had been
used for that measurement (“face” or “home”) will turn itself on. If you push the
button again before the memory’s light turns itself off: the number 2, alternating
with the penultimate temperature taken will be projected, with and the lightening
of the used button will turn itself on. And so on.
6. ROOM TEMPERATURE CALIBRATION
If, pressing the “face” button, the projection shows “CAL”
the device needs to be stabilized (par. 2.1.2).
Therefore, the thermometer will not let you take a measurement, which would
not be correct. On the contrary it will activate an Automatic Quick Calibration
System (AQCS). Now you have two possibilities:
1. Wait about 5 minutes without touching the thermometer, until the
AQCS ends.
2. Perform a Manual Quick Calibration System (MQCS)
as follows:
•press the “face” and “home” button simultaneously (fig. 8)
as suggested by their flashing lights: the light of the “home” button will
flash;
•within 10 seconds, focus the thermometer on an internal wall or wardrob
with uniform temperature and at a point between approximately between
80 and 150 cm (30 and 60 inches) from the floor and press the
"home” button (fig. 9).
•once the right distance is reached (temperature values placed between
the two dots,fig. 4), release the button: the projection will flash slowly
showing the room temperature.
To ensure a reliable temperature reading, do not focus the thermometer on an
outside wall, window, source of heating or cooling (radiator, air conditioner, lamp,
computer, surface in contact with the human body, etc.).
The thermometer is now ready to take a reading and will keep the MQCS for 15
minutes. The MQCS is possible only if the room temperature is in the 16-40°C
(60.8-104°F) temperature range.
Manual quick calibration (MQCS) can also be performed without the
thermometer’s suggestion if, for example, you need to move through
rooms having different temperatures.
7. REPLACING the BATTERIES
•
Set your thumb in the oval hollow on the back of the unit, press down and
slide the battery hatch out as shown in figure 10.
•Remove the battery hatch.
•Remove the old batteries and dispose of them as required in the containers
provided for this purpose.
•Insert 2 new AAA - LR03 batteries, preferably alkaline, carefully complying
with the position indicated in their housing.
•To close the hatch, slide it in the opposite direction from which it was
opened. After changing the batteries, let the thermometer stabilize for 20
minutes before taking a temperature reading, or run a MQCS (par. #6).
•Remove the batteries if you do not expect to use the thermometer for a long time.
06 - English -
“E.1” and the symbol
“bAt” ( ),
appear, or the unit does
not turn on at all.
Remove the batteries
immediately and replace
them when necessary
(see par. #7).
The batteries are
dead.
Obtain new batteries for
changing them when the
signal E.1 (below) appears.
The symboL “bAt” ( ) is projected in
alternation with the temperature value.
The batteries are low but
many measurements may
be taken still.
ITEM PROJECTED and DESCRIPTION PROBLEM SOLUTION
10. MEANING OF MESSAGES
The projection shows "Hi.2" and the value
alternately.
Seek medical attention.
If you’ve pressed the
“face” button:
temperature of
40°C/104°F or more.
"Hi.4"appears on the
projection.
The room temperature is
too high (above 40°C /
104°F).
Move to another,
cooler site.
The projection
reads"Lo.5”.
If you’ve pressed the
“face” button: the room
temperature is too low
(below 10°C or 50°F).
Move to another,
warmer room.
08 - English -
If you’ve pressed the
“home” button”: the room
temperature is too low
(below 5°C or 41°F).
If you’ve pressed the
“home” button”: the
room temperature is
between 5 and 15.9°C
(41 and 60.6ºF).
“Lo.5"and the temperature value are
projected alternately.
The temperature reading
can be taken but
accuracy is not
guaranteed.
If you’ve pressed the
“face” button”: the room
temperature is
between 10 and 15.9°C
(50 and 60.6ºF).
11. TROUBLESHOOTING
1. The projection does not turn on:
- the batteries are completely dead or incorrectly inserted; replace or reinsert
them (par. #7).
2. The temperature is not projected between the two dots:
- the unit is not at the correct distance; move the thermometer forward or back
until the projected temperature falls precisely between the two dots (fig. 5).
3. The projected temperature is not clearly visible:
- there is too much light in the room or the batteries are flat; cast a shadow
over the subject or replace the batteries.
4. The sensor (fig. 1) is damaged or water has seeped into the thermometer:
- contact your Dealer right away for technical service.
5. The thermometer temperature reading is too low:
- make certain that the warnings (par. #2) have been met;
- check that the sensor (fig. 1) is not soiled or damaged; if it is, clean it as
indicated in par. #9 or contact your Dealer for technical service;
- check that the thermometer is perpendicular to the forehead (fig. 2).
6. The thermometer temperature reading is too high:
- make certain that the warnings have been met (par. #2).
7. The thermometer appears blocked, for instance, some lights keep themselves
on for longer than 2 minutes:
- reset the thermometer by removing and reinserting the batteries.
If you’ve pressed the
“home” button: the
surface temperature read
is below the operating
limit (<1°C/33.8°F ).
The temperature reading
cannot be taken.
The projection shows
“CAL” and the lights of
the “face” and the
“home” buttons flash.
The thermometer has not
stabilized. The symbol
“CAL” and the blinking
lights suggest that you
perform the MQCS.
Perform an MQCS (par.
#6).
The projection reads
"E.8".
The thermometer was
moved before the light
started flashing, or the
area is subject to strong
electromagnetic fields.
Wait until the lightstarts
flashing beforemoving the
thermometer; make certain
that there are no mobile or
cordless telephones in the
vicinity.
09 - English -
If you’ve pressed the
“home” button: the
temperature detected
exceeds the limit for
unit operation (>55°C or
>131°F ).
The temperature
reading cannot be
taken.
The projection reads
"Hi.2".
If you’ve pressed the
“face” button: the
temperature detected
exceeds the limit for
operation with this button
(>42.5°C or >108.5ºF ).
Pleasemake certain that
you’vepressed the
correctbutton, with
regardto the measured
object,and that the
warnings have beenmet.
The projection reads
“Lo.3”.
If you’ve pressed the
“face” button: the
forehead temperature
appears to be too low
(<34.0°C or <93.2°F ).
Make certain the sensor is
not soiled or damaged
and thatthe subject has
not comefrom a
cold room.
ITEM PROJECTED and DESCRIPTION PROBLEM SOLUTION
10 - English -
12. TECHNICAL CHARACTERISTICS
Power supply: 2 AAA (LR03) alkaline batteries - 1.5 V
Life of high quality batteries: more than 1 year or than 1,000 readings (depending on use).
Dimensions: mm 94,5 x 43,5 x 21,5 (3.72, 1.71, 0.85 inches)
Weight: gr. 60 (2.12 oz) - (included batteries)
Distance from the subject: approximately 6 cm, calculated using an optical aiming system.
Keep in a clean, dry place, preferably at a temperature ranging between +16 and +40°C (60.8 and 104°F). Store at a
temperature included between -10 and +60°C(14 and 140°F) and in any case not lower than -18°C (0.4°F)or higher
than +70°C (158°F).
Expected life: 10 years
FIDATI is a class IIa medical device (per Directive 93/42/EEC and subsequent amendments and integrations), belonging
to the Thermofocus and VisioFocus Family, tested in hospitals, private clinics and medical offices.
Contact the manufacturer for clinical precision, characteristics and procedures.
Tecnimed srl, P.le Cocchi,12 - 21040 Vedano Olona (VA) - Italy undertakes full responsibilityfor this product's compliance
with the reference standards.
FIDATI is compliant with the pertinent ASTM standard (E1965-98:2009) and CEI EN 60601-1 and 60601-1-2 standards.
Internally powered equipment for continuous operation.The FIDATI LEDs emit low light radiation in compliance with IEC
62471.
FIDATI Non-contact infrared thermometer
Dispose of the device
in compliance with
applicable legislation
regarding electrical
equipment and
batteries.
Follow instructions for use
Device designed for
continuous use
Keep away from water
ATTENTION: read the
warnings
Recyclable material
Applied part: type BF
(1) The “face”button can alsooperate in rooms where the temperature isbetween 10 and 16°C(50 and 60.8°F); while the
“home”button can also operate in roomswhere the temperature is between 5 and 16 °C(41 and 60.8°F): inboth cases,
accuracyand the operatingrange are not guaranteed andthe reading is displayed as "Lo.5".
(2) The ASTM E1965-98-2009 standard requires +/-0.2°C (+/-0.4°F) accuracy for infrared thermometers in the
37-39°C (98.6-102.2°F) temperature range while the ASTM E667-86 and E1112-86 standards require +/- 0.1°C
(+/-0.2°F) precision for mercury and electronic thermometers in that same temperature range.
Measurement range
Room temperature working range
Resolution
93.2/108.5 °F
60.8/104.0 °F (1)
0.1
+/- 0.5°F
+/- 0.4°F (2)
+/- 0.5°F
Taking the body
temperature at
the forehead
34,0/42,5°C
16/40°C (1)
0,1
+/-0,3°C
+/-0,2°C (2)
+/-0,3°C
Accuracy
Accuracy
Accuracy
from 34,0 to 35,9°C
from 36,0 to 39,0°C
from 39,1 to 42,5°C
from 93.2 to 96.7°F
from 96.8 to 102.2 °F
from 102.3 to 108.5°F
33.8/131 °F
60.8/104.0 °F (1)
0.1
+/- 1.8°F
+/- 0.5°F
+/- 0.4°F
+/- 0.5°F
+/- 1.8°F
Measurement range
Room temperature working range
Resolution
1,0/55,0°C
* 16/40°C (1)
0,1
+/-1,0°C
+/-0,3°C
+/-0,2°C
+/-0,3°C
+/-1,0°C
Accuracy
Accuracy
Accuracy
Accuracy
Accuracy
from 1,0 to 19,9°C
from 20,0 to 35,9°C
from 36,0 to 39,0°C
from 39,1 to 42,5°C
from 42,6 to 55,0°C
from 33.8 to 67.9°F
from 68.0 to 96.7°F
from 96.8 to 102.2 °F
from 102.3 to 108.5°F
from 108.7 to 131 °F
Other
readings
07 - English -
8. HOW TO CHANGE the SETTINGS from CELSIUS (°C) to
FAHRENHEIT (°F), from AXILLARY to ORAL or RECTAL and vice versa
Depending on where it is going to be sold, your thermometer leaves the factory:
- preset to Celsius (°C) or Fahrenheit (°F)
- and referred to axillary (”Ax”), oral (”Or.”) or rectal (”rEc”) temperature readings,
or internal temperature readings;
If necessary, these settings can be modified as follows:
•while the thermometer is off, aim the thermometer to any uniform surface;
•press and hold the “Mem” button; the projection will show the letter “A”
and after about 8 seconds it will change, showing the settings in sequence:
•when the desired setting appears, release the button.
Only one setting can be modified at a time.
If the thermometer was produced with the sole internal temperature setting,
only the °C/°F setting will be available for changing.
The measurement of the body temperature should be taken always at the
center of the forehead (par. #4.1) or at the eyelid (par. 4.2), no matter what
the current setting is: in fact, the axillary, oral or rectal settings provide a
forehead temperature value that is a valid approximation of the axillary, oral
or rectal temperature respectively (see par. 3).
9. CLEANING
CLEANING THE SENSOR: The thermometer sensor (fig. 1) is a very delicate area
and must be kept clean. Store the device in a dry, clean place, away from dust.
However, if you need to remove dust or dirt from the sensor, use a cotton swab
slightly dampened with alcohol. Remove all dirt and make certain that nothing
accumulates on the sensor’s lens. Do not use any other objects or liquids as the
surface of the sensor could easily be scratched or damaged. Never let any excess
liquid penetrate into the thermometer and sensor.
CLEANING THE THERMOMETER BODY: use a soft clothdampened with soap and
water and possibly re-wipe with a sodium hypochlorite disinfectant.
DO NOT USE the thermometer for at least 30 minutes after cleaning.
05 - Español -
4.3 Otras medidas
FIDATI también puede ser usado para tomar temperaturas de objetos y líquidos
de 1 a 55°C, usando el botón casa. Por ejemplo:
1. temperatura del biberón (fig. 7), sopa y baño, ecc, mezclando bien los líquidos
antes de la medición (en los dos últimos casos hay que tomar la temperatura
con rapidez para evitar la formación de condensación en la lente y esperar
alrededor de 30 min. antes de realizar otra toma de temperatura);
2. temperatura de la habitación, apuntando el equipo a alguna pared o muebles
(vea el par. #5);
3. la temperatura de las heridas, inflamaciones, cicatrices, problemas circulatorios
(para uso médico).
Proceder como para la medición en la frente pero pulsando el botón
“casa” . La proyección será sobre la superficie y se encenderá la luz del
botón “casa”.
Al final de la medición, la proyección del valor de la temperatura será visible
para 12 segundos. Durante estos segundos, si necesario, se puede apuntar
el termómetro contra una otra superficie para todavía leer la temperatura: si
tienes dificultades y no puedes ver el valor porque la superficie es transparente
(agua del baño) o demasiado oscura y irregular (sopa), cuando se suelta el
botón se puede dirigir la proyección sobre una otra superficie clara y opaca.
No es necesario respectar la distancia correcta mas: en este caso el termómetro
no esta midiendo, esta solo proyectando el valor de la temperatura que ha
relevado antes.
5. FUNCIÓN TEMPERATURA AMBIENTE y MEMORIA
Con el botón “Mem” se puede visualizar la temperatura ambiente y se pueden
ver los valores de las ultimas 9 mediciones (función memoria).
- Apuntar el termómetro contra una cualquiera superficie clara y uniforme.
- Apretar una vez el botón “Mem” : vas a ver proyectada la letra “A”
(Ambiente) alternada con el valor de la temperatura ambiente y la luz del botón
“Mem” se va a encender.
- Apretando otra vez el botón “Mem”, vas a ver proyectados alternados el numero
1 y el valor de la ultima medición y se va a encender la luz del botón utilizado
(cara o casa). Apretando otra vez el botón “Mem” antes que suya luz se apaga,
vas a ver proyectados alternados el numero 2 y el valor de la penúltima medición
con la luz del botón utilizado.
6. CALIBRACIÓN de la TEMPERATURA AMBIENTE
Si cuando presione el botón “cara” se ve proyectada la palabra
“CAL”, significa que el termómetro tiene que ser estabilizado (par. #2.1.2).
En este caso, el termómetro no permite de hacer la medición, porque podría ser
incorrecta, pero activa un sistema di estabilización rápida automática (AQCS).
Tenéis dos posibilidades:
1. esperar mas o menos 5 minutos sin tocar el termómetro hasta que el proceso
de AQCS esta acabado automáticamente; o
2. efectuar la Calibración rápida manual MQCS (Manual Quick calibration
System):
•presionar contemporáneamente los botones “cara” y “casa” ,
(fig. 8) como es sugerido por el parpadeo de las luces relativas: la luz del
botón “casa” va a parpadear;
•dentro de los próximos 10 segundos apuntar el termómetro hacia una pared
o hacia un objeto con una temperatura constante ubicado entre los 80 y los
150 cm sobre la altura del piso y presionar el botón “casa” (fig. 9).
•cuando stáis a la distancia correcta (o sea, cuando la temperatura es
proyectada entre los dos puntos), soltar el botón: la proyección va a
parpadear lentamente indicando la temperatura del ambiente.
Para asegurarse de que la temperatura tomada es una temperatura
representativa de la habitación, evite apuntar el equipo hacia una pared que dé
al exterior o ventana o a una fuente de calor o frío (una lámpara, computadora,
calentador, aire acondicionado, etc.).
El termómetro ya se encuentra preparado para tomar la temperatura y va a
mantener la calibración por 15 minutos. El MQCS es posible utilizar solo cuando
la temperatura se encuentra entre 16 y 40 °C.
El MQCS se puede utilizar también sinla sugerencia del termómetro y en
caso de trasladarse de habitación en habitación con diferentes
temperaturas.
7. CAMBIO de BATERÍAS
•
Presionar con el pulgar el pequeño hueco oval situado en la parte posterior del
termómetro y deslizar la tapa de las baterías como en fig. 10.
•
Quitar la tapa de las baterías.
•
Sacar las pilas usadas y tirarlas a un apropiado contenedor.
•
Introducir 2 pilas nuevas (AAA, 1,5 V), colocarlas en la posición correcta.
•
Cerrar la tapa deslizando en sentido contrario al de abertura. Después de
cambiar las pilas, esperar 20 minutos antes de hacer una medición u hacer
una calibración manual MQCS (ver par. #6).
•
Remover las pilas si prevé no usar el instrumento por un largo tiempo.
06 - Español -
El termómetro proyecta
el código "E1" y el
símbolo “bAt” ( ), o
la proyección no se
encienden.
Remover y imediatamente
las pilas y hacer la
sustitución cuando es
necesario (leer pár 7).
Las pilas están
totalmente agotadas.
Adquirir las baterìas por la
sustitución cuando se vee
el simbulo “E.1” (veer
abajo).
El símbolo “bAt” ( ) es proyectado
en alternancia al valor de la temperatura
Las pilas se están
agotando.
INSCRIPCIÓN y DESCRIPCIÓN PROBLEMA SOLUCIÓN
10. MEANING OF MESSAGES
El valor indicado parpadea en
alternancia con "Hi.2".
Consultar con el médico.
Si has utilizado el botón
“cara”: Presencia de
fiebre muy alta (más de
40º.
La proyección
muestra"Hi.4".
Temperatura ambiente
demasiado alta (superior
a 40°C).
Situarse en un lugar más
fresco.
La proyección
muestra"Lo.5”.
Si has utilizado el botón
“cara”: temperatura
ambiente demasiado baja
(inferior a 10°C).
Colocarse en un lugar
más cálido.
08 - Español -
Si has utilizado el botón
“casa”: temperatura
ambiente demasiado baja
(inferior a 5°C).
Si has utilizado el botón
“casa”: temperatura
ambiente entre 5 y
15.9°C.
El valor indicado parpadea en
alternancia con “Lo.5”.
La medición es posible
pero la precisión no está
garantizada.
Si has utilizado el botón
“ca5a”: temperatura
ambiente entre 10 y
15.9°C.
10 - Español -
Alimentación: 2 pilas alcalinas tipo AAA (LR03) de 1,5 V
Tiempo de vida de baterías de calidad: mas que 1 año o que 1.000 mediciones (según el uso).
Dimensiones: mm 94,5 x 43,5 x 21,5
Peso: gr. 60 - (incluidas las pilas)
12. CARACTERÍSTICAS TÉCNICAS
FIDATI Termómetro de infrarrojos a distancia
Distancia defuncionamiento entre el termómetro y lapersona fijada por señal óptica:
6 cm.
Conservar en un lugar seco y limpio, preferentemente a una temperatura
comprendida entre 16 y 40°C. No mantener a una temperatura inferior a -18 y
superior a 70°C.
Duraciòn de vida prevista del aparato: 10 años.
El FIDATI es un equipo médico de clase IIa (acorde a la directiva 93/42/CEE) de la
familia de Thermofocus y VisioFocus que ha sido aprobado en hospitales, clínicas
de la salud,consultorios médicos.La exactitudclínicade laboratorio,las características
y procedimientos están disponibles con el fabricante sobre pedido.
Este termómetro infrarrojocumple con los requerimientos establecidos por la ASTM
Standard (E1965-98) andpor en conformidad con los requerimientos de las normas
CEI EN 60601-1 y 60601-1-2.
Equipo acondicionado internamente para operaciones continuas.
Toda la responsabilidad por la conformidad de este producto es asumida por
Tecnimed srl, 12, p.le Cocchi - 21040 Vedano Olona (VA) – ITALY.
Las luces led de FIDATI emiten exiguas radiaciones luminosas, en conformidad con
los requerimientos de la norma IEC 62471.
Leer las instrucciones
de utilizo
Aparato para una
constante utilización
Llevar lejos de agua
CUIDADO: leer las
advertencia
Materiale riciclabile
Parte aplicada:
tipo BF
Franja de medición
Franja de temperatura
ambiente
Resolución
Exactitud de 34,0 a 35,9°C
Exactitud de 36,0 a 39,0°C
Exactitud de 39,1 a 42,5°C
34,0/42,5°C
16/40°C (1)
0,1
+/-0,3°C
+/-0,2°C (2)
+/-0,3°C
Franja de medición
Franja de temperatura ambiente
Resolución
Exactitud de 1,0 a 19,9°C
Exactitud de 20,0 a 35,9°C
Exactitud de 36,0 a 39,0°C
Exactitud de 39,1 a 42,5°C
Exactitud de 42,6 a 55,0°C
1,0/55,0°C
16/40°C (1)
0,1
+/-1,0°C
+/-0,3°C
+/-0,2°C
+/-0,3°C
+/-1,0°C
Medición sobre la frente Otras medidas
(1) El botón "cara" puede trabajar también en habitaciones con
temperatura entre 10 y 16°C, sin embargo el botón "casa"
puede trabajar en habitaciones con temperatura entre 5 y 16°C.
En ambos los casos, la precisión no está garantizada y el valor
reflejado estará en alternancia con el mensaje “Lo.5”.
(2) Los requiriemientos de las normas ASTM para
termómetros infrarrojos en un rango de 37 a 39°C
es de +/- 0,2 ºC, mientras que para termómetros
de mercurio-en-vidrio y termómetros electrónicos,
los requerimientos por los estándares E 667-86 y
E 1112-86 de la ASTM de 37 a 39º C e s de
+/-0,1ºC.
Despachar según la ley
de los aparatos
electrónicos y de las
baterías.
11. EVENTUALES PROBLEMAS y SOLUCIONES
1. La proyección no se enciende:
- las baterías están totalmente gastadas o mal colocadas: cámbielas o
colóquelas correctamente (par. #7).
2. La temperatura proyectada no se encuentra en el centro de los dos puntos:
- la distancia no es correcta; mover el termómetro hacia adelante u hacia atrás
hasta que la proyección de la temperatura sea visible exactamente en medio
de los dos puntos (fig. 5).
3. La proyección de la temperatura es poco visible:
- la luz ambiente es demasiado intensa o las pilas se están agotando, haga
sombra con su cuerpo o remplace las baterías.
4. El sensor (fig. 1) está estropeado o ha entrado agua en el termómetro:
- contacte con el distribuidor para que le asista.
5. La temperatura visualizada en el termómetro es demasiado baja:
- verificar que todas las advertencias (par. #2) sea respetadas;
- comprobar que el sensor (fig. 1) no esté sucio u estropeado: si este fuera el
caso limpiarlo como se indica en par. #9 o contacte con el distribuidor;
- comprobar que el termómetro está colocado perpendicularmente a la frente
(fig. 2).
6. La temperatura marcada en la pantalla es demasiado alta:
- comprobar que todas las advertencias están siendo respetadas (par. #2).
7. El termómetro parece bloqueado (por ejemplo las luces se quedan encendidas
para 2 minutos o más):
- ponga el termómetro en la posición inicial, para ello extraiga y vuelva a colocar
las baterías.
Si has utilizado el botón
“casa”: la temperatura
de la superficie analizada
no alcanza el límite
inferior (<1°C).
Es imposible tomar la
temperatura.
La proyección a
muestra “CAL”y las
indicadores de los
botones “cara” y “casa”
parpadean.
Il termómetro no esta
estabilizado. El simbulo
“CAL” y las luces de los
botones que parpadean
sugieron de hacer la MQCS.
Realizar una MQCS (par.
#6).
La proyección
muestra"E.8".
El equipo ha sido movido
antes que acabe el
parpadeo de las luces, u
estáis en presencia de un
fuerte campo
electromagnético.
Esperar que las luces acaben
de parpadear antesde mover
el termómetro; comprobar de
no tener teléfonoscelulares o
inalámbricos demasiado
cerca).
09 - Español -
Si has utilizado el botón
“casa”: la temperatura
de la superficie medida
supera el límite superior
(>55°C).
Es imposible tomar la
temperatura.
La proyección muestra
"Hi.2".
Si has utilizado el botón
“cara”: La temperatura de
la superficie medida
supera el límite superior
con este botón
(>42,5°C).
Asegúrese de tener
presionando el botón
correcto para lo que
tenéisque medir y que
vais a respectar todas las
advertencia.
La proyección muestra
“Lo.3”.
Si has utilizado el botón
“cara”: temperatura de la
frente aparentemente
demasiado
baja (<34,0°C).
Comprobar que el sensor
esté sucio o estropeado o
que la persona no
procedade un ambiente
a baja temperatura.
INSCRIPCIÓN y DESCRIPCIÓN PROBLEMA SOLUCIÓN
07 - Español -
8. CÓMO CAMBIAR de CELSIUS (°C) a FAHRENHEIT (°F),
de ORAL a RECTAL a AXILAR, y viceversa
Dependiendo del país de destino su termómetro ha sido configurado para
mostrar: - la temperatura en grados ºC o ºF;
- referencia axilar (“Ax”), oral (“Or”) o rectal (“Rec”); o temperatura interna.
Para cambiar las configuraciones proceda a lo siguiente:
•
con el termómetro apagado, apuntarlo contra una cualquiera superficie uniforme.
•presione (sin soltarlo) el botón “Mem” , la proyección vas a mostrar la letra
“A” y después de de 8 segundos, se mostrarán los cambios posibles en la
pantalla rotativamente:
•cuando aparece el modo deseado, suelte el botón.
Podrá realizar una modificación a la vez, para realizar otra, empiece de nuevo.
Si el termómetro es producido con solamente la modalidad de la temperatura
interna, se pueden modificar solamente las modalidades C°/F°.
La medición de la temperatura corporal debe ser efectuada siempre al centro
de la frente (par. #4.1) o sobre el parpado (par. #4.2) independientemente
de la modalidad: las referencias axilar, oral o rectal proveen un valor de la
temperatura frontal aproximadamente comparable a la axilar, a la oral o a la
rectal respectivamente (par. #3).
9. LIMPIEZA
LIMPIEZA DE LA GUIA DE ONDA (punta del equipo): el sensor (fig. 1) es una
zona muy delicada y debe ser siempre limpio. Se recomienda entonces de
mantener el termómetro en un lugar seco y limpio, protegido contra el polvo.
Si se necesita limpiar el sensor quitar polvo u otra suciedad, usar un palito de
algodón humedecido en alcohol. Asegurarse de quitar toda la suciedad evitando
que se acumule al final del sensor. No usar otros objetos o líquidos que
podrían fácilmente dañar la superficie del sensor. Durante esta operación
asegúrense que el liquido en exceso no penetre entre el termómetro yel sensor.
LIMPIEZA DEL CUERPO DEL TERMÓMETRO: usar un paño suave y levemente
mojado con jabón y agua y eventualmente utilizar también un desinfectante.
NO USAR el termómetro por lo menos 30 minutos después de haberlo
limpiado.