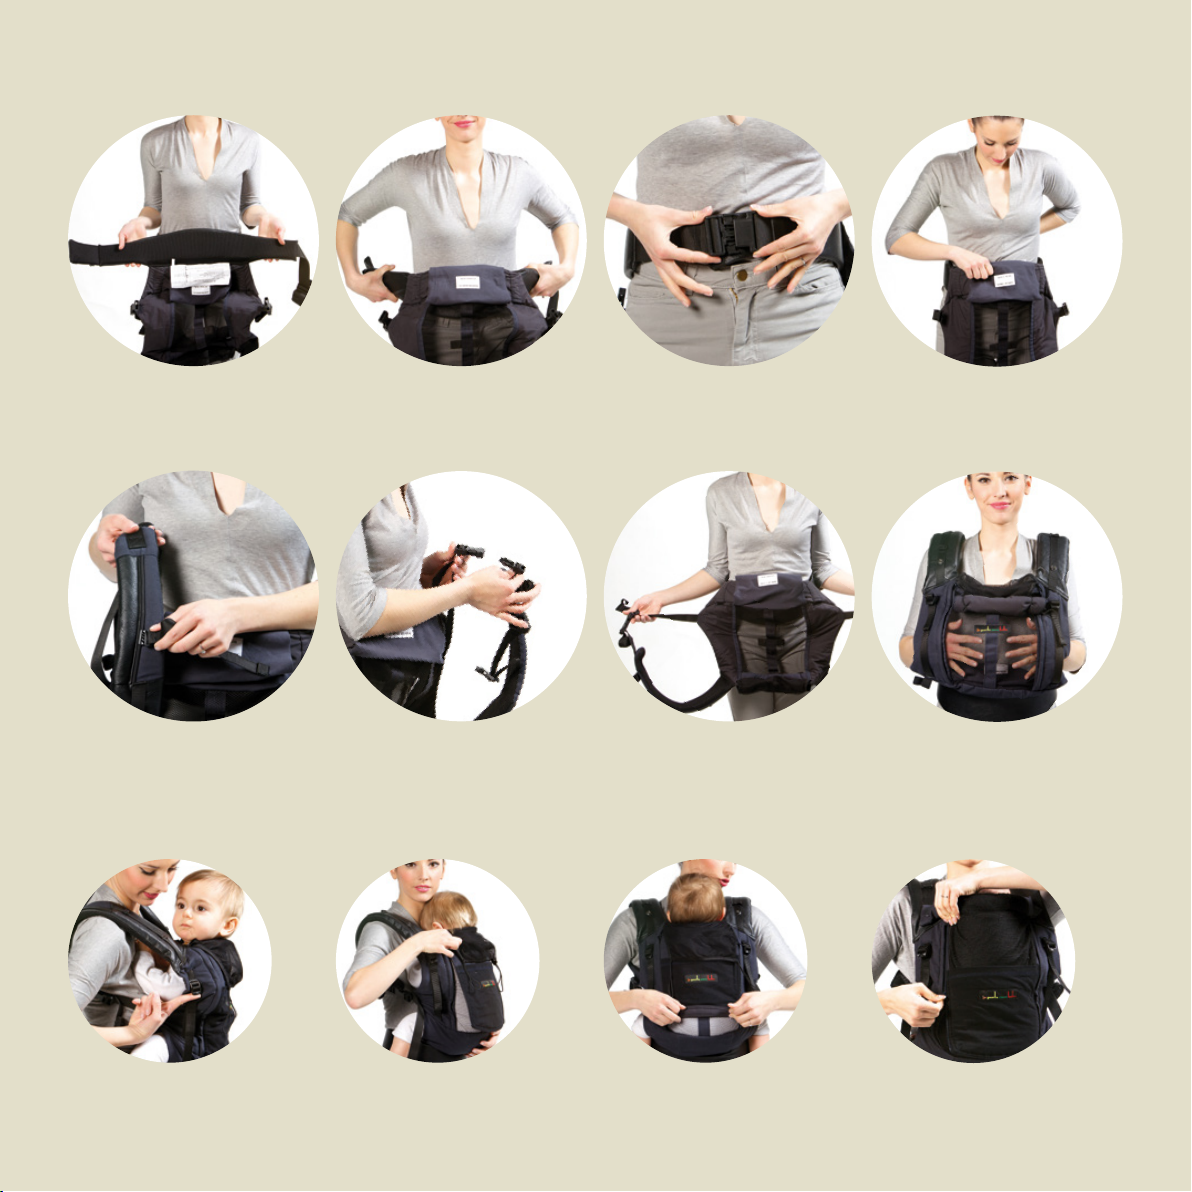
JPMBB PhysioCarrier User manual

3,5*/5 - 20KG 0/4 - 36 M
user’s guide
PHYSIOLOGICAL
BABY CARRIER
*with optional booster & neck
pillow pack
PhysioCarrier


FOUR-SEASONS ROLL-UP THERMO-VENTILATION FLAP
LATERAL ADJUSTMENT STRAPS:
- Adjust capacity to size of baby, from newborn to large baby.
- Support the flexed position of the knees and help tilt the pelvis.
- Allow weight to be distributed between shoulder suspenders and lumbar belt.
MIRROR FOR BACK CARRYING
HEAVY-DUTY VENTILATED PADDING (2,5cm)
TRANSPARENT VENTILATED HEAD COVER
BABY’S PHYSIOLOGICAL SEATED POSITION
FRONT, SIDE AND BACK CARRY 4 SEASONS THERMO-VENTILATION
3
PhysioCarrier

Setting up your PhysioCarrier - p.5
Installing the optional Booster extension pack - p.6
Front Carry for an infant - p.7
(optional booster and neck pillow)
Front Carry, from 4 months - p.8
Adjustments tips - p.9
Side Carry - p.10
Back Carry - p.12
Safety - p.15
5-15kg 4-18m
5-15kg 4-18m
7-20kg 6-36m
3,5-7kg 0-4m
PhysioCarrier
IMPORTANT NOTICE: KEEP FOR FUTURE REFERENCE

Setting up your PhysioCarrier baby carrier
Opening the ventilation flap
55
3. Put the male clip of the lumbar belt
into the safety elastic. Attach the clip
and check that it is secure. You should
hear a click.
4. Adjust the strap, then bring the baby
carrier around to the front again.
5. Push the slider of the horizontal
strap along the suspender towards
the press stud.
8. You should rst try on and adjust
the baby carrier when it is empty,
before putting Baby into it.
2. Turn the belt so that the foam side
is against you. Rotate the belt around
your waist so that the baby carrier is
behind you.
1. Hold the baby carrier upside down,
with the outside against you.
6. Attach the male clip to the female
clip on the same side, so that the
suspender is closed.
7. Loosen the straps of the suspen-
ders attached to the side of the
central compartment.
a. To open the ap, undo the central
section’s straps, to eliminate creases.
b. Pull up the slider of the zipper. d. To close it, loosen the side straps,
unroll the ap and while holding the
zipper at the top, pull the slider down.
c. Roll up the ap. Attach it with the
elastic bands under it.

6
Installing the optional «Booster» extension pack
Installing the neck pillow (optional «Booster» extension pack)
Installing the Booster (optional «Booster» extension pack)
1: To carry an infant,
starting from a few
days old.
2: To carry a baby higher, so that
curious Baby can see over your
shoulder.
PhysioCarrier only
36 m/20 kg
6 m/7 kg
0 m/3,5 kg
18 m
4 m/5 kg
12 m
I. Slip the neck pillow into the
tunnel.
II. Attach the neck pillow with the
press studs.
The «Booster» exten-
sion pack with booster
seat and removable
headrest is perfect for
carrying an infant. But
it is also designed for a
bigger baby, who gets
a higher perch and a
much better view over
your shoulder.
When Baby weighs a
lot, the booster is useful
to give the carrying
adult a higher center
of gravity and the
sensation of carrying a
backpack (which some
people prefer).
A. Attach the baby carrier as shown
on page 15. Slip your hand into the
tunnel so that you can take hold of the
booster in the next step.
B. Insert the booster in the tunnel, the
point towards you and the wide part
under the white label.
C. Before seating Baby, place the label
facing up.
D. Baby sits with his bottom on the
label.
Newborn with neck pillow
and booster.
Baby age 16 months, without
booster or neck pillow.

7
Front carry for an infant (with optional «Booster» extension pack)
1. With the booster in place (p.6) and
the baby carrier on you (p.5), hold
Baby against you, knees bent.
5. Holding Baby with one hand, slip
your other hand through the suspender.
9. Support Baby with one hand; with
the other hand, adjust the suspender
strap by pulling down.
2. Turn the booster towards you, seat
Baby on the label.
6. Pull the other suspender up on your
shoulder, still holding Baby.
10. Do the same on the other side.
3. Check Baby’s position: Knees must
be open to the same width as the hips.
7. Clip the buckle behind your back
and tighten if necessary.
11. Pull the straps of the front section
to uncover Baby’s face and adjust the
t to Baby’s body.
4. Check Baby’s position: Knees raised
and bent. Feet unsupporteds.
8. Check Baby’s position. Baby must
be sitting in the middle, back against
the mesh.
12. See Page 9 for how to adjust side
straps; adjust head cover; cover or
uncover the mesh against Baby’s back.
3,5-7kg 0-4m

8
Front carry (from 4 months)
Starting when Baby can hold up their head, or as soon as they can open
their knees wider than the width of the baby carrier (at around 4 months).
1. Start with the suspender straps at-
tached and loose, as shown on page 15.
5. As you continue to hold Baby, put
your arm through the rst suspender.
9. Adjust the suspender strap by
pulling down…
13. Depending on Baby’s size and their
mood, you can leave one arm free.
2. Hold Baby against you.
6. Then slip into the second suspender.
10. ... on both sides.
3. As you continue to hold Baby, take
hold of the suspenders at the top of the
central section.
7. Once you have put on the sus-
penders, attach the horizontal strap
between your shoulder blades.
11. See Page 9 for how to adjust side
straps; adjust head cover; cover or
uncover the mesh against Baby’s back.
4. Lift the suspenders and make sure
Baby is seated correctly, deep in the
baby carrier.
8. Adjust the tightness of the horizon-
tal strap across your back.
5-15kg 4-18m

9
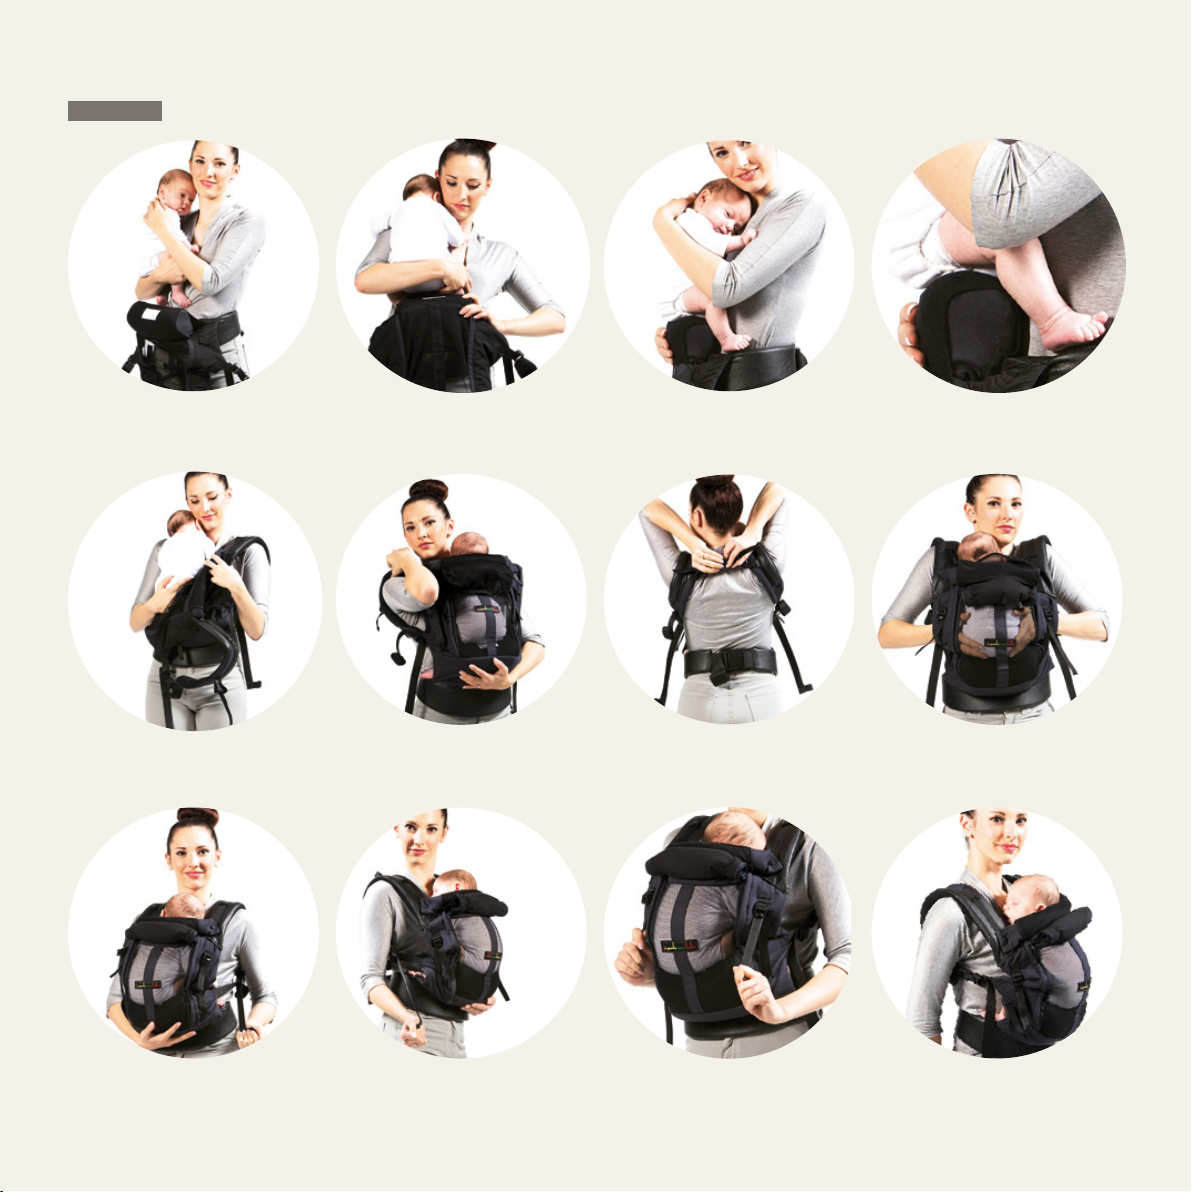
Supporting the head with the head cover
Adjust to a perfect fit for Baby
Opening the ventilation flap
Adjustment tips
You can wear the suspenders crossed in
the back. To wear them crossed, unclip
the suspenders before steps 1 to 6, then
cross them and clip them at step 5, on
page 8.
Crossed suspenders
a. To open the ap, loosen the straps of
the central section.
I. Tightening the side straps allows you
to adjust the baby carrier to t Baby’s
body..
A. To support Baby’s head, use the
mesh head cover.
b. Pull up the slider of the zipper.
II. This makes it possible for a large and
mobile Baby to have their arms out.
d. To close it, loosen the side straps,
unroll the ap and while holding the
zipper at the top, pull the slider down.
B. Attach the elastic loops to the hooks
on the suspenders.
c. Roll up the ap. Attach it with the
elastic bands under it.
III. This frees the respiratory passages,
particularly for infants.
C. Make sure Baby’s face is ventilated.
If necessary, tighten the strap of the
central section.
Before the age of 4 months,
Baby can’t hold his head up.
You need to use the head
cover.
Later, it will come in handy
when Baby is resting or
sleeping.

10
Side carry
1. Unfasten your suspenders.
11. Find the most comfortable position
on your shoulder for the suspender.
19. Support Baby.
9. Pull the central section up Baby’s
back, so that Baby is seated comfor-
tably, deep in the baby carrier.
17. Loosen the strap with your thumb,
pushing up. (Do not unfasten, simply
loosen.)
2. Your two suspenders are now
unfastened.
3. Place the baby carrier on your hip,
on the side you carry Baby.
12. Adjust the back strap by pulling it
down.
4. Take the strap from your carrying
side, and the suspender from the other
side...
10. Tuck Baby’s hand under your arm.
18. Hold Baby and lift your arm out.
5-15kg 4-18m

11
16. See Page 9 for how to adjust side
straps; adjust head cover; cover or
uncover the mesh against Baby’s back.
5. ... and attach the strap to its oppo-
site suspender.
13. Take the remaining suspender and
the remaining strap from the other side
and unroll the remaining strap.
6. Slip on the suspender.
14. Put the suspender across your back
then under your armpit and attach it to
the strap.
7. Get ready to put Baby in the baby
carrier.
15. Adjust the tightness by pulling
towards you.
8. Pull Baby’s leg through, the leg that
will be behind you, between the strap
and your back.

12
Back carry
Using the head cover
7-20kg 6-36m
1. Start from a front carry position (see
page 18)
B. Pull them backwards, over Baby’s
head.
2. Loosen but do not unfasten the
straps.
11. Lean forward slightly and slip on
your suspender.
3. Loosen the horizontal back strap.
C. Attach them to the buttons.
9. Lift up your right arm so Baby’s head
can pass under it. Continue to hold
Baby.
10. Continue to move Baby around to
your back. Continue to hold Baby.
A. Reach behind you and take hold of
the head cover’s elastic loops.
12. Slip on the second suspender by
putting your elbow through it.
4. The suspenders should now be loose.

13
Back carry with the Booster (with optional Booster pack)
5. While you continue to hold Baby
with one hand, raise your other hand...
II. Baby will be sitting higher and able
to satisfy her curiosity by looking over
your shoulder.
6. ... then slip off the suspender and
now hold Baby with the other hand.
13. Tighten your suspenders by pulling
on the straps.
14. You can use the mirror to check on
Baby behind you.
Exit. Loosen the midsection strap and the suspender straps. Remove the suspen-
ders (see steps 12 and 11) and bring Baby around to the front again, holding him
at all times.
7. Take your elbow out to remove the
other suspender, then hold Baby with
both hands.
I. Baby will be sitting with his bottom
on the label. Go through the steps
listed above.
8. Turn the baby carrier around to your
right. Continue to hold Baby.

PhysioCarrier
15

15
FALL HAZARD - Infants can fall through a wide leg opening or out of carrier.
• Adjust leg openings to fit baby’s legs snugly.
• Before each use, make sure all fasteners are secure.
• Take special care when leaning or walking.
• Never bend at waist; bend at knees.
• Only use this carrier for children between 7,7lbs and 44lbs.
SUFFOCATION HAZARD - Infants under 4 months can suffocate in this product if
face is pressed tight against your body.
• Do not strap baby too tight against your body.
• Allow room for head movement.
• Keep infant’s face free from obstructions at all times.
WARNING
FALL AND SUFFOCATION HAZARD
1. Read all instructions before assembling and using the soft carrier.
2. Keep instructions for future use.
3. Check to assure all buckles, snaps, straps, and adjustments are secure before each use.
4. Check for ripped seams, torn straps or fabric and damaged fasteners before each use.
5. Ensure proper placement of child in product includ- ing leg placement.
6. Premature infants, infants with respiratory problems, and infants under 4 months are at greatest risk of suffocation.
7. Never use a soft carrier when balance or mobility is impaired because of exercise, drowsiness, or medical conditions.
8. Never use a soft carrier while engaging in activities such as cooking and cleaning which involve a heat source or exposure to chemicals.
9. Never wear a soft carrier while driving or being a passenger in a motor vehicle.
SAFETY RULES
IMPORTANT NOTICE: KEEP FOR FUTURE REFERENCE
PHYSIOCARRIER JPMBB - BABY CARRIER 3,5*/5KG TO 20KG / 4-36 M *with booster pack
CARE
Wash at 30°, on a gentle wash, air dry, no iron, no bleach..
CONFORMITY
Complies to ASTM F2236 standard and european safety requirements for childcare items. Oko Tex 100 certified fabric. No heavy metals used in the dye.
The brand name and model are registered. All rights of reproduction reserved by Je Porte Mon Bébé® - JPMBB®.
Designed in France, made in Europe.

www.jeportemonbebe.com
Je Porte mon Bébé - 366 Avenue Joseph-Louis Lambot - BP 50537 - ZI Toulon Est - 83042 Toulon Cedex 9 - France - +33-4 83 73 52 10
PhysioCarrier
Table of contents
Other JPMBB Baby Carrier manuals