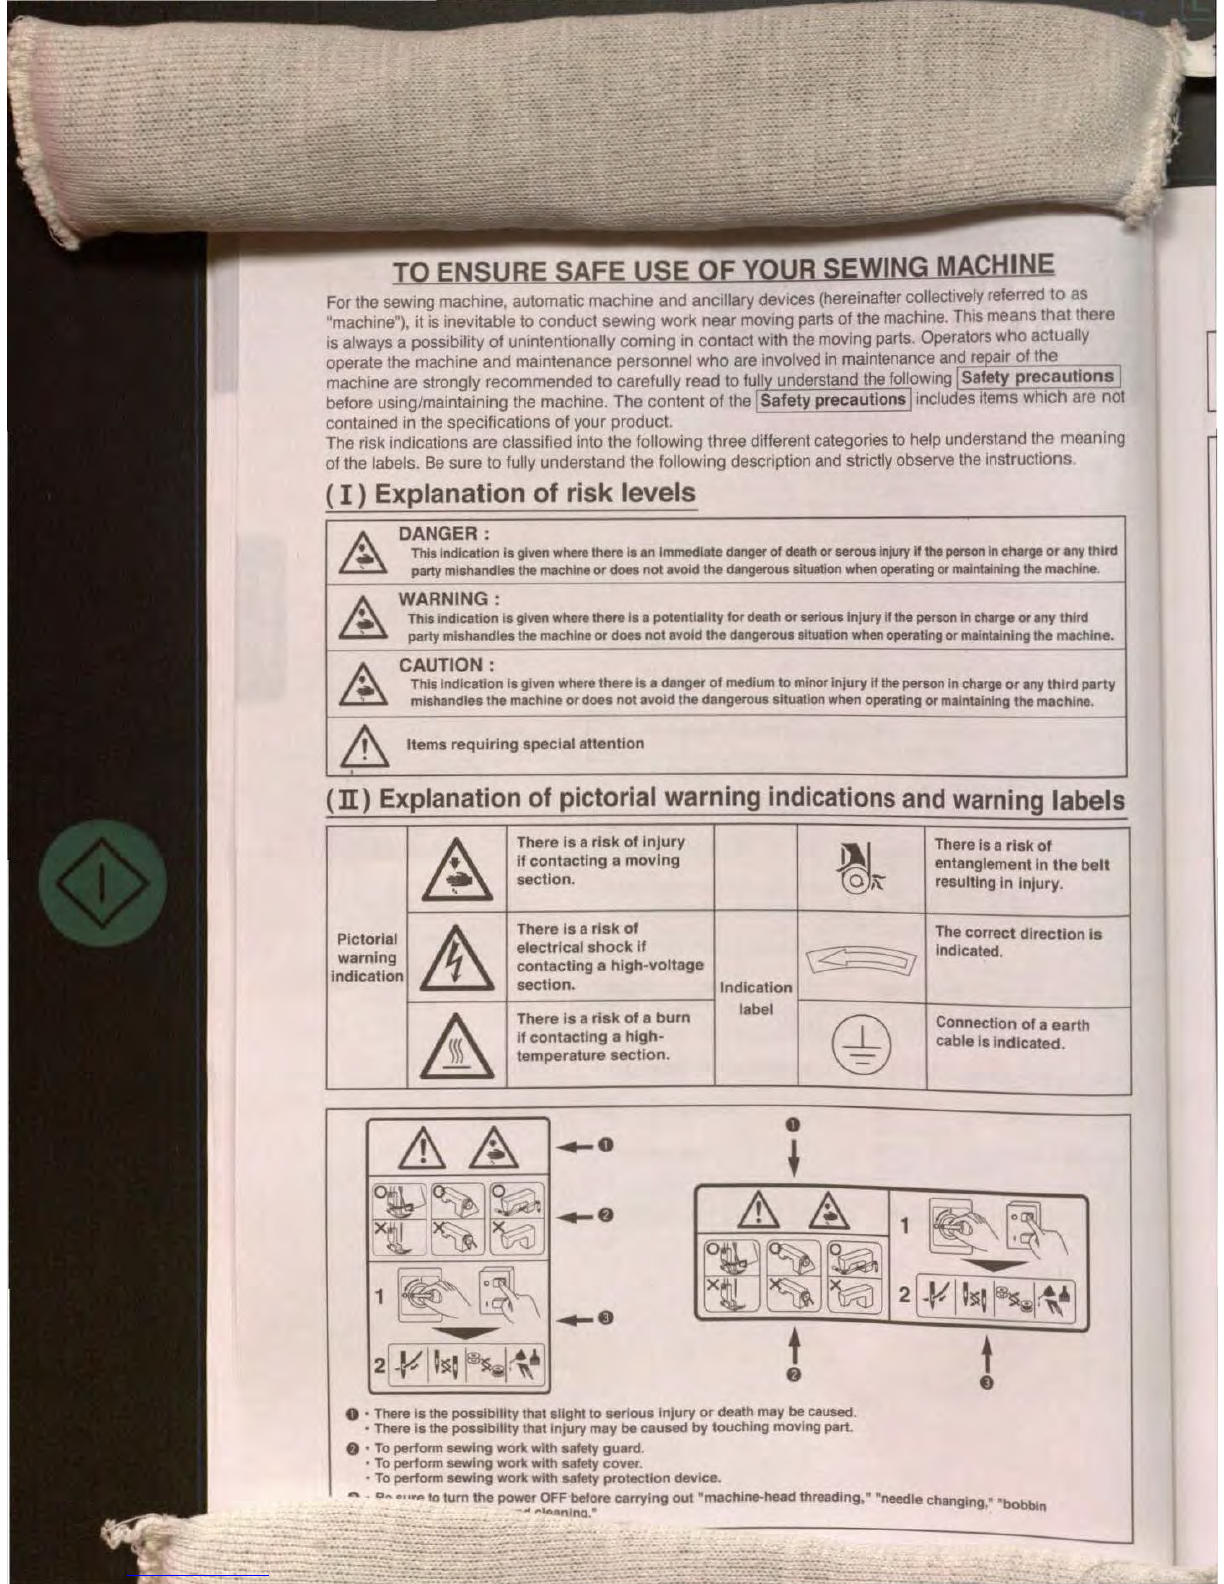
JUKI SC-922 User manual

SC-922
QXm~a~&
INSTRUCTION
MANUAL
MANUAL
DE
INSTRUCCIONES
itmtJCaJ]~
5
!.
:
t:0)1tt11~-
~ttO)J:l
~
~as•l.\...tl1l.H
t
t.:i!*L,
~®
btJTc?
~~"'*l.J1t
o
!t~to:
fl!m
L,
~~.'
tt
tt.
<.
ttl!bt
o:,
lf.EOiiJ
t;:
~
~i:
C7)J&m~aBJJa~
asmh<
tt.t!
"'
0
~tt,
\,
r:>Z:t,~
<."
l
i:IJ!/sbQ
~?
li:,
t:
O)
J6lmltl'.ij8~f¥·V~
<.
tf.~l.'
•
NOTE : Read safety Instructi
ons
carefully
and
understand
them
beforeusing.
Retain this Instruction Manual for future reference.
NOTA : Antes decomenzara usar esta
m~qulna
leacon detencl
6n
hastacomprender todas l
as
lnstrucclonesde sequrldad. Conserve este Manual
de
instrucclonesamano
para
futuras
consultas.
it.
:
~T
~~~~m
.
~~~~mzm-~oo~*~m~M~
.
~*
·
il~~•~•*~m~an~
.
tHIIIB>t•~
-
No.OO

TO
ENSURE SAFE
USE
OF
YOUR SEWING MACHINE
For thesewing machi
ne
,automatic machine and ancillarydevices (hereinafter collectively referred
to
as
"machine"), it is inevitable
to
conduct sewing work
near
moving parts
of
themachine This means
that
there
is always a possibility
of
unintentionally coming in contact with the moving parts. Operators who actually
operate the machine and maintenance personnel
who
are involved in maintenance and
re
air
of
the
machine are strongly recommended
to
carefully read
to
fully understand the following Safety
precautions
before using/matntaimng the machine. The content
of
the I
Safety
precautionsIincludes items which are not
contained in
the
specifications
of
your product.
The risk indications are classified into the following three different categories
to
help understand the meaning
of
the labels.
Be
sure
to
fully understand the following description
and
strictly observe the instructions.
(I ) Explanation of risk levels
~
DANGER :
This indication Isgiven
where
thereIs
an
Immediate
danger
of
death
or
serous
Injury
If
the
person
In
charge
or
any
third
party mishandles the
machine
or doet notavoid thedangerous situation
when
operating
or
rnamtaining
the
machine.
~
WARNING:
Thisindication Isgiven where there Isapotentiality for
death
orserious InjuryII
the
person
In
charge
or
any
third
partymishandles
the
machine
or
doea notavoid thedangerous situation
when
operating ormaintaining the machine.
~
CAUTION :
ThisIndication Isgiven where thereIs a danger
of
medium
to
minor Injury If
the
person
In
charge
or
any
third party
mishandlesthemachine
or
does not avoid the dangerous situation when operating ormaintaining the machine.
&
Items
requiring
special
attention
(
n)
Explanation
of
pictorial
warning
indications
and
warning
labels
~
There
Is
a
risk
of
Injury
~~
There
Is
a
risk
of
If
contacting
a
moving
entanglement
In
the
belt
section.
resulting
In
Injury.
Pictorial
~
There
Is
a
risk
of
The
correct
direction
Is
warning
electrical
shock
If
~
indicated
.
Indication
contacting
a
high-voltage
section.
Indication
&
There
Is
a
risk
of
a
burn
label
@
Connection
of
a
earth
if
contacting
a
high-
cable
Is
indicated.
temperature
section.
0
.....o
~
t
f)
t
•

SAFETY PRECAUTIONS •
Accldentmeans
"
tocause--~
1 personal
Injury
or death
or
damageto
property
."
A
L------
-----
--
--
-tA
~DANGER
1. When It
1~
necessary to
open
the control box containing electrical parts,
be
sure
to
turn
the
poweroff
and
walt for ftve minutes or
more
before opening thecover
in
order
to
prevent accident
lead
i
ng
to electrical
shock.
Basic precaution &CAUTION
--------------.
1. Be sure
to
read the Instruction manual and otherexplanatory documents
supplied
with accessories
of
the machine before
us
i
ng
the
machine. Carefully keep
the
Instruction manual and theexplanatory
docu
·
mentsat hand
for
quickreference.
2. The content
of
this section includesItemswhich are
not
contained Inthe specifications
of
your
product
3. Be sure
to
wearsafety goggles
to
protectagainst accidentcaused by needle breakage.
4. Thosewho use aheart
pacer
haveto
use
the
machine afterconsultation
with
a
med
i
cal
specialist
[Safety
devices and warning labels]
1. Be sure
to
operate
the
machine after
verifying
that safetydevlce(s)
Is
correctly Installed
in
placeand
works normally In order
to
prevent accident caused by lack
of
the
devlce(s).
2. Ifany
of
the
safety devi
ces
is removed, be sureto replace It and verify that
it
works
normally
In
order to
prevent accident
that
can
result
In
personal injury
or
death.
3.
Be
sure
to
keep the warninglabelsadhered on the machineclearly visible
In
order
to prevent
accident
that can result In personal injury ordeath.
If
any
of
the labels hasstained
or
come unstuck, be sure
to
change
it
with a new
one
.
Application
anct
modification I
1. Never use the machine
for
any application otherthan
its
intended one
and
In any manner other than
that
prescribed In
the
instructionmanual
In
order to prevent accident
that
can
result In personal injury
or
death.
JUKIassumes no responsibility
for
damagesor personal injury
or
death resulting from
the
use
of
the
machine
for
any application
other
than the Intended
one
.
2. Never modify and alter
the
machineIn order
to
prevent accident that
can
result In personal Injury
or
death.
JUKIassumes no responsibility
for
damages or personal injury
or
death resulting from
the
machine
which hasbeen modified
or
altered.
Education and training]
1. In order
to
preventaccident resulting from unfamiliaritywith
the
machine,
the
machi
ne
hasto
be
used
only
by
the
operatorwho has been trained/educated
by
the employer with respect to
the
machine opera-
tion
and
how
to
operate
the
machine
with
safety
to
acquireadequate knowledge andoperation skill.
To
ensure
the
above, the employer has
to
establish an education/training plan
for
the
operators
and
edu-
cateJtraln them beforehand.
[i!eins
for which the power
to
the machine h·
as
to
beturned
off
I
~
Tu~
~lng
the
pO~e
-;
off
:
-
Tu~l~g
th;
power
-
sw~c
-h
off, then;emovlng-
the
'
p;,;;r
pl~g
from
thi
outlet.-
This
--'
• applies to
the
following. -
--
.j
-1
~
9;
s-
u~
t;
l
~medi;tcly
-
t~r~
th~
p~;e;
;ffif
any
abnormality
or
failure Is found
or
In
the
case
of
power
failure
in
order
to protect againstaccident thatcan result
In
personal injury ordeath.
2. To protect against acci
dent
resulting from abrupt start
of
the machine,be sure
to
carry
out
the
follow-
I
ng
operati
ons
after
tumlng
the power off. Forthe machine Incorporating a clutch motor, in
part
i
cular
,
be sure
to
carry
out
the
following
operations after
turning
the power offand verifying
that
the machine
stops
completely.
2-1
. Forexample, threading
the
parts
such
as
the needle,looper, spreader etc. which have
to
be
threaded,
or
changing
the
bobbin.
2-2. Forexample, changing
or
adjusting
all
componentparts
of
the
machine.
2-3. For example, when Inspecting, repairing or cleaning
the
machine or leaving
the
machine
.
3. Be sure to remove the
power
plug
by holdingthe plug section instead of
the
cord
sectionin order
to
pre-
vent
electrical-shock,earth-leakage
or
fire accl
den1
.
4. Besure
to
turn
the
power offwhenever the machine
is
leftunattended between works.
5. Be sure
to
turn
the
power off
in
the
case
of
powerfailure
In
order
to
prevent accident
resulting
of
break-
age ofelectrical components.
[ii"
RE'CAUTIONS
TO
BE
TAKEN
IN
VARIOUS
OPERATION
STAGES
:
[Transportation I
1. Be sure to li
ft
and move
the
machi
ne
In a safemanner taking
~he
machine
weight
In
consideration. R
efe
r
to the text
of
the Instructionmanual
for
the
mass of
the
machme.
ii

2.
Be sure
to
take
sufficientsafety measures
to
prevent falling ordropping beforelifting
or
moving the
machineIn
order
to protectagainst accident that can result
in
personal injuryor
death
.
3.
Once the machine has been
unpacked,
neverre-pack Itfortransportation
to
protectthe machineagainst
breaka~e
resulting from unexpected
accident
ordropping.
Unpackin_ I
1. Be sure
to
unpack
the
machine In
the
prescribed orderIn order
to
prevent accident
that
can result In
personal
injury
ordeath. In
the
case
the
machine ls,crated,
In
particular, be sure
to
carefully check nalls.
The nails have
to
be removed.
2. Be sure
to
check
the machine
for
the
position
of Its centerofgravity
and
take It out from the package
careful!
in
order
to
prevent
accident
that
can result In personal injuryordeath.
Installation
( I ) Table and
table
stand
1.
Be sureto useJUKI genuine table
and
table stand In orderto prevent accidentthat
can
result
In
per-
sonal injury
or
death. If ItIs Inevitable to use a table and table stand which
are
not
JUKI
genuineones,
selectthe table and tablestand which are able to supportthe machineweightand reaction force
during
operation.
2. Ifcasters are fitted
to
the table stand,
be
sure
to
use the casters
with
alocking mechanism and lock
them to secure the machine
during
the
operation, maintenance, inspection
and
repair in order
to
prevent
accident that can resultin personal
Injury
or
death.
(
n)
Cable and
wiring
1. Be sure to prevent an extra
force
from being applied
to
the cable during
the
use
in
order
to
prevent
electrical-shock, earth-leakage
or
fire
accident. In addition,
If
It is necessary to cablenear the operating
section such as the V-belt, be
sure
to
providea space
of
30
mm
or
morebetween the operating section
and thecable.
2. Be sure
to
avoid
starburstconnection In
order
to preventelectrical-shock, earth-leakage
or
fire accident.
3. Be sure to securely connect
the
connectors In order to prevent electrical-shock, earth-leakage
or
fire ac·
cident. In addition, besure to remove
the
connectorwhile holding
its
connectorsection.
(m)
Grounding
1.
Be
sure
to
have
an
electrical
expert
Install an appropriate power
plug
in
orderto prevent accident
caused by earth-leakage
or
dielectric strength voltage fault.
In
addition,besure
to
connect the
power
plug to the grounded outlet
without
exceptions.
2.
Be sure to
ground
the
earth cable In
order
to preventaccident caused
by
earth
leakage.
(l'l)
Motor
1.
Be
sure to
use
the specified rated
motor
(JUKI genuine product)
in
order
to
preventaccident caused by
burnout.
2. Ifa commercially available cluteh
motor
Is used with the machine, besure
to
select
one
with
an entan-
lement reventive pulley
cover
In
order
to
protectagainst being entangled
by
the V·belt
Before o eration ·
1.
Be
sure
~o
makesure that the
connectors
and cables are
fr~
from damage, dropout
and
looseness
be-
fore turnmg
the
poweron in
order
to
preventaccident resulting
in
personal Injury
or
death.
2. Never put
your
hand
Into
the
moving
sections
of
the machine in orderto prevent accld t th t It
in personal
injury
or
death. en • a can.resu
In addition, check to
be
sure that the direction
of
rotation of
the
pulley
agrees
with
th
h
3.
If
the
table
stand
with casters
is
used,
be
sure
to secure thetable stand by lockl e
atrrhow
s
own
on
~ulley
.
• • 1 • ng ecasters
or
w1th
adJUSters,
if
provided, m order
to
protectaga
nst
accedent caused
by
abrupt start f
th
D . . 1 o
emachlne
urmg
operatton I •
1.
Be
sure not
to
put
your
fingers,
hair
or
clothing
close
to
the moving sections such
as
th h
hand pulley and motor
or
place something nearthosesections while
the
machi . i e andwheel,
to
prevent accidentcaused by entanglement
that
can result in personal injury
0
~~~at~.operation
in
order
2.
Be
surenot
to
place
your
fingers near
the
surround area
of
the needleor Inside th th
cover when turning
the
power
on
or
while
the
machine
is
In
operation
in
orde t e read take-up lever
can result
in
personal Injury
or
death. r 0 prevent accident
that
3. The machine
runs
at a high speed. Never
bring
your
hands near
the
moving s ti
spreader, needlebar,
hook
and
cloth
trimming
knife duringoperation
In
order~
ons such
as
looper,
againstInjury. In addition,
be
sure
to
turn
the
power
off
and check
to
be
sure
th:r;~tect
yo~r
hands
ly stops before changing the thread. emach
me
complete·
4.
Be
careful
not
to
allow
your
fingers
or
any
other
parts
of
your body
to
be cau ht
be
and tablewhen removing the machine from
or
replacing Iton thetable
In
ord
g t
tween
the machine
can result
in
personal Injury
or
death.
er
0 prevent accident
that
5.
Be
sure to turn thepower offand check
to
be surethat the
machine
and
motor
co 1
lng the beltcover
and
V-belt
in
order to preventaccident
caused
by
abruptstart
0
~~
etelystop before remov-
6. If a servomotor
is
used with the machine,
the
motordoes not prOduce noise
wh
'le
mach
in
e or motor.
Be
surenot
to
forget
to
turn the power
off
In orderto prevent accident
caused~
e
~e
machine Is atrest.
7.
Never use
the
machine with
the
cooling
opening
of
the
motor
power
box
shleiJ~
1
rupt startof
the
motor.
accidentby overheat. n
Order
to prevent
fire

Lubricat
i
on
1. Be sure
to
use JUKI genuineoil and JUKIgenuine grease to
the
partsto be lubricated.
2. Ifthe oil
adh
e
res
on
your
eye
or
body
,
be
sure to I
mmediately
wash it
off
In
order
to
prevent inflammation orIrritation.
3. If the
ollls
swallowed unintentionally,
be
sure toImmediately
consult
amedical doctor
In
order to pre-
vent diarrhea
or
vomiting.
Maintenance
I
1. In prevention
of
accident caused
by
unfamiliarity with
the
machine, repair and adjustmenthas
to
be
carried
out
by a service technician who
is
thoroughly familiar
with
the
machinewithin
the
scopedefined
In
the
Instruction manual.
Be
sure to
use
JUKI genuine parts when replacing any
of
the
machineparts.
JUKI assumes
no
responsibility
for
any accidentcaused by i
mproper
repair
or
adjustmentor
the
use
of
any part other than JUKI genuine one"
2. In prevention
of
accident caused
by
unfamiliarity
with
the
machine
or
electrical-shockaccident,
be
sure
to
askan electrical technician
of
your
company or JUKI
or
distributorin
your
area for repairand mainte-
nance (Including wiring)
of
electrical components.
3. When carrying out repair
or
maintenance
of
the machine which uses air-driven
parts
such
as an air
cyl-
inder, be sure
to
remove
the
air
supply
pipe
to
expel air remaining
In
the machine beforehand, In
order
to
prevent accidentcaused
by
abruptstart of
the
air-driven parts.
4.
Be
sure
to
checkthat screws and nuts arefree from looseness after completion
of
repair, adjustment
and part replacement.
5.
Be
sure
to
periodicallyclean
up
the
machi
ne
during
its
duration
of
use. Be
sure
to
turn
the
power
off
and
verify that the machineand
motor
stop
completely
before
cleaning
the
machine
in
order
to
prevent
ac·
cident caused
by
abrupt
start
of
the
machineormotor.
6. Be sure
to
turn
the power
off
and veri
fy
that the machi
ne
and
motor
stopcompletelybeforecarrying out
maintenance, Inspection
or
repair
of
the
machine. (For
the
machine with a clutch motor, the motor
will
keep running
for
awhile
by
Inertia even after turning
the
power off. So,be careful.)
7. If the machine cannot
be
normally
operated after repair
or
adjustment,Immediatelystop operation and
contact
JUKJ
or
the
distributor
in
your
area
for
repair In order
to
prevent accident that
can
result
In
per-
sonal Injury
or
death.
8. Ifthe fuse has blown,
be
sure to
turn
the power off
and!
eliminate thecause ofblowing
of
the
fuse and re-
place the blown fuse with a new onein order
to
prevent
acc
ident that can result In personal Injury
or
death.
9.
Be
sure
to
periodicallyclean up
the
air vent
of
the fan
and
inspect
the
area
around
the
wiring
in
order
to
revent fire accident
of
the
motor
.
Operating
environmentl
1. Be sure
to
use the machine
under
the environment
which
is
not
affected by
strong
noise source (electro-
magnetic waves) suchas a high-frequency welder in
order
to preventaccident caused
by
malfunction
of
the machine.
2. Never operate
the
machine In
any
place wherethe voltagefluctuates by more
than
•rated voltage
1::10
%"
Inorder
to
prevent accidentcaused
by
malfunction of
the
machine.
3.
Be
sure
to
verify
that
the air-driven devicesuch
as
an
air
cylinderoperates at
the
specified airpressure
before using
it
Inorderto prevent accident caused by malfunction
of
the machine.
4.
To
usethe machine with safety, be sure to
use
it
under the environment which satisfies
the
following conditions:
Ambient temperature
during
operation soc to
35
oc
Relative humidity during operation 35 %
to
85
%
5.
Dew
condensation can
occur
If
bringi
ng
the machine suddenly from a cold environment
to
awarm one.
So
,
be
sure
to
turn the power
on
after having waited
for
a
suffic
ient period of lime until there
Is
no
sign
of
wa-
ter droplet In order
to
prevent accident caused
by
breakageor malfunction
of
the electrical components.
6.
Be
sure
to
stop
operation when lightningflashes
for
the
sake
of
safetyand remove
the
power
plug
In
order to preventaccident caused by breakageor malfunction
of
the electrical components.
7. Dependi
ng
on the radio wavesignal
condition
,
the
machine
may
generate noise
in
the
TV
orradio.
If
this
occurs use
the
TV
or
radio
with
kept well away from
the
machine.
8.
Forth~
worker who Is Involved
in
the work
to
be
done
In
the
environment relevant to "
noise
valueIn the
working environmentis 85 dB
or
moreand less than
90
dB",
be
sure to take appropriate measures,
as
required,
such
as
the
use
of
ear protection
or
the like
to
protect against health hazard.
In
addition,
for
the
worker who
Is
Involved
In
the
work
to
bedoneIn
the
environment relevant
to
•noise
level
in
the
working
environment
is
90
dB
or
more
,"
be
sure
to
Instruct
him/he~
to wear ear protection withoutexceptions
in
order to protectagainst health hazard, and displaya
sign
explaining how
to
use
the
ear protection
at
an
easily viewable location
for
the
worker
.
IV

This model
is
in
tended for commercial use.
IBEFORE OPERATION "IMPORTANT SAFETY INSTRUCTIONS"
When
using
the
sewing
m~chine,
basic safety precautions
should
always
be
followed
,
inc
luding
the
follow1ng
: Read
all
instructions before using
DANGER
-To
reduce
the
risk
of
electric
shock:
WARNING-
To reduce
the
risk
of
bums, fire, electric shock, orInjury to persons:
1. Do
not
allow
to
he
used
as
a
toy
. Close attention Is necessary when this machine
is
used by
or
near
children.
2.
Use
this
machine
only
for
Its
Intended
use
as
described
In
this
manual. Use
only
attachments
recommended
by
the manufactureras contained In this manual.
3. Never operate
this
machine
If
it
Is
not
working
properly, if
it
has
been
dropped
or
damaged,
or
dropped
into water. Return the machine
to
the nearest authorized dealer
or
service center for examination, repair,
electrical
or
mechanical adjustment.
4. Never drop
or
insertany object Into any opening.
5.
Do
not
use
outdoors
.
6.
Do
not
operate where aerosol (spray)
products
are being used orwhere oxygen Is
being
administered.
7.
To
disconnect,
turn
all controls
to
the
off
position
, then remove plug form outlet.
8. Never operate
the
machineunless Its
oil
pan has been filled with oil.
OPERATION PRECAUTIONS "SAVE THESE INSTRUCTIONS"
1. Never operate
the
machine
with
any
air
openings
blocked. Keep ventilation openings of
the
sewing
machinetree
from
the accumulation
of
lint
,
dust
, and loose cloth.
2. Keep fingers away from all moving
parts
. Special care Is required aroung the sewing machine needle.
3. Always use the proper needle plate.
The
wrong
plate can cause the
needle
to
break.
4.
Do
not
use
bent
needles.
5. Do
not
pull
or
push
fabric whilestitching.
It
maydeflect theneedle causing
it
to break.
6.
Switch
the
sewing
machine
off
when
making
any adjustments
in
the needle area, such
as
threading
needle, changing needle, threading
bobbin
,
or
changing presserfoot,
and
the like.
7. Always
disconnect
power
source
from
sewing
machine when removing covers lub 1 t' h
. . , r ca
mg
,
or
w en
makingany
other
userservicing adjustments mentioned in the Instruction manual.
a. Keep
your
hands
away from
the
needle when you
turn
the power switch
ON
or while the
machine
Is
operating.
9. Do
not
put
your
fingers Into
the
thread take-up coverwhile the machine is operating.
10
. Be
sure
to
turn
the
powerswitch
OFF
before
tilting
the
machine head orremoving theVbelt.
11. While the
sewing
machine Is
In
operation,
be
careful not to allow your
or
any
th
o
er
person
's
head or
hands to come close
to
the handwheel, V
belt
, bobbin winder or motor. Also do n t 1
to them. Doing
so
may
be
dangerous. • o Pace anything close
12.
If
your
machine Is provided
with
a belt cover, finger guard or any other protect d
ors, o not operate
your
machine
with
any
ofthem removed.
13.
To
achieve security,
be
sure
that
the
power
supply earth wire has
been
connect d
be
. e fore operating the
sewmg machine.
14
.
No
motor
sound Is heard when the sewing machine Is not operating.
5o
do not f
OFF
atthe end
of
work. ' orget
to
turn the
power
15. When you
move
the
unit
from a
cold
place directly to a warm place
dew
cond .
' ensatlon
may
It T
ON
the power
to
the
unit
after
you
haveconfirmed there is no fear
of
dew
cond . resu · urn
ensat1on
16- In case
of
thunder
, be sure
to
stop
the
unit
and remove the power plug from th ·
safety. e receptacle
for
extra
17. Whenever you connect/remove the
power
connector
or
the like, be sure
tot
0
beforehand. um
FF
the power switch

FOR SAFE OPERATION
~
1.
To
avoid electrical
shock
hazards, neither open
the
cover
of
the
electrical
box
for
the motor
nor
touch the components
mounted
inside
the
electrical
box
while
the
power switch
Is
ON.
1. So as
to
avoid personal injuries, never operate the machine
with
the safety devices
&
such
as the
belt
coverand
the
eye-guard cover removed.
2.
So as
to
avoid personal injuries caused
by
being
caught
in
the machine, during
operation,
be
careful
not
to
allowyour
or
any
other
person's head, hands
or
clothes
to come close to
the
handwheel, V-belt
or
motor.
Also
,
do
not
place anything close
to them.
3. So as
to
avoid Injuries
to
fingers and hands, be careful
not
to
allow
your
or
any
other
person's fingers
to
come close
to
the
cloth
cutting knife
or
the
needle when
turning
ON
the
power
or
during
operation.
4. So as
to
avoid Injuries
to
fingers and hands,
do
not place
the
fingers inside the eye-
guard cover.
5. So as
to
avoid personal injuries caused
by
abrupt
start
of
the
machine, turn
OFF
the
power switch and ascertain that
the
sewing machi
ne
does not
run
even
if
the
start
ing pedal
is
depressed when removing
belt
cover,motor pulley
or
V-belt.
6. So as
to
avoid personal injuries caused
by
abrupt
start
of
the
machine, turn
OFF
the
power
switch
and ascertain that
the
sewing
machine does
not
run
even
if
the
starting pedal
is
depressed when
performing
such
works
as
inspection
or
adjustment
of
the sewing machi
ne,
cleaning, threading,replacing the needle,
etc
.
7. So as
to
avoid electrical
shock
hazards, do
not
operate
the
machine
with
the
power
supply earth wire removed.
8.
So
as
to
avoid
electrical
shock
hazards
and
accidents
caused
by
damaged
electrical
components
, be
sure
to
turn
OFF
the power
switch
before
Inserting/
detaching
the
power plug.
9. So as
to
avoid personal injuries caused
by
abrupt
start
of
the
machine, turn
OFF
the power switch when leaving the sewing machine table.
1
o. So as
to
avoid personal Injuries caused
by
abrupt
start
of
the
machine, turn
OFF
the
powerswitch when
the
electricity
fails
.
11.
So
as
to
avoid personal injuries caused by being caught In
the
machine, the motor
pulley should
be
attached
with
the
pulley cover
as
well
as
the
catching protection
pin
.
12. When changing
the
set value described in the functions
for
maintenance (attached
with
• mark) on
the
function
setting
list
in
this
Instruction
Manual,
be
sure
to
purchase
the
Engineer's Manual andperform the
work
after
fully
understandi
ng
the
contents
.
If
the
set valve
Is
carelessly changed,
It
Is
In danger
of
causing the machine
to
be
broken
or
the
performance
to
be
deteriorated. So,
be
careful.
13.
Be
careful
of
handling
this
product
so
as
not
to
pour
water
or
oil
,
shock
by
dropp
ing,and the like
since
this
product
is aprecision Instrument.
vi

CONTENTS
I SPECIFIC
A'TIONS
..........................•.....•......................1
I
"'
I I I I I I I I I I I I I I I I I I I I I I I I I I I I I I
n SET
UP
IIIII
1 I I I I
IIII
I I
II
I I I I I I I
II
1111111111
I I I
II
I I I
II
I I I
111.1111
1
. -
...........................................
.
1. Installing the
motor
unit.......................................................................................................
.........
.....
1
2. Installing the control box
....
..
...............................................................................................
....
...
_1
3. Installing the belt............................................................................................................
....................
2
4. Adjusting thepulley cover......................................................................................
...........................
2
5.
Installation
and
adjustmentfor the protecting pin
and
thebelt slip-off preventing bracket
...................
3
6. Connecting the cords...........
..
............................................................................................................4
7. Attaching the connecting rod...............................................................................................
..
.........
12
8. Setting procedure ofthe machine
head
..
...........................................................................
............
13
9. Adjusting the machine
head
(direct-drive
motor
type
sewing
machine
only)
............................
14
m.
FOR
THE
OPERATOR
............................................................................
15
1. Operating procedure
of
the sewing machine
..
...
............................................................................
IS
2. Operation panel (CP-18)
...
..
................
...
..............................................................................
........
-
..
16
3. Operating procedure
of
the sewing pattern..........................................................................._
.....
17
(1)
Reverse
feed
stitchmg
pattern
...................................................................................................
1"
(2) Overlapped stitching pattern......................................................................................................
16
4. One-touch setting................
...
..
.......... . .
......
-19
.
·········
······················································
···
··
···
·
··
···
···
5. Production support function
......
...............................................................................................
......
20
6. Setting
of
functions
of
SC-922
......................................................
..
.......................................
......
...
23
7. Function setting list.....
..
....
..
.........................
.. ..
.
..............
24
8. Detailed explanation
of
selection of
functio~s
.............................................................
:::
...
..
.......
..
.
29
9. Automaticcompensation of neutral point
of
th
·~·
~~~;·~~~~~
·
;·
:::::::::::::::::::::::::::::::::
....
.......
.......
42
10. Selection
of
the pedal specifications.......
..
.......
..
.............
42
11
. Setting
of
the
auto
lifter function ...............................................................
43
12. Selecting procedure
of
the
key-1
0
~
·
~
·
~~~~~~~
·
~
.........................................................................
::::::::44
13. Initialization of
the
setting data ......................................................................
..
44
~
o
Ia
0 0
oooo,.oo
ooo
o
lo
o I O I I
IOO
too
I I I I
If
I I
10
0 0 I I I I 0 I
OliO
t 0 0 o
II
t 0 I 0 0 I
Ito
ott
I 0 I o o o I I 0 f 0 I I I o
ool
0
oo
I
00
0
oooooool
'N. MAINTENANCE ................................... .
......
45
1.
Removing the
rear
cover..........
..
••••
..
••
..
•
...........
•••
..........
••
....
•
45
2. Replacing th f
...
..
..............................................................................................
..
.
..
e
use
....
...................
..
..............
..
....
45
3. Errorcodes ....
..
.....................·.........·........................
..
.............
..
.......................
......
.
....
.
........
...........................................................
..
....
.....
..
..
.
.....
.....
..
......
46
Vii

I . SPECIFICATIONS
Supply voltage Single phase 100 to 120V 3-phase
200
to
240V
Singlephase
220
to
240V
Frequency 50Hz/60Hz 50Hz/60Hz 50Hz/60Hz
Operating envi- Temperature : 0
to
40
"C Temperature : 0
to
40
'C Temperature : 0
to
40
C
ronment Humidity : 90% or less Humidity :90% or less Humidity : 90%
or
les_s
__
Input 310VA 310VA 310VA
• The electric power is a reference value for
the
model equipped with
the
LU-1510N-7 machinehead.
It differs by the selected machine head.
n.
SET-UP
1.
Installing the motor unit
0
2. Installing the control box
1)
Attach bracket 0 supplied with the
unit
using
four supplied screws (M5 x 1
O)
as shown
in
the
f1gure
.
Install the motor unit on the table with
the
fitting
bolt
asm.supplied
with
the
unit as accessories.
At
this time, insert the nuts
and
washers supplied
with the unit as accessories
as
shown m
the
figure
so
that
the
motor
unit
can
be
securely llxed
on
the
table.
1) Press three bolts 0 supplied with
the
unit
as
ac-
cessories into
the
motor hanging bolt
hole
m
the
table and fix them.
2)
Temporarily tighten convex washer, spring wash-
er
and
nut
on
the
side where
two
bolts
are
at-
tached.
3)
Hang
the
motor unit
to
the washer
which
has
been temporarily tightened,
and
attach convex
washer, spring washer
and
nut to
the
other
bolt
on
the
oppos~e
side.
4)
After adjusting
the
installing pos1tion
of
the
motor,
securely tighten
the
respective nuts.
2) Loosen four screws 8 supplied
w1th
the
motor
unit
as
accessories. tighten screws
f)
after
hang-
ing
control
box
unit
0 to the screws,and fix
con-
trol
box
unit
0.
-1-

3.
Installing
the
belt
15mm(9.8N)
4.
Adjusting
the
pulley
cover
Belt
0
a.IUICI
1)
The
belt
drstance,
between
sewing
machme
pul-
ley
and
motor
pulley, must be
parallel.
2)
The
belt
tension should be
adJusted
by
turrung
the
tension
adJUSt
nuts 0
to
change
height
of
the
motor,
so
that
the belt sinks down
by
about
15
mm
(9.8N)
when
rt
IS depressed
by
band
at
the
center
of
the
belt span.
If
the
belt tension
rs
not
trght,
speed
is
unstable
at
low-speed
or
medrum-speed
opera
t
ron,
ana
the
needle
wall
not stop exactly
an
posrtion.
1)
After
adjustrng
the
be1t
tension,
adjust
the
pu
cover
0
so
that
the
clearances
between
the
~
and
the
pulley
cover 0 .E)
and
0
should
be
1he
same.
2)
After the
completion
of
adJustment,
trghte
screws
f)
located
on
the
srde
of pulley
cow
0
and
securely
fax
the pulley cover 0
so
that
does
not
shp
out of position.

5. Installation and adjustment for
the
protecting pin
and
the belt slip-off preventing
bracket
WARNING:
To
protect
against possible personal injury due
to
abrupt
start
of
the
machine,
be
sure
to
start
the
following work
after
turning
the
poweroff and ascertaining
that
the
motor
is
at
rest.
Be
lt
_
Belt
/
4 mm
oriess
4
mm
or less
Adjusting position
for
protecting pin
Pulley Motor
pulley
Adjusting position
tor
belt
slip-off
preventing bracket
1} Attaching hole
for
the protecting pin
To
attach protecting pin 0 .select either attaching
hole 0
or
attaching hole
€)
in the
motor
pulley
cover
1n
accordance
with
the direction
of
rotation
of
the
sewing machine
and
attach
the
ptn in
the
selected hole using screw 8
and
washer
f)
sup-
plied with the unit.
a)
If
the motor shaft rotates
in
directton A
tn
the
figure
on
the above:
• Attach protecting pin 0
in
attaching
hole
0 .
b)
Ifthe motor shaft rotates
in
direction B inthe
figure onthe above:
- · Attach protecting pin 0
in
attaching
hole
€)
.
2}
Adjustment
for
the
protecting pin
and
the
belt
slip-off preventing bracket
Adjust
the
posttiOn
of
protecttng
pin
0
and
belt
slip-off preventing bracket 0
In
accordance with
the
figure on the left.
a)
Adjusting
the
protecting
ptn
Loosenscrew
f)
and
adjust
so
that
protecting
pin 0 is positioned
at
the location indicated
in the figure on the left.
b)
Adjusting belt slip-off preventingbracket
Loosen screw 0 and adjust
so
that belt slip-
offpreventing bracket 0 is positioned
at
the
location indicated
in
the
figure
on
the
left.
If protecting pin 0 is
not
properly adjusted,
it
is possible that your fingers
may
be
caught
tn
the clearance provided between
the
pulley
and the belt resulting
in
injury.
If
belt slip-off
preventing bracket0 is not properly
ad-
justed,
it
is possible
to
allow the
belt
to
slip off
causing safety hazard.
3)
After the adjustment, lighten screws
f)
and 0
so
as
to secure protecting
ptn
0
and
belt
slip-off
preventing bracket 0
to
prevent these compo-
nents to fluctuate because
of
vibration.
4}
Before starting the operation
of
the
sewing ma-
chine, ascertain that protecting
pin
0 and belt
slip-off preventing bracket 0
do
not
come
in con-
tact with the pulley and
the
belt.
-3-

6.
Connectingthe cords
WARNING:
•
To
prevent personal injury caused
by
abrupt
start
of
the
sewing
machine
,
carry
out
the work a
turning
OFF
the power switch
and
a lapse of 5
minutes
or
more
.
•
To
prevent damage
of
device
caused by
maloperation
and
wrong
specifications,
be
sure
to
connectall thecorresponding connectors to the specified
places.
•
To
prevent personal inj
ury
caused by maloperation, be
sure
to
lock
the
connector
with
lock
.
•
As
for
the details
of
handling respective devices, read ca
refully
the
Instruction
Manuals
suppl"led
with the devices before handling
the
devices.
Following
connectors
are
prepared
on
the
SC-922
.
Connect
the
connectors
co
ming from the
machme
hea:i
to
the
corresponding
places
so
as
to
fit
the
dev1ces
mounted
on
the
machi
ne
head.
0
CN30
Motor
signal
connector
f)
CN33
Needle
bar
position
detector
{+SV
type)
:
It
0
CN41
Stepping motor:
It
is used only
wtth
the
f)
CN36
detec
.ts
the
needle
bar
position. 0
CN43
DLU-5494N-7.
Mac~me
head
soleno
i
d:
Provided
wi
th
so-
Synchronizer {+12V type) :It
detects
the
l
en
o
i~S
fo
r
thread
tri
mm
i
ng
,
reverse
feed
G9
CN44
needle bar posi
t1on
.
0
CN37
stJtchmg
,
one
-
touch
type
reverse
feed
s .t h
Hand
sw1tch
: Hand switch
other
than
the
Presser
_foot
lifting
solenoid
(
Only
fo~l
t~
.
touch
-back
sw
i
tch.
0
CN38
autom~t1c
presser
foot
lifter
type)
e
Q)
CN48
Safety
sw1tch
(standard) :
When
tilbnQ
thB
Operation
panel
:
Various
kinds
f .
sew
i
ng
machine without
turnmg
the
power
can
b o
sewmg
OFF
,
the
operation
of
the
sewing
machine
15
. e
programmed
.
(For
details
of
the
erahon
panel
other
than
CP-18
r f
op-
prohibited
so
as
to
protect
against
dangerb
0
CN39
lnstru~tion
Manual
for
the
panel
,
toe
b~
~o
the
OPTION switch: Input function
can
~
Stand1ng
machine
pedal
.
JUKI
sed
.)
·
terns
PK70
,
etc
.
Sewing
machi.ne
standard
changed by changing over the 1
n
function
w1th
this switch.
f)
CN40
tr~lled
with
external
signals.
can
be
con-
~
CN51
Extended inpuVoutputconnector
sor
S~ngle-needle
control
solenoid
·
It
.
4J)
CN58
~xtended
input connector (for
the
sen
w1th
the
LH-41
oo
sewin · .
IS
used
vtded
with
a
single-needleg
machme
pro-
41)
CN59
mput
,etc.)
le-
control
device
. Extended output connector (for
the
50
noid valve output)
-4-

1)
Pass cords 0
of
the
thread trimmer solenoid,
reverse
feed
solenoid
and
detector
cords 8
through table hole 0
an
d route them under the
table.
2)
Loosen screw
€)
in
cover 8
wit
ha screwdr
iver
to
open
the
cover.
3)
Con
nect
14P
code 8 coming
from
t
he
machine head to
co
n-
nector 0 (CN
36
).
4) When t
he
opt1o
na
l AK dev1ce
is a
tt
ached ,
co
nn
ect 2P
co
n-
nec
tor 0 coming from t
he
AK
dev1ce
to
connectorG (CN37)
5) Insert connecto r 0
commg
from
the
de
tecto
r into connec-
tor
0
(C
N
33)
.
6)
Connect connector
tD
com
ing
from the motor
to
conn
ector G)
(C
N30)
on
the
circuit board.
(Caution) 1. When using the AKdevice, set whether
to
use
the
AK
device
after
confirmi
ng
how
to
select
the auto-lifterfunction. (Retter
to
"
m-11
. Settingof
the
auto
lifter function" p.
43
.)
2.
Be
sure
to
securely insert the respective connectors
after
checking
the
inserting
direc-
tions
since
all connectors have the
inserting
directions. (When using a
type
wi
th
lock,
in-
sert
the
connectors until they
go
to
the
lock.)
The
sewing
machine
is
not
actuated unless
the connectors are inserted properly. In addition, not
only
the
probl
em
of
error warning
or
the
like
occurs
,
but
also the sewing machine
and
the control box aredamaged.
[Connecting
the
connector
for
the
operation
panel]
The connect
or
for the operation panel
is
provided.
Paying
atte
ntion to
the
orientation
of
the
connector
45
.connect it
to
connect
or
(C
N
38)
41)
located on the
circuit board. A
ft
er
connecting, securely lock
the
con·
nectar.
(Caution)
Be
sure
to
turn
OFF
th
e
power
before
co
nnect
ing
th
ec
on
nector.
- 5 -
1
I
1
I
I
I
I
I
I
I
I
I
I
I
I
I
I
-

[ Connection ofthe pedal
of
standing-work machine 1
-
Insert
PK70 connector
~
into connector •
(C~
[How
to
bundle all cords]
How
to
fix
cable
clip
band
~
Panel
~
Pull
12P)
on
the
PWB
(Caution)
Be
sure
to
turn
OFF the power
befort
connecting the connector.
7)
After
inserting
the
connector, put
all
cords
togettr
er
with cable
Clip
band
4D
located
on
the
sided
the
box.
(Caution) 1. Fix the
cord
clamp
and the
cable
ci!l
band
following
the
attaching
proet
dure.
2. When
removing
the
connector,
re-
move
It
from
the
wire
saddle
and
remove
it
while
pressing
the
hoOk
d
thecable
clip
band.
How
to
remove cable clip band
Panel
Push
_.,.;;,
Pushing
the
hook portion, push
the
band
to
remove
IL
8>
Close
cover 0 and fix
the
cover
by
lighten
screw
0
With
a screwdnver.
be
(Caution) Take care
not
to
allow
the cord
to
caught under
cover
e.

[For
CE
specifications
only]
CE
1o
230V E
Brown
} AC
b~----
1
~=
Blue
220V-240V
IL------l
0 Green /Yellow I
(
ground
wi
re
)
____
_.
9)
Connect connector
4P
f)
to connector
~
located
on
the side of
the
box
.
1
0)
Connect
motor
output cord
G>
of
t
he
power sw
itch
to connector Q .
Connect motor output
cord
~
to
connect
or
~ locat-
ed
on
the side of the
box
.
Installing power sw
itch
Connectpowersupply
co
rd to the
po
w
er
switch.
[CE specifications]
Single phase 230V •
Po
w
er
supply cor
ds
:
Brown
, B
lue
,
and green/yellow
(groun
d w
tre)
-
7-

[Chan
ging
over
the
voltage between 100 V and 200
V]
WARNING:
To
prevent personal injuries caused
by
electric
shock
hazards
or
brupt
st
rt
of
the lng
machine,
carry out
the
work after turning
OFF
the power switch end I p
accidents caused
by
unaccustomed work
or
electric
hock,
rcqu
our
dealers when adjusting theelectrical components.
of
5
mlnut
or
more.
To
prmm
tlh
trlc
expert or
engineer
o1
By
rna
ng
th following two changes the
SC-922
be
useJ
Wlth
three d nr nt power supplies e
phase 100 • 120 V,
smgl
·phas
200
to
240
v
a:
3i>hase 200
to
240
v.
•
Only
the control
box
which uses
PWA·
T
PCB
be
changed
1
Repla
oemem
of
the
pow
rcords
Changtng-round
of connector Q
on
the
PWR
PCB
1)
Turn OFF tho power
with
tho power
swtch
or.
checking that
the
sowrng
machne
has
stopped
• The Illustration below shows the PWR-T
PCB
.
2)
Draw
out
tho
pow r cord from
tho
power
recepla2
after
checkmg
that
the power
switch
has
been
t
OFF
. Then
wa
t for s nunutos
or
more
Thetype
of
PCB
differs
by
destination.
A
3)
Loosen
the screws whtch arc used to
secure
rear
hd
of
tho
control box cover
Carefully
open~
rear
cover
Wiring
for
the
single-phase
100
v
4)
Chang
ng procedur ofthe power
voltage
(Caution)
If
the
supply
power
changing
is
carrie!
out In a
wrong
manner
,
the
control
box
w.
break. Be
extremely
careful
when
taking
~
supply voltage
chang
i
ng
procedure.
8
c
Be sure
to
connect the
wire
between
1and 2
If
it
Is
connected
be1ween
1-3
or
2•3
the
._j
(B
ld
)machine
will
be
Inoperative '
ng
oxs
• .
1
WHITE
(Plug side)
BLACK
i""''{) 3
GREEN/
r
YELLow
-=
(
Plug
Side)
A.
To
change overthe
supply
voltage
from
200
•
240V
to
100
·120
V
• Change the power cord with tho JUKI
genutne
<:01
With the
part
number
(M90355800AO)
Chang
the earth cord With
the
one
w1th
the part
numbe
(M90345800AO)
•
Change
over supply voltage changeover
connector
t
mounted
on the
PWR
PCBwrth the
connec
tor
for
100~
• Connect the
crrmp
style termrnal of
AC
mpU1
cord.,
the
powerplug as shown In the
frgure
A
B,
C.
To
change over the
supply
voltage from
100
•
120
Vto
200
• 240 v
• Change the power cord
With
the JUKI
genu
ne
conl
wtth
the
part number (M90175800AO)
•
Change
over supply voltage changeover
connector
t
mounted
on
the
PWR
PCB
With
the
connector
fOI'
200
•
Connect
the
cr
mp
contact of the
AC
rnput
cord
to
PQwer
plug
as 1
ustrated
rn
Ftg
B
for
the
3-phaSEl
po-.e'
supply
or
asIllustrated
rn
FIQ
C for
the
srngte-phaSll
c#
S)
Before
clos1ng
the rear lid of thecover,
ascertan
~
that
the
relevant parts have been correctly
cha,ged
Wrthout
fall
S)
Close
the
read
lid
whrle
pross1ng
rt,
taking
care
001
allow
the
Wlnng
to be caught between
the
read
lid
the
cover
and the
matn
body
of
the control
bOX
The!'
secure
the
hd
wrth
tho
screws
Locking
scctlon
ve
the
(C
aution) Be sure to
remo
.
15
connector while
holding
1
locking
ectlon with
your
fing r • Be
extremelY
ca:
tul
not
to
pull the
connect
forcibly.

[In
case
of
u
si
ng
the
power
switch
for
LA]
JA3o
220V
Red
AC
Black }
U
~---
__;:::
~
~II:J
::>)
200V
-240V
White
JA
1o
1
20
V
GreenI Yellow
(
ground
wi
re
)
EBiack }AC
b
~====
J~
~
-
0 White 100V-120V
0 Green I Yellow
(
gr
o
und
wire)
Connect
motor
output cord
Q)
to connector 0 locat-
ed
on
the
side
of
the
box
.
Installing power switch
Connect power supply cord
to
the power
sw1
t
ch.
[JA
sp
ec
ifications]
3-phase 220 V :
Power
supply
cords
:
black,
white
,
red
and
green
/
yellow
(ground wire)
Single phase 120V :
Power
supply
cords
:
black
,
white, and green/yellow (ground
wire)
When the metallic conduit is used,
be
sure to change
over
the powercord section following the steps
of
pro-
cedure described below
(Caution)
Be
sure
to
c
arry
out
th
is procedurebefore
installing
the
control
box
on
the
machine
table.
(1)
Place
th
e control box with its frame side
do
wn on
the machine table
as
illustrated
in
the
ske
tch.
(2) Loosen scr
ew
CD
in underside cover 0 to open
the cover.
3 Change over the cord shown
in
the red-
li
ne
cir
cl
e
following the steps
of
procedure
descr
i
bed
below.
-9-

4
Remove
two
screws 8
to
remove
clamptng
plate
0
from
the
ma
in body of the control
box
s
Remove
connector
()
while holding
1ts
loclo.~
section
G
wtth
yourftngers.
6
Turn
connector 0 to remove
the
cord
locking
section
.
7 Loosen nut C) to remove
the
connector
from
clamping
plate 0

)ve
clamping
plate
mtrol
box.
)Iding
1ts
lock
ng
he cord
locki~;
onnector
tror.:
·
~
b
Q
otnr
Pl
"\
:
(8
Put
locknut 0
on
the power cord and
draw
out
the cord G from inside clamping plate 0.
s Install clamping plate 0 back to the control box.
1a
Pass power cord G through conduit 0 .
11
Fix
conduit
0
with
locknuts 0
with
clamping
plate 0 placed between the locknuts.
1~
Close underside cover 0
and
secure the cover
with screw
€)
-11-

7.
Attaching the connecting rod
11)
Make
sure
that the power
switch
15
IU
med
OFF
msert power supply cord
commg
fr
om
the
llOie'
sw1tch
mto
the power plug socket.
(Caution) 1. Top
end
of
power
supply
cord
VIr·
ies In
accordance
with
destination~
supply
voltage
. Check
again
theJit
ply
voltage
and
the voltage
designa.
ed
on
the
control
box
when
lnstailg
the
switch.
2. Be
sure
to
prepare power
plug
I
conformed
to
the
safety
standard.
3. Be
sure
to
connect
the
ground
wit
greenI
yellow)
.
1) Fix
conn
ecting
ro
d 0 to
ms
ta
lling
hole
0 °1
perJ
lever
f)
w
1th
nut e. G
2)
Ins
talling
connect1ng
rod 0 to
ms
talli
ng
hOle
peda
lengthen t
he
pedal
de
pressing s
tr
o
ke
,
and
the
opera
t
1on
at
a
med1um
speed
Wi
ll
be
eas.er
.
Other manuals for SC-922
3
Table of contents
Other JUKI Sewing Machine manuals

JUKI
JUKI AMS-224EN/IP-420 User manual

JUKI
JUKI MF-7923 User manual

JUKI
JUKI LK-980 Series Quick start guide

JUKI
JUKI PS-800-12080 User manual

JUKI
JUKI AW-3SD User manual

JUKI
JUKI MF-7000 Series Quick start guide

JUKI
JUKI LU-1510 User manual

JUKI
JUKI MH-380 User manual

JUKI
JUKI LZ-2290C-F User manual

JUKI
JUKI DDL-7000A-7 Series User manual

JUKI
JUKI SC-20 Quick start guide

JUKI
JUKI HZL-T100 User manual

JUKI
JUKI PLK-G4030R User manual

JUKI
JUKI PLC-1710-7 User manual

JUKI
JUKI MO-644D User manual

JUKI
JUKI LU-2810 Series User manual

JUKI
JUKI Jtron JTR-DLU5490/SHU Series User manual

JUKI
JUKI HZL - 353Z Series User manual

JUKI
JUKI AMS-343B User manual

JUKI
JUKI UT55 User manual