JUKI IP-110 Type F User manual

Instruction Manual
for Production Support Function
(IP-110)
ENGLISH

i
CONTENTS
!. INTRODUCTION ....................................................................................... 1
1. Outline..................................................................................................................................... 1
2. Basic operation procedure.................................................................................................... 3
2-1.
Changing over between the information mode and the normal sewing mode.............3
2-2. Information mode ......................................................................................................... 4
2-3. Normal sewing mode ................................................................................................... 5
@. SETTING ................................................................................................... 6
1. Setting procedure to be taken before rst use.................................................................... 6
1-1. Entering a password .................................................................................................... 6
1-2. Setting required data items in sequence ................................................................... 8
(1) Enabling the operation of the production support function ......................................................8
(2) Setting the date and time......................................................................................................... 9
(3) Setting the sewing machine ID .............................................................................................. 10
1-3. Carrying out setting of other data............................................................................. 10
2. Setting procedure to be taken before regular operation.................................................. 11
2-1. Setting the date and time........................................................................................... 11
2-2. Setting the sewing machine ID.................................................................................. 11
2-3. Setting the enable/disable of the production support function............................. 12
2-4. Setting the sewing recorder function....................................................................... 13
2-5. Setting the production management function ........................................................ 14
(1) In the case of counting up the target production volume according to the pitch time............ 14
(2)Inthecaseofcalculatingthetargetproductionvolumeaccordingtothespeciedstarting/
nishingtimesofdayofworkandtotalproductionvolume ..................................................15
2-6. Setting common data for the production support function ................................... 18
(1) Production support common setting screen No. 1................................................................. 18
(2) Production support common setting screen No. 2................................................................. 19
#. OPERATION............................................................................................ 20
1. Operating the work management screen........................................................................... 20
2. Operating the pitch time monitor screen........................................................................... 22
2-1. Pitch time monitor screen No. 1................................................................................ 22
(1) Production volume graph mode............................................................................................. 22
(2) Pitch time graph mode...........................................................................................................24
2-2. Pitch time monitor screen No. 2................................................................................ 26
3. Operating the sewing recorder ........................................................................................... 27
3-1. Sewing recorder screen No. 1................................................................................... 27
3-2. Sewing recorder screen No. 2................................................................................... 29
3-3. Uploading/downloading the sewing recorder data ................................................. 30
4. Operating the production management function.............................................................. 31
4-1. Production management screen No. 1..................................................................... 31
4-2.Production management screen No. 2...................................................................... 33
$. ERRORS.................................................................................................. 34

– 1 –
!. INTRODUCTION
1. Outline
ThisInstructionManualdescribestheproductionsupportfunctionwhichisenabledbyinstallingtheIP
(Intelligent Panel) on the sewing machine and operating it. The IP measures the operational status of
thesewingmachineandrecordsit.Inaddition,itvisuallyindicatestherecordeddatatohelpimprove
efciencyinsewingworkfromvariouspointsofview.Themeasuredandrecordeddataonthesew-
ingmachineoperationcanalsobeloadedintoapersonalcomputerbywayofamedium.Bycollecting
andloadingoperationdatafromtwoormoresewingmachinesintoapersonalcomputer,notonlythe
detailedanalysisoftheoperationalstatuswithSMDAA(SewingManagementDataAnalysisApplication
software)butalsotheaccumulationoftheanalyzeddataareenabled.Withthoseanalyzedandaccu-
mulateddata,efciencyimprovingactivitiesfortheentiresewingplantcanbecarriedoutcontinuously.
* RefertotheInstructionManualforSMDAAfortheSMDAA.
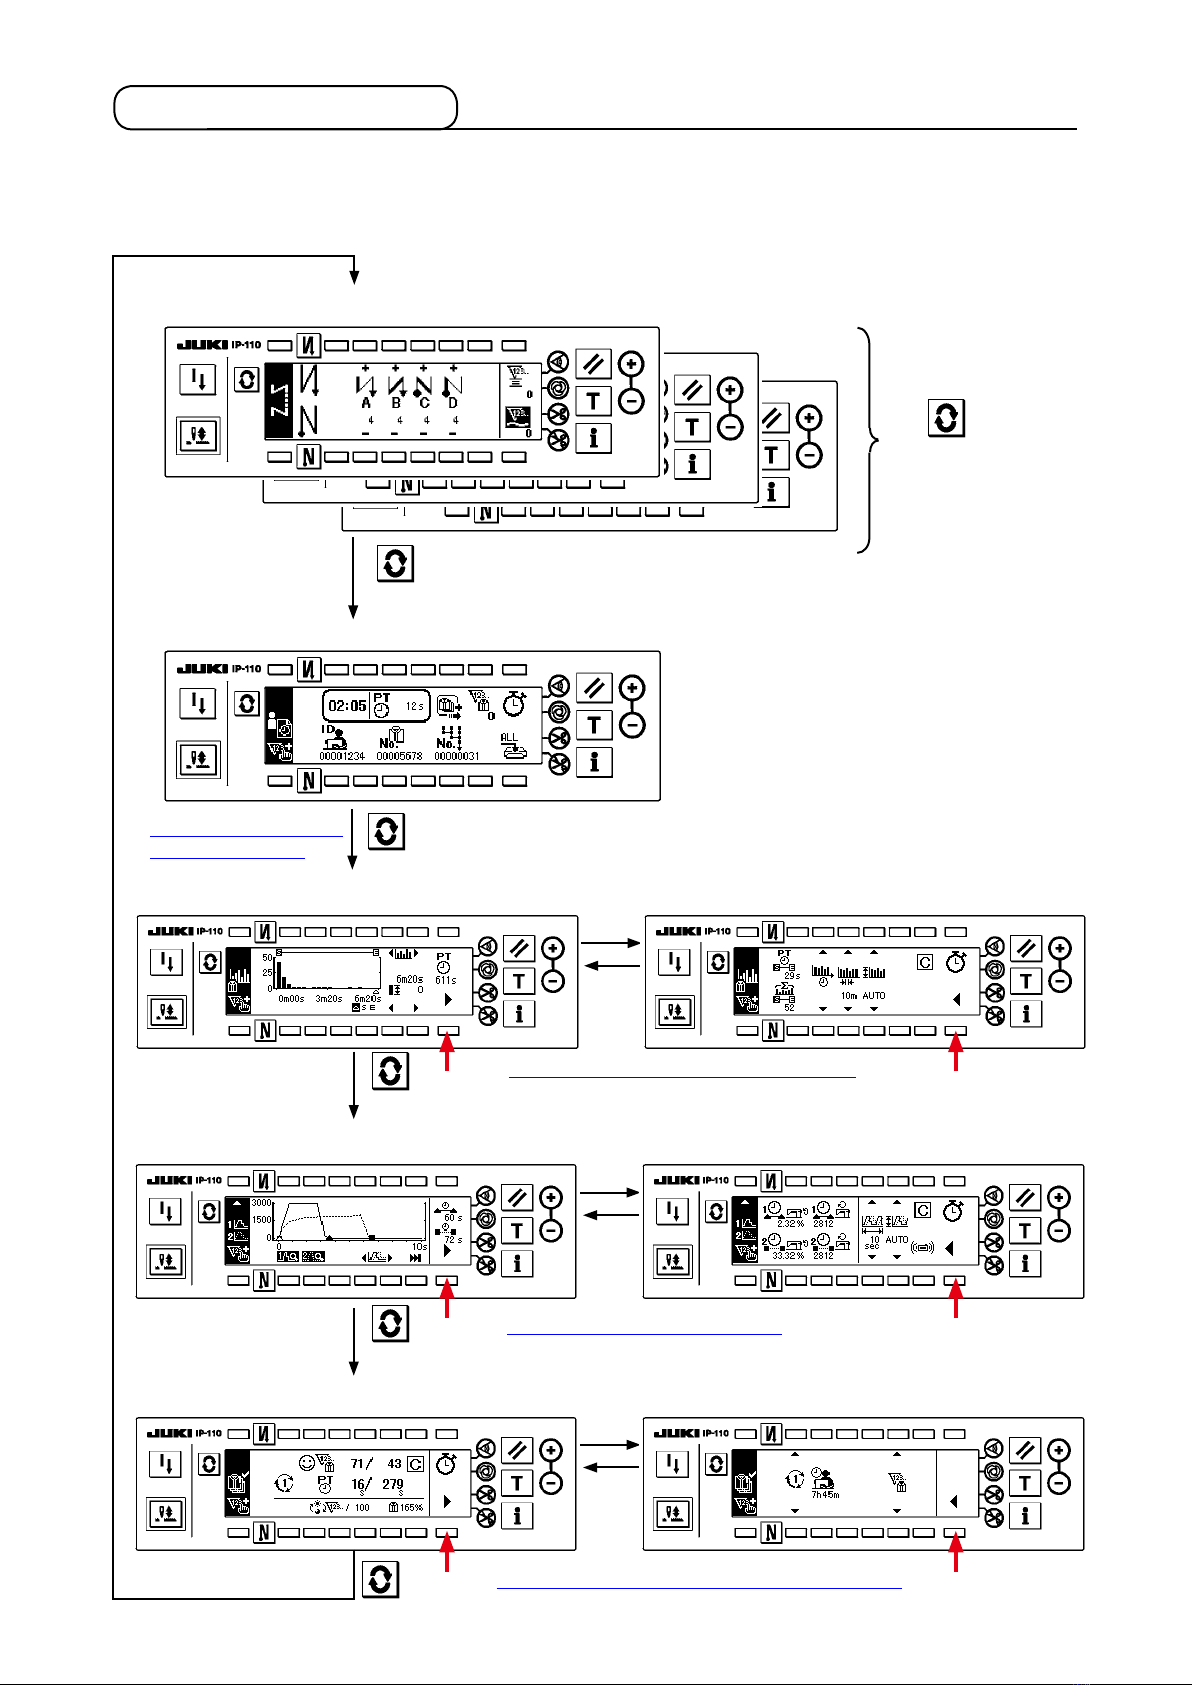
TheproductionsupportfunctionbymeansoftheIPiscategorizedintofourfunctionalparts,i.e.,work
management function, pitch time monitor function, sewing recorder function and production manage-
mentfunction.Eachofthemhasitsownsupportcapability.Usethembyselectinganappropriateone
accordingtoyourneeds.
* Itshouldbenotedthattheworkmanagementfunctioncannotbedisabledsinceitmanagesdataon
the sewing machine operation. Operation of the other three functions can be changed over between
the enable and disable.
(1) Work management function
Tousetheworkmanagementfunction,workhistorydatasuchastheoperatorID,productnumber
andprocessnumber,whicharetobeembeddedintheoperationdatarecordedbyeachsewing
machine,shouldbeentered.TheSMDAAcarriesoutoperationalstatusanalysisbasedonthose
pieces of data.
This function is also used when loading the operation data from the sewing machine into a personal
computer.
(2) Pitch time monitor function
Withthepitchtimemonitorfunction,itispossibletospecifyanarbitrarytargetsectiontomonitor
thetransitionoftheproductionvolume(i.e.,thequantityofsewnitems)perunittimeandthepitch
timedistributionanddisplaythemontheIPasabarchart.Inaddition,theoperationalstatussuch
asthetotalproductionvolumeandaveragepitchtimeinthespeciedsectioncanbeanalyzedand
indicatednumerically.Throughthesecapabilities,thesewingworkcanbemonitoredoveralong
timeandvisuallyanalyzedtoenabletrackingdownofthetimewhenaproblemhasoccurred.
(3) Sewing recorder function
Thesewingrecorderfunctioncontinuouslymeasuresthenumberofrevolutionsandthreadtrimming
timing of the sewing machine at all times to show the results on the IP as a line chart. The sewing
machineoperator'sskilllevelischeckedandtechnicaltrainingisprovidedbasedonthelinegraph.
Itispossibletodisplayanoperator'sskillleveltogetherwiththatofaskilledoperatororwithhis/her
workdataofthepastonascreenforthepurposeofcomparison,sothatthecomplicatedandhard-
to-understandsewingmachineoperationcanbevisualizedforeasieranalysis.
(4) Production management function
Theproductionmanagementfunctiondisplaysthetargetproductionvolumeforgivenworkinghours
andtheactualproductionvolumetonotifytheoperatorofadelayorprogressofsewingworkinreal
time.Withthisfunction,theoperatorisabletocarryouthis/herworkwhilecheckinghis/herwork
pace.Thisenhanceshis/hermotivationtoachievehis/hergoal,therebyleadingtoaincreasein
productivity.Inaddition,thisfunctionallowsearlydetectionofadelayinworkmakingitpossibleto
identifyaproblemandtakeanappropriatemeasureatanearlystage.

– 2 –
<Explanation of terms used in this Instruction Manual>
Pitchtime: Lengthoftimerequiredtonishasewingitem.
Manual switch : The switch located on the screen of each production support function and used for
counting up the production volume.
Productionmanagementswitch(handyswitch):
The optional manual switch which can be connected to the IP. It is used for counting
up the production volume.
Manualinput: Itisandataentryoperationforcountingonesewingsequence.Itisagenericterm
that represents pressing of the aforementioned Manual switch or the Production man-
agement switch.
Operationdata: Dataobtainedbymeasuringtheoperationalstatusofthesewingmachineandre-
cording it.
SMDAA: ItisanabbreviationfortheSewingManagementDataAnalysisApplication.Itis
the application software used for loading the aforementioned operation data from a
sewingmachineintoapersonalcomputerbywayofamediumtocarryoutdetailed
analysisofthemachine'soperationalstatusonthepersonalcomputer.

– 3 –
2. Basic operation procedure
2-1.
Changing over between the information mode and the normal sewing mode
TheIPpaneloperationisgenerallydividedintotheoperationundertheinformationmodeandthat
under the normal sewing mode. The mode can be changed over between those two modes using the
Information switch .
Information mode
Underthismode,functionsettingsfortheproductionsupportfunctionarecarriedoutandthesew-
ingmachineoperationisset/checked.
*Undertheinformationmode,thesewingmachinecannotperformsewing.
Normal sewing mode
Underthismode,thesewingmachineperformssewing.
Thesewingscreendiffersonamodel-by-modelbasis.ItispossibletousetheIPpanelbychang-
ing over the screen, with the Screen changeover switch , between the sewing screen and the
production support function screen on which the production support operation is enabled.
<Sewingscreenwhichdiffersonamodel-by-modelbasis>
<Production support function screen on which the production support opera-
tion is enabled>
Press the
switch .

– 4 –
The following shows the outline of the operation setting procedure for the production support function
under the information mode. Refer to the item page given under the screen for detailed explanation of
the operation setting procedure for each screen.
2-2. Information mode
<Information mode screen No. 1>
<Sewing management information screen No. 1>
<Sewing management information screen No. 2>
<Productionsupportfunctionoperationenable/
disable setting screen>
<Sewing machine ID setting screen>
<Date and time setting screen>
<Production support function password setting
screen>
<Production support common setting screen
No. 2>
<Production support common setting screen
No. 1>
<Production management function setting
screen>
<Sewing recorder function setting screen>
Keep the switch held
pressed for three seconds.
Keep the switch held pressed for three seconds.
@. 1-2.(2) Setting the date and time
@. 1-1. Entering the password
@. 2-6. Setting the common data on the production
support function
@. 2-6. Setting the common data on the production
support function
@. 2-5. Setting the production management function
@. 2-4. Setting the sewing recorder function
@. 2-3. Setting the enable/disable of the operation
of the production support function
@. 2-2. Setting the sewing machine ID

– 5 –
2-3. Normal sewing mode
Thescreensforthepitchtimemonitor,sewingrecorderandproductionmanagementaredisplayedby
settingthedisplayonafunction-by-functionbasisaftertheproductionsupportfunctionoperationhas
been enabled under the information mode.
The following shows how to change over the screen under the normal sewing mode.
The screen is
changed over with
the
switch.
(Caution)
The screen displayed
differs by the sewing
machine model.
<Sewingscreenwhichdiffersonamodel-by-modelbasis>
<Workmanagementscreen>
* Whentheproductionsupportfunction
operationisenabled,theworkman-
agement screen is shown without
exceptionsregardlessofthedisplay
setting of other functions.
#. 1. Operating the work
management screen
▼
▼
<Pitch time monitor screen No. 1> <Pitch time monitor screen No. 2>
▼
▼
<Sewing recorder screen No. 1> <Sewing recorder screen No. 2>
#. 2. Operating the pitch time monitor screen
▼
▼
<Production management screen No. 1> <Production management screen No. 2>
#. 3. Operating the sewing recorder
#. 4. Operating the production management function

– 6 –
@. SETTING
1. Setting procedure to be taken before rst use
Toputtheproductionsupportfunctionintouseforthersttime,itisnecessarytoenterapasswordto
unlocktheoperation.
Unlocktheoperationfollowingthestepsofproceduredescribedbelow.
1-1. Entering a password
(1) Displaying the password setting screen
1) Press the Information switch onthenormalsewingscreentodisplaytheinformationscreen
No. 1.
<Information screen No.1>
i switch 1
2) Then,keepi switch 1heldpressedforthreesecondstodisplaythesewingmanagementinforma-
tion screen No. 1 (maintainer level).
<Sewing management information screen No. 1 (maintainer level)>
3) Keep Reset switch 2heldpressedforthreesecondstodisplaythepasswordentrypopupscreen.
<Password entry popup screen>
Reset switch 2

– 7 –
(2) Entering a password
<Password entry popup screen>
Numeric input switch 3
1) Input the eight-digit password "46495963" with Numeric input switches 3.Conrmtheinputnum-
ber with Enter switch 4.
Then, input the eight-digit password again with Numeric input switches 3andre-conrmtheinput
number with Enter switch 4.
* If Cancel switch 5ispressedduringthepasswordentry,thedatabeinginputwillbecleared.
<Sewing management information screen No. 1 (maintainer level)>
Sewing management information screen No. 2 display changeover switch 6
A
* Ifthepasswordinputsecondlyisdifferentfromthatenteredrstly,thepasswordmismatchpopup
screen will appear. In this case, input the correct password.
<Password mismatch popup screen>
It is also possible to return the setting for the production support function to the disable.
The password to disable the production support function is "59634649."
2) Whenthepasswordentryhasbeencompletedproperly,theswitchdisplay ▶(Ainthegure)ad-
ditionallyappearsonthesewingmanagementinformationscreenNo.1.Thesewingmanagement
informationscreenNo.2canbedisplayedbypressingSewing management information screen No.
2displaychangeoverswitch6.
Ifyouhaveinputawrongpassword,thesettingfaultalertwillsoundandtheswitchwillnotaddition-
allyappearonthescreen.
Numeric input switch 3
Cancel switch 5
Enter switch 4

– 8 –
1-2. Setting required data items in sequence
To use the production support function, the "production support function operation enable setting," "date
and time setting" and "sewing machine ID setting" have to be carried out without exceptions. Be sure to
enter data on the required items following the steps of procedure described below after having entered
the password to unlock the operation of the production support function.
(1) Enabling the operation of the production support function
1) On the sewing management information screen No. 1 (maintainer level) which appears after having
entered the password, press the Sewing management information screen No. 2 display changeover
switch ▶to display the sewing management information screen No. 2.
Production support function operation enable/disable changeover switch 1
<Sewing management information screen No.2>
2) Then, press Production support function operation enable/disable changeover switch 1to display
the production support function operation enable/disable setting screen.
<Production support function operation enable/disable setting screen>
Function selector switch 2
3) Select the enable for the operation of the production support function with Function selector switch 2.
When the operation of the production support function is enabled, the item for setting display/non-
display of the pitch time monitor function screen, sewing recorder function screen and production
management function screen additionally appears to allow the respective functions to be used
under the normal sewing mode.
Operation of the produc-
tion support function is
enabled
Operation of the produc-
tion support function is
disabled
Function selector switch 2

– 9 –
Cancel switch 7
Enter switch 7
3 4 5
3 4 5
4) Select the function to be used from among the sewing recorder function, pitch time monitor function
andproductionmanagementfunctionandsetitsdisplaystatusbetweenthedisplayandnon-dis-
playusingswitches 3, 4and 5.Thescreenofthefunctionwhichissettothedisplayisdisplayed
bypressingtheswitch under the normal sewing mode.
Itshouldbenoted,however,theworkmanagementfunctionscreenisdisplayedonlybysettingthe
operation of the production support function to the enable with Function selector switch 2because
the information common to all of the functions need to be managed on this screen.
Switch 3:Usedtosetthesewingrecorderfunctionscreentothedisplay/non-display
Switch 4:Usedtosetthepitchtimemonitorfunctionscreentothedisplay/non-display
Switch 5:Usedtosettheproductionmanagementfunctionscreentothedisplay/non-display
5) WhenEnter switch 6ispressed,theinputsettingsareconrmedandthedateandtimesetting
screenisdisplayed.
*
Ifthedateandtimehavealreadybeenset,thesewingmachineIDsettingscreenisdisplayed.Ifthesewing
machine ID has also been set, the screen is restored to the sewing management information screen No. 2.
WhenCancel switch 7is pressed, the settings will be cleared and the screen will be restored to
the sewing management information screen No. 2.
<Date and time setting screen>
Time setting switch 8
(2) Setting the date and time
Function selector switch 2
Time setting switch 8
Cancel switch !0
Enter switch 9
1)
Set the current date and time with Time setting switch
8
.Ifanydatewhichdoesnotexistonacalendar(such
asthe31standaleapyear)isset,therelevantdatewillbeshowninblack-and-whitereversevideo.
2) WhenEnter switch 9ispressed,thesettingsareconrmedandthesewingmachineIDsetting
screenisdisplayed.
* IfthesewingmachineIDhasalreadybeenset,thescreenisrestoredtothesewingmanagement
information screen No. 2.
Inthecaseofthedatewhichdoesnotexistonacalendar(showninblack-and-whitereverse
video),theforbiddendataalertwillsoundandtheinputdatacannotbeconrmed.
WhenCancel switch !0 is pressed, the settings will be cleared and the screen will be restored to
the sewing management information screen No. 2.
<Production support function operation enable/disable setting screen>

– 10 –
(3) Setting the sewing machine ID
<Sewing machine ID setting screen>
Numeric input switch !1 Cancel switch !4
Enter switch !3
Numeric input switch !1
Clear switch !4
1) Input an eight-digit ID of the sewing machine with Numeric input switches !1.
The sewing machine ID is used when analyzing the operation measurement data gathered from
two or more sewing machines with the SMDAA. Be sure to set a unique ID for the sewing machine
because it is necessary to associate the sewing machines installed in a sewing plant respectively
with the operation measurement data gathered from those machines.
* Be sure to set the sewing machine ID without exceptions.
Iftheblankbarisdisplayed,theforbiddendataalertwillsoundtodisableconrmation.
2) When Enter switch !3ispressed,thesettingisconrmedandthescreenisrestoredtothesewing
management information screen No. 2.
When Cancel switch !4 is pressed, the settings will be cleared and the screen will be restored to
the sewing management information screen No. 2.
If Clear switch !2 is pressed, the sewing machine ID being input will be cleared. Re-input the sew-
ing machine ID.
To input the sewing machine ID without fail, it is possible to set the sewing machine ID
input method to the twice input style.
Refer to "@. 2-6. (2) Production support common setting screen No. 2" for details.
1-3. Carrying out setting of other data
When you complete the procedures given in "1-2 (1) Enabling the operation of the production support
function," "1-2 (2) Setting the date and time" and "1-2 (3) Setting the sewing machine ID" after having
unlocked the operation following the procedure given in "1-1. Entering a password" in accordance with
the Instruction Manual, the screen is restored to the sewing management information screen No. 2.
On this screen, the following can be carried out :
Switch 1: Setting the details of the sewing recorder function
Switch 2: Setting the details of the production management function
Switch 3: Setting the common items for the production support
Carry out setting according to the usage of the sewing machine.
* Refer to "@. 2 Setting procedure to be taken before regular operation" for details of setting procedure.
123
<Sewing management information screen No.2>

– 11 –
2. Setting procedure to be taken before regular operation
To set data on the operation of the production support function, press the Information switch under
the normal sewing mode to change over to the information mode.
2-1. Setting the date and time
<Date and time setting screen>
Time setting switch 1
Cancel switch 3
Enter switch 2
1) Set the current date and time with Time setting switch 1.
* Ifanydatewhichdoesnotexistonacalendar(suchasthe31standaleapyear)isset,therelevant
datewillbeshowninblack-and-whitereversevideoandthesettingcannotbeconrmed.
2) WhenEnter switch 2ispressed,thesettingisconrmed.WhenCancel switch 3is pressed, the
setting is cancelled and the screen is restored to the previous one.
2-2. Setting the sewing machine ID
<Sewing machine ID setting screen>
Numeric input switch 1
Cancel switch 4
Enter switch 3
Clear switch 2
1) Input an eight-digit ID of the sewing machine with Numeric input switches 1.
ThesewingmachineIDisusedwhenanalyzingtheoperationmeasurementdatagatheredfrom
twoormoresewingmachineswiththeSMDAA.BesuretosetauniqueIDforthesewingmachine
becauseitisnecessarytoassociatethesewingmachinesinstalledinasewingplantrespectively
with the operation measurement data gathered from those machines.
* BesuretosetthesewingmachineIDwithoutexceptions.
Iftheblankbarisdisplayed,theforbiddendataalertwillsoundtodisableconrmation.
2) WhenEnter switch 3ispressed,thesettingisconrmed.WhenCancel switch 4is pressed, the
setting is cancelled and the screen is restored to the previous one. If Clear switch 2is pressed, the
sewing machine ID being input will be cleared. Re-input the sewing machine ID.
To input the sewing machine ID without fail, it is possible to set the sewing machine ID
input method to the twice input style.
Refer to "@. 6-2. (2) Production support common setting screen No. 2" for details.
*
Refer to "!. 2-2 Information mode" fortheoperatingproceduretobetakenuntilthisscreenisdisplayed.
*
Refer to "!. 2-2 Information mode"fortheoperatingproceduretobetakenuntilthisscreenisdisplayed.

– 12 –
2-3. Setting the enable/disable of the production support function
Onthe<Productionsupportfunctionoperationsettingscreen>undertheinformationmode,theenable/
disablesettingfortheentireproductionsupportfunctioncanbecarriedout,andthedisplay/non-display
setting for the sewing recorder function screen, pitch time monitor function screen and production man-
agementfunctionscreencanbecarriedoutonfunction-by-functionbasis.
<Production support function operation enable/disable setting screen>
Cancel switch 6
Enter switch 5
1234
1234
Input the item to be set referring to the table given below.
WhenEnter switch 5ispressed,theinputdataisconrmed.WhenCancel switch 6is pressed, the
input data is cancelled and the screen is restored to the previous screen.
No. Item to be set Description
1Enable/disableofthe
operation of the production
support function
Enable/disableoftheoperationoftheentireproductionsupportfunctionisset.
Operation enabled : Operation disabled :
* Whentheoperationisenabled,items2to 4forsettingthedisplay/non-
displayofthesewingrecorderscreen,pitchtimemonitorscreenandproduction
managementscreenadditionallyappearonthescreen.
2Display/non-displayofthe
sewing recorder screen
Display/non-displayofthesewingrecorderscreenisset.(*1)
Display: Non-display:
3Display/non-displayofthe
pitch time monitor screen
Display/non-displayofthepitchtimemonitorscreenisset.(*1)
Display: Non-display:
4Display/non-displayofthe
production management
screen
Display/non-displayoftheproductionmanagementscreenisset.(*1)
Display: Non-display:
*1. Whenthescreenissettothedisplay,thescreenisaddedtothenormalsewingmodescreenandit
becomes available.
Refer to "!. 2-3 Normal sewing mode" for the operating procedure under the normal sewing mode.
*
Refer to "
!
. 2-2 Information mode"fortheoperatingproceduretobetakenuntilthisscreenisdisplayed.

– 13 –
2-4. Setting the sewing recorder function
The operation and the display-related basic items of the sewing recorder function can be set on the
<Sewing recorder function setting screen> under the information mode.
<Sewing recorder function setting screen>
Cancel switch 4
Enter switch 3
Input data on items 1and 2referring to the table given below.
When Enter switch 3 is pressed, the input data is conrmed. When Cancel switch 4is pressed, the
input data is cancelled and the screen is restored to the previous screen.
*
Refer to "!. 2-2 Information mode" for the operating procedure to be taken until this screen is displayed.
2
2
1
1
No. Item to be set Description
1Data sampling time The time interval during which the number of revolutions of the sewing machine is
measured and recorded is set.
Set value : 0.05, 0.10, 0.50, 1.00, 1.50, 2.00 (sec)
Initial value : 0.10 (sec)
* Data over the time interval specied by the set value "0.05: 25 minutes," "0.10:
50 minutes," "0.50: 250 minutes," "1.00: 500 minutes," "1.50: 750 minutes," or
"2.00: 1000 minutes" can be stored in memory of the sewing machine. When
the memory capacity is exceeded, the oldest piece of data is erased to store the
latest piece of data at all times.
* The accuracy of the graph plotted on the IP depends on the time interval set
vale.
2The upper limit of the
vertical axis (the number of
revolutions) of graph
The upper limit of the graph displayed on the sewing recorder screen No. 2 is set.
Set value : 6000, 9000 (sti/min)
Initial value : 6000 (sti/min)
* On the sewing recorder screen No. 2, the graph can be used under the auto
range mode or by setting an arbitrary range in increments of 1000 (sti/min) not
more than the upper limit.

– 14 –
2-5. Setting the production management function
Theoperationandthedisplay-relatedbasicitemsoftheproductionmanagementfunctioncanbeseton
the <Production management function setting screen> under the information mode.
*
Refer to "!. 2-2 Information mode"fortheoperatingproceduretobetakenuntilthisscreenisdisplayed.
<Production management function setting screen>
Switch 1for setting the target production volume count-up method
Theproductionmanagementfunctionscreendisplaysthetargetproductionvolumeforgivenworking
hoursandtheactualnumberofsewnproductstonotifytheoperatorofadelayorprogressofhis/her
sewingworkinrealtime.
The target production volume is calculated in two different methods. The method can be changed over
using switch 1for setting the target production volume count-up method.
1Countingupthetargetproductionvolumeaccordingtothelapseofaspeciedpitchtime
: Counting up according to the target pitch time
2Calculatingthetargetproductionvolumeasofthecurrenttimeofdayaccordingtothespecied
starting/nishingtimesofdayofworkandtotalproductionvolume
:Calculatingfromtheworkingtimeofday1
:Calculatingfromtheworkingtimeofday2
:Calculatingfromtheworkingtimeofday3
(1) In the case of counting up the target production volume according to the pitch time
Thetargetproductionvolumeiscountedupaccordingtothelapseofaspeciedtargetpitchtime.
<Production management function setting screen (in the case of count-up according to the pitch time>
Target pitch time setting switch 2
Input data on items 2to 4referring to the table given in the next item.
WhenScreen closing switch 6is pressed, the screen is closed and restored to the previous screen.
WhenClear switch 5ispressed,thetargetpitchtime,targetproductionvolumeforadayandthecur-
renttargetproductionvolumecanbetotallycleared.
Screen closing switch 6
Clear switch 5
Current target production volume correction switch 4
Daily target production volume setting switch 3

– 15 –
No. Item to be set Description
2Target pitch time setting
switch
The target pitch time for sewing work is set. Every time the length of time
corresponding to the target pitch time is elapsed, the current target production
volume is counted up.
* When the switch is pressed, the numeric input popup screen is displayed. Input
a set value in the popup screen.
* When the target pitch time is changed, the current target production volume 4is
automatically cleared.
3Daily target production
volume setting switch
The target production volume to be produced from the starting to the end of working
hours in a day is set.
* When the switch is pressed, the numeric input popup screen is displayed. Input
a set value in the popup screen.
4Current target production
volume correction switch
The current target production volume that is counted up every time the length of
time corresponding to the target pitch time is elapsed can be corrected.
* When the switch is pressed, the numeric input popup screen is displayed. Input
a corrected value in the popup screen.
(2) Inthecaseofcalculatingthetargetproductionvolumeaccordingtothespecied
starting/nishingtimesofdayofworkandtotalproductionvolume
The target production volume as of the current time of day is calculated and displayed on the production
management screen under the sewing mode by setting data on the time period during which sewing work
is carried out such as the starting/nishing/resting times of day and a daily target production volume.
* Three different working conditions to can be entered. When two or more operators use one
sewing machine, the machine should be used after the entry of working hours on an operator-by-
operator basis.
<Production management function setting screen (in the case of calculating the target produc-
tionvolumebysettingthestarting/nishingtimesofdayandthetotalproductionvolume)>
Workingconditionselectorswitch7
Screenclosingswitch!1
Clearswitch!0
Working/restingtimessettingswitch8
Dailytargetproductionvolumesettingswitch9
Input data on items 7to 9referring to the table given in the next item.
When Screen closing switch !1 is pressed, the screen is closed and restored to the previous screen.
When Clear switch !0 is pressed, the operating time and rest time and the daily target production vol-
ume of the selected working conditions to can be totally cleared.

– 16 –
No. Item to be set Description
1Workingconditionselector
switch
Ontheassumptionthatonesewingmachineisusedbytheoperatorsworkingthe
shiftorforsewingtwoormoredifferentsewingitems,threedifferentdailyworking
conditions(workinghoursandtotalproductionvolume) can be set. The
workingconditionssetinthisstepcanbeinvokedontheproductionmanagement
screen under the normal sewing mode. This eliminates re-setting of detailed
workingconditionsattheshifttimeorthesewingitemchanging.
2Working/restingtimes
setting switch
Thestarting/nishingtimesofworkandtherestingtimeofdayareset.Theworking
timeperiodcanbesetmorenelywithworkingtimeandrestingtimeeachofwhich
can be set to three different values.
* Refer to the next item "@. 2-5 (2)-1 How to set the working time and resting
time" for details of setting procedure.
* Theactualworkingtime,obtainedbysubtractingtherestingtimefromthelength
oftimeelapsedfromthestartingtotheendofdailywork,isdisplayed.
3Dailytargetproduction
volume setting switch
Thetargetproductionvolumetobeproducedfromthestartingtotheendofworking
hoursinadayisset.
* Whentheswitchispressed,thenumericinputpopupscreenisdisplayed.Input
a set value in the popup screen.
(2)-1. How to set the working time and resting time
Dailyworkingtimeissetnelybytheworkingtimeandrestingtimeeachofwhichcanbesettothree
different values.
Thefollowingshowsanexampleofthesettingprocedure.Inputdataappropriatelyreferringtotheex-
ample.
Example)Setthefollowingtimeperiodforworkingcondition .
Workinghours:8:00-17:00
Lunchbreak:12:00-13:00
Workbreaks:10:00-10:10,15:00-15:10
8:00 10:00 12:00 13:00 17:00
15:00
1) Startsettingtheworkingtimeand
resting time
Startinputtingdataonworking
condition .
2) Settheworkingtime.
Selecttheinputofworkingtime
1 .Inputofdataonworking
time 1
<Setting procedure>
Working/resting times setting 1
Input of data on working time 1 2

– 17 –
3) Inputtheworkinghours8:00
to 17:00.
4) Set the resting time
Select the input of data on
resting times 4 , 5
and 6 .
5) Inputthelunchbreak12:00to
13:00.
Inputtheworkbreak10:00to
10:10.
Inputtheworkbreak15:00to
15:10.
6) Setting is completed.
Input of working hours 3
Input of resting times 4, 5 and 6 4
Input of a work break 5
Setting is completed 6
A
* SectionAdisplaystheactualworkinghoursobtainedbysubtractingtherestingtimefromthelength
oftimeelapsedfromthestartingtotheendofdailywork.

– 18 –
2-6. Setting common data for the production support function
Itemscommonlyappliedtoeachproductionsupportfunctionaresetontheproductionsupportcommon
setting screens No. 1 and No. 2.
(1) Production support common setting screen No. 1
Cancel switch 7
Enter switch 6
1234
1234
5
5
*
Refer to "!. 2-2 Information mode"fortheoperatingproceduretobetakenuntilthisscreenisdisplayed.
Input data on items 1to 5referring to the table given below.
WhenEnter switch 6ispressed,theinputdataisconrmed.WhenCancel switch 7is pressed, the
input data is cancelled and the screen is restored to the previous screen.
No. Item to be set Description
1Acceptablenumberof
stitches for count-up
Whenthesewingmachinestopsafterthreadtrimmingandthenumberofsewn
stitches exceeds the preset number of stitches, an input of the count-up of
production volume is accepted.
Setting range : 0 - 99 Initial value : 0
* Input of the production volume count-up :
Production volume count-up switch and the optional production management switch
input,displayedoneachproductionsupportscreenunderthenormalsewingmode.
This setting is used for preventing incorrect input or fraudulent input.
2The number of times of
thread trimming per count
The number of times of thread trimming per count on the production volume counter
is set.
Setting range : 1 - 999 Initial value : 1
* Thissettingisusedinthecaseofautomaticcountupbythethreadtrimming
operation without using the production volume counter.
3Enable/disableofcountby
thread trimming
Enable/disableoftheautomaticcount-upoftheproductionvolumecounterandthe
quantityofsewnitemscounter.
Enable Disable Initial setting : Disable
* Whenthisitemissettotheenable,thenumberoftimesofthreadtrimming
described in 2is referred.
4Displaymethodselector
switch
Theunitemployedtodisplaythetimedataoneachproductionsupportfunction
screen is set.
:Displayedinsecond :Displayedinminute
Initialsetting:Displayedinsecond
5Resting status On each production support function screen, the measurement of the operational
statusofthesewingmachineandrecordingofdatacanbetemporarilyhalted.This
halt status is set.
Measurement is at halt :
Measurement is at halt and starting of the sewing machine is prohibited :
Other manuals for IP-110 Type F
3
Table of contents
Other JUKI Sewing Machine manuals

JUKI
JUKI AMS-221EN Series Quick start guide

JUKI
JUKI LBH-780 Series User manual

JUKI
JUKI MS-1261 User manual

JUKI
JUKI MH-380 User manual

JUKI
JUKI DDL-9000A Quick start guide

JUKI
JUKI PS-800-12080 User manual

JUKI
JUKI AC-172N-1790AN User manual

JUKI
JUKI LS-1340 User manual

JUKI
JUKI DLM-5200N User manual

JUKI
JUKI LU-2210N-7 User manual

JUKI
JUKI LBH-1700 User manual

JUKI
JUKI DDL-8700B-7 User manual

JUKI
JUKI PLK-G2516R User manual

JUKI
JUKI HZL-L series User manual

JUKI
JUKI PLC-2710N-7 User manual

JUKI
JUKI JTR-MS1190/TA-STS User manual

JUKI
JUKI AMS-210DHL-6100 User manual

JUKI
JUKI MOJ 2500N series User manual

JUKI
JUKI CP-160 User manual

JUKI
JUKI LG-158 User manual