Junction Victoria User manual


1
Contents
Welcome word ................................................................................ 2
Safety Information........................................................................... 2
Quick Start Instructions ................................................................... 4
System component presentation .................................................... 6
Component features ....................................................................... 8
Components technical details ......................................................... 8
Power assist mode description........................................................ 9
Operating Range............................................................................ 10
Using your power assisted bicycle................................................. 11
General handling instructions ................................................... 11
Turning the power on................................................................ 12
Using the controller................................................................... 12
LCD Display unit functions......................................................... 13
Selecting a power assistance mode........................................... 13
Specific riding maneuvers.......................................................... 13
Removing or inserting the battery............................................. 14
Charging the battery ..................................................................15
Setting the LCD Display parameters...........................................15
Turning the power off ................................................................16
Maintenance & storage..................................................................16
Cleaning your power assisted bicycle.........................................16
Storing your power assisted bicycle ...........................................17
Disposal ..........................................................................................17
Troubleshooting .............................................................................18
System malfunction sign and error codes ..................................18
Checking the Speed sensor unit .................................................18
Troubleshooting guide ...............................................................19

2
Welcome word
Congratulations on buying a power
assisted bicycle! Whether it is to make
your daily commute to work easier,
extend your riding time, help you keep up
with your friends or family or simply to
enjoy all the comfort, efficiency and fun
that this type of bicycle allows, we are
confident that you will appreciate all the
features and benefits your new bicycle
has to offer.
Safety Information
Although modern power assisted bicycles
look a lot like their regular counterparts,
there is quite a lot of technology behind it
and some notable differences in their
riding behavior, handling, and
maintenance requirements.
This manual has been created to provide
you with the instructions needed to safely
handle and operate your power assisted
bicycle, understand its function,
maintenance, and adjust its parameters.
It is important that you carefully read and
understand this manual before you ride
your power assisted bicycle. It should also
be kept handy for future reference.
This document is not a complete service
manual. We recommend that you seek
advice from a qualified technician if
anything is unclear.
Note that some manufacturers may not
honour their warranty if the handling and
operation has not been done properly.
The following symbols will be used
throughout the manual. They represent
important Warnings and Cautions about
the proper handling and operation of your
power assisted bicycle. They should be
carefully observed because failure to do
so might result in serious injuries, damage
or loss of performance of the system.
For other information not related to the
power assist system but regarding your
bicycle such as part assembly,
adjustments, maintenance, or riding
basics, please refer to your Owner Manual
provided separately at the time of
purchase.
Indicates important
information or a caution
about the proper use of a
component of the system.
Indicates a warning about
important safety information.

3
Always use your power assisted
bicycle according to the local laws
and regulations.
Don’t attempt to alter or
disassemble any component of
the power assist system.
Maintenance should only be performed by a
qualified technician.
Only use the original equipment
provided to operate and charge
the system. For replacement
parts, contact the bicycle dealer where the
product was purchased.
A power assisted bicycle handles
differently than a regular, human
powered bicycle. The acceleration
can be surprisingly effective and you should
get familiar with its behavior progressively
before riding on public roads or crowded
bicycle-designated paths.
Power assisted bicycles are
heavier than most other bicycles.
Always keep in mind that the
required distance needed for braking may
be longer than what you are used to on a
regular bicycle. This also calls for more
attention to the maintenance of your brake
system and tires.
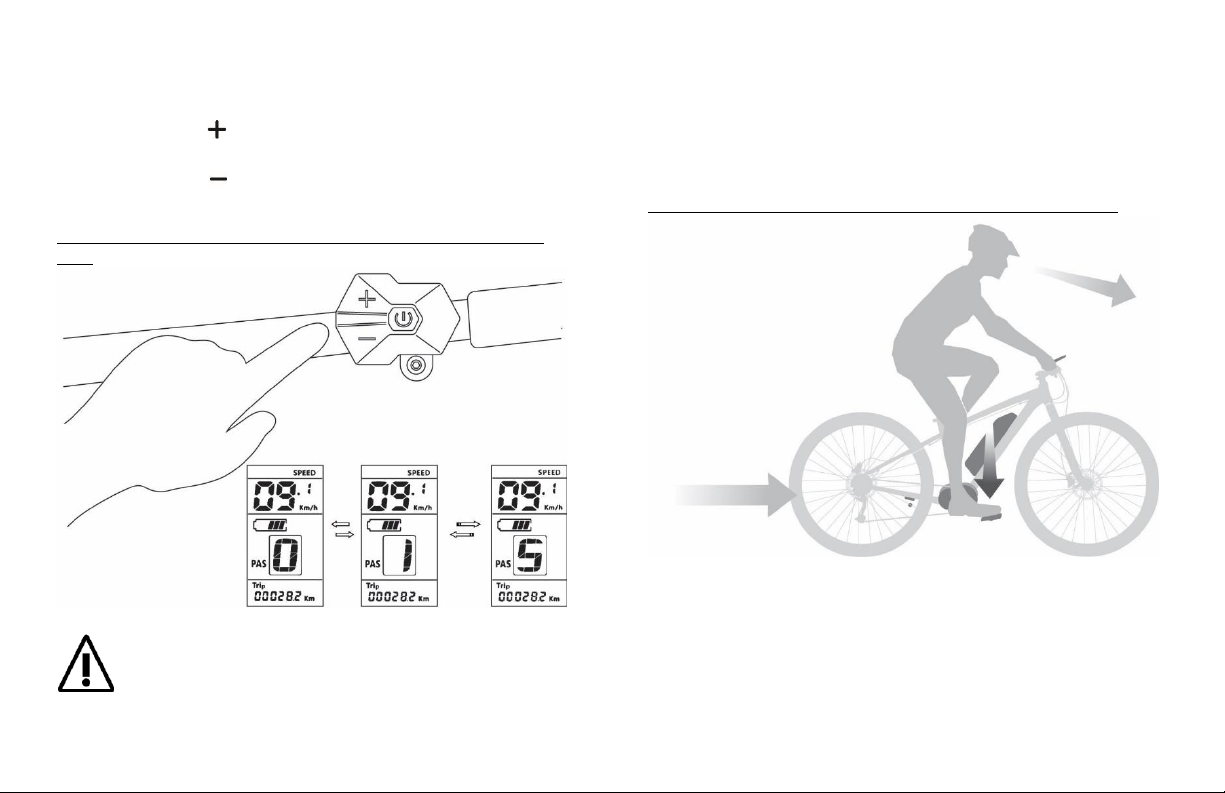
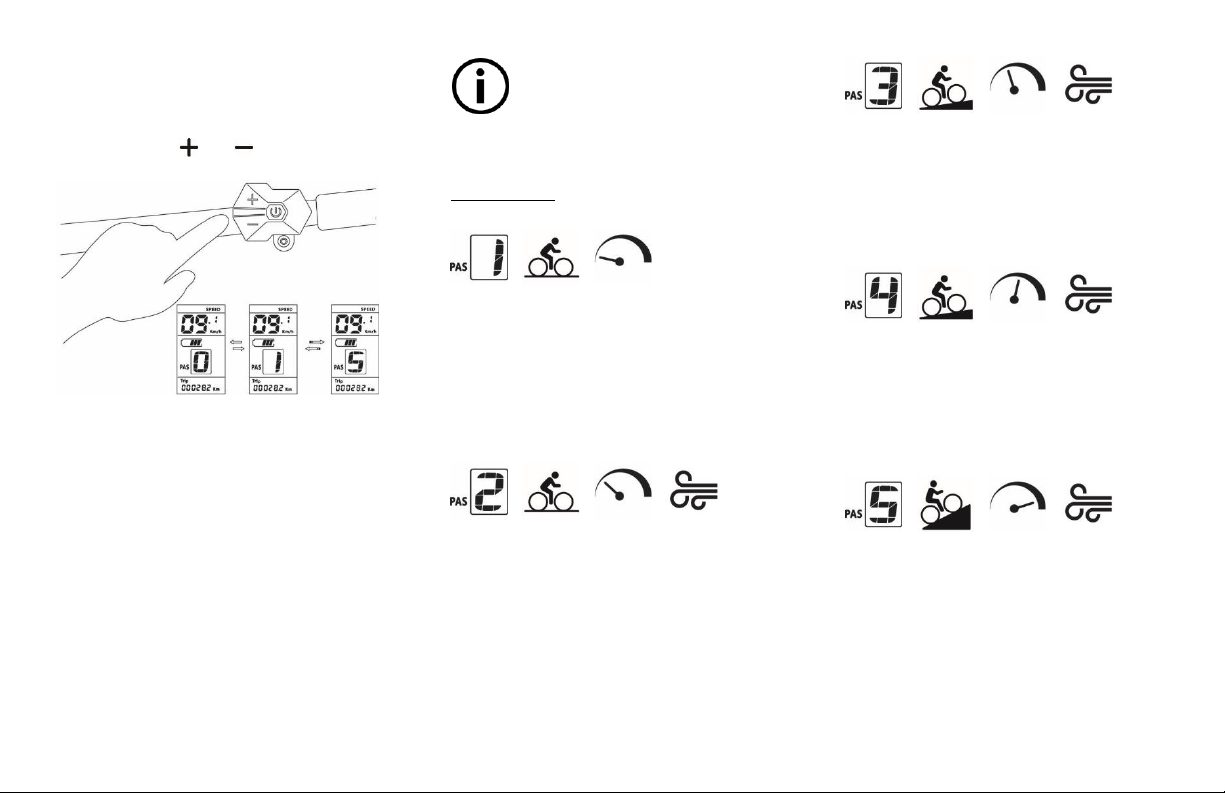
Always look far in front of you
while riding to make sure you
have sufficient time to react if any
situation occurs. Avoid looking at the LCD
controller unit for a long period. Instead,
learn how to operate it with only a quick
glance.
A power assisted bicycle is not
suited for use by children or
certain persons with reduced
physical or mental capabilities. Make sure
you know and understand local laws and
regulations regarding this type of vehicle.
Laws and regulations regarding
the limitations and use of a power
assisted bicycle varies among
countries and even sometimes among states
and provinces. Make sure you know and
understand local laws and regulations if you
plan to travel with your power assisted
bicycle.
Important information about battery storage
Do not store the battery in a cold
environment, even for a short
period. If you must leave or store
your power assisted bicycle outside or in a
place that is not heated, you should remove
the battery and store it inside, at room
temperature. Cold temperatures can
damage the battery.
Store the battery away from high
heat sources such as direct
sunlight or inside a vehicle during
summer.
Make sure to follow all the
instructions described in section
Storing a power assisted bicycle
when storing the bicycle for a long period.

4
Quick Start Instructions
STEP 1: Charge the battery
1. Connect the AC power plug into the charger.
2. Plug the AC power plug into an electrical outlet. The LED
indicators on the charger will light up.
3. Connect the charging plug into the socket on the battery. The LED
indicators on the battery will blink, confirming that charging is
underway. Let the battery charge until it is fully charged.
4. The light on the charger will turn green when fully charged.
5. Pull the charging plug from the battery and replace the rubber
protector cap.
STEP 2: Turn the system on
1. Mount the bicycle and stand still over it or sit on the saddle with
a foot resting steady on the ground.
2. Press the power button on the battery. LED indicators will light
up and show battery charge level.
3. Press the power button on the controller for 2 seconds. LCD
Display will light up.
Do not turn the power assist system on before having mounted the
bicycle and being seated properly with at least one foot on the
ground. An unexpected ignition of the power assistance while
mounting the bicycle can result in serious injuries.

5
STEP 3: Select your assistance level
1. Press the button on the controller to switch to a higher power
assistance mode. LCD Display will show the mode you selected.
2. Press the button on the controller to switch to a lower power
assistance mode.
Note: Level 1 provides the least power assistance, while level 5 provides the
most.
Be careful if you decide to start off with a high power assistance mode
as the first pedal stroke may result in an unexpectedly quick
acceleration!
STEP 4: Start off
1. Make sure the path in front of you is clear.
2. Hold on to the handlebar with both hands and push on the pedals.
The power assist will kick in almost instantly.
Note: The power assist will only stay engaged when the rider is pedaling.
Ride safely!

6
System component presentation
Charger unit
1. Charger
2. AC Power cord
3. LED Indicator
4. Charging plug
*Charger may not be exactly as shown
Battery unit
1. Battery
2. Power button
3. Rubber protector caps
4. Charging socket
5. USB port
6. LED battery level indicator
7. Key lock
Motor unit
1. Motor shell

7
Controller unit
1. Power button
2. Power assist. mode up button
3. Power assist. mode down button
4. Handlebar clamp
5. Power cord
LCD Display unit
1. LCD Display screen
2. Handlebar bracket
3. Clamp adapter
4. Power cord
5. Coupler
Speed sensor unit
1. Sensor
2. Magnet

8
Component features
Charger unit
▪Converts input electrical current from
wall outlet to charge the battery.
▪Red LED light while charging battery.
▪Green LED light once battery is charged.
Battery unit
▪Stores energy to power the motor unit.
▪Lithium-ion Type
▪Charging plug
▪USB port to charge devices
▪Key lock to secure on the bicycle’s frame
Motor unit
▪Provides power assistance to the
bicycle’s drivetrain
▪Brushless electric motor
▪Integrated torque sensor
▪Center mounting
Controller unit
▪Connects to LCD Display unit for…
▪turning on / off the LCD Display unit
▪changing power assistance mode
▪Adjusting LCD Display parameters
LCD Display unit
▪Displays information such as…
▪Current speed
▪Average speed
▪Maximum speed
▪Current power assist mode
▪Battery level
▪Riding time
▪Trip distance
▪Headlight status
▪Malfunction error code
▪Auto Off function
▪Adjustable backlight brightness
Speed Sensor unit
▪Connects to the motor unit and LCD
Display unit to measure current speed.
Components technical details
Battery
▪Voltage: 36V
▪Capacity: 10.4 Ah
▪Energy content: 375 Wh
▪Operating temperature
▪Discharge: -10 to 50°C
▪Charging: 0 to 40°C
▪Storage temperature: 5 to 40°C
Motor unit
▪Power: 250 W
▪Max drive torque: 90 Nm
▪Assistance cut-off speed: 32 km/h*
*Power assistance cut-off speed required by
Canadian regulations. May be different in a
different country.

9
Power assist mode description
How to shift through power assist modes
Switch through power assist modes using
the controller’s and buttons.
The LCD Display unit will show which
mode you’re in. Use a power assistance
level according to the current riding
conditions. Use a high assistance level
when going uphill or against a head wind
and switch to a lower assistance level if
you are riding on a flat road or with a tail
wind.
The operating range (battery
autonomy) of your bicycle is greatly
influenced by the power assistance
level you chose and how you manage it during
your ride. For more details on how to optimize
your operating range, see the following section on
operating range.
Mode 1 –Minimum assistance
Compensates for the power assist
system’s own weight without reaching
high speed. Use on flat surface with low
wind resistance. Operating range is at its
highest.
Mode 2 –Low assistance
Helps to reach a steady, slightly higher
speed than normal. Use on flat surface
with low to medium wind resistance. High
operating range.
Mode 3 –Intermediate assistance
Maintains a steady speed on variable
incline surfaces with medium wind
resistance. Optimal balance between
power assistance and operating range.
Mode 4 –High assistance
Reach greater speeds. Use on long inclines
and against strong wind resistance. Expect
a reduced operating range if riding with
this assistance level for a long period.
Mode 5 –Maximum assistance
Reach the highest speeds or get maximum
help to climb steeper inclines. Keep a
close watch at your battery capacity if
using this mode for a long trip.

10
Walk Mode
Use Walk Mode when walking beside your
bicycle and you’re in need of power
assistance. For example, when walking up
a hill.
To enter Walk mode:
Press and hold Down button for 2
seconds (from any mode). Walk mode will
instantly shut down once you release the
button.
Switching to Walk mode will instantly
ignite the motor and propel the bicycle
to a speed of 5 km/h even with no
pressure on the pedals. Make sure you are holding
your bicycle steadily and that the path in front of
your bicycle is clear. Walk mode will automatically
shut down once you release the button.
Operating Range
The distance you will be able to ride with
a single battery charge depends on many
factors. Some are under your control and
some are not. The factors you have no
control on are weather conditions such as
wind direction, wind strength, and
temperature. Difficult road surfaces also
influence the range you can achieve.
Loose and irregular ground surfaces will
increase your tires rolling resistance and
therefore require more power and
decrease the range you can cover.
The factors you have control over are the
following:
▪The power assistance level you choose
▪How often you shift gears
▪Tires pressure and condition
▪The weight of cargo you are carrying
▪Condition of the battery
Here are some tips to help you reach
maximum range of a battery charge:
▪Only use the power assistance you need
for each condition during your ride. (You
may not need maximum assistance
while riding on flat ground or with a tail
wind).
▪After a stop, start off again on an easy
gear combination and shift up
progressively as you gain speed. (Think
of it as driving a car with a manual
transmission where you would not start
accelerating in a high gear).
▪Keep your tires inflated at the
recommended pressure. (This will
significantly reduce the rolling
resistance of your tires and require less
power to propel the bicycle).
▪Only bring the necessary equipment to
keep your overall weight as low as
possible.
▪Always charge your battery according to
the instructions described in section
Charging the battery of this manual to
extend its life and performance.
It is recommended that you plan your
ride to make sure you can make it back
home on a single charge or have a
charging stop planned in advance.

11
Using your power assisted bicycle
General handling instructions
Handling a power assisted bicycle
Remove the battery from the bicycle
before proceeding to the following…
▪…Transporting your bicycle inside of
your vehicle or on a bicycle rack.
▪… Performing mechanical adjustments
or maintenance on your bicycle.
▪… Shipping your bicycle overseas or
even nationally with a transport
company.
Remove the LCD Display unit and
controller if packing the bicycle for
travelling in a train or airplane to prevent
damage to these components.
Power assisted bicycles are
considerably heavier than regular
bicycles, therefore you should take
extra caution before lifting your bicycle and use a
proper lifting technique in order to not hurt your
back.
If you are using a bicycle rack to
transport your power assisted bicycle
on your vehicle make sure it can
support the bicycle’s weight.
Do not move your bicycle while the
battery is connected and charging to
prevent damage to the power cord
and connections.
Your bicycle’s ‘’Walk’’ mode is
designed to help you push your bicycle
uphill. See section ’Power assist mode
description’ to learn how to use this function.
Always advise shipping companies
that you are shipping dangerous
goods and follow their requirements
for packaging or ask your bicycle dealer on
recommendations regarding the packaging of
your battery for transport.
Handling the battery
Never submerge the battery in water
and avoid washing it with a high-
pressure washer. Although it has been
designed to be water resistant, the battery’s shell
is not fully sealed.
Never attempt to modify or
disassemble the battery. This could
lead to serious injuries, cause serious
damage and will void the manufacturer’s
warranty. Only a qualified technician should
perform repair or maintenance on any parts of the
power assist system.
Only use genuine parts provided by the
manufacturer to charge the battery
and always follow the charging
instructions and warnings.
Do not place the battery near heat
sources or throw in fire.
To prevent battery leakage, do not
leave your power assisted bicycle or
battery under direct sunlight for
prolonged periods or inside a vehicle on a hot day.
If a battery has suffered a strong
impact it may be damaged. You should
have it checked by a qualified dealer to
make sure it is safe to use before riding your power
assisted bicycle again.
Always respect the battery’s operating
temperature limits described in
section ‘Technical Details’.
If the battery starts leaking, stop using
it immediately and contact a qualified
dealer for instructions.

12
If a leakage from the battery occurs,
avoid touching it as it is corrosive. If
the liquid gets in contact with your
clothes, wash them with clean water. If it gets in
contact with your eyes, do not rub but wash
thoroughly under clean water and contact a
physician.
When charging your battery, make
sure the connectors are clean and free
of water or dirt before connecting the
charger.
The warning labels on the battery and
charger present important
information for your safety. Make sure
to follow the instructions carefully.
Turning the power on
Do not turn the power assist system on
before having mounted the bicycle
and being seated properly with at
least one foot on the ground. An unexpected
ignition of the power assistance while mounting
the bicycle can result in serious injuries.
This power assist system has an auto
shut off function. If there is no
operation or input from the controller
for some time, the LCD Display unit will shut down
automatically.
To turn the power assist system On:
1. First turn the battery power on
▪Press the power button on top of the
battery. LED indicators will light up and
show battery charge level.
2. Then turn the LCD Display on
▪Press and hold the controller’s Power
button for 2 seconds. LCD Display will
power up.
Always turn the battery on before
turning the LCD Display on. LCD
Display will not power up if the battery
power is not turned on before.
If the error logo shows up when the
LCD Display lights up do not ride your
bicycle. Contact a qualified dealer to
have your power assist system
checked.
Using the controller
Position the controller facing up, next to
your grip so you can reach it with the
thumb.
▪Press and hold Power button for 2
seconds to turn the LCD Display On or
Off.
▪Short press Power button for 1
second to switch LCD Display mode
(current speed, average speed,
maximum speed, trip distance,
odometer, time…).
▪Press Up button to switch power
assistance mode to a higher level.
▪Press Down button to switch power
assistance mode to a lower level.
▪Press and hold Down button for 2
seconds to switch to Walk mode from
any mode. Walk mode will instantly shut
down once you release the button.
▪Press and hold down the button for 2
seconds to turn on or off the backlight.
▪Press and hold down the and
buttons simultaneously for 2 seconds to
reset the max speed, average speed, trip
time and trip distance.
Switching to Walk mode will instantly
ignite the motor and propel the bicycle
to a speed of 5 km/h even with no
pressure on the pedals. Make sure you are holding
your bicycle steadily and that the path in front of
your bicycle is clear. Walk mode will automatically
shut down once you release the button.

13
LCD Display unit functions
1. Currently displayed function
2. Current speed
3. Speed unit
4. Battery charge level
5. Headlight on (if equipped)
6. Current Power Assist mode
7. System malfunction sign
8. Current odometer function
9. Odometer
10. Odometer unit
Selecting a power assistance mode
Once the system is powered up, you may
want to select a higher or lower power
assistance mode. This will change the
assistance level that the system gives you
based on the pressure you put on the
pedals while riding.
It is recommended to start off with the
lowest level of assistance and increase it
gradually if needed. Doing so will offer a
much smoother acceleration, helping you
keep control over your speed as well as
saving the battery’s life.
Keep the assistance level lower while
riding casually on flat surfaces. Increase
the assistance level when approaching an
incline to help you climb with less effort.
If you wish to walk beside the bicycle on
an incline or if the bicycle is heavy to push
because of the load it is carrying, you may
want to use the Walk mode that will make
the bicycle self propel at a speed of 5
Km/h.
For more details on the power assistance
modes, their assistance level and how to
switch through them, go to section Power
assist modes description.
Specific riding maneuvers
There are some maneuvers that should be
avoided when riding a power assisted
bicycle. A sudden, ignition of the power
assist system in an unexpected situation
can cause the bicycle to accelerate when
it is not required and handle erratically.
In the following riding situations, it is
recommended not to put pressure on the
pedals to avoid a sudden acceleration
from the power assist system:
▪While walking besides the bicycle.
▪While taking a curve at high speed.
▪While riding on a patch of water, mud,
snow, ice, or any slippery surface.
▪While lifting the front wheel up to clear
an obstacle.

14
Removing or inserting the battery
Your key is needed to lock the battery
to prevent it from unintentional
detachment or from theft.
Put the provided spare key in a safe
place in the event that you lose the
first key. Take note of the key number
that was provided to you along with your key set
to make a new spare if needed.
To remove the battery:
▪Insert the key into the key lock of the
battery.
▪Turn the key for half a turn, counter
clockwise (to the left) to unlock the
battery.
▪Firmly push the battery along the
battery holder bracket towards the
front, being careful not to hit the bike
frame.
To Insert the battery:
▪Insert the key into the key lock of the
battery.
▪Turn the key for half a turn, counter
clockwise (to the left) to unlock the
battery.
▪Check the battery holder bracket to
ensure there isn’t any water
accumulation. Then align and firmly
push the battery along the battery
holder bracket towards the rear.
▪Turn the key for half a turn, clockwise
(to the right) to lock the battery in
position.

15
Charging the battery
It is recommended to remove the
battery from your bicycle before
charging it. Otherwise, it is also
possible to charge the battery while the battery is
still on the bicycle. However, in that situation,
make sure it is resting in a stable position that
won’t allow the bicycle to move or fall during the
charging process.
To charge the battery:
▪Connect the AC power plug into the
charger.
▪Plug the AC power plug into an electrical
outlet. Check that the LED indicator on
the charger lights up to confirm that
power is going through.
▪Lift the rubber protector cap and
Connect the charging plug into the
socket on the battery.
▪Check that the LED indicators on the
battery are flashing to confirm that
charging is underway.
▪Let battery charge until it is fully
charged.
▪Pull the charging plug from the battery
and replace the rubber protector cap.
If the battery is not fully charged after
7 hours, unplug the battery and
contact a qualified dealer to have the
battery checked.
A battery will wear out with age.
Following the best charging and
storing procedure will extend its life to
a maximum. However, when an abnormally short
battery capacity after a full charge is observed, it
is likely that it needs to be replaced.
Setting the LCD Display parameters
To enter parameters adjustment mode
and adjust values / settings:
▪Double press controller’s Power button
twice (Interval must be less than 0.3
seconds) to get into Parameters
adjustment mode. First setting
adjustment (Speed unit setting) will
show up, blinking, on the LCD Display
unit.
▪Change the setting’s value by pressing
the controller’s Up or Down
buttons.
▪Confirm the desired value by pressing
the controller’s Power button . Next
setting adjustment option will then
appear on the LCD Display unit.
▪Proceed the same way for the following
adjustment options.
The setting adjustment sequence is the
following:
Do not change the setting value for
Wheel Size or Voltage. These settings
have been set by the factory and
should not be modified.

16
Settings past the password prompt
can only be accessed by the
manufacturer.
Parameters adjustment mode quits
automatically when there is no input
given to the controller for 10 seconds.
Setting the Speed unit
Displayed speed unit value can be set to
Kph (kilometers per hour) or Mph (miles
per hour).
Setting the LCD Display backlight
The LCD Display backlight brightness can
be adjusted from 1 to 5. On models
equipped with an integrated headlight, its
brightness will also be set accordingly.
Setting the Auto Off time
Your Power assisted bicycle has an Auto
Off function to prevent the waste of
battery life when the bicycle is not used.
The time before the system shuts off
automatically after the bicycle has not
been used or any input has been given to
the controller can be adjusted from 1 to 9
minutes.
Setting the wheel size
The correct wheel size has been set at the
factory and should not be modified. Doing
so may result in system malfunction.
Voltage
The correct voltage has been set at the
factory and should not be modified. Doing
so may result in system malfunction.
Password
A password has been set at the factory
and prevents the access to more settings.
Only the manufacturer can access these
settings.
Turning the power off
Do not dismount your bicycle before
having turned the power assist system
off. An unexpected ignition of the
power assistance while dismounting the bicycle
can result in serious injuries.
To turn the power assist system Off:
▪Press the Battery’s Power button .
The LCD Display will shut down.
Maintenance & storage
Besides your bicycle’s regular mechanical
maintenance, for which the requirements
can be seen on the user manual that was
provided with your bicycle, there is no
maintenance related to the Power assist
system required by the rider. Do not
attempt to open any of the Power assist
system components. All service or repair
should only be carried out by a qualified
technician.
Always turn off the Power assist
system before proceeding to regular
bicycle inspection, maintenance, or
repair.
Cleaning your power assisted bicycle
The bicycle user manual that was
provided to you separately contains a
more detailed bicycle washing
procedure and recommendations. It is
suggested to refer to it.
Never submerge any of the
components of the Power assist system
in water.

17
Remove the battery and wash your bicycle
with water and mild soap. Do not use a
high-pressure water hose to prevent
water from getting inside the
components.
Make sure to keep the battery unit
contact prongs and holders clean. Use a
damp cloth to remove grit, dust, mud, etc.
Storing your power assisted bicycle
A discharged battery stored for a long
period can be permanently damaged. To
prevent such a situation, the following
should be observed when storing your
power assisted bicycle for a long period:
▪Charge the battery to around 75% of full
capacity
▪Remove the battery from the bicycle
▪Store the battery in a dry, tempered
room away from humidity at room
temperature (around 20°C).
▪Check battery charge after 6 months of
storage and charge to around 75%
again.
Do not store the battery in a cold
environment, even for a short period.
If you must leave or store your power
assisted bicycle outside or in a place that is not
heated, you should remove the battery and store
it inside, at room temperature. Cold temperature
can damage the battery.
Store the battery away from high heat
sources such as direct sunlight or
inside a vehicle during summer.
Do not leave the battery unit
connected to the charger for long
periods besides the normal charging
period.
Disposal
Check with your local waste management
services for the proper way to dispose of
the components of the Power assist
system. Do not dispose of these
components with other household waste.
Check for a local battery recycling
program to dispose of the battery.

18
Troubleshooting
Don’t attempt to alter or disassemble
any component of the power assist
system. Maintenance should only be
performed by a qualified technician.
This section describes, only for reference
purposes, some malfunctions that could
happen related to the power assist
system.
For other mechanical issues not related to
the power assist system, such as a
derailleurs or brakes malfunction, please
refer to section Troubleshooting of your
Owner Manual provided separately at the
time of purchase.
System malfunction sign and error codes
The LCD Display unit can communicate a
problem related to the power assist
system through an error code.
If a malfunction is detected, the System
malfunction sign will appear on the LCD
Display unit and an error code will be
displayed instead of the current speed
function such as the below example:
1. System malfunction sign
2. Error code
If a system malfunction sign and an error
code appear, please contact a qualified
technician or get in touch with our
customer service for instructions. Refer to
the following most common error code
list applicable to your power assisted
bicycle:
Error
code
Malfunction description
21
Motor controller malfunction
23
Motor malfunction
24
Motor malfunction
26
Battery malfunction
27
Abnormal motor temperature
30
Connection malfunction
Checking the Speed sensor unit
▪Check and make sure the Speed sensor
unit is present and that it is properly
attached to the frame.
▪Check and make sure the magnet is
present and properly attached to the
wheel.
▪Check and make sure the magnet is
properly positioned to be detected by
the Speed sensor unit when the wheel is
turning. The magnet should be
positioned in a way that it moves past
the Speed sensor unit within 15 mm.

19
Troubleshooting guide
Problem
Possible causes
Solution
Pedaling feels stiff
▪Improper tire pressure (may be too low)
▪Either the controller or battery or both are turned
off
▪Battery is low
▪Add air
▪Make sure the display is lit up on the
controller and the lights are on on the
battery
▪Charge battery
Pedal assist is not activated
▪Battery is empty
▪Are you overusing the battery? eg. Above or
below the operating temperature, and/or with
excessive cargo weight
▪You’re pedaling over 32km/h
▪You’re not pedaling
▪Internal connections may be loose.
▪Either the controller or battery or both are turned
off
▪Motor temperature exceeds 100 degrees
▪Check the battery and charge if needed
▪Turn off the battery and bring indoors to
cool off. Try again later
▪Check the speedometer, assistance is
only provided up to 32km/h
▪You must pedal for the power-assist to
activate
▪Contact a qualified technician or place of
purchase
▪Make sure the display is lit up on the
controller and the lights are on on the
battery
▪Turn off the battery and bring indoors to
cool off. Try again later
The battery loses it’s charge very fast
▪The battery may be almost expired
▪Contact the place of purchase to order a
new battery
The battery won’t charge
▪Are the charger cords connected properly to the
battery and the wall?
▪Make sure plugs are clean and fully
connected. If the battery still won’t
charge contact the place of purchase
This manual suits for next models
1
Table of contents
Other Junction Bicycle manuals