manuals.online logo
Brands
  1. Home
  2. •
  3. Brands
  4. •
  5. Juniper
  6. •
  7. Switch
  8. •
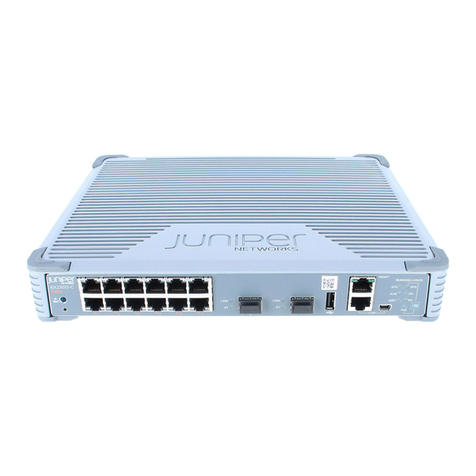
  9. Juniper EX2200 Series User manual

Juniper EX2200 Series User manual

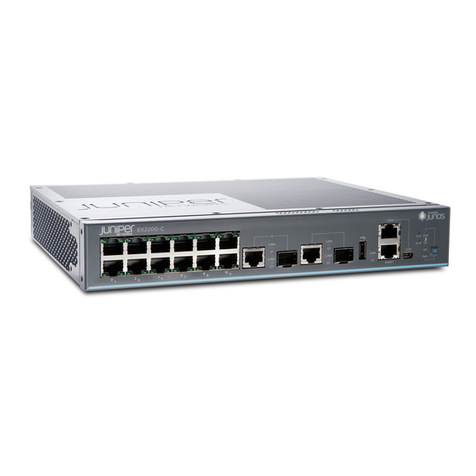
EX2200 Switch Quick Start
To install and configure a Juniper Networks EX2200 Ethernet Switch, you need:
zTwo mounting brackets and eight mounting screws (provided)
zA power cord with a plug appropriate for your geographical location and a power cord
retainer (provided)
zEthernet cable with an RJ-45 connector attached (provided)
zManagement host, such as a PC, with an Ethernet port (not provided)
zScrews to secure the chassis to the rack or cabinet (not provided)
zPhillips (+) screwdriver, number 2 (not provided)
For more information about the tasks described in this quick start and other setup tasks,
see the EX Series documentation at http://www.juniper.net/techpubs/.
Part 1: Mount the Switch
You can mount an EX2200 switch on two posts of a 19-in. rack or cabinet by using the
mounting brackets provided with the switch.
1. Place the rack or cabinet in its permanent location, allowing adequate clearance for
airflow and maintenance, and secure it to the building structure.
NOTE: If you are mounting multiple units on a rack, mount the heaviest unit at the bottom
and mount the other units from the bottom to the top in decreasing order of the weight of
the units.
2. Align the mounting brackets along the front or rear of the side panels of the chassis
depending on whether you are front-mounting or rear-mounting the switch.
3. Attach the mounting brackets to the chassis by using the mounting screws. Tighten
the screws.
NOTE: The switch weighs 10 lb (4.5 kg). Installing the switch requires one person to lift
the switch and a second person to secure it to the rack.
4. Have one person grasp both sides of the switch, lift the switch, and position it in the
rack, aligning the mounting bracket holes with the threaded holes in the rack rail.
Align the bottom hole in each mounting bracket with a hole in each rack rail, making
sure the chassis is level.
5. Have the second person secure the switch to the rack by using the appropriate
screws. Tighten the screws.
Part 2: Connect Power to the Switch
1. Squeeze the two sides of the power cord retainer clip and insert the L-shaped ends of
the wire clip into the holes in the bracket on each side of the AC appliance inlet on the
real panel.
2. Insert the coupler end of the power cord into the AC appliance inlet.
3. Push the cord into the slot in the adjustment nut of the power cord retainer. Turn the
nut until it is snug against the base of the coupler and the slot in the nut is turned 90°
from the top of the switch.
4. If the AC power source outlet has a power switch, set it to the OFF (0) position.
5. Insert the power cord plug into the power source outlet.
6. If the AC power source outlet has a power switch, set it to the ON (|) position.
g027019
SYS
ALM
SPD
DX
EN
POE
g027020
Mounting rack
Mounting bracket
g027012
Tighten
adjustment nut.
Retainer clip
Adjustment nut
Juniper Networks, Junos, Steel-Belted Radius, NetScreen, and ScreenOS are registered trademarks of Juniper Networks, Inc. in the United States and other countries. The Juniper Networks Logo, the Junos logo, and JunosE are
trademarks of Juniper Networks, Inc. All other trademarks, service marks, registered trademarks, or registered service marks are the property of their respective owners. Juniper Networks assumes no responsibility for any inaccuracies
in this document. Juniper Networks reserves the right to change, modify, transfer, or otherwise revise this publication without notice. Products made or sold by Juniper Networks or components thereof might be covered by one or more
of the following patents that are owned by or licensed to Juniper Networks: U.S. Patent Nos. 5,473,599, 5,905,725, 5,909,440, 6,192,051, 6,333,650, 6,359,479, 6,406,312, 6,429,706, 6,459,579, 6,493,347, 6,538,518, 6,538,899,
6,552,918, 6,567,902, 6,578,186, and 6,590,785. Copyright © 2010, Juniper Networks, Inc. All rights reserved. Printed in USA. Part Number: 530-035819, Revision 01, 23 June 2010.
Part 3: Perform Initial Configuration
NOTE: Before you begin the configuration, enable a DHCP client on the management
PC you will connect to the switch so that the switch can obtain an IP address
dynamically.
NOTE: Read the following steps before you begin the configuration. You must complete
the initial configuration using EZSetup within 10 minutes. The LEDs on the network ports
on the front panel blinks when the switch is in the initial setup mode. The switch exits
EZSetup after 10 minutes and reverts to the factory configuration, and the PC loses
connectivity to the switch.
1. Transition the switch into initial setup mode by pressing the mode button below the
LED labeled POE on the right-hand side of the front panel of the switch for 10
seconds.
If the switch does not transition into initial setup mode, revert to the factory default
configuration. See the EX Series documentation at http://www.juniper.net/techpubs/.
2. Connect the Ethernet cable from the Ethernet port on the PC to port 0 (ge-0/0/0) on
the front panel of the switch.
The ge-0/0/0 interface is now configured as a DHCP server with the default IP
address, 192.168.1.1. The switch can assign an IP address to the management PC
in the IP address range 192.168.1.2 through 192.168.1.253.
3. From the PC, open a Web browser, type http://192.168.1.1 in the address field, and
press the Enter key.
4. On the J-Web login page, enter root as the username, leave the password field
blank, and click Login.
5. On the Introduction page, click Next.
6. On the Basic Settings page, enter the hostname, enter and reenter a password,
specify the time zone, and synchronize the switch date and time settings with the
management PC or set them manually. Then, click Next.
7. Use the Management Options page to select the management scenario:
−In-band Management—Use VLAN ‘default’ for management
Select this option to configure all data interfaces as members of the default VLAN.
Click Next. Specify the management IP address and the default gateway.
−In-band Management—Create new VLAN for management
Select this option to create a management VLAN. Click Next. Specify the VLAN
name, VLAN ID, member interfaces, and management IP address and default
gateway for the new VLAN.
−Out-of-band Management—Configure management port
Select this option to configure only the management interface. Click Next. Specify
the IP address and default gateway for the management interface.
8. Click Next.
9. Specify the IP address and default gateway for the management interface.
10. Click Next.
11. On the Manage Access page, you may select options to enable Telnet, SSH, and
SNMP. For SNMP, you can configure the read community, location, and contact.
12. Click Next. The Summary page displays the settings you have selected.
13. Click Finish. The configuration is committed as the active switch configuration. You
can now log in with the CLI or the J-Web interface to continue configuring the switch.
NOTE: After the configuration is committed, the connectivity between the PC and the
switch might be lost. To reconnect, release and renew the IP address by executing the
appropriate commands on the PC or by removing and reinserting the Ethernet cable.
Safety Warnings Summary
This is a summary of safety warnings. For a complete list of warnings, including
translations, see the EX Series documentation at http://www.juniper.net/techpubs/.
WARNING: Failure to observe these safety warnings can result in personal injury
or death.
zPermit only trained and qualified personnel to install or replace switch components.
zPerform only the procedures described in this quick start and the EX Series
documentation. Other services must be performed only by authorized service
personnel.
zBefore installing the switch, read the planning instructions in the EX Series
documentation to make sure that the site meets power, environmental, and clearance
requirements for the switch.
zBefore connecting the switch to a power source, read the installation instructions in the
EX Series documentation.
zInstalling an EX2200 switch requires one person to lift the switch and a second person
to install mounting screws.
zIf the rack has stabilizing devices, install them in the rack before mounting or servicing
the switch in the rack.
zBefore installing or after removing an electrical component, always place it
component-side up on an antistatic mat placed on a flat, stable surface or in an
antistatic bag.
zDo not work on the switch or connect or disconnect cables during electrical storms.
zBefore working on equipment that is connected to power lines, remove jewelry,
including rings, necklaces, and watches. Metal objects heat up when connected to
power and ground and can cause serious burns or become welded to the terminals.
Power Cable Warning (Japanese)
The attached power cable is only for this product. Do not use this cable for another
product.
Contacting Juniper Networks
For technical support, see http://www.juniper.net/support/requesting-support.html.
g040300

Other manuals for EX2200 Series

11

Other Juniper Switch manuals

Juniper NFX250 User manual

Juniper

Juniper NFX250 User manual

Juniper EX8200 Series Quick start guide

Juniper

Juniper EX8200 Series Quick start guide

Juniper QFX10016 User manual

Juniper

Juniper QFX10016 User manual

Juniper QFX5100 Installation instructions

Juniper

Juniper QFX5100 Installation instructions

Juniper EX4100 User manual

Juniper

Juniper EX4100 User manual

Juniper QFX5110-32Q User manual

Juniper

Juniper QFX5110-32Q User manual

Juniper EX8208 User manual

Juniper

Juniper EX8208 User manual

Juniper EX3300 User manual

Juniper

Juniper EX3300 User manual

Juniper EX2300-C Installation instructions

Juniper

Juniper EX2300-C Installation instructions

Juniper EX 3200 48T User manual

Juniper

Juniper EX 3200 48T User manual

Juniper EX2200 Series User manual

Juniper

Juniper EX2200 Series User manual

Juniper EX4300 Installation instructions

Juniper

Juniper EX4300 Installation instructions

Juniper EX8200 Series Instruction Manual

Juniper

Juniper EX8200 Series Instruction Manual

Juniper EX3200 Series Quick start guide

Juniper

Juniper EX3200 Series Quick start guide

Juniper EX2300-C User manual

Juniper

Juniper EX2300-C User manual

Juniper EX Series User manual

Juniper

Juniper EX Series User manual

Juniper EX8208 User manual

Juniper

Juniper EX8208 User manual

Juniper EX8208 User manual

Juniper

Juniper EX8208 User manual

Juniper EX8200 Series User manual

Juniper

Juniper EX8200 Series User manual

Juniper EX4500 Series User manual

Juniper

Juniper EX4500 Series User manual

Juniper EX2500 Installation instructions

Juniper

Juniper EX2500 Installation instructions

Juniper Day One+ User manual

Juniper

Juniper Day One+ User manual

Juniper EX2200 Series Installation instructions

Juniper

Juniper EX2200 Series Installation instructions

Juniper EX Series User manual

Juniper

Juniper EX Series User manual

Popular Switch manuals by other brands

Belkin F1DN108C user manual

Belkin

Belkin F1DN108C user manual

Swann USB EXTERNAL HUB SW-U-4PMH Specifications

Swann

Swann USB EXTERNAL HUB SW-U-4PMH Specifications

StarTech.com IES1G52UP12V quick start guide

StarTech.com

StarTech.com IES1G52UP12V quick start guide

Simplified MFG RM42C user manual

Simplified MFG

Simplified MFG RM42C user manual

Comm-Tec UP-1080p user manual

Comm-Tec

Comm-Tec UP-1080p user manual

motogadget m-stop instruction manual

motogadget

motogadget m-stop instruction manual

HP 5130 48G 4SFP+ XI Product End-of-Life Disassembly Instructions

HP

HP 5130 48G 4SFP+ XI Product End-of-Life Disassembly Instructions

Justin JH-810 user manual

Justin

Justin JH-810 user manual

FineTek SC28P/N Operation manual

FineTek

FineTek SC28P/N Operation manual

StarTech.com SV431HDU3A2 quick start guide

StarTech.com

StarTech.com SV431HDU3A2 quick start guide

MikroTik CSS610-8P-2S+RM quick guide

MikroTik

MikroTik CSS610-8P-2S+RM quick guide

H3C S7500E-XS Series Faq

H3C

H3C S7500E-XS Series Faq

Atlona AT-HDVS-150-TX user manual

Atlona

Atlona AT-HDVS-150-TX user manual

steute Ex ZS 73 Mounting and wiring instructions

steute

steute Ex ZS 73 Mounting and wiring instructions

Allied Telesis AT-x510-28GTX Command reference

Allied Telesis

Allied Telesis AT-x510-28GTX Command reference

HP 6125G Command reference

HP

HP 6125G Command reference

ORVIBO ZigBee Mini Hub Faq

ORVIBO

ORVIBO ZigBee Mini Hub Faq

Allied Telesis AT-IX5-28GPX installation guide

Allied Telesis

Allied Telesis AT-IX5-28GPX installation guide

manuals.online logo
manuals.online logoBrands
  • About & Mission
  • Contact us
  • Privacy Policy
  • Terms and Conditions

Copyright 2025 Manuals.Online. All Rights Reserved.