Jupiter Bikes ATLAS User manual

USERS MANUAL
Folding Electric Bike | Vélo Pliant Electric | Bici Eléctrica Plegable

2
Structural Diagram ...................................................... 2
Specications ................................................................. 3
Installing the Front Wheel ...................................... 4
Installing the Kickstand ........................................... 5
Installing the Handlebars ....................................... 5
Seat Post Installation ................................................. 6
Pedals Installation ....................................................... 6
Charging the Battery ................................................. 7
Removing the Battery ............................................... 7
Turning On Your Bike ................................................. 8
The LCD Display ........................................................... 8
Precautions When Riding ....................................... 9
Care and Maintenance ........................................... 10
Safety Warnings .......................................................... 11
Warranty .......................................................................... 12
TABLE OF
CONTENTS

3
STRUCTURAL DIAGRAM
NOTE:
Manual illustrations are for demonstration purposes only. Illustrations may not reflect exact
appearance of actual product. *Specifications subject to change without notice.*
*Mileage is subjected to weight, road conditions, temperature,
wind speed, riding habits, etc.
*Please use the original charger that was provided with purchase.
*Warranty becomes invalid in the instance of any unauthorized
bike modification.
Handlebar
Brake
Stem
Shocks
Front ForkDisc BreakChainwheel
Frame Latch
Seat Post
Seat Post Clamp
Motor Pedal
Bike FrameSaddle
TABLE OF
CONTENTS

4
PACKING CONTENTS:
Atlas Electric Bike
Saddle & Seat Tube
User Manual
Charger
In Frame Battery
2 Keys for Battery Lock
Rear Mudguard
Multi-Purpose Bike Tool
SPECIFICATIONS
MOTOR & BATTERY
Motor Wattage: 48V / 500w
Charging Time: 4-6 hours
Waterproof Rating: IP54
Battery Capacity: 48V / 10.4Ah
Battery Type: Lithium Ion
Charging Current 2A max
METER:
Display: LCD Display
Remaining Power: Yes
Speed: Yes
Total Mileage: Yes
Speed Mode: 5 Speed Levels
COMPOSITION
Frame: Aluminum Alloy Unibody Frame
Brake Type: Front & Rear Disc
Production dimensions:
Folded: H = 40”, W = 30”, L = 40”
Unfolded: H = 44”, W = 30”, L = 74”
Seat Height (from ground) 34” - 41” (adjustable)
Net Weight (with battery) 60 lbs
Wheel Base: 47 Inches
Tire Size: 27.5” x 3”
Tire Pressure: 20 - 35 psi

5
INSTALLING THE FRONT WHEEL
Remove parts from box and locate
the front wheel and front wheel
axle.
Unscrew the thumb screw on the
axle, place the axle in the front
wheel, then loosely re-screw it.
Place the front fork on to the axle.
Make sure the Axle Latch is open.
Hand tighten the thumb screw,
then close the Axle Latch. Test and
make sure the wheel does not
wobble.
PACKING CONTENTS:
Atlas Electric Bike
Saddle & Seat Tube
User Manual
Charger
In Frame Battery
2 Keys for Battery Lock
Rear Mudguard
Multi-Purpose Bike Tool

6
INSTALLING THE HANDLEBARS
Attach the handlebars onto the
handlebar stem and tighten screws.
Remove the 4 screws on the top
cover, then remove the cover.
Loosen screws 1, 2, and 3 and align
the handlebar step with the front
wheel, then re-tighted. To adjust the
angle, loosen screw 4, adjust it, then
re-tighten.
INSTALLING THE KICKSTAND
1. Locate Kickstand, Kickstand
Bolts, Washers, & Hex Wrench.
2. Align the Kickstand behind
where it attaches on the left
side of the frame.
3. Screw in bolts with washers
using the included Park Tool.

7
SEAT POST INSTALLATION
Unlatch and loosen seat
clamp. Put seat post in
frame and adjust to desired
height. Retighten and re-
latch clamp.
PEDALS INSTALLATION
The right pedal is reverse
threaded so twist in the
opposite direction. Look
for an R engraved on the
threaded end. It should
hand twist easily on the
pedal arm. If it doesn’t,
unscrew and try again.
Use a 15mm wrench for
the last 1 or 2 turns. Repeat
with the left pedal on the
other side.

8
The Atlas battery can be charged inside or outside the bike frame. The
red led light on the charger will turn green when fully charged.
CHARGING THE BATTERY
Turn the key counter clockwise
and remove it. Unlatch the Bike
Frame Latch by sliding the
thumb lock, then pulling the
latch away from the bike.
Fold the bike, then rest the
folded frame on the metal
stand under the Chainring, the
bike should balance and stay
upright. Then pull the battery
out.
REMOVING THE BATTERY

9
THE LCD DISPLAY
TURNING ON YOUR BIKE
After charging the bike,
press the power button
on the LCD display to
power up your bike.
Check tire pressure,
then Congratulations!
You are ready for
your first ride!
Don’t Forget! Practice
common sense &
safety measures when
riding your bike.
Pedal Assist
Termp
Odo / Trip
Speed
Run Time
Battery
Up and Down buttons
change Pedal Assist
level.
Hold Power button to
turn off bike.
Hold up for a few
seconds to turn on
display light.

10
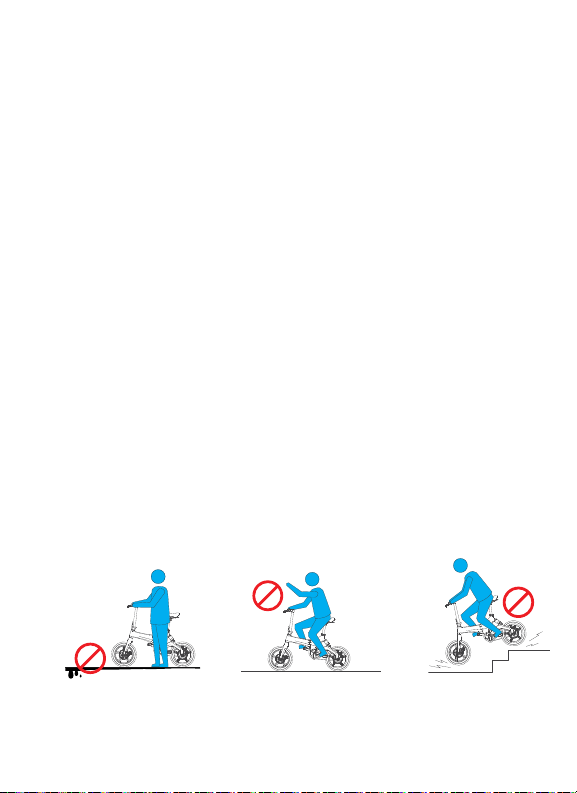
PRECAUTIONS WHEN RIDING
Do not ride in snowy
or slippery road
conditions.
Always ride with
both hands on the
handlebar.
Never ride down stairs,
escalators orelevators.
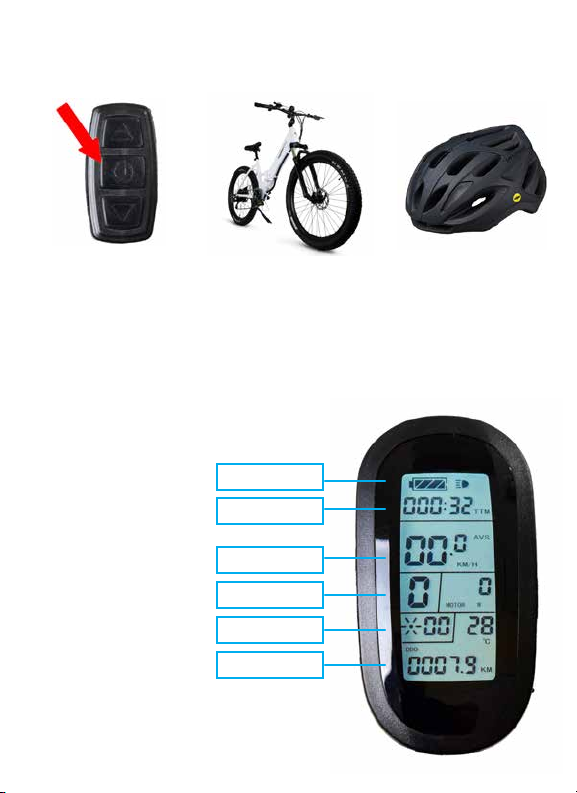
• Wear the appropriate protection gear such as helmets, knee pads, and elbow pads to help
prevent injury.
• Inspect the bike, brakes, & battery before each ride to ensure all is in working order.
• Do not ride on slopes over 15°.
• If you must ride in the rain or snow, please ride at lower speeds and keep a safe stopping
distance from objects and vehicles in front of you.
• Children under the age of 16 are not advised to ride the bike.
• Avoid sudden starts and stops.
• Do not lean forwards or backwards while riding, and maintain a safe speed at all times.
• If the battery runs low, keep a low constant speed & charge the battery as soon as possible.
• Do not store your bike in the trunk of a car in hot weather.
• Have a full understanding of local traffic rules and regulations before you ride.
• Be aware of your surroundings at all times, and be sure to always ride in safe conditions.
• Keep a comfortable distance from other riders.
• Use caution when riding in environments with low visibility, lower your speed or stroll your bike
if needed.
• Do not ride the bike backwards or do any actions that may endanger yourself and others
while riding.
• Do not lend your bike to others without letting them become familiar to this manual first.
• Do not ride while ill or under the influence of drugs or alcohol.
• Accelerate slowly when riding. Sudden acceleration may throw you out-of-balance and could
cause falls or injury.

11
CARE & MAINTENANCE
CLEANING YOUR BIKE
To clean the Atlas carefully wipe with a damp cloth, then dry with a dry cloth. Do
not use water to clean the Atlas, as the electrical and electronic systems may
get wet, resulting in personal injury or malfunction of the bicycle. You should
clean your bike after each ride. Lube the chain every so often to keep it smooth.
BIKE CARE
• Keep tires properly inflated. Check for 20-35 psi. before each ride.
• Check brakes regularly. Look for issues before each ride.
• Regularly clean, lube and inspect your chain.
• Check and secure any loose bolts or parts on the Atlas. Hand tighten if needed.
BATTERY
• Keep your Atlas away from fire and excessive heat.
• Top off battery charge whenever you have the change
• To avoid damage to the battery, never subject the Atlas to intense physical
shock, severe vibration, or impact.
• Protect the bike from water or moisture.
• Never disassemble the bike or its battery.
• If there are any issues with the battery, please contact Jupiter Bike Customer
Support 813-609-2453 or support@jupiterbike.com.
STORAGE
• If you plan on storing the Atlas for a substantial period of time, please make
sure you fully charge the battery before storing. The battery should be fully
charged once a month after this.
• To protect against dust, cover the Atlas.
• Store the Atlas indoors, in a dry place and at a suitable temperature.
• You should bring the Atlas into a warm environment (above 50 degrees
Fahrenheit) for charging.
• Do not leave the Atlas plugged into the charger for long periods of time.
What about motor maintenance? Your Atlas motor is designed to be
maintenance-free. If a problem arises (a rarity), contact Jupiter Bike Customer
Support 813-609-2453 or support@jupiterbike.com.

12
• For your safety, please read the user
manual carefully. Make sure the owner
and operator understand and accept all
the safety instructions.
• Ride at your own risk and use common
sense.You will be responsible for any loss
or damage caused by improper use.
• The elderly, pregnant women, children,
and those with heart conditions should not
use this product.
• Do not exceed the weight limit of 265
pounds. Only 1 rider at a time.
• Inspect each part of the product prior
to each use to ensure that it has been
correctly maintained and is properly
functioning.Riding with improperly
adjusted brakes is dangerous and may
result in serious injury or death.
• Operate in safe, suitable locations. Do not
ride on roads with obstacles, such as litter,
stones, etc.Avoid riding on steep slopes or
in narrow areas.Avoid riding in the rain or
on smooth slippery surfaces such as ice
or snow.Avoid riding near flammable gas,
steam, liquid or dust that could cause a
fire.
• If you have had any head, neck or back
ailments, or prior surgeries to those areas,
Do Not ride this product.
• Do not ride without proper training, at high
speeds, on uneven terrain or on slopes.
• Be sure all safety labels are in place and
understood prior to riding.
• Do not use near motor vehicles.
• Do not ride after taking prescription
medications or drinking.
• Do not answer your phone, carry items or
engage in any other activities while riding.
• Always wear appropriate safety gear,
including shoes and a helmet.We
encourage you to use lighting, reflectors
and signal flags.
• Always comply with laws, regulations and
ordinances, including local traffic laws.
• Always give way to pedestrians, and be
alert to your surroundings, both directly in
front of you and in the distance.
• When riding with others, always maintain
a safe distance to avoid the possibility of
a collision.
• Be sure to maintain your balance when
turning, and don’t make sharp turns.
• Applying the brakes too hard, or suddenly,
can cause a wheel to lock which may
cause you to lose control and fall which
may result in injury or death.
• Only ride the product with adequate
daylight for visibility.
• Do not lift the product from the ground
while it is on and the wheels are in motion.
This may result in free spinning wheels
which may cause injury to yourself or
others.
• Do not jump on or off the product or jump
while using it, or perform stunts.
• When not in use, store your bike in a cool,
dry area away from sunlight and water.
• To clean your bike, use a soft damp cloth
to wipe clean, and dry with a dry cloth.
To protect internal wiring and electric
components, do not soak or rinse your bike
with water, and do not clean your bike with
corrosive or flammable chemical solvents,
like alcohol, gasoline, paraffin or acetone.
• Do not attempt to disassemble, modify,
repair or replace the unit or any
components of the unit without instruction
from Customer Support. This will void any
warranty and can lead to malfunctions that
may cause injury.
• The socket-outlet shall be installed
near the equipment and shall be easily
accessible.
• This product contains a button battery. If
swallowed, it could cause severe injury
or death in just 2 hours. Seek medical
attention immediately.
CALIFORNIA PROPOSITION 65
WARNING: this product can expose you to a
chemical such as Cadmium that is known
to the State of California to cause cancer or
birth defects or other reproductive harm. For
more information go to:
https://www.p65warnings.ca.gov/products
TROUBLESHOOTING
For troubleshooting or operational issues,
please contact Jupiter Tech at 813-609-BIKE
SAFETY WARNINGS

13
JUPITER BIKE ATLAS - LIMITED 1 YEAR WARRANTY
The Jupiter Bike Atlas and accessories are manufactured to high quality standards.
The Jupiter Bike Atlas is warranted to the original purchaser for one full year from
the original purchase date against defective materials or workmanship. This warranty
applies to replacement parts only and specifically excludes the tire tread.This warranty
becomes void if the original purchaser transfers the product to another individual.
If the Jupiter Bike Atlas suffers damage due to customer modifications and/or is used
for any application other than for which it was designated, this warranty is void. This
warranty does not include damage due to: (A) neglect, (B) accident, (C) unreasonable
use, (D) improper maintenance or (E) any other causes not attributed to defects in
material or workmanship. Any implied or otherwise explicit guarantees made through
the merchandiser of this product are not covered in this warranty coverage agreement
and are expressly disclaimed.
If you feel your Jupiter Bike Atlas is not operating properly and may need a replacement
IMPORTANT NOTE
This machine was designed for certain applications only. Jupiter Tech strongly
recommends that this machine NOT be modified and/or used for any application other
than that for which it was designated. If you have questions relative to its application,
please contact us and we will advise as to its proper use. This warranty gives you
specific legal rights, and you may also have other rights which vary from state to state.
PRODUCT REGISTRATION
Please register you product within 10 days of purchase at
https://www.jupiterbike.com/product-registration
RETURNS & EXCHANGES
Please refer to our website JupiterBike.com for all product exchange information &
procedures.
Please keep the original packaging.
813-609-BIKE (2453)
www.Jupiterbike.com
JUPITER TECH 5600 Airport Blvd. Suite C, Tampa, FL 33634
WARRANTY

14
Schéma structurel ....................................................... 2
Caractéristiques ............................................................ 3
Installation de la roue avant ................................. 4
Installation de la béquille ....................................... 5
Installation du guidon ............................................... 5
Seat Post Installation ................................................. 6
Installation de la tige de selle ............................. 6
Chargement de la batterie .................................... 7
Retrait de la batterie .................................................. 7
Turning On Your Bike ................................................. 8
Allumer votre vélo ....................................................... 8
Précautions lors de la conduite .......................... 9
Entretien et maintenance ..................................... 10
Avertissements de sécurité ................................ 11
Garantie ............................................................................ 12
TABLEAU DE
CONTENU

15
SCHÉMA STRUCTUREL
REMARQUE:
Les illustrations du manuel sont uniquement à des fins de démonstration. Les
illustrations peuvent ne pas refléter l’apparence exacte du produit réel. *Spécifications
sujettes à changement sans préavis.*
*Le kilométrage dépend du poids, des conditions routières, de la
température, de la vitesse du vent, des habitudes de conduite, etc.
*Veuillez utiliser le chargeur d’origine fourni avec l’achat.
*La garantie devient invalide en cas de modification non autorisée
du vélo.
Guidon
Frein
Tige
Chocs
Fourche avant
Frein à
disque
Roue à chaîne
Loquet
de cadre
Tige de selle
Collier de tige
de selle
Moteur Pédale
Cadre de
vélo
Selle
TABLEAU DE
CONTENU

16
CONTENU DE
L’EMBALLAGE :
Vélo électrique Atlas
Selle et tube de selle
Manuel de l’Utilisateur
Chargeur
Batterie dans le cadre
2 clés pour le verrouillage
de la batterie
Garde-boue arrière
Outil de vélo polyvalent
CARACTÉRISTIQUES
MOTEUR ET BATTERIE
Puissance du moteur: 48 V/500 W
Temps de charge: 4-6 heures
Indice d’étanchéité: IP54
Capacité de la batterie: 48 V / 10,4 Ah
Type de batterie: lithium-ion
Courant de charge 2A max
MÈTRE:
Affichage: écran LCD
Puissance restante: Oui
Vitesse: Oui
Kilométrage total: oui
Mode vitesse: 5 niveaux de vitesse
COMPOSITION
Cadre: cadre monocoque en alliage d’aluminium
Type de frein: disque avant et arrière
DIMENSIONS DE FABRICATION:
Plié: H = 40”, L = 30”, L = 40”
Déplié: H = 44”, L = 30”, L = 74”
Hauteur du siège (à partir du sol) 34”- 41” (réglable)
Poids net (avec batterie) 60 lb
Empattement: 47 pouces
Taille des pneus: 27, 5” x 3”
Pression des pneus: 20 - 35 psi

17
MONTAGE DE LA ROUE AVANT
Retirez les pièces de la boîte et
localisez la roue avant et l’axe de
la roue avant.
Dévissez la vis à oreilles sur l’axe,
placez l’axe dans la roue avant,
puis revissez-le sans serrer.
Placez la fourche avant sur
l’essieu. Assurez-vous que le
loquet de l’essieu est ouvert.
Serrez à la main la vis à oreilles,
puis fermez le loquet de l’essieu.
Testez et assurez-vous que la roue
ne vacille pas.

18
INSTALLING THE HANDLEBARS
Fixez le guidon sur la potence du
guidon et serrez les vis.
Retirez les 4 vis du capot
supérieur, puis retirez le capot.
Desserrez les vis 1, 2 et 3 et alignez
le marchepied du guidon avec la
roue avant, puis resserrez. Pour
régler l’angle, desserrez la vis 4,
réglez-la, puis resserrez-la.
INSTALLATION DE LA BÉQUILLE
1. Localisez la béquille, les boulons
de béquille, les rondelles et la
clé hexagonale.
2. Alignez la béquille derrière
l’endroit où elle se fixe sur le
côté gauche du cadre.
3. Vissez les boulons avec les
rondelles à l’aide du Park Tool
inclus.

19
INSTALLATION DE LA TIGE DE SELLE
Déverrouillez et desserrez
le collier de selle. Placez la
tige de selle dans le cadre
et ajustez à la hauteur
désirée. Resserrez et
MONTAGE DES PÉDALES
La pédale droite est filetée
à l’envers, donc tournez
dans la direction opposée.
Recherchez un R gravé
sur l’extrémité filetée. Il
devrait tourner facilement
à la main sur le bras de la
pédale. Si ce n’est pas le
cas, dévissez et réessayez.
Utilisez une clé de 15 mm
pour les 1 ou 2 derniers
tours. Répétez avec la
pédale gauche de l’autre
côté.

20
La batterie Atlas peut être chargée à l’intérieur ou à l’extérieur du cadre
du vélo. Le voyant LED rouge du chargeur deviendra vert lorsqu’il sera
complètement chargé.
CHARGER LA BATTERIE
Tournez la clé dans le
sens inverse des aiguilles
d’une montre et retirez-la.
Déverrouillez le loquet du
cadre du vélo en faisant glisser
le verrou de pouce, puis en
éloignant le loquet du vélo.
Pliez le vélo, puis posez le
cadre plié sur le support
métallique sous le plateau,
le vélo doit s’équilibrer et
rester droit. Retirez ensuite la
batterie.
RETRAIT DE LA BATTERIE
Table of contents
Languages:
Other Jupiter Bikes Bicycle manuals